


Center console lid fix

Rookie
Joined: May 2011
Posts: 80
Likes: 3
From: VA
Absolutely great write up. Great pictures. Overall excellent DIY
Just did this, took me about 20mins, tops! I hated the sticky armrest. Props!!
Just did this, took me about 20mins, tops! I hated the sticky armrest. Props!!
****As one member found out, DO NOT use locktite for this fix.*****
Had the same problems on two of my cars, both LS430,here is a fix if the lid will not open, or needs a push from the back to open, or the lid feels loose
dealer remedy is replace $940.00
You need to remove the box for this repair.
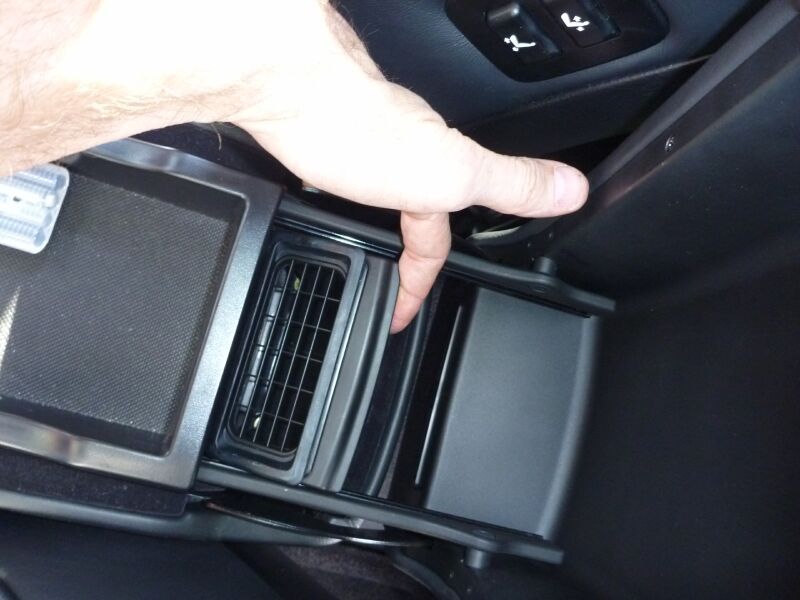
Open the lid, take all your stuff out, remove the bottom pad, under this there are bolts, remove these.
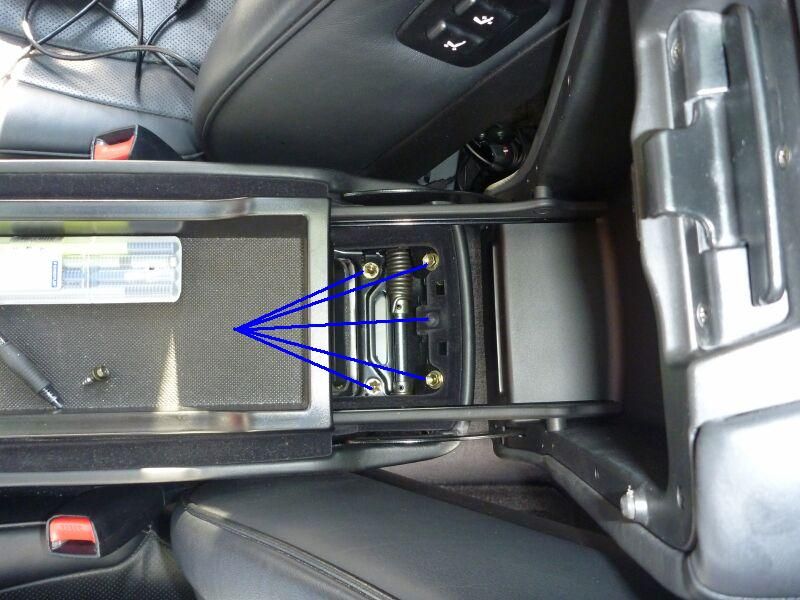
With the lid open look to the rear, and you will see the air vent, this just lifts out, remove it, and you will also see more bolts, and one screw, remove these, the bolts also have captive nuts,these tend to fall out when you remove the bolts, just get some pliers, press the clips together.
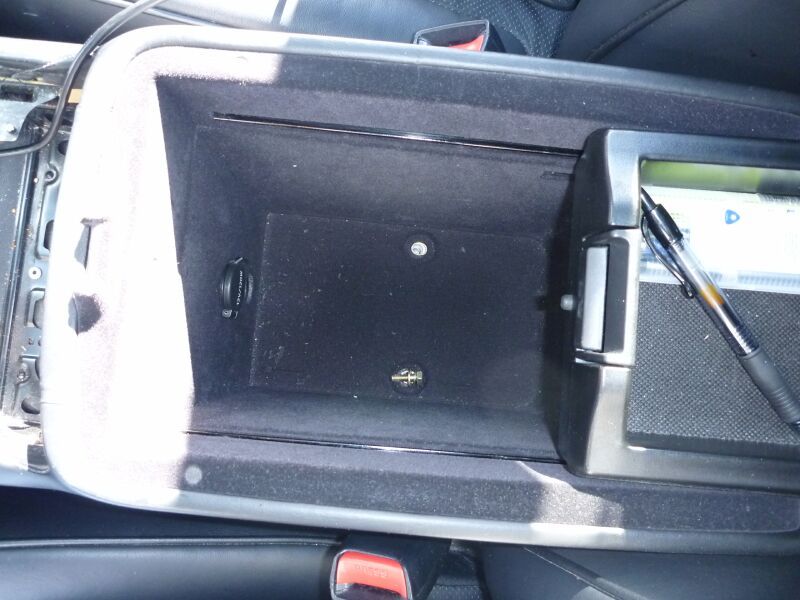
The box is ready to removed ,put a cloth or towel around the shifter area, as when you remove the box, it may mark or scratch the wood, you may need to wiggle the box to get it out, but it will lift up.
Do this from the REAR seat, take a flash light with you, as when the box lifts up, there are two connectors you need to disconnect, one is the cig lighter, the other the light, so as the box starts to lift, look under, you will see the 2 plugs, take them off, there are pressure points on the clips to disconnect, once this is done the box is free to remove.
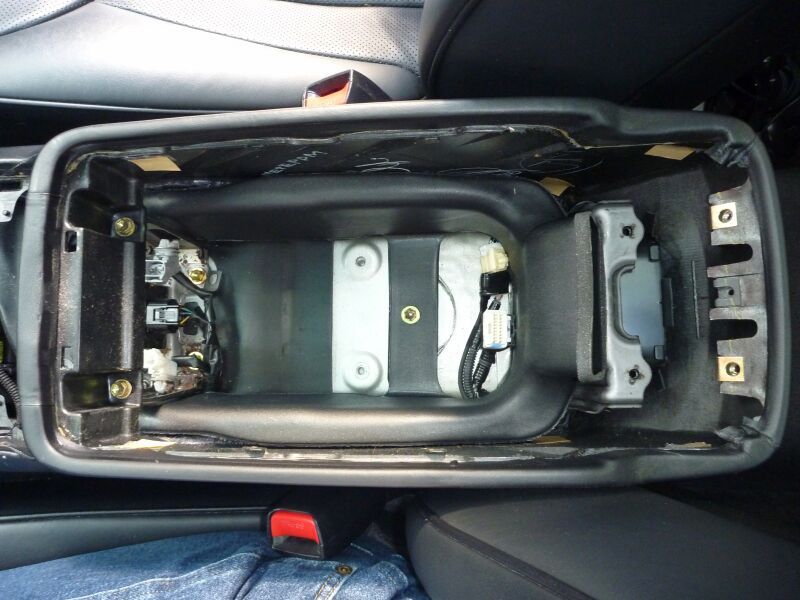
When you have removed the box, make sure you lay it down on towel, or cloth as not to mark the top, turn it on its lid, you will see a series of small screws all around the dark plastic, these have to be removed, along with the latch, as there is a screw underneath.
After this, the 2 half�s will not totally separate, but that�s ok, this is enough to work on.
Now look for the main 2 hinges to the lid,you will see its held on to the main housing with 4 golden colored bolts/screws, these are loose or have fallen out, tighten them, start to assemble in reverse order.
The whole job takes about 40 mins
thanks
Had the same problems on two of my cars, both LS430,here is a fix if the lid will not open, or needs a push from the back to open, or the lid feels loose
dealer remedy is replace $940.00
You need to remove the box for this repair.
Open the lid, take all your stuff out, remove the bottom pad, under this there are bolts, remove these.
With the lid open look to the rear, and you will see the air vent, this just lifts out, remove it, and you will also see more bolts, and one screw, remove these, the bolts also have captive nuts,these tend to fall out when you remove the bolts, just get some pliers, press the clips together.
The box is ready to removed ,put a cloth or towel around the shifter area, as when you remove the box, it may mark or scratch the wood, you may need to wiggle the box to get it out, but it will lift up.
Do this from the REAR seat, take a flash light with you, as when the box lifts up, there are two connectors you need to disconnect, one is the cig lighter, the other the light, so as the box starts to lift, look under, you will see the 2 plugs, take them off, there are pressure points on the clips to disconnect, once this is done the box is free to remove.
When you have removed the box, make sure you lay it down on towel, or cloth as not to mark the top, turn it on its lid, you will see a series of small screws all around the dark plastic, these have to be removed, along with the latch, as there is a screw underneath.
After this, the 2 half�s will not totally separate, but that�s ok, this is enough to work on.
Now look for the main 2 hinges to the lid,you will see its held on to the main housing with 4 golden colored bolts/screws, these are loose or have fallen out, tighten them, start to assemble in reverse order.
The whole job takes about 40 mins
thanks

Rookie
Joined: Jun 2016
Posts: 95
Likes: 5
From: Georgia
So mine became loose as well. These little screws don't do a good job of keeping the hinge in place. Here are a couple of pic after I remove the console. The two plug ins are in the front.. I got in the back seat and was able to hold the console up towards the cup holder and then squeezed the plugs in to pop them loose.
Instructor


Joined: Dec 2014
Posts: 1,129
Likes: 199
From: DFW, TX
Big THANKS! for this thread. My '04 console worked perfect and then I got this '05 and the console opened/closed terrible. I thought I was going to have to live with it until I went search and came across this thread. It took me just under an hour and I followed the instructions just as posted. Now my console works perfect!
Like it's mentioned in the thread, take ALL of the little black screws out from under the console. Also, I had a hard time putting the main screws back in the rear of the console. I had to use the electric tape inside the socket to hold the nut. Double check you didn't loose your container nut before putting it all back. I didn't double check and had to take it out again to put the nut back in place.
My biggest surprise was that I found a $4,600 check under the console when I pulled it out. It was over 5 years old but I can only imagine the lady that lost it must sweating it hard when should couldn't find that check.
Moderator
Joined: Feb 2013
Posts: 2,498
Likes: 244
From: Milwaukee, Wi
My 2005 is still flawless, the 2001 on the other hand is starting to act like it doesn't want to latch unless I really fiddle with it. It could be we only have 1 or 2 screws holding the hinge on still. Not much else to fail in there..
ClubLexus Stories
Celebrating Lexus & Toyota from Around the Globe

8 Tips for Improving Your Hybrid or Plug-in Hybrid's Efficiency!
Michael S. Palmer
10 Best Lexus Models No One Remembers
Joe Kucinski
TRD Off-Road Premium: Best 2026 4Runner, Except This One Thing
Michael S. Palmer
Top 10 Lexus & Toyotas to Drive Before You Die!
Joe Kucinski
Top 10 Lexus/Toyotas With The LEAST 5-Year Depreciation
Joe Kucinski
Lexus LC500 Convertible Auction: A Preview of Rising Values?
Brett Foote
GX 550 vs TX 550: Best 3-Row Luxury Lexus Family Hauler
Michael S. Palmer
9 Best Lexus Models You Can Buy for Half Price (And 1 You Shouldn't!)
Joe Kucinski
2026 Lexus NX Buyer's Guide: Models, Features, Prices & More!
Brett Foote
Lexus Test Driver

Joined: Sep 2016
Posts: 8,574
Likes: 390
From: PA
Big THANKS! for this thread. My '04 console worked perfect and then I got this '05 and the console opened/closed terrible. I thought I was going to have to live with it until I went search and came across this thread. It took me just under an hour and I followed the instructions just as posted. Now my console works perfect!
Like it's mentioned in the thread, take ALL of the little black screws out from under the console. Also, I had a hard time putting the main screws back in the rear of the console. I had to use the electric tape inside the socket to hold the nut. Double check you didn't loose your container nut before putting it all back. I didn't double check and had to take it out again to put the nut back in place.
My biggest surprise was that I found a $4,600 check under the console when I pulled it out. It was over 5 years old but I can only imagine the lady that lost it must sweating it hard when should couldn't find that check.
Like it's mentioned in the thread, take ALL of the little black screws out from under the console. Also, I had a hard time putting the main screws back in the rear of the console. I had to use the electric tape inside the socket to hold the nut. Double check you didn't loose your container nut before putting it all back. I didn't double check and had to take it out again to put the nut back in place.
My biggest surprise was that I found a $4,600 check under the console when I pulled it out. It was over 5 years old but I can only imagine the lady that lost it must sweating it hard when should couldn't find that check.
The best I found when replacing the cupholder was a menu from an Italian restaurant in Orlando (further authenticating my car began its life in FLA). I like to put my stickers on straight, but the Naples dealership has a sticker on the front glass that doesn't have their name on straight (it's a circle)--I leave it as a reminder as to where this car was sold and serviced....
Intermediate

Joined: Sep 2006
Posts: 274
Likes: 3
From: MI
My '05 had this latch issue the day I bought it 2 1/2 years ago. The leather on the armrest was pretty badly worn too. So I bought a replacement leather one on eBay - (not just some universal 'cover', but one made for our cars.) Only thing is I just had never gotten around to doing these fixes until just yesterday.
Glad I did them simultaneously, because in order to replace the leather, you've gotta complete all the steps involved in this bracket tightening tutorial.
You'll see in the pics though, that I ended up just wrapping this new one over the existing. The existing one is stapled into the plastic armrest formwork. I didn't have the proper tool to staple mine in, and I also didn't have the time (nor the clamps) to bond the new leather edges onto the plastic substrate with a Locttite or an E6000 type of adhesive. Those need about 15 minutes to set, then another 4 to 8 hours to cure. Instead I just used hot-glue to bond where the staples would have gone. I also laid an extra 1/2" of new padding to the top surface which made a WORLD of difference in the comfort level, because the old padding was next to non-existent.
Last edited by SuperCoupe400; Jul 25, 2017 at 03:08 PM.
I am planning to get mine reupholstered as well. The padding is way too thin. Maybe a 1/4" foam will work good. I wonder if the original leather will fit over the thicker foam
My '05 had this latch issue the day I bought it 2 1/2 years ago. The leather on the armrest was pretty badly worn too. So I bought a replacement leather one on eBay - (not just some universal 'cover', but one made for our cars.) Only thing is I just had never gotten around to doing these fixes until just yesterday.
Glad I did them simultaneously, because in order to replace the leather, you've gotta complete all the steps involved in this bracket tightening tutorial.
You'll see in the pics though, that I ended up just wrapping this new one over the existing. The existing one is stapled into the plastic armrest formwork. I didn't have the proper tool to staple mine in, and I also didn't have the time (nor the clamps) to bond the new leather edges onto the plastic substrate with a Locttite or an E6000 type of adhesive. Those need about 15 minutes to set, then another 4 to 8 hours to cure. Instead I just used hot-glue to bond where the staples would have gone. I also laid an extra 1/2" of new padding to the top surface which made a WORLD of difference in the comfort level, because the old padding was next to non-existent.
Glad I did them simultaneously, because in order to replace the leather, you've gotta complete all the steps involved in this bracket tightening tutorial.
You'll see in the pics though, that I ended up just wrapping this new one over the existing. The existing one is stapled into the plastic armrest formwork. I didn't have the proper tool to staple mine in, and I also didn't have the time (nor the clamps) to bond the new leather edges onto the plastic substrate with a Locttite or an E6000 type of adhesive. Those need about 15 minutes to set, then another 4 to 8 hours to cure. Instead I just used hot-glue to bond where the staples would have gone. I also laid an extra 1/2" of new padding to the top surface which made a WORLD of difference in the comfort level, because the old padding was next to non-existent.
Rookie
Joined: Jun 2016
Posts: 95
Likes: 5
From: Georgia
I found this website called Auto Console Covers that sells these covers that go over the armrest. They stretch over the console and are soft and comfortable. I put an inch of foam under mine as well. It may be hard at first to stretch it over everything but will cover eventually. Also when i had to take mine a part i used bigger screws all the way around at the bottom plastic piece. I also found these rubber tabs at each corner that are better at Lowes when it closes for a better fit than the little factory ones.

Driver School Candidate
Joined: Jul 2017
Posts: 19
Likes: 0
From: MD
This thread was very helpful for me to remove and repair my center console on my 2005 LS430, I had the same problem as others, when I removed the console and took arm pad off the 4 phillips screws holding the arm pad to the hinge were loose and just needed to be tightened. I also had to replace the latch since the misalignment caused the latch to break. The latch cost around 40 dollars. The latch part number is 58908-12080 if anyone needs that.