
Center console lid fix


Pit Crew


Joined: Nov 2011
Posts: 148
Likes: 47
From: GA
I took my front armrest apart while installing MP3 player stuff. I thought these pics might help the next guy...
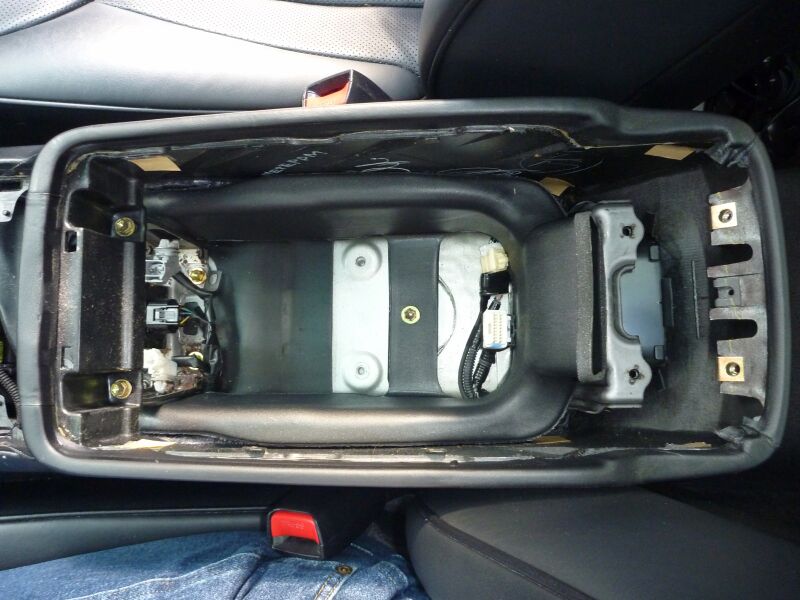
Front Armrest disassy -
Remove a/c vent
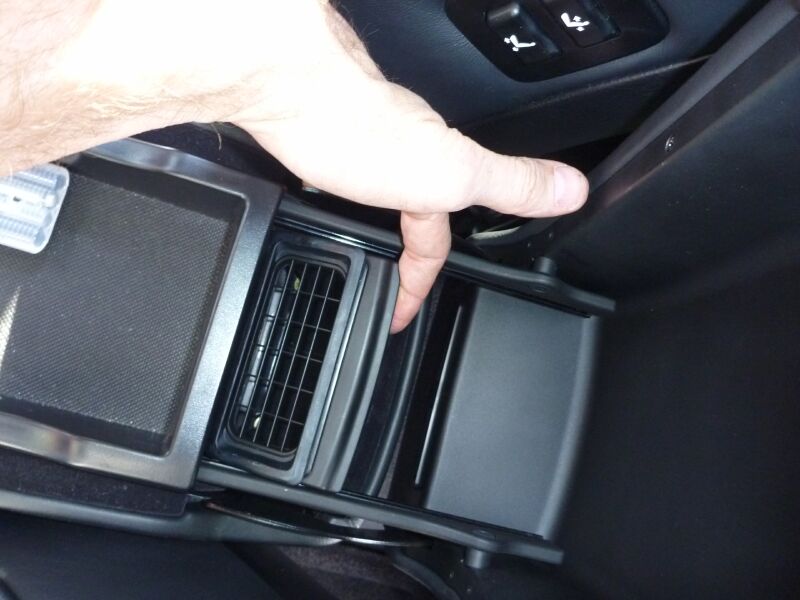
Remove four bolts and one screw
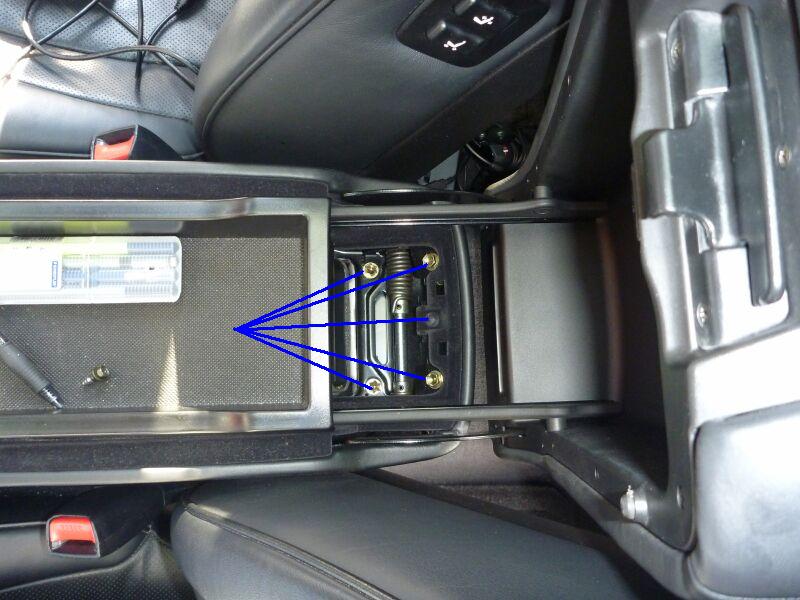
Remove two bolts from the bottom of the armrest storage box
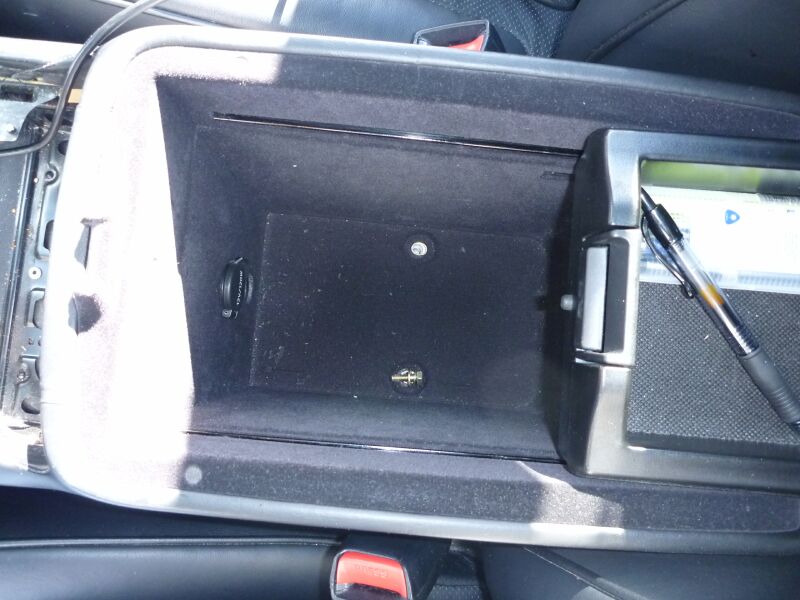
Removed armrest assy
Front Armrest disassy -
Remove a/c vent
Remove four bolts and one screw
Remove two bolts from the bottom of the armrest storage box
Removed armrest assy


Thread Starter
Driver
Joined: Oct 2006
Posts: 120
Likes: 11
From: florida
makes sense to use it, since they have worked loose in the 1st place, seems likely they will again.

Thread Starter
Driver
Joined: Oct 2006
Posts: 120
Likes: 11
From: florida
NOT.
Last edited by sigers98; Apr 24, 2012 at 06:19 PM.


Driver School Candidate
Joined: Mar 2012
Posts: 36
Likes: 2
From: Georgia
I am trying to get the box out to repair my lid and have some problems. Mainly, I cannot get the wires disconnected for the lighter and light. There is barely enough room to get my hand under the box from the back and cannot feel any way to get the pieces apart. Is there any trick I am missing? And of course, I lost one to the captive nuts and can't locate it.
Thread Starter
Driver
Joined: Oct 2006
Posts: 120
Likes: 11
From: florida
I am trying to get the box out to repair my lid and have some problems. Mainly, I cannot get the wires disconnected for the lighter and light. There is barely enough room to get my hand under the box from the back and cannot feel any way to get the pieces apart. Is there any trick I am missing? And of course, I lost one to the captive nuts and can't locate it.
Driver School Candidate
Joined: Mar 2012
Posts: 36
Likes: 2
From: Georgia
Finally got mine done. I learned one thing, DO NOT USE LOCKTIGHT on the screws. It will destroy the plastic the screws thread into. I learned this the hard way. Had everything back together and within a few seconds the lid was very loose. I pulled it apart again and the plastic posts the screws thread into came out in about 50 small pieces. The plastic just crumbled. I was able to jury rig it back together but I am not sure how long it will last. Anybody have a good Ecru lid they want to donate to me for passing on this info?
.
.
.
.
Thread Starter
Driver
Joined: Oct 2006
Posts: 120
Likes: 11
From: florida
[QUOTE=Chemtj;7474113]Finally got mine done. I learned one thing, DO NOT USE LOCKTIGHT on the screws. It will destroy the plastic the screws thread into. I learned this the hard way. Had everything back together and within a few seconds the lid was very loose. I pulled it apart again and the plastic posts the screws thread into came out in about 50 small pieces. The plastic just crumbled. I was able to jury rig it back together but I am not sure how long it will last. Anybody have a good Ecru lid they want to donate to me for passing on this info?
i know someone mentioned lock tight, i did not use it when i did mine, but are you refereing to the 4 main bolts that were loose ?
i know someone mentioned lock tight, i did not use it when i did mine, but are you refereing to the 4 main bolts that were loose ?
Driver School Candidate
Joined: Mar 2012
Posts: 36
Likes: 2
From: Georgia
Yes. The 4 screws that attach the hinge to the underside of the plastic lid. Mine were all loose as typical with others here. I thought I would be smart and use a drop of blue locktight so they would not come loose again. It nearly instantly destroyed the plastic. Then I read the directions on the locktight container (typical male, install first then read directions). It states "for use on metal parts only. Do not use on plastic". Expensive lesson. I will use lock washers on the new lid. Still looking for an Ecru lid. $225 new from Sewell. Hoping for a good one from scrap yard or maybe a member here. I don't have enough posts here to post in the classifieds yet. I just wanted to warn everyone here not to make my mistake and save everyone some money by doing so.
Thread Starter
Driver
Joined: Oct 2006
Posts: 120
Likes: 11
From: florida
Yes. The 4 screws that attach the hinge to the underside of the plastic lid. Mine were all loose as typical with others here. I thought I would be smart and use a drop of blue locktight so they would not come loose again. It nearly instantly destroyed the plastic. Then I read the directions on the locktight container (typical male, install first then read directions). It states "for use on metal parts only. Do not use on plastic". Expensive lesson. I will use lock washers on the new lid. Still looking for an Ecru lid. $225 new from Sewell. Hoping for a good one from scrap yard or maybe a member here. I don't have enough posts here to post in the classifieds yet. I just wanted to warn everyone here not to make my mistake and save everyone some money by doing so.
http://www.ebay.com/itm/01-02-03-LEX...8a9eb3&vxp=mtr