When you click on links to various merchants on this site and make a purchase, this can result in this site earning a commission. Affiliate programs and affiliations include, but are not limited to, the eBay Partner Network.
I followed some guides here and decided to DIY all 4-struts on my 04 RX330. I started with the rears, using Monroe sensatrack struts. It went amazingly smooth, about 2-hours for the first, with most of that time running back and forth to get different tools and figuring out the spring compressor (the OEM autozone rental). The second one took about 25 minutes.
I was so pleased it all went so smooth, and moved onto the fronts. It took about 5 minutes (w/ air tools) to get the assembly out of the driver side. I compressed the spring as I did with the rears but found the front spring was quite a bit bigger, and I was left with a very narrow gap between the top and bottom of compressor, or to move to the next rung of the spring the compressor wasn't big enough. None the less I left the narrow gap, cranked it down and it seemingly loosened up. But when I removed the top hat there was the slightest "boing", and each end of the spring popped out about an extra inch, making it impossible for me to reassemble.
I ended up bringing to several shops ( a few could not compress an completely uncompressed spring). Probably my bad, but I thought it dangerous to leave such a heavily compressed spring overnight.
Left at another shop who are supposed to assemble today.
I'm still left with the last corner, I might just have that shop do it for convenience at this point. But is there a trick? I saw one member he used FOUR spring compressors (of the same OEM autozone brand), but didn't seem to do it for anything other than additional safety.
For what my mechanic charged to replace the struts, it was well worth it.
The hydraulic spring compressors are much more effective & safer.
If you are having a hard time, best to bring it to a shop.
This does not answer the OPs question about a trick for the front struts, but my experience doing all four struts was the front springs were harder to compress than rear springs as the OP discovered.
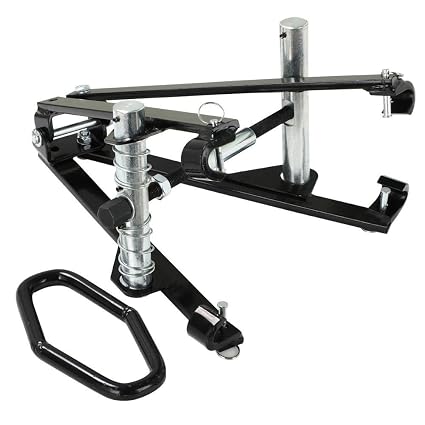
When I did my struts I had access to one of these:
Similar to your experience with the rear struts I could easily compress the rear springs enough to remove the tension from the strut and mount.
When I tried compressing the front struts just hooking on to the springs I could not get enough compression to unload the strut and the mount. I had to hook the upper arms of the compressor on the upper spring seat in order to compress the spring enough to unload the strut and the mount. This was safe to do with the machine I was using. I would NOT have attempted this with the "Auto-Zone" type spring compressors. I would be very worried about that type slipping off the upper spring seat.
I have performed this DIY and completely agree with above post. This is an area of DIY where you need to be very careful. Best just to take to a shop which has wall-mounted style compressor with cage around it. And yes, fronts are more difficult. The autozone rentals do work on smaller vehicles but are variable on SUVs and trucks. The concern is when you compress one side of spring more than other and spring can slip and swing around and whack you...which wont be good.
I'm looking at getting this done and you guys are scaring me off. I've done two of these swaps on another vehicle w/o issue, but those front ones do look tricky. Does anyone have any comments on the using strut assemblies? Seems like the extra money spent on the fully assembled unit would mitigate the risk of compression and save time as well. I just don't know the quality. Rockauto is selling ones made by FCS for a little under $100 each, which is not much more than the strut by itself.
I just found this post by researching the same issue for a 2002 RX300. As someone mentioned the 2004 and up are very similar if not identical. Anyway, I am having the same problem and also tried the wall mounted compressor at a local shop, and it did not work either. I am considering going to the local Toyota dealer, but not sure they will help me out, even for money. I also thought I might try it with two additional compressors. My thoughts were to compress it as much as I can with one set, and then add the second set of compressors at 90 degrees because I think I can span an extra coil that way. I would also continue to tighten down the original set as necessary to maintain the additional safety margin. Anyone have any thoughts about this?
I borrowed two sets of the tool to make it a little easier and safer. With three or four attachments you can compress more evenly and walk the tool around as you release it. Try with two pairs (from different stores if each store only has one loaner). I compressed mine with Autozone style spring compressor tool and yes it was a bit tricky, particularly when putting the struts on. I think I removed and repositioned to recompress after I had removed the struts. It was tricky to uncompress after I installed the struts because stuff got in the way of the compression tool bolt as I backed it out.
Lordy, guys it is not that difficult, the hardest thing is making sure the upper mount is in the detent when Putting it together, I am over 60 and done this 8 times with no problems, just go slow and use the safety clips on most of the tools available to the consumer. I just bought a new one from Walmart online, and it is improved over what I have from HB freight. By the way lube the screw shafts before using, it will work smoother and not tear the threads up like my old set of spring compressors.
Good spring compressor does the job.
I did front struts on my 12 HiHy what is identical job to RX family. Btw, our RX350 has only shocks in the rear, not struts.
I have $42 clamshell compressor and if worked quite well. I wouldn't call it easy or 5 min job, it's sweatting you out even with power tools but, it's quite doable.
In my case, trick was to get compressor claws onto the spring as far up to the mounting plates as possible and then really compress it all the way down.
Another thing to pay attention to is though spring seat is clearly identified on the lower mount, it is not that easy on the upper one, on bearing plate. There is a mild hump in it that is spring seat and that needs to be aligned properly, or it will keep seating crooked and then you can't get it on right.
I followed some guides here and decided to DIY all 4-struts on my 04 RX330. I started with the rears, using Monroe sensatrack struts. It went amazingly smooth, about 2-hours for the first, with most of that time running back and forth to get different tools and figuring out the spring compressor (the OEM autozone rental). The second one took about 25 minutes.
I was so pleased it all went so smooth, and moved onto the fronts. It took about 5 minutes (w/ air tools) to get the assembly out of the driver side. I compressed the spring as I did with the rears but found the front spring was quite a bit bigger, and I was left with a very narrow gap between the top and bottom of compressor, or to move to the next rung of the spring the compressor wasn't big enough. None the less I left the narrow gap, cranked it down and it seemingly loosened up. But when I removed the top hat there was the slightest "boing", and each end of the spring popped out about an extra inch, making it impossible for me to reassemble.
I ended up bringing to several shops ( a few could not compress an completely uncompressed spring). Probably my bad, but I thought it dangerous to leave such a heavily compressed spring overnight.
Left at another shop who are supposed to assemble today.
I'm still left with the last corner, I might just have that shop do it for convenience at this point. But is there a trick? I saw one member he used FOUR spring compressors (of the same OEM autozone brand), but didn't seem to do it for anything other than additional safety.
any thoughts?
I did one with four manual compressors on a single spring. The issue is that the spring is much wider at bottom than the top. This make compression even harder than a standard spring.
My thoughts: don't DIY the spring compression. Take it to a shop.
Or better yet buy the fronts with the coil overs already mounted as they sell the entire assembly now.