


Vaistech SLI installation instructions w/ pics for 04-07 RX
Thread Starter
MultiTasking Mom
Joined: Mar 2003
Posts: 1,662
Likes: 2
From: California
A couple of people were looking for install instructions, so I decided to put some together for the forum w/ pictures. My photography is not great and the tight space made it hard to focus. So sorry about that. I don�t have photos of each and every step, but hopefully the words are enough to get you thru the install.
Tools you need:
- Ratchet with 10mm bolt head
- Ratchet extension wand � very important � 8-10� is about right
- Velcro for the SLI placement
- Flashlight
- Flathead screwdriver
- Towel
Optional tools (not required but helpful):
- Telescoping magnet tool
- Black electrical tape
Tools you need:
- Ratchet with 10mm bolt head
- Ratchet extension wand � very important � 8-10� is about right
- Velcro for the SLI placement
- Flashlight
- Flathead screwdriver
- Towel
Optional tools (not required but helpful):
- Telescoping magnet tool
- Black electrical tape
Last edited by lexuslover; Jul 18, 2006 at 12:33 PM.
Thread Starter
MultiTasking Mom
Joined: Mar 2003
Posts: 1,662
Likes: 2
From: California
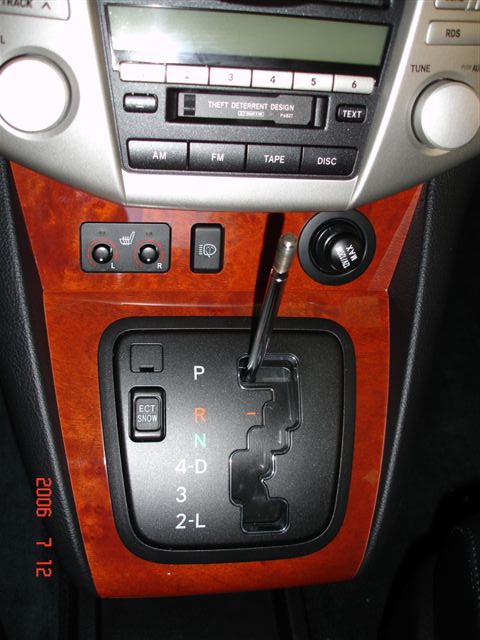
Step 3: REMOVE THE TAB AND PRESS THE INSIDE BUTTON TO SHIFT THE **** TO 'D' or �L� (to get the shift **** out of the way) - The tab on the upper left of the shifter gate can be removed with a small flathead.
Step 4: PULL OFF THE WOOD SHIFTER GATE TRIM � Put both hands at the bottom of wood trim and pull upwards evenly on the left/right. It takes a little bit of force, but eventually the bottom part will come up, and then gently pull the top part off. This piece of trim is held on only by 4 clips.
Step 5: PULL OFF THE CIG LIGHTER WOOD TRIM PIECE � Put one hand behind the left side of the wood trim and the other hand behind the wood trim on the right. Pull evenly towards your body (pull straight out) and the piece will give and come out. This piece of trim is held on only by 2 clips. You do not have to unplug the wires on this piece; you can just let the thing dangle off the side.
Last edited by lexuslover; Jul 18, 2006 at 12:35 PM.
Thread Starter
MultiTasking Mom
Joined: Mar 2003
Posts: 1,662
Likes: 2
From: California
Step 6: REMOVE FIRST TWO (2) 10mm BOLTS HOLDING IN THE RADIO ASSEMBLY (RA) � The first two are easy to remove; you can see them immediately once you look underneath the RA. I would suggest using your hand to remove the final few counterclockwise twists so that the bolts don�t fall into the cavity below.
Step 7: REMOVE FINAL TWO (2) 10mm BOLTS HOLDING IN THE RADIO ASSEMBLY (RA) � Warning: These bolts are difficult to see/reach and the distance you have to pull them out of the RA is quite long. It is easy to drop the bolts in the cavity � if this happens, you will NOT get them back! They will be lost in oblivion. The good news is that you don�t really need these two and the loss of 2 bolts doesn�t create any issues, but it is annoying to lose them. There are two holes to the left and right of bolts you just removed in Step 6. If you shine your flashlight into the hole, you will see a bolt up and towards the back. Stick the ratchet extension thru that hole and remove that bolt. What I did is keep going until it felt loose (this took several tries � just be patient), and when the bolt was just about ready to be taken out, I stuck in a telescoping magnet to �fish� it out safely. (If you unscrew it too far, it will fall into the cavity.)

Step 8: PLACE TOWEL OVER THE SHIFT **** AREA
Step 9: REMOVE RADIO ASSEMBLY � Put one hand underneath the left side of RA, the other hand underneath the right side. Pull towards you and the whole unit slides out easily. Let the unit rest on the towel supported by the naked shift **** handle.

Step 7: REMOVE FINAL TWO (2) 10mm BOLTS HOLDING IN THE RADIO ASSEMBLY (RA) � Warning: These bolts are difficult to see/reach and the distance you have to pull them out of the RA is quite long. It is easy to drop the bolts in the cavity � if this happens, you will NOT get them back! They will be lost in oblivion. The good news is that you don�t really need these two and the loss of 2 bolts doesn�t create any issues, but it is annoying to lose them. There are two holes to the left and right of bolts you just removed in Step 6. If you shine your flashlight into the hole, you will see a bolt up and towards the back. Stick the ratchet extension thru that hole and remove that bolt. What I did is keep going until it felt loose (this took several tries � just be patient), and when the bolt was just about ready to be taken out, I stuck in a telescoping magnet to �fish� it out safely. (If you unscrew it too far, it will fall into the cavity.)
Step 8: PLACE TOWEL OVER THE SHIFT **** AREA
Step 9: REMOVE RADIO ASSEMBLY � Put one hand underneath the left side of RA, the other hand underneath the right side. Pull towards you and the whole unit slides out easily. Let the unit rest on the towel supported by the naked shift **** handle.
Thread Starter
MultiTasking Mom
Joined: Mar 2003
Posts: 1,662
Likes: 2
From: California
Step 10: CONNECT CABLES � One of the 3 harness plugs will be identical to the Vais cable plug. Unconnect the Lexus plug from the headunit (HU) and replace it with the identical plug from Vais (the one on the �Y� shaped cable). Then plug the Lexus plug into the large corresponding female Vais plug on the Y cable. The 3rd prong on the Vais cable is to connect the other black Vais cable to the Y cable. (Note � I noticed that the Vais plug into my HU was not a perfectly snug fit and never �clicked� into place. I did the best I could, and even called Vais about it, and it seems that is fine if you can�t get it to click. Just get it as tight as you can.)

Thread Starter
MultiTasking Mom
Joined: Mar 2003
Posts: 1,662
Likes: 2
From: California
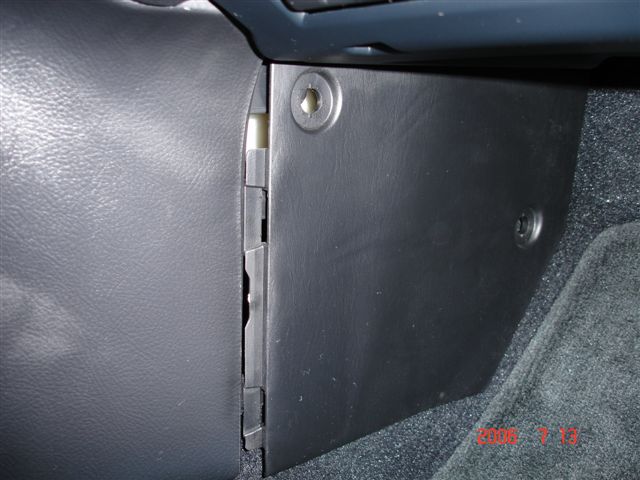
Step 11: REMOVE THE PASSENGER FOOTWELL SIDE PANEL � On the 04 RX there are 2 small plastic tab screws that you unscrew and remove. (On the 06+ RX they are not screws but just plastic punch tabs which you pry off with flathead.) The panel is held in by clips on the left hand side. Slide the panel to the RIGHT to unhook the tabs carefully. Note: Do not just pull the panel straight towards you � you can crack the tabs, as they are thin and fragile.
Thread Starter
MultiTasking Mom
Joined: Mar 2003
Posts: 1,662
Likes: 2
From: California
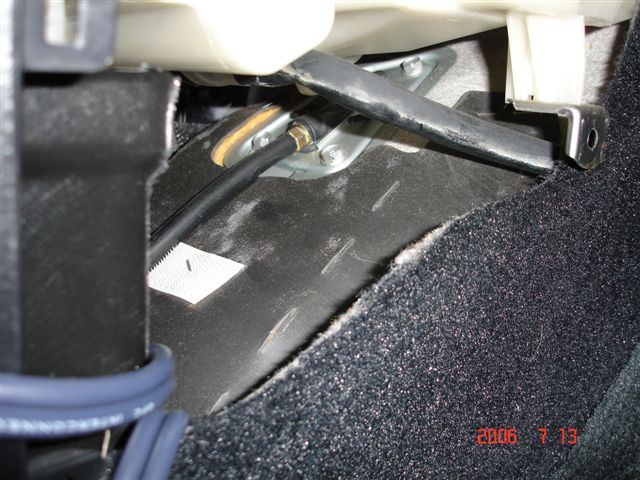
Step 12: FEED VAIS CABLE INTO THE LOWER CAVITY AREA � Take the straight Vais cable that you just connected to the Y cable and feed it down thru the cavity towards the passenger footwell. It takes a little bit of fiddling, but it will get down there with plenty of slack to spare. Make sure you pull the slack down by the passenger area so it is easier to replace the RA when you are complete.
Trending Topics
Thread Starter
MultiTasking Mom
Joined: Mar 2003
Posts: 1,662
Likes: 2
From: California
Step 12: CONNECT SLI and IPOD � Take the white Vais plug that you just fed into the passenger footwell and connect it to the SLI. Connect the last Vais cable (the gray plug w/ RCA) to the IPOD and SLI as instructed in the manual.
Step 13: SLIDE THE RADIO ASSEMBLY BACK IN HALFWAY and SETUP/TEST YOUR SLI � Move the radio assembly into the brackets that hold it in about half way. Put your shifter back in P so that you can turn on the car and test your install. Setup your SLI as instructed (emulation mode) and test the functionality of your iPod. Once you are satisfied that it works, continue.
Step 14: PUT RADIO COMPENENTS, WOOD TRIM BACK IN PLACE � Do the above in reverse. The only helpful note here is when replacing the two 10mm bolts deep in the holes, I actually taped the head of the bolt onto the bolt head to prevent losing them while you are trying to insert them. It works!
ClubLexus Stories
Celebrating Lexus & Toyota from Around the Globe

10 Lexus Bargains That are Cheaper Than a New Toyota RAV4
Joe Kucinski
8 Weirdest Things Lexus Has Ever Built
Verdad Gallardo
10 Lexus Designs That Have Aged Like Fine Wine
Verdad Gallardo
8 Tips for Improving Your Hybrid or Plug-in Hybrid's Efficiency!
Michael S. Palmer
10 Best Lexus Models No One Remembers
Joe Kucinski
TRD Off-Road Premium: Best 2026 4Runner, Except This One Thing
Michael S. Palmer
Top 10 Lexus & Toyotas to Drive Before You Die!
Joe Kucinski
Top 10 Lexus/Toyotas With The LEAST 5-Year Depreciation
Joe Kucinski
Lexus LC500 Convertible Auction: A Preview of Rising Values?
Brett Foote
Thread Starter
MultiTasking Mom
Joined: Mar 2003
Posts: 1,662
Likes: 2
From: California
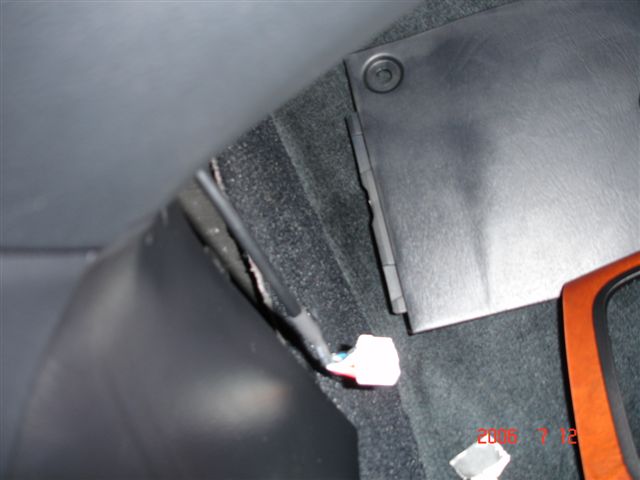
Step 15: VELCRO SLI and CLOSE SIDE PANEL � Velcro 2 strips to the bottom of the SLI and place the SLI snugly inside that bottom area by the passenger footwell. Leave the gray wire out anywhere you want it to come out. Replace the side panel.

Thread Starter
MultiTasking Mom
Joined: Mar 2003
Posts: 1,662
Likes: 2
From: California
Step 16: TUCK/HIDE GRAY WIRE � You can either tuck the gray wire along the center stack or hide it under the mat. I chose the floor mat hide. I taped up the last 8� or so with black electrical tape since I have the black interior and the wire basically is exposed by the edge of the floormat next to the tray. My iPod sits in the tray on a sticky pad.
Hidden under floormat view:

Gray wire:
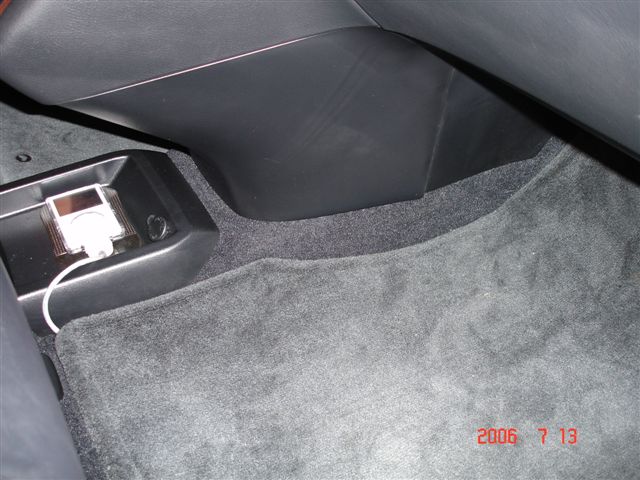
Wire w/ Black electrical tape & FINISHED IPOD INSTALL view

Hidden under floormat view:
Gray wire:
Wire w/ Black electrical tape & FINISHED IPOD INSTALL view
Thread Starter
MultiTasking Mom
Joined: Mar 2003
Posts: 1,662
Likes: 2
From: California
Some other notes:
- I mainly use the iPod to connect and disconnect when I get into the car. I don't use it in simple mode, so I don't need much slack to control the iPod directly. If you prefer direct control, I recommend doing the gray wire tuck along the bottom of the center stack. That will give you at least a foot more slack in the wire to be able to pick up the iPod from the tray.
- The iPod location does not interfere with the sliding center console. You can still slide back and forward in every position.
- The SLI is accessible within 30 sec once you remove the side panel. There is no reason to undo all the wood trim and Radio assembly to get to the SLI in the event you need an upgrade in the future.
Feel free to post any questions!! Good luck and happy driving


Rookie
Joined: Jul 2004
Posts: 59
Likes: 1
From: California
Thanks for the awesome instructions. I have a question. I've been thinking of doing this same install, but was intending to tuck the Vais unit underneath the head unit, and run the cable through a hole I would drill somewhere in the center stack (connecting to my MP3 player stored in the center console).
By my estimation, the unit would fit, so I'm wondering what drove you to install the Vais unit where you did, and then running the cable under the mat? It seems like if you had room, you could have mounted the Vais unit underneath the head unit, run the cable down and past the shift lever, and under the front of the center stack, connecting to your iPod in the same location it is in now.
Will the Vais unit not fit where I'm thinking of installing it? Or are there any other compelling reasons to mount the unit where you did?
Thanks and congratulations on a great install!

Driver School Candidate
Joined: Dec 2004
Posts: 43
Likes: 0
From: Maryland
Originally Posted by srashid
Excellent work, thank you very much.
I am a bit worried I would lose bolts, etc., while doing this, but if I have it installed they will probably do the same just not tell me.
Great job.
I am a bit worried I would lose bolts, etc., while doing this, but if I have it installed they will probably do the same just not tell me.
Great job.
Thread Starter
MultiTasking Mom
Joined: Mar 2003
Posts: 1,662
Likes: 2
From: California
sakaike, good questions!
here are some thoughts:
i don't recall the amount of space under the headunit. i think it might fit, but then you would have to velcro the SLI to the bottom of the HU. i think that would be ok, but i'd worry about it falling off or shaking loose at some point and rattling around. then you'd have to remove the wood trim again to fix it.
i also wanted the SLI to be easily accessible for firmware upgrades. initially i didn't think it was a big deal but my friend actually bought his just before the group buy and that one did not have the I Agree Bypass, so he took it out and sent it back to have it updated (and it took very little time). so it is possible you have to get to it at some point in the future.
the other thing is i wanted the SLI AUX RCA jacks to be accessible in case i have a non-ipod use for it. the floor panel makes it easy to get to it as well as run a second set of RCA cables out and under the mat for use. (like for a satellite radio tuner or something)
you are right - i could have run the thing straight down the center stack, but as far as i could tell there wasn't an easy way to get underneath the shifter and out. i wanted to avoid drilling holes at all costs, and keep in mind that although the cable may be sorta thin, the iPod plug attached to the cable is quite big, so anything you are trying to feed it thru must be as large/wide as that plug! the floor mat solution or the tuck method to the little tray seemed better for me b/c i don't want that much slack around the sliding console area for a nice clean install.
hope that helps!