


Cell Shading Explained
hey guys.
Recently I've seen many cell shading pics and I like that style. Are there any ways to make a picture look like it's cell-shaded? (only a few tones of color, straight-line color separation, etc.)
Can this be one with photoshop?
Recently I've seen many cell shading pics and I like that style. Are there any ways to make a picture look like it's cell-shaded? (only a few tones of color, straight-line color separation, etc.)
Can this be one with photoshop?
GS -Trance


Joined: May 2002
Posts: 2,846
Likes: 0
From: Georgia
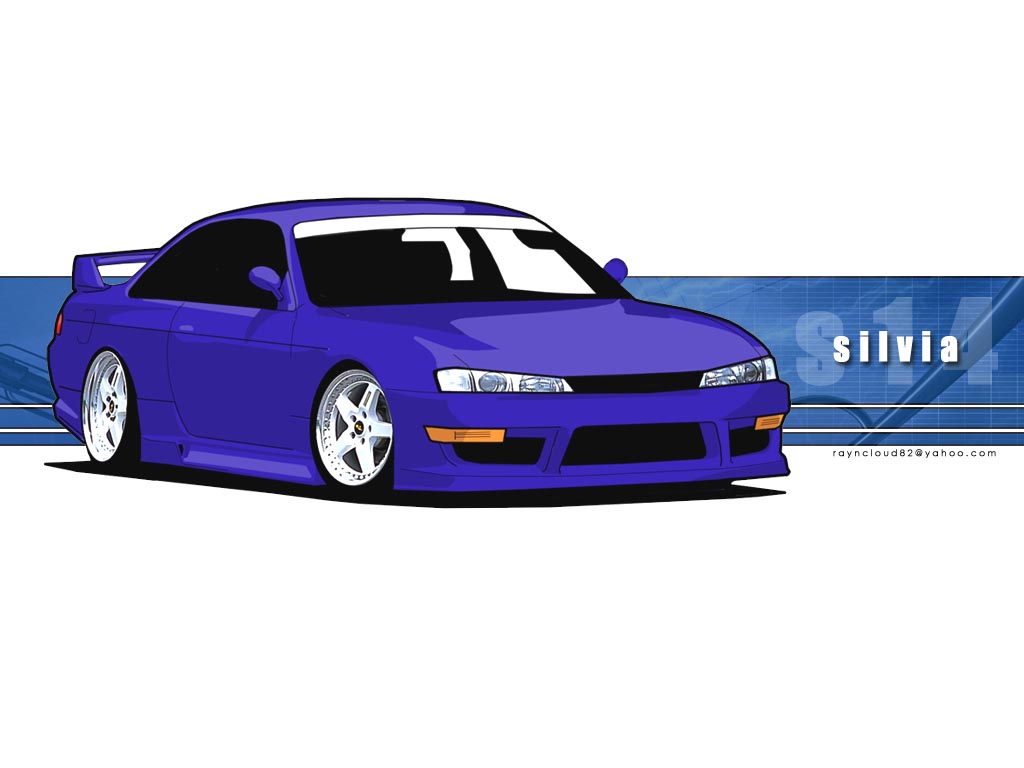
Globe......havent seen you post in here in a while.I agree the cell shading trend is awesome especially the really detailed ones.Did you see the one .star. did of the Silvia? it is awesome!!
I ahve tried to cheat and use photoshop filters to accomplish this and I have found it cant be done.Maybe I havent experimented enough but you def. can get the crisp lines which is what I think makes the illustrations so nice.Like how .star. outlined the car with a heavier line, that looks really good to me.I have tried the filter blur>smart blur but that doesnt look to convincing to me.I think you just gotta spend the itme and lots of it to make an impressive cell shade.But there may be a secret out there I dont know about, if you find it please let me know as well.
I ahve tried to cheat and use photoshop filters to accomplish this and I have found it cant be done.Maybe I havent experimented enough but you def. can get the crisp lines which is what I think makes the illustrations so nice.Like how .star. outlined the car with a heavier line, that looks really good to me.I have tried the filter blur>smart blur but that doesnt look to convincing to me.I think you just gotta spend the itme and lots of it to make an impressive cell shade.But there may be a secret out there I dont know about, if you find it please let me know as well.
Lexus Test Driver
Joined: Sep 2002
Posts: 1,298
Likes: 1
From: Illinois
1. first i would crop the image so that nearly all of it just the car. then i would make a new layer and fill it with white, lets just name the layer........ white, lol. then turn the opacity to around 50% or so so it brightens up the image and makes it seem to have less contrast.

p.s. its very important to name the layers cause things get confusing.
2. in a new layer choose a fat black brush, but not too fat. i like to use anywhere from 7-9 px. solid brushes. here i used 7. proceed to outlining the outside of the car and bottom shadwow. of course its hard to free hand with a mouse so just pick a point to start and hold shift and move the mouse over an inch. or a bit more and click it again so the brush will follow you in a straight line. name the layer "outline"

3. now in the same layer start to use the brush to fill in the bottom of the car with black (wheel well, shadow, wheels, etc.)

the rest will be posted while im finishing this up. this is the first tutorial i ever had to do so forgive me if i leave out anything.
p.s. its very important to name the layers cause things get confusing.
2. in a new layer choose a fat black brush, but not too fat. i like to use anywhere from 7-9 px. solid brushes. here i used 7. proceed to outlining the outside of the car and bottom shadwow. of course its hard to free hand with a mouse so just pick a point to start and hold shift and move the mouse over an inch. or a bit more and click it again so the brush will follow you in a straight line. name the layer "outline"
3. now in the same layer start to use the brush to fill in the bottom of the car with black (wheel well, shadow, wheels, etc.)
the rest will be posted while im finishing this up. this is the first tutorial i ever had to do so forgive me if i leave out anything.
Last edited by RaynArt; Aug 23, 2003 at 03:06 PM.
Lexus Test Driver
Joined: Sep 2002
Posts: 1,298
Likes: 1
From: Illinois
4. now in the outline layer go over the taillights in a brush 1-3 depending on what you want. here i used 3 for some lines i felt needed to "pop out" and 2 for the finer lines that seperate the body from the bumpers, doors, etc. and 1 for even finer lines.

5. then i filled in the windows and seats with black but not the background. of course you can do this in complete detail like the car but im doin it this way for tutorial sake.

6. now with the magic wand in the "outline" layer, select the body pieces. make a new layer and fill the selection. name the layer, "body color" and move this layer so that it is underneath the "outline" layer. i just chose blue cause this way it will be easy to see the highlights and shadows later. (picking black or white isnt always a good thing cause when the highlights/shadows are put in later, it wont even show up)

5. then i filled in the windows and seats with black but not the background. of course you can do this in complete detail like the car but im doin it this way for tutorial sake.
6. now with the magic wand in the "outline" layer, select the body pieces. make a new layer and fill the selection. name the layer, "body color" and move this layer so that it is underneath the "outline" layer. i just chose blue cause this way it will be easy to see the highlights and shadows later. (picking black or white isnt always a good thing cause when the highlights/shadows are put in later, it wont even show up)
Lexus Test Driver
Joined: Sep 2002
Posts: 1,298
Likes: 1
From: Illinois
7. make a new layer called lights. move this layer underneath the body color layer. fill in the taillights with red and white depending what part of the taillight is is. same goes with sidemarkers, headlights, etc.

8. make another new layer. name it, shadows. now hide all the other layers except the white. in this layer, begin to paint in black all the dark areas of the car, lights, and everything else. i just did the rear cause its allready been an hr. and a half doing this but you get the idea. when your done doing the whole car. pull the opacity down to about 30% or whatever u are comfortable with.
(THIS PROCEDURE IS EXACLTY THE SAME AS HIGHLIGHTS EXCEPT YOU BRUSH WITH WHITE)
8b. while we're at it, use the ecliptical marquee and try to select the rims. with this selection go to the outline layer and hit delete.

im going to stop here. you get the idea, its not so hard at all, just takes time. i didnt do a very good job but i rushed it....... A LOT! its easy to figure things out from here. sorry for the short and crappy tutorial but i hope it gives u a better idea of what ur doing. ill make a better one, next time. ill keep hosting the pics for a bit but i might take them down later cause im not too proud, lol.
when all is done, just turn the "white" layer opacity all the way up again.
8. make another new layer. name it, shadows. now hide all the other layers except the white. in this layer, begin to paint in black all the dark areas of the car, lights, and everything else. i just did the rear cause its allready been an hr. and a half doing this
but you get the idea. when your done doing the whole car. pull the opacity down to about 30% or whatever u are comfortable with.(THIS PROCEDURE IS EXACLTY THE SAME AS HIGHLIGHTS EXCEPT YOU BRUSH WITH WHITE)
8b. while we're at it, use the ecliptical marquee and try to select the rims. with this selection go to the outline layer and hit delete.
im going to stop here. you get the idea, its not so hard at all, just takes time. i didnt do a very good job but i rushed it....... A LOT! its easy to figure things out from here. sorry for the short and crappy tutorial but i hope it gives u a better idea of what ur doing. ill make a better one, next time. ill keep hosting the pics for a bit but i might take them down later cause im not too proud, lol.
when all is done, just turn the "white" layer opacity all the way up again.
Lexus Test Driver
Joined: Sep 2002
Posts: 1,298
Likes: 1
From: Illinois
doing this to a stock GS430, i realized its more fun to chop it first normally. drop, rims, etc. then do cell shading. at least it hides some wheel gap, lol.
i havent done cell shading in a bit but im working on another new style of it. even more cartoony, so to speak. and ive been messing around with abstract stuff cause school is starting soon so i wont chop as much
heres something im messing around with. i never did abstract stuff before so im "practicing" to get used to it. i dont wanna get stuck just doing cars all the time.
oh, and who can i talk to, to change my name? confusing with all the different names on boards and id like to change it to Rayn.
Last edited by RaynArt; Aug 23, 2003 at 06:14 PM.
Trending Topics
ClubLexus Stories
Celebrating Lexus & Toyota from Around the Globe

Top 10 Most Confusing Things Lexus Has Ever Done!
Joe Kucinski
2026 Lexus ES Review: Lexus Re-Embraces Founding Principles
Michael S. Palmer
10 Lexus Bargains That are Cheaper Than a New Toyota RAV4
Joe Kucinski
8 Weirdest Things Lexus Has Ever Built
Verdad Gallardo
10 Lexus Designs That Have Aged Like Fine Wine
Verdad Gallardo
8 Tips for Improving Your Hybrid or Plug-in Hybrid's Efficiency!
Michael S. Palmer
10 Best Lexus Models No One Remembers
Joe Kucinski
TRD Off-Road Premium: Best 2026 4Runner, Except This One Thing
Michael S. Palmer
Top 10 Lexus & Toyotas to Drive Before You Die!
Joe KucinskiGS -Trance
Joined: May 2002
Posts: 2,846
Likes: 0
From: Georgia
star,
The tutorial is helping alot!! I see how you do it now Here is my M3 project so far.The wheels are gonna be a pain in the a**.For now I just leave them from the picture.Have you done any wheels using this method yet?anyway let me know how you think its coming.
The tutorial is helping alot!! I see how you do it now
Here is my M3 project so far.The wheels are gonna be a pain in the a**.For now I just leave them from the picture.Have you done any wheels using this method yet?anyway let me know how you think its coming.


Driver School Candidate
Joined: Jan 2003
Posts: 43
Likes: 0
From: Rhode Island
It was well worth of try
some errors on my first try but well it was my first try hehe
Most of people here don't wanna share their knowledges and being cocky specially in photoshop forum but i really appreciate your tutorial
Again
Thanx
some errors on my first try but well it was my first try hehe
Most of people here don't wanna share their knowledges and being cocky specially in photoshop forum but i really appreciate your tutorial
Again
Thanx
Last edited by RolLex; Aug 26, 2003 at 04:07 PM.


Joined: Feb 2001
Posts: 31,944
Likes: 2,737
From: North Carolina
Originally posted by .star.
oh, and who can i talk to, to change my name? confusing with all the different names on boards and id like to change it to Rayn.
oh, and who can i talk to, to change my name? confusing with all the different names on boards and id like to change it to Rayn.
 I assume you really meant Rayn, not Ryan.