
Lexus Champion
I wasn't just proposing the addition of cats to the Borla exhaust for sound. It will also help keep the car clean. I think soot will wind up being your biggest complaint.

Rookie
Quote:
I think soot will wind up being your biggest complaint.
Well Combfilter, let us know about the soot. If it takes 750 or so miles to accumulate, thats not that bad. I've been thinking of removing my cats and putting in test pipes (for only at the track of course). The soot can be washed off, and I wash my car a lot. As long as the soot doesnt damage my paint I just may do it. Just as long as it dosnt sound too much like a rice burner.I think soot will wind up being your biggest complaint.
Lead Lap
I really expected the headers to have fitment issues. But I'm glad they didn't. The OEM stuff seemed harder to remove that installing these headers. If I had the vehicle on a lift I could have them done in 3 hrs. But I would safely say that most everyone who has never done a set of them would more than likely take about 5-6 hrous.
Someone in one of the previous posts had commented in the weld's appearance. The reason why they looked the way they did was more than likely from the oils that were on the pipes during welding. Even if you throughly clean the mandrel bends there is still oil on them somewhere. You could excersize a lot of precaution and place them in a furnace, burn off the oils and then let them cooloff before using them. Its an unnecessary step that most of us would rather pass. The flow of the exhaust will not care what your headers look like from outside. OEM manifolds are machine MIG welded. Its how they keep costs down. These are stainless steel that have been Heli-arc TIG welded by hands of an experienced welded. It has been my experience that penetration is more important than apperance. [ask any lady that.... ] These headers do a job and a half by uncorking the flow restriction at the OEM manifolds.
We should have the sims installed soon and then see how it all goes thereafter. Then its just a matter of researching the ecu's ability to adapt to the increased flow and excepting the sim's output.
I'm still trying to recoop (sp?) from the long night of work. We installed them Tuesday. Yesterday I hung out (tradition) with the DFW supra crowd and didn't crash until midnight. I'm looking forward to having a long night of sleep tonight.
I had not idea there was a DFW meet. I'm sure Troy and I should be able to make it out there. Nick01 could you PM me the details. Thanks in advance.
Just hang in there guys. More info to be out shortly. We'll get back to you guys shortly. Both, Troy and I appreciate everyone's patience.
-Joe
Someone in one of the previous posts had commented in the weld's appearance. The reason why they looked the way they did was more than likely from the oils that were on the pipes during welding. Even if you throughly clean the mandrel bends there is still oil on them somewhere. You could excersize a lot of precaution and place them in a furnace, burn off the oils and then let them cooloff before using them. Its an unnecessary step that most of us would rather pass. The flow of the exhaust will not care what your headers look like from outside. OEM manifolds are machine MIG welded. Its how they keep costs down. These are stainless steel that have been Heli-arc TIG welded by hands of an experienced welded. It has been my experience that penetration is more important than apperance. [ask any lady that....
] These headers do a job and a half by uncorking the flow restriction at the OEM manifolds. We should have the sims installed soon and then see how it all goes thereafter. Then its just a matter of researching the ecu's ability to adapt to the increased flow and excepting the sim's output.
I'm still trying to recoop (sp?) from the long night of work. We installed them Tuesday. Yesterday I hung out (tradition) with the DFW supra crowd and didn't crash until midnight. I'm looking forward to having a long night of sleep tonight.
I had not idea there was a DFW meet. I'm sure Troy and I should be able to make it out there. Nick01 could you PM me the details. Thanks in advance.
Just hang in there guys. More info to be out shortly. We'll get back to you guys shortly. Both, Troy and I appreciate everyone's patience.
-Joe

Lexus Champion
I drove the car again tonight. It's funny when it idles it sounds like a v8..kind of sounds cool. I drive it about 4miles and still no cel. I did have my car chirp a 2nd gear tonight on this grippy road which it never does.
Here's some pics. I have some more pics that I will post up for a DIY in a separate thread here in a few days.

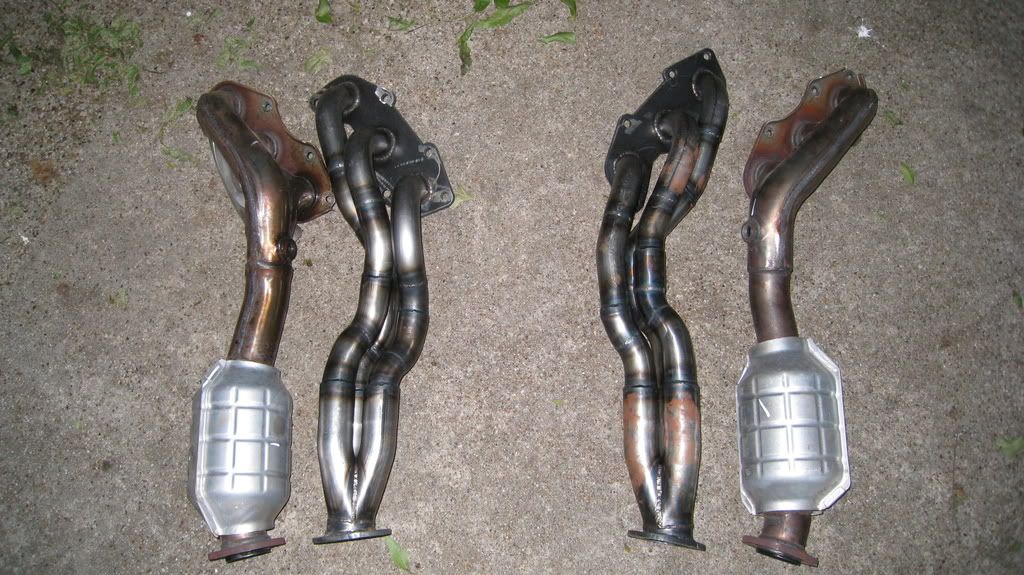


the last pic is the flange connection I was a little worried about. I think it's fine though.
Here's some pics. I have some more pics that I will post up for a DIY in a separate thread here in a few days.
the last pic is the flange connection I was a little worried about. I think it's fine though.


Advanced
Carchitect & Combfilter,
What sequence did you use to tighten down the headers? Bolts near the engine first and then the bolts at the exhaust pipe flange or the other way around?
I am certainly not going to question anyone’s work but I know that Daniel suggests to tighten the two bolts at the lower exhaust flange first. This helps to make the flanges fit together more square. When I was in the process of putting on my set, until I discovered a fitment issue with the driver’s side header, I could line the passenger side flange up perfectly.
Do both lower flanges look the same as the picture that is posted. Maybe it does not matter because of the aluminum crush gasket but….
Regards,
Lexus Champion
Quote:
What sequence did you use to tighten down the headers? Bolts near the engine first and then the bolts at the exhaust pipe flange or the other way around?
I am certainly not going to question anyone�s work but I know that Daniel suggests to tighten the two bolts at the lower exhaust flange first. This helps to make the flanges fit together more square. When I was in the process of putting on my set, until I discovered a fitment issue with the driver�s side header, I could line the passenger side flange up perfectly.
Do both lower flanges look the same as the picture that is posted. Maybe it does not matter because of the aluminum crush gasket but�.
Regards,
We did engine first then exhaust.. Yes, both lower flanges look the same. I think it's fine, with the crush gaskets. The passenger side is a little more of a gap than the drivers side.Originally Posted by Gaugster
Carchitect & Combfilter,What sequence did you use to tighten down the headers? Bolts near the engine first and then the bolts at the exhaust pipe flange or the other way around?
I am certainly not going to question anyone�s work but I know that Daniel suggests to tighten the two bolts at the lower exhaust flange first. This helps to make the flanges fit together more square. When I was in the process of putting on my set, until I discovered a fitment issue with the driver�s side header, I could line the passenger side flange up perfectly.
Do both lower flanges look the same as the picture that is posted. Maybe it does not matter because of the aluminum crush gasket but�.
Regards,


That looks great Troy!
so are you going to track it yet or wait a little longer??
Thanks for sharing!
Mike
so are you going to track it yet or wait a little longer??
Thanks for sharing!
Mike
Lexus Champion
Quote:
so are you going to track it yet or wait a little longer??
Thanks for sharing!
Mike
No track time for me the rest of the summer. It's too hot here in TX.Originally Posted by passnu2
That looks great Troy! so are you going to track it yet or wait a little longer??
Thanks for sharing!
Mike
How's the new ride?

Lexus Test Driver
^^^ is ennis ever open in the evenings?? might be able to catch a cooler night
Quote:
How's the new ride?
I have to take the stuff of my car and hope to do that this weekendOriginally Posted by combfilter
No track time for me the rest of the summer. It's too hot here in TX.How's the new ride?
 other things have kept me pretty busy....Once I get this done then will get the new one. I have to go back to the dealer also and have the OEM springs slapped back on so I need to use a lift and make sure I can get in there.
 so do you have any cats now with these headers?? if i recall you had the 2nd set removed??
Lexus Fanatic
Joe Z
Lexus Fanatic
close
May 15, 2022
- Join DateNov 2004
- LocationUnder an IS F since 2008
- Posts:13,441
-
iTrader Positive Feedback100
-
iTrader Feedback Score(10)
-
Likes:764
-
Liked:1,076 Times in 592 Posts
Quote:
This can easily be resolved by making sure the flanges are designed with a "seat" for the crush gaskets.. Originally Posted by combfilter
We did engine first then exhaust.. Yes, both lower flanges look the same. I think it's fine, with the crush gaskets. The passenger side is a little more of a gap than the drivers side.
Just like oem......

Driver
Quote:
Just like oem......
I can cut the flanges on my CNC plasma table the same minute I need them, and avoid the headaches that come with waiting on machine shops to deliver the parts. So why go thought the trouble of having a machine shop machine the extra space in the flange to fix something that isn't broken.Originally Posted by Joe Z
This can easily be resolved by making sure the flanges are designed with a "seat" for the crush gaskets.. Just like oem......