


 I want 06 tails now. Group Buy Anyone?

06 Tail light install with PICS
UPDATED 02/25/2006: See additional install pics on 4th page.
EDIT: Holy cow, it's been almost 5 years since this thread! Pics re-added per request. Enjoy.
-------------------------------------------------
Tools to be needed for self install:
Flat head screwdriver
Phillips screwdriver
10mm socket and ratchet
T-40 Torx socket available at Sears or Auto parts store such as Kragen, Shucks, Checkers, Autozone, Peps
Masking Tape
Needle nose pliers-angled preferrable
Patience
-------------------------------------------------
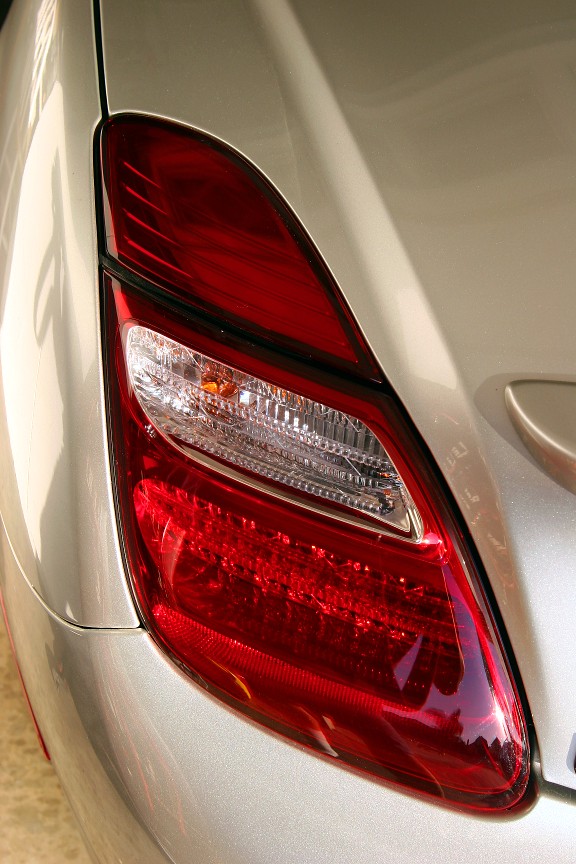
OK, I finally received the top portion of the taillights that were backordered from Lexus for a few weeks.
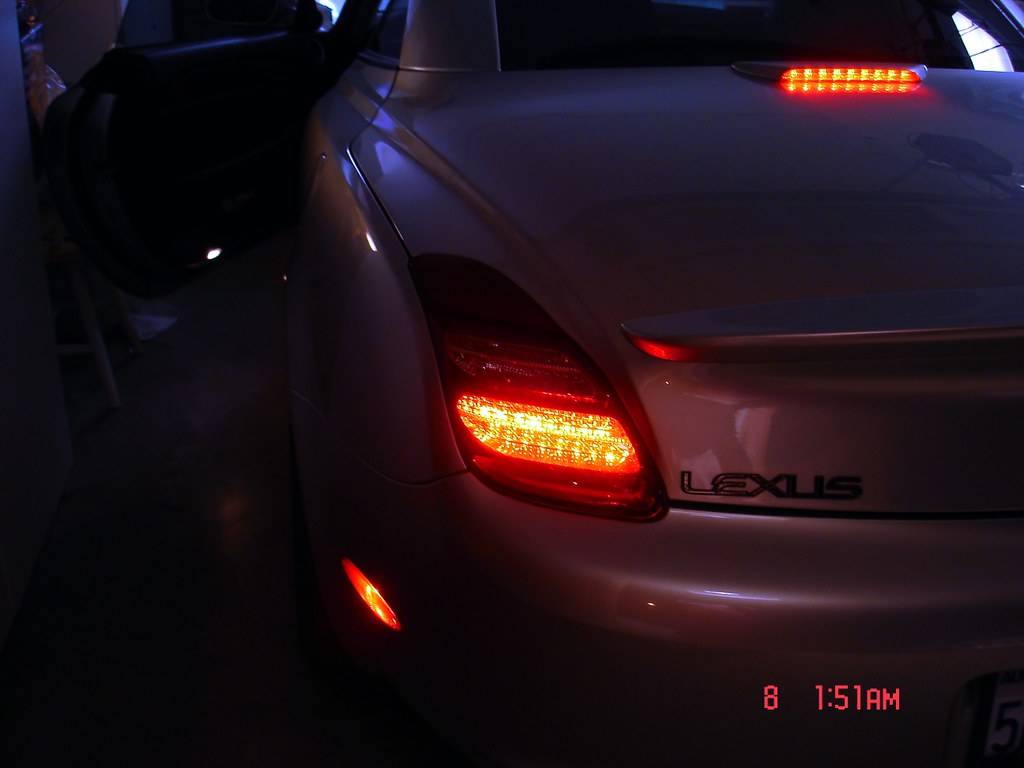
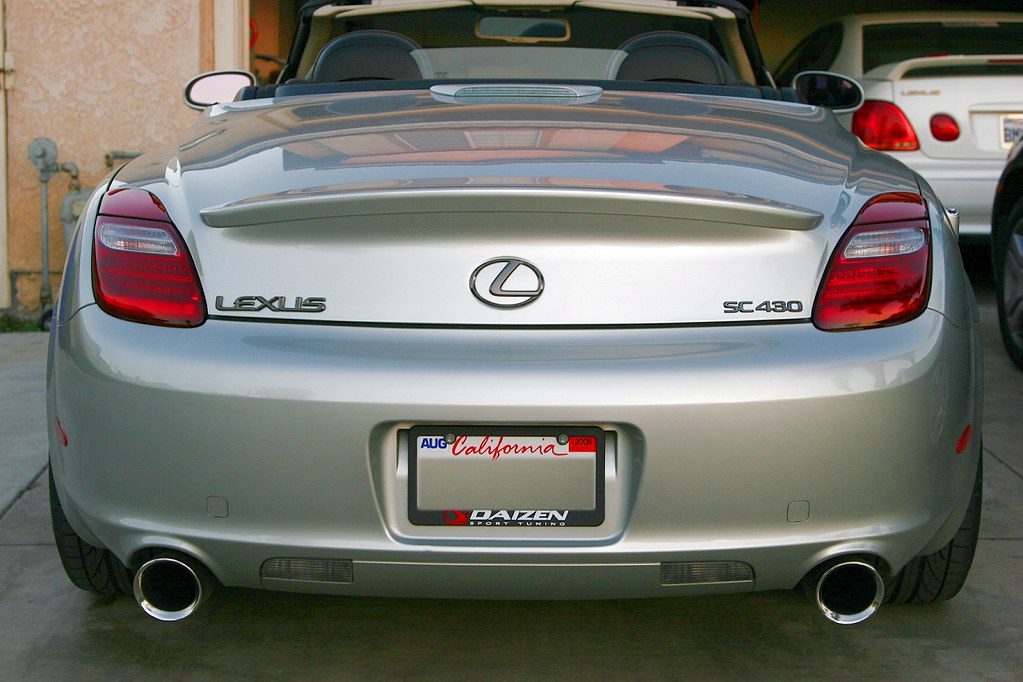
So far I am very happy with the look of the new lenses as well as the LED lights that now match the 3rd brake light.
Install time is around 2 hours taking your time as some carpet in the trunk does need to be removed to get to the wiring harness.
See Carson for Group Buy:
1 qty left lower taillight:
1 qty left upper taillights
1 qty right lower taillight
1 qty right upper taillight
2 wiring harness for new taillights
2 new amber bulbs for turn signals
1 ECU in the rear to control lights and lamp out indicator-See end of post for more details.
Question: Is the top taillight portion required. Not required, but highly recommended as a large gap exist between the new taillight and old top portion. See pic.

Put the top up.
To prevent scratching of painted surfaces, I highly recommend that you place masking tape over all painted surfaces around the lights including the deck lid and rear quarter panel.
The most difficult part of the install is removing the lights as some force is needed for the main light assembly. Also those carpet clips can be a paint. I recommend a needle nose plier but expect to break a few unless you have an actual tool to remove them. Some use a screwdriver and others use two screwdrivers. Needle nose is simpler, just make sure it is clean and be careful of the carpet. You may want to place a rag or towel between the pliers and carpet.
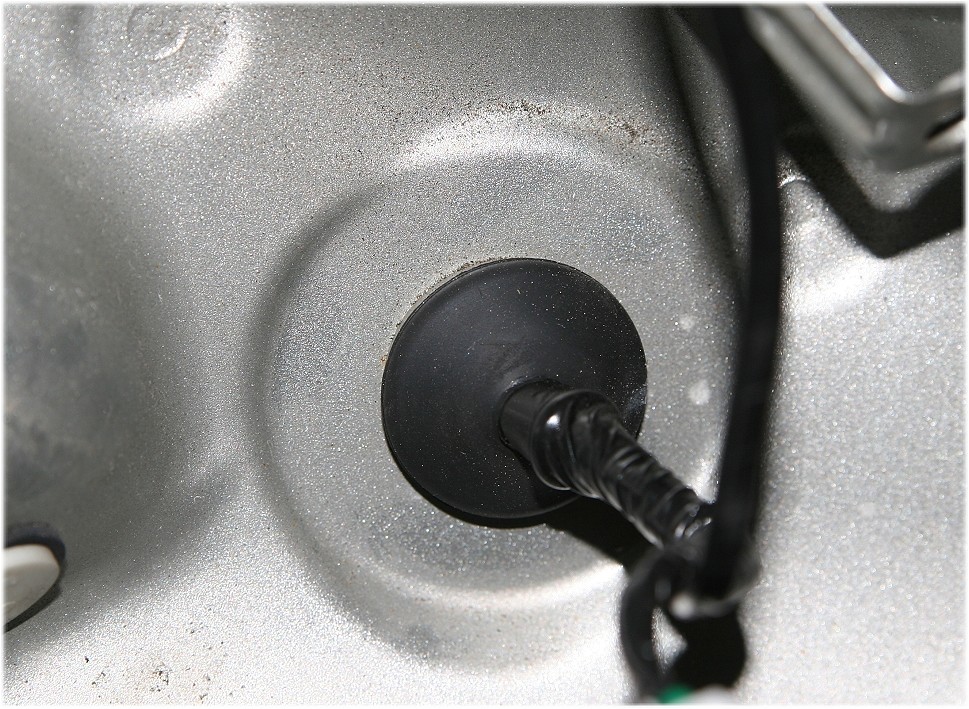
First thing is to remove the tailights and disconnect the bulbs from it.
Only one screw holds it in which is covered by a small piece of plastic that pops out next the taillight. Visible when you pop the deck lid. Once the screw is removed, carefully yet with some effort slide the unit towards you. Be careful you do not break something. Now remove the two bulbs from the taillight.
Next is to remove the harness which requires some of the trunk carpet/top trim piece as pictured to be removed. Trim just pops up.

Now reach inside the carpet and disconnect the harness. Pull the harness out through the grommet.
Reassembly is the reverse
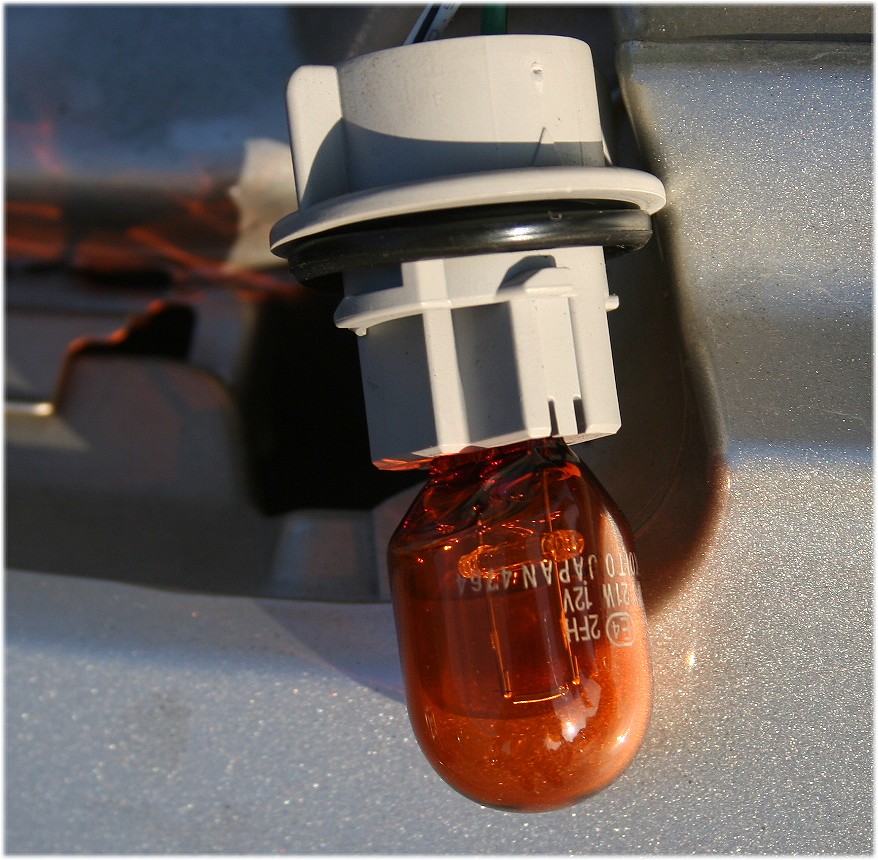
Connect new harness and ensure grommet is snug.
Install new bulb.
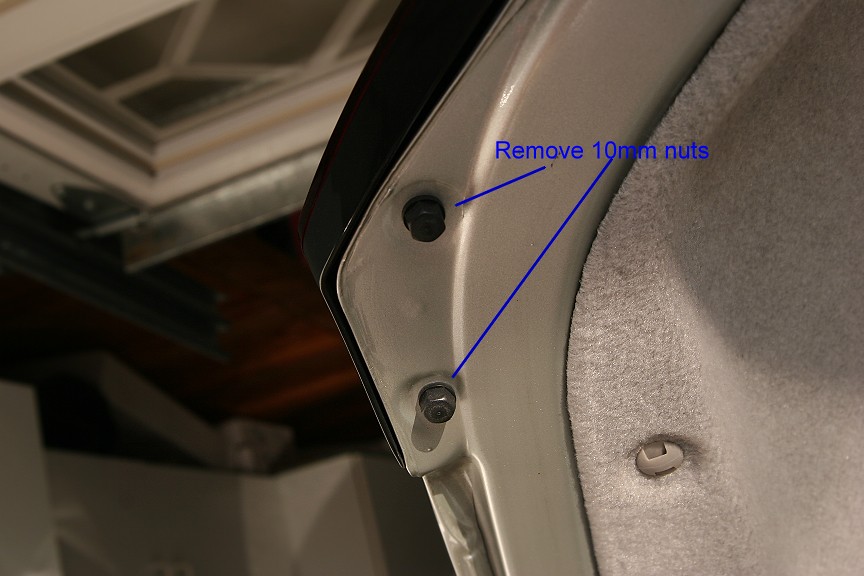
Top portion is a quickie
Remove these two nuts with a 10mm socket
Lift the unit up so that the screws are out of the holes and SLIDE the light to the side. Left light=slide to left, Right light=slide to right. Takes a little effort.
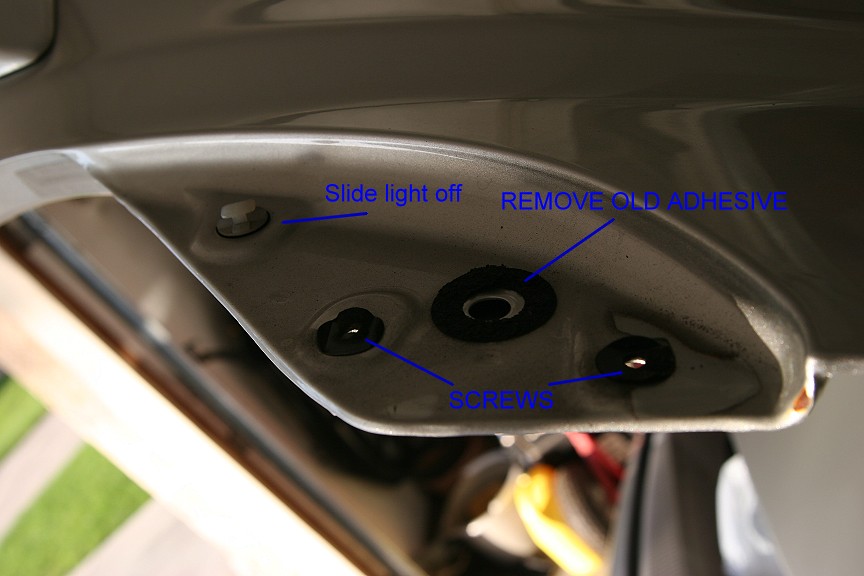

Install new light in opposite manner
Now that is part I.
The remaining problem is that the new LEDs will set off your LAMP OUT indicator on the dash. I have in my hand some load resistors that are supposed to correct this. I will install these and report back in the next few days.
Lee
EDIT: Holy cow, it's been almost 5 years since this thread! Pics re-added per request. Enjoy.
-------------------------------------------------
Tools to be needed for self install:
Flat head screwdriver
Phillips screwdriver
10mm socket and ratchet
T-40 Torx socket available at Sears or Auto parts store such as Kragen, Shucks, Checkers, Autozone, Peps
Masking Tape
Needle nose pliers-angled preferrable
Patience
-------------------------------------------------
OK, I finally received the top portion of the taillights that were backordered from Lexus for a few weeks.
So far I am very happy with the look of the new lenses as well as the LED lights that now match the 3rd brake light.
Install time is around 2 hours taking your time as some carpet in the trunk does need to be removed to get to the wiring harness.
See Carson for Group Buy:
1 qty left lower taillight:
1 qty left upper taillights
1 qty right lower taillight
1 qty right upper taillight
2 wiring harness for new taillights
2 new amber bulbs for turn signals
1 ECU in the rear to control lights and lamp out indicator-See end of post for more details.
Question: Is the top taillight portion required. Not required, but highly recommended as a large gap exist between the new taillight and old top portion. See pic.
Put the top up.
To prevent scratching of painted surfaces, I highly recommend that you place masking tape over all painted surfaces around the lights including the deck lid and rear quarter panel.
The most difficult part of the install is removing the lights as some force is needed for the main light assembly. Also those carpet clips can be a paint. I recommend a needle nose plier but expect to break a few unless you have an actual tool to remove them. Some use a screwdriver and others use two screwdrivers. Needle nose is simpler, just make sure it is clean and be careful of the carpet. You may want to place a rag or towel between the pliers and carpet.
First thing is to remove the tailights and disconnect the bulbs from it.
Only one screw holds it in which is covered by a small piece of plastic that pops out next the taillight. Visible when you pop the deck lid. Once the screw is removed, carefully yet with some effort slide the unit towards you. Be careful you do not break something. Now remove the two bulbs from the taillight.
Next is to remove the harness which requires some of the trunk carpet/top trim piece as pictured to be removed. Trim just pops up.
Now reach inside the carpet and disconnect the harness. Pull the harness out through the grommet.
Reassembly is the reverse
Connect new harness and ensure grommet is snug.
Install new bulb.
Top portion is a quickie
Remove these two nuts with a 10mm socket
Lift the unit up so that the screws are out of the holes and SLIDE the light to the side. Left light=slide to left, Right light=slide to right. Takes a little effort.
Install new light in opposite manner
Now that is part I.
The remaining problem is that the new LEDs will set off your LAMP OUT indicator on the dash. I have in my hand some load resistors that are supposed to correct this. I will install these and report back in the next few days.
Lee
Last edited by Pearlpower; Dec 25, 2010 at 12:56 PM.
Lead Lap
Joined: Aug 2005
Posts: 454
Likes: 0
From: Canada
Lee,
I would love to see an 02 to 05 model with the 06 headlights. Would this be something you would consider? I have an 06 and love the new headlights, however I like the older front end better. I think this combination might look deadly.
It would be awsome if someone from photoshop could put this together for us to judge, then we could set up a poll. Obviously the 06 tailights are a big hit.
Any opinions?
Trending Topics
Originally Posted by Pearlpower
The remaining problem is that the new LEDs will set off your LAMP OUT indicator on the dash. I have in my hand some load resistors that are supposed to correct this. I will install these and report back in the next few days.
Lee
Lee
j/k.... I want to make sure this resistor works since I just have my clean dash back and I want to keep it like that. Thanks for the hard work.
ClubLexus Stories
Celebrating Lexus & Toyota from Around the Globe

Top 10 Lexus & Toyotas to Drive Before You Die!
Joe Kucinski
Top 10 Lexus/Toyotas With The LEAST 5-Year Depreciation
Joe Kucinski
Lexus LC500 Convertible Auction: A Preview of Rising Values?
Brett Foote
GX 550 vs TX 550: Best 3-Row Luxury Lexus Family Hauler
Michael S. Palmer
9 Best Lexus Models You Can Buy for Half Price (And 1 You Shouldn't!)
Joe Kucinski
2026 Lexus NX Buyer's Guide: Models, Features, Prices & More!
Brett Foote
Top 10 Reasons to Buy a Lexus TX 550h+ (& 3 Reasons to AVOID!)
Michael S. Palmer
Top 10 Lexus & Toyota Models of the 1990s RANKED!
Joe Kucinski
10 Great Toyotas That Could Have Been Lexus Models
Joe Kucinski
Originally Posted by RMR
I would definetly go for a group buy.....!!!
NICE430
NICE430

Rookie
Joined: Aug 2005
Posts: 94
Likes: 0
From: CA
OK, I tried to install the load resistors today and came across a couple of things that lead to failure.
1) Two would be required for each taillight. 2x2=4 resisters
2 Load resisters by nature get VERY VERY HOT! Now I could not find my pyrometer, but the resistor could not be held by the finger. Reading other forums, they get as hot as a bulb itself. Now this poses a big problem-where to mount 4 of these hot little items. Inside the trunk will not work as the carpet is resting flush with the trunk where it would surely burn or create a possible fire hazard. The taillight itself has no room. Only place available are the small areas next to the rear side marker lights which would mean a bit of length of wire. Not the way I like to do things.
3) Last issue is the lights do DIM with these installed. Not good as LEDs are not overly bright to begin with.
So with this I aborted the install as I prefer a nice clean setup and will instead pull the bulb in the dash as it is limited in function anyhow. I had one fog light and 2 side marker bulbs out and the little bulb out light did not light up. Only works for brake, headlight, and taillight.
But at least I can say I tried. If you are willing to put up with the above it will work. I
I still enjoy the taillights and would do it again without hesitation.
Now all is not lost. I do have a factory wiring book coming and will look into what exactly is reading and triggering the light.
Lee
1) Two would be required for each taillight. 2x2=4 resisters
2 Load resisters by nature get VERY VERY HOT!
Now I could not find my pyrometer, but the resistor could not be held by the finger. Reading other forums, they get as hot as a bulb itself. Now this poses a big problem-where to mount 4 of these hot little items. Inside the trunk will not work as the carpet is resting flush with the trunk where it would surely burn or create a possible fire hazard. The taillight itself has no room. Only place available are the small areas next to the rear side marker lights which would mean a bit of length of wire. Not the way I like to do things. 3) Last issue is the lights do DIM with these installed.
Not good as LEDs are not overly bright to begin with. So with this I aborted the install as I prefer a nice clean setup and will instead pull the bulb in the dash as it is limited in function anyhow. I had one fog light and 2 side marker bulbs out and the little bulb out light did not light up. Only works for brake, headlight, and taillight.
But at least I can say I tried. If you are willing to put up with the above it will work. I
I still enjoy the taillights and would do it again without hesitation.
Now all is not lost. I do have a factory wiring book coming and will look into what exactly is reading and triggering the light.
Lee
Last edited by Pearlpower; Nov 19, 2005 at 09:43 PM.
wow, lee, sounds like this is a lot harder than i thought.... umm.... this is not good, the heat is definitely a big big problem. so from what you said about resister and about the "dimming" effect, it seems like the load resister is there to reduce the amount of current that get pumped into the taillights huh?
anyway, dimming is bad too, like you said led are not bright to begin with.
i am a bit confused by your write up on the dash light and the fogs/side markers. but hey with the wiring book coming, i am sure we will see update on this thread soon nagain
anyway, dimming is bad too, like you said led are not bright to begin with.
i am a bit confused by your write up on the dash light and the fogs/side markers. but hey with the wiring book coming, i am sure we will see update on this thread soon nagain
Driver School Candidate
Joined: Aug 2005
Posts: 26
Likes: 0
From: FL
Lee, on my 94 Supra, I changed a small control unit in the trunk when I went to the nicer 98 tail lights. This small box was for a 98 model of course and basically fooled the system into thinking the car was a 98...The warning light issues was solved...Find out if the SC has such a control unit...(was a yellow box 2 inches square)...Nice Write up !!
Hughie....FL
Hughie....FL