
How do I remove my tail light

Thread Starter
Registered User
Joined: Apr 2001
Posts: 145
Likes: 0
From: Boston
I hit a bump today and my tail light malfunction light lit up on my dash.
So, I got out and banged on the light housing and my right tail light below my yellow blinker popped back on.
Later when I passed over a speed bump it went out again!
Then back on when I made a fast left turn... SIGH!
Before I go taking my tail light apart (I havent done it before), does anyone know how or have any tips?
I attached a picture from teh RX parts manual.
The red circles are screws I have not seen yet from a surface inspection of my tail light and trunk. But the blue circles indicate black screw caps ive noticed on the light housing.
So... do I just remove the screws located behind the screw caps (the ones in blue) and pull out the housing?
OR do I need to get to the screws circled in red also?
Thanks a bunch guys!

Driver School Candidate
Joined: Nov 2002
Posts: 20
Likes: 0
From: WA
Very similar situation happened to me last weeek. The rear light warning light came on. I checked the rear tail light and it was out. Next time I started the car the warning light did not come on and the rear tail light was working. Several days later the warning light came on again and did not go out. The rear tail light was not working. It turned out to be just the bulb.
Pole Position
Joined: Jan 2002
Posts: 333
Likes: 0
From: Washington
this same thing has been happening to me the past 2 days...i've noticed it before...usually i can just tap that tail lite and it comes back on...only on the right outer lite...wonder if this is a known issue...:eek:
Pole Position
Joined: Dec 2002
Posts: 376
Likes: 0
From: Massachusetts
Not a specific problem to the RX300 - I've seen it happen on many vehicles, especially in the real cold weather (more lamps burn out in cold weather - or at least it seems that way!).
"I hit the lamp housing and it comes on for a while." The filament is broken and reconnects until another jolt. Got to replace it.
Here's how...
Start with the scanned diagram above.
#8 is for the wiring harness and you will not see this.
#7 are the 2 covers, pry them off gently.
#6 are the 2 screws, remove them (the only screws you need to touch).
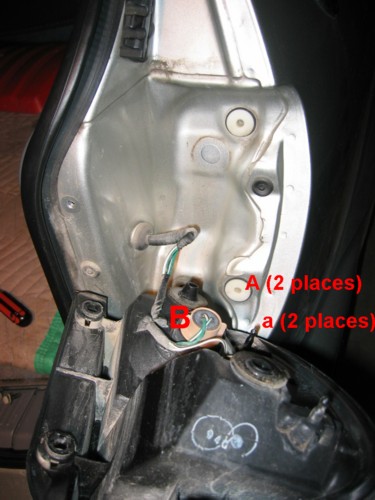
#2 the lamp housing (lens), remove this by pulling straight back. [see second pic in post] The pop fastener "A" and "a" must come apart in two places. You may need to pry the lens housing out (toward the rear) by using something that will not damage the paint or plastic like a flat thin paint stirrer. Be careful not to damage anything.
Twist out the lamp holder (connector) "B" and pull out the lamp from the connector base.
Replace the lamp (dual filament) 7443.
Pics showing the steps:
Remove the 2 caps over the screws and remove the 2 screws shown here.

Assembly removed
"I hit the lamp housing and it comes on for a while." The filament is broken and reconnects until another jolt. Got to replace it.
Here's how...
Start with the scanned diagram above.
#8 is for the wiring harness and you will not see this.
#7 are the 2 covers, pry them off gently.
#6 are the 2 screws, remove them (the only screws you need to touch).
#2 the lamp housing (lens), remove this by pulling straight back. [see second pic in post] The pop fastener "A" and "a" must come apart in two places. You may need to pry the lens housing out (toward the rear) by using something that will not damage the paint or plastic like a flat thin paint stirrer. Be careful not to damage anything.
Twist out the lamp holder (connector) "B" and pull out the lamp from the connector base.
Replace the lamp (dual filament) 7443.
Pics showing the steps:
Remove the 2 caps over the screws and remove the 2 screws shown here.
Assembly removed
Last edited by ederny; Jan 25, 2003 at 08:39 PM.

Thread
Thread Starter
Forum
Replies
Last Post


