
PLEASE HELP ASAP!!! (emergency brake question)


i dont want to get too much into the story b/c it just makes me mad but... to make a long story short, i was replacing the brakes and rotors on my 99RX300 and the emergency brake got messed up... i need help in getting some diagrams to see what the e-brake set up looks like BEFORE it got messed up and i need to know what size that HUGE lug is so i can take the hub off and work on the e-brake behind it. also, i need to know is there a special tool to put these back in place?? 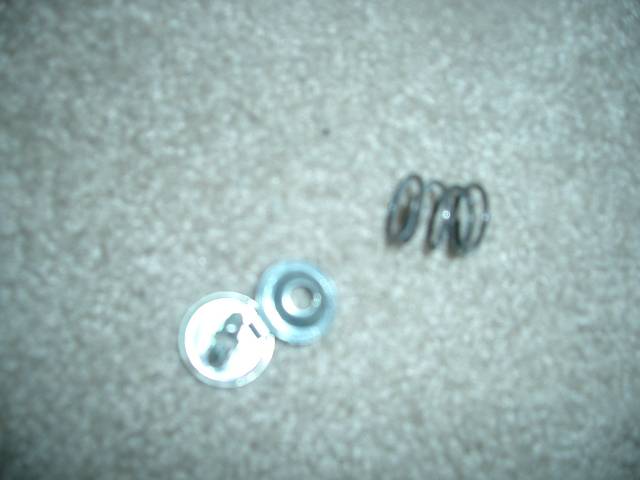 basically there are 2 sets of these behind the hub and both came out of place
  PLEASE HELP
basically there are 2 sets of these behind the hub and both came out of place PLEASE HELP

Lexus Champion
Joined: Mar 2004
Posts: 1,973
Likes: 10
From: Arizona
The strange little symbols indicate where to place high temp caliper grease.
The tool used to replace the brake shoe retainer is a pair of needle nose pliers. This is numbers 14,15,16. Push washer 14 into the spring 15 and use the plier tips to grasp and turn the retainer pins 16.
The tool used to replace the brake shoe retainer is a pair of needle nose pliers. This is numbers 14,15,16. Push washer 14 into the spring 15 and use the plier tips to grasp and turn the retainer pins 16.
obviously i can look at the other wheel, but if i dont have too... i dont want to  im lazy
Tammy, i tried to pm u last night b/c i knew u know a lot about this stuff, but i couldnt pm u for some reason THANKS FOR THE PIC!!
i now need 2 questions answered... looking at the pic in my orignial post, i see where the shoe hold down spring (#15) and the the hold down pin (#14) but where does the third part go?? (there are 3 pieces in my pic) and there is a second set of those 3 pieces, where does the 2nd set go
  ... and i ALSO need to know the size of that lug that holds the hub down... any help is GREATLY appreciated!!
im lazy Tammy, i tried to pm u last night b/c i knew u know a lot about this stuff, but i couldnt pm u for some reason
THANKS FOR THE PIC!!i now need 2 questions answered... looking at the pic in my orignial post, i see where the shoe hold down spring (#15) and the
the hold down pin (#14) but where does the third part go?? (there are 3 pieces in my pic) and there is a second set of those 3 pieces, where does the 2nd set go ... and i ALSO need to know the size of that lug that holds the hub down... any help is GREATLY appreciated!!
Lexus Champion
Joined: Mar 2004
Posts: 1,973
Likes: 10
From: Arizona
The spring has an inner and outer cup washers, sandwiching the spring when installed on the post. The part in question, center in your picture, is the inner cup. There are two sets installed per shoe, holding the shoe in place till you reinstall the return springs and the strut.
The hub should not need to be removed to install the brake shoes.
The disk with the drum is the last part installed prior to adjusting the shoes to the drum, so the hub needs to remain in place.
The hub is only removed when the bearings are loose and the hub replacement is needed. When replaced or removed, the bearing nut (what you are referring to) is tightened to apply a "pre-load to the bearing set" on the hub. This prevents the inner bearing races from spinning on the spindle and damaging it. when you turn the undisturbed hub, you will feel the bearing "drag".
I will remove my rear wheel, the cotter key and retainer to get the socket size for you . I 'l take a minute...


Trending Topics

CL Community Team


Joined: Apr 2001
Posts: 16,564
Likes: 1,388
From: Austin, TX
thank you so much... but after reading your post prior to this, idk if i can do it... is there anyway i can get in touch with you via the phone to ask you some questions or is that asking a bit too much. i would like to fix this myself since i have already gone this far, but if i cant, i would end up taking the car to a shop and that would just nullify all the work i did yesterday if its ok, with you, i would just like to ask a few more questions before i continued to try and fix this. thanks for everything you have done to this point  it is MORE than GREATLY APPRECIATED
if its ok, with you, i would just like to ask a few more questions before i continued to try and fix this. thanks for everything you have done to this point it is MORE than GREATLY APPRECIATED
CL Community Team
Joined: Apr 2001
Posts: 16,564
Likes: 1,388
From: Austin, TX
have you used Private Messaging [PM]? This keeps the information out of public eye.
varsity64:
Remember you have to adjust the star nut before you are completly done.
To counter the wear (if you are replacing the shoes) you have to turn the star enough times to allow the drum to go over the new shoes. Then you spin the drum and with a mallet strike the drum some where near the middle of both shoes. Then you turn the star from the (17 is the cover in the picture above) window spin the drum and use the mallet. You keep doing this till there is a slight grab. Final few clicks can be done by repeated application of foot-brake.
Salim
CL Community Team
Joined: Apr 2001
Posts: 16,564
Likes: 1,388
From: Austin, TX
reatiners:
Assembly created by 16, 15 & 14 [two sets] hold the shoes from falling off. The springs keep them pulled in while the above assembly prevent lateral movement but allow sideways motion (needed to apply brakes).
From you photo, I can spot 15 and 14. The other object seems like 2 or 3 or 9 or 17.
Dotted lines from item 16 indicate there are two identical sets. Confusion comes in due to dotted line terminating at 9. 9 only goes to the middle mount. 13 dotted lines goes through the hole of the shoe.
all numbers refer to Tamys post.
Lexus Champion
Joined: Mar 2004
Posts: 1,973
Likes: 10
From: Arizona
The 30mm half shaft drive shaft nut is torque spec at 159 Ft Lbs ... (216Nm)
(My mistake on a lower torque suspicion.)
Insure the vehicle will not move by jackstands or wheel chocks prior to removing the shaft nut.
(My mistake on a lower torque suspicion.)
Insure the vehicle will not move by jackstands or wheel chocks prior to removing the shaft nut.
Last edited by Tammy; Nov 7, 2006 at 03:01 PM.

Thread
Thread Starter
Forum
Replies
Last Post
KyleJ
Suspension and Brakes
0
Sep 5, 2018 09:06 AM