When you click on links to various merchants on this site and make a purchase, this can result in this site earning a commission. Affiliate programs and affiliations include, but are not limited to, the eBay Partner Network.
Something I have been meaning to address for some time now is a proper cleaning DIY for USA-spec 1992-1997 2JZ-GE EGR systems. Specifically the notoriously impossible to clean upper/internal EGR area leading to the internal crossover dispersion pipe behind the throttle body.
I encountered this problem myself several months ago when I had to find a way to clean the one in my car to pass CA smog.
In the end I just bought a brand new Y-manifold but there is no reason an old one cannot be cleaned out completely so that your EGR Code 71 goes away (assuming the rest of your EGR system has been cleaned and you've already replaced the EGR VSV and/or EGR Temp Sensor).
Well I am of the mind that it isn't so impossible despite Toyota listing NO service procedure for cleaning it out in the TSRM or any factory part number for a new freeze plug which should be replaced when knocking the old one out to clean that passage.
The full procedure would involve cleaning/unblocking the EGR pipe, EGR valve and both EGR passages of the "Y" plenum on 2JZ-GE's if the issue is not EGR Temp Sensor or EGR VSV related (usually the easy culprits).
I have two spare "Y" manifolds with which to demonstrate this. The annoying part is that that upper internal EGR section of that manifold is prone to clogging after 20+ years in some cases (though YMMV) and I took measurements and identified a Dorman steel freeze plug part that should match the original (which is also steel against aluminum). For most going to that much trouble is not necessary hence this thread but I'm sure some folks will need it at some point.
If you can delete the EGR system in your area, go for it. For California SC300 owners and possibly others in restrictive locations a fully working EGR system may be the only option.
FREEZE PLUG DIAMETER (measured on manifold with caliper gauge): 20.75mm
Ordered: Dorman 20mm BRASS plug (P/N: 565-101) but brass on aluminum is not a good idea. Plus this isn't a very good fit and I believe it may have a pinhole(?) for some reason which rules it out.
There is a Dorman 20mm steel plug (555-104) but probably a better fit is the Dorman 20.76mm steel plug (555-013). Or a steel freeze plug in 13/16ths which is the same masurement as 20.64mm.
It was recommended to me that a freeze plug should be sealed with something when tapping a new one into the manifold plug area.
Additional small plug area near EGR valve mating surface: 14.9mm (measured on manifold)
Ordered Dorman 14.80mm METAL plug (P/N: 555-114).
I am not sure if using a BRASS freeze plug on an ALUMINUM intake manifold is a good idea since putting the two metals together is usually a recipe for causing corrosion. At least when dealing with radiators, radiator drain plugs and coolant. No coolant here obviously but still it is better to source a steel plug like the factory one.
.....
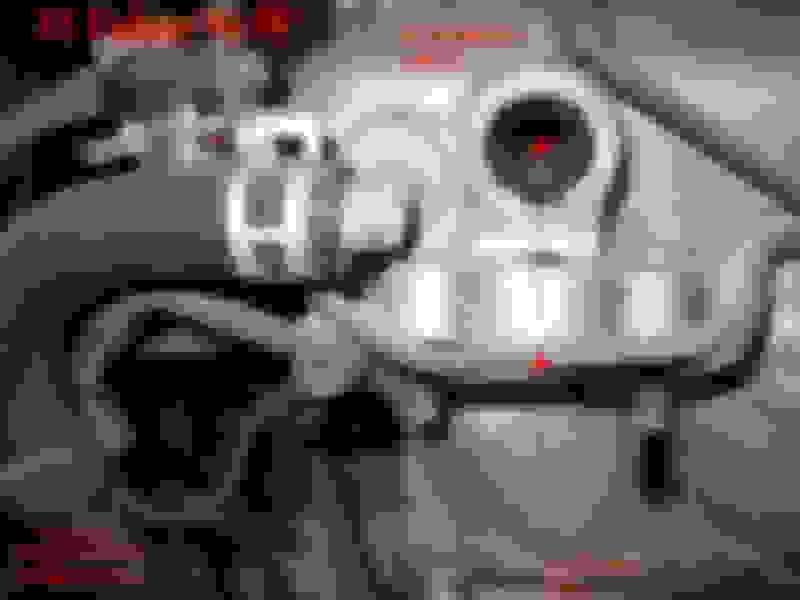
First some details. Here is how badly the little steel 90-degree pipe on your EGR valve can become clogged. Cleaning out the entire valve and removing and cleaning this little part can do wonders for an old EGR valve:
....
Second, some telling information that this "freeze plug" EGR passage method some manufacturers use is not limited to Toyota. Here's a thread for EGR system diagnosis on Suzuki Sidekick and Chevry Tracker 1.6L engines:
NOT a Toyota engine below but the same concept. Interestingly the thread poster does not recommend removing the EGR freeze plug in this example... but I have to wonder how on Earth all that carbon buildup would be completely removed without getting at the plug.
And here's a Celica-Supra 5M, 6M or 7M thread where buried in the middle of the posts, a one person asks if the OP removed the EGR freeze plug area and replaced it with a new one:
Third... (and I realize this is somewhat out of order at the moment) here is the correct way you are supposed to remove your the EGR tube that connects the cylinder head to the EGR valve:
You need to use a long extension to get the pipe off first the correct way like this, which requires you brace the angle bend with one hand to keep the socket centered on each 12mm bolt as you remove and re-torque to 15 ft-lbs...
The large nut holding that EGR pipe in place is 32mm. The Toyota/Lexus TSRM states that it requires 47 ft-lbs of torque.
Now how to actually do that: you could just use a big 32mm open ended wrench and guesstimate it. The right way is to use a torque wrench with a 32mm crows foot adapter and re-calculate to account for how a crows foot socket throws off the torque setting slightly from your initial 47 ft-lb adjustment. I have to admit I am not completely familiar with that procedure yet but apparently a crows foot socket will throw off your intended torque setting unless you compensate for the variance it causes.
....
Apologies for this being an incomplete thread at the moment. I have not had time (or ample space in my cramped apartment) to accomplish the main goal of this thread yet but it is not at all impossible to do.
I felt it best to establish the thread for now and list all my findings and measurements. At the very least if someone is desperate and they really have no other option available and they NEED their 2JZ-GE EGR system fully operational to pass smog they can at least begin working from what is available in this thread.
Blame Toyota for making this more difficult than it needs to be by not listing a replacement freeze plug or stating a cleaning procedure for this very hard to get to section of the USDM 2JZ-GE EGR passages.
I have experienced a recurring CEL Code 71 ("EGR Malfunction / Insufficient EGR Flow") due to this one manifold EGR passage being blocked with carbon after doing ALL of the following:
--cleaning every EGR passage except this one hard to get to spot
--cleaning my entire EGR valve
--replacing my entire EGR valve with a brand new aftermarket Standard Motor Products OEM spec model
--replacing all EGR gaskets
--cleaning my EGR-valve-to-cylinder-head pipe
--replacing my EGR VSV, replacing my EGR Temp Sensor
--replacing my EGR Vacuum Modulator
--checking and replacing several vacuum hoses
--triple checking the EGR VSV, EGR valve and EGR vacuum modulator for proper pressure holding and release function with a vacuum hand pump with pressure gauge
While a few of those things listed did need to be repaired or cleaned due to individual failures (some resulting *from* the years of carbon buildup) I STILL got a CEL Code 71 "EGR Malfunction" after having done every single one of those things due to this one hard to get to EGR passage on the inside of the "Y" intake plenum still being fully blocked with carbon buildup. Even another used "Y" manifold plenum which was confirmed to have internal flow was still causing the ECU to register insufficient EGR flow due to it also having at least some degree of carbon buildup. Only after replacing the entire manifold with a brand new one from Toyota/Lexus did the CEL 71 finally go away for good.
Since those won't always be available brand new from Toyota I feel this is a necessary thread to help SC300 and even GS300 and Supra MKIV NA owners who may have no option available other than full repair in strict emission locales.
Again, if you do not live in an area where this will be an issue for you then you are home free. For SC300 owners who have no way around it and have to pass smog this is an attempt to help where Toyota/Lexus has not bothered to (other than selling brand new old stock aluminum "Y" plenums).
Last edited by KahnBB6; Oct 31, 2016 at 05:32 AM.
Reason: Grammatical corrections and clarifications
Have you considered tapping the inside of the EGR ports on the intake manifold and just running threaded plugs to seal them? I've done that in the past to clean out EGR passages on a B18.
Originally Posted by KahnBB6
The large nut holding that EGR pipe in place is 32mm. The Toyota/Lexus TSRM states that it requires 47 ft-lbs of torque.
Now how to actually do that: you could just use a big 32mm open ended wrench and guesstimate it. The right way is to use a torque wrench with a 32mm crows foot adapter and re-calculate to account for how a crows foot socket throws off the torque setting slightly from your initial 47 ft-lb adjustment. I have to admit I am not completely familiar with that procedure yet but apparently a crows foot socket will throw off your intended torque setting unless you compensate for the variance it causes.
....
The torque values are slightly different due to the increase in length from the crows feet. Lets say you have a torque wrench that measured 18" from the end to the center of the drive (where the socket should be). Now when you add on a crows foot (lets assume 2" length from center of the drive to center of the crows foot opening) it increases the length of the wrench to 20" (18" torque wrench length + 2" crows foot). The formula is basically:
The torque values are slightly different due to the increase in length from the crows feet. Lets say you have a torque wrench that measured 18" from the end to the center of the drive (where the socket should be). Now when you add on a crows foot (lets assume 2" length from center of the drive to center of the crows foot opening) it increases the length of the wrench to 20" (18" torque wrench length + 2" crows foot). The formula is basically:
In my example it would be Torque setting = (47) / (20/18)
Torque setting = 42.3 ft lbs
You'll have to calculate it for your specific tools, but the concept is fairly simple.
THANK YOU! I'm glad you chimed in Blkexcoupe! I've been meaning to look up the formula but hadn't yet as of last night. Much appreciated.
Originally Posted by Blkexcoupe
Have you considered tapping the inside of the EGR ports on the intake manifold and just running threaded plugs to seal them? I've done that in the past to clean out EGR passages on a B18.
I had not thought of that one. That's a very clever alternative and I'm enthused to hear it worked for you while cleaning out EGR passages on a previous engine. I guess my only concern would be having enough clearance to get a cleaning tool in there (I've used a "Snake Bit EGR Cleaning Tool" at the end of a variable speed electric drill) but a tap is a tap and perhaps not too much room is needed.
Honestly any effective method that works should be tried so long as the access ports can be completely plugged back up again (but made accessible for service again later).
I'd assume Dorman sells generic plugs as well. Probably something with a hex head would do?
THANK YOU! I'm glad you chimed in Blkexcoupe! I've been meaning to look up the formula but hadn't yet as of last night. Much appreciated.
I had not thought of that one. That's a very clever alternative and I'm enthused to hear it worked for you while cleaning out EGR passages on a previous engine. I guess my only concern would be having enough clearance to get a cleaning tool in there (I've used a "Snake Bit EGR Cleaning Tool" at the end of a variable speed electric drill) but a tap is a tap and perhaps not too much room is needed.
Honestly any effective method that works should be tried so long as the access ports can be completely plugged back up again (but made accessible for service again later).
I'd assume Dorman sells generic plugs as well. Probably something with a hex head would do?
I would recommend removing the y pipe from the car, clean everything out, then tap the threads, and install the plug. The initial cleaning will be the toughest, but after that you'd be able to use something like seafoam deep creep and q-tips to clean out minor build up.
Anything with threads that can create a seal will work. I think I used set screws with teflon, so that I could make it sit flush.
This isn't a problem on my car any longer. In my case I had to shell out and buy an a brand new y-pipe from Lexus since at the time I had no effective cleaning solution and due to a junior mechanic damaging the one spare y-pipe Gerrb sent me that actually had some EGR passage flow. I was against a deadline to get a passing smog result so that my registration wouldn't lapse. Spending $150 on a manifold when under that pressure was painful but worth it. I just barely made it in time.
The reason I made this thread is because when I asked how many new y-pipes were left in national inventory it wasn't many. Therefore I feel 2JZ-GE owners deserve a fix. No one should have to struggle so much under a smog test deadline trying to figure out if they've properly cleaned these things up.
I have the damaged y-pipe (only at the EGR valve mating area) and my engine's original fully clogged y-pipe set aside in a box to practice a cleaning repair on specifically to demonstrate for this thread.
The plan is to get in there with throttle body cleaner, a scraping tool and an EGR cleaning flexible drill bit and get out every bit of gunk that builds up in these things.
Set screws with teflon for your method sounds right. And a matching tap of course. You're right-- cleaning out not only one of these manifolds but the EGR valve and the metal pipe that goes onto the cylinder head is definitely some tedious work requiring patience.
I am going to try one of the Dorman steel plugs listed above on the damaged y-pipe first to see how well it replaces the original. If nothing works I'll move on to the other manifold perhaps with the set screw method.
Either way no one will be using these two spare manifolds so they're perfect to experiment on to find the best solution.
Aight so I stumble on to this little gem of a thread by chance, and it's an awesome coincidence that I did, because while the motor is being worked on in Portland, I'm getting the last of my intake plenum cleaned up for reassembly, the info on two passages covered with freezing plugs is very insightful!, I don't know if this was covered already?, Ide like to point out that the EGR cooler that is in the back of our GE head is very prone to being so clogged that there is simply no way anything could ever get though that little hell hole, my heads' cooler chamber was simply chalk full of carbon from the years of improper use and ****ty low quality regular that the prior owner most likely fed this SC with ill try to find a pic or two of that mess!
Now, I do apologise in advance if this has been covered else where, But!?
What is known about cleaning thoes pesky steel vacuum tubes attached under the y-pipe? has it been talked about?, has anyone ever encountered one of thoes clogged so bad that nothing could be pumped thought one of these? Is there a solution for cleaning these small steel tubes, I've tried hydrochloric acid and even chucked in some acoustic guitar string into a drill and used it like a bore snake after fraying/unraveling the working end!, all with very mediocre results when it came to just one tube of the bunch with a particular 90 degree Bend that I just can't get past.
Any way please chime in if you know what I'm talking about and you got information on how to clean these, I'll be more then happy to answer any questions and post pics of the problem area, thanks in advance,
P.S. I used "OIL Eater" as in the brand cleaner to soak the intake plenum parts including the Y, and it turned out gloriously clean and new looking, it's that good carbon and years of crap just melted away I had very minimal scrubbing to do, just got to do the passageways on the Y
I forgot I made this thread a while back and made a new one recently on the same subject. In the new thread I go through the cleaning procedure for the 92-97 2JZ-GE Y-manifold. Some measurement information is repeated: