
I had to replace the fuel pump gasket on the passenger side on my LS. Here is a step by step with pics. Hope this helps....


Pole Position
Doublebase
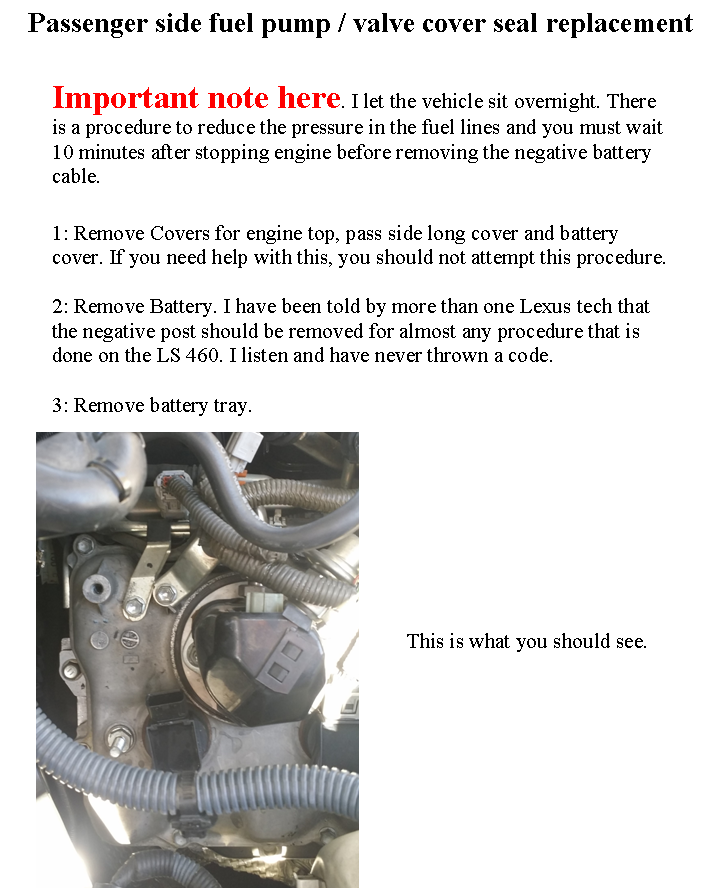
Pole Position
close
Jan 21, 2025
- Join DateOct 2014
- LocationNew Hampshire
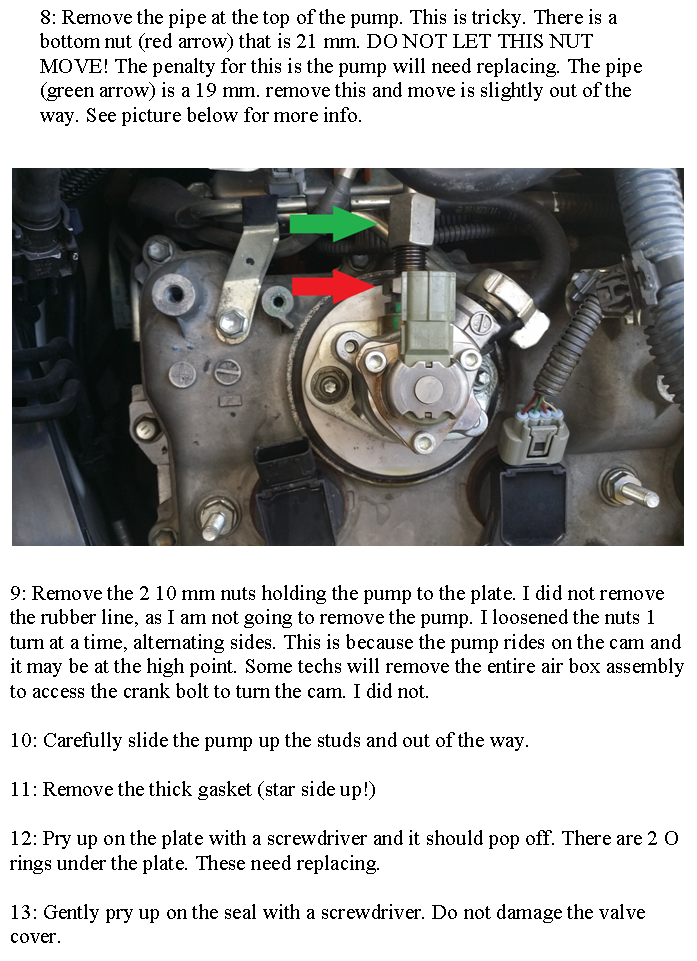
- Posts:2,561
-
iTrader Positive Feedback0
-
iTrader Feedback Score(0)
-
Likes:139
-
Liked:365 Times in 252 Posts
Nice write up! I've watched a video on it and it seems like your version is much quicker. I want to say in the video the guy removed the drivers up top, coolant pipes, many many electrical connectors and maybe the intake. Then again he did both sides. How long did it take you to do the passenger side, roughly? I have almost 150,000 miles on mine and so far they're not leaking but I imagine that day is coming. I'll probably do the valve cover gaskets while I'm in there. Nice work!
Lexus Fanatic
I agree with Double....very valuable contribution and something that may be of use to some in the future!
Lexus Fanatic
Also....what were your symptoms or what caused you to suspect an issue/leak?
I noticed the seal was wet around the bottom. I cleaned it with brake cleaner and it came back. The passenger side took about 1 hour to do. I had the parts.
I replaced the driver side, but didnt take pics. I replied to an existing thread on this forum on replacing the drivers side. There is a video at the top, but i found he does a lot of extra work. I eposted a reply showing what i found. The drivers side took about an hour and 3/4, but i went slowly.
I replaced the driver side, but didnt take pics. I replied to an existing thread on this forum on replacing the drivers side. There is a video at the top, but i found he does a lot of extra work. I eposted a reply showing what i found. The drivers side took about an hour and 3/4, but i went slowly.

4th Gear
Good morning fblonk. Following your instructions, I was able to replace both fuel pump gaskets this past weekend. 3.5 hrs! Lots easier than I anticipated. A HUGE thanks! for the write-up.
Pole Position
Doublebase
Pole Position
close
Jan 21, 2025
- Join DateOct 2014
- LocationNew Hampshire
- Posts:2,561
-
iTrader Positive Feedback0
-
iTrader Feedback Score(0)
-
Likes:139
-
Liked:365 Times in 252 Posts
This thing should be stickied up top, an amazing write up. If I need to do this repair you just saved me five hours.

Driver School Candidate
Thinking about doing this on my Ls, in step 5 which clips do you mean. Also in step 8 do how did u keep the nut still? Just hold a wrench on it ?


^^ its an insulator around the fuel pump(black cover). And step 8 just use 2 open box wrench and make sure you dont turn the 21mm wrench.
Also to note on the driver side when recoonecting the fuel line make sure you connect the lines back to how they where and not reversed.if you do you�ll immediately know by the car hesitation to start and any throttle response will shut the car off. I know, just did this about 20 mins ago
Also to note on the driver side when recoonecting the fuel line make sure you connect the lines back to how they where and not reversed.if you do you�ll immediately know by the car hesitation to start and any throttle response will shut the car off. I know, just did this about 20 mins ago
Driver School Candidate
Quote:
Word, appreciate the feedback... my car is pushing 175 so I got a few issues I�m going to tackle including this.Originally Posted by Mekoz
^^ its an insulator around the fuel pump(black cover). And step 8 just use 2 open box wrench and make sure you dont turn the 21mm wrench.
Also to note on the driver side when recoonecting the fuel line make sure you connect the lines back to how they where and not reversed.if you do you�ll immediately know by the car hesitation to start and any throttle response will shut the car off. I know, just did this about 20 mins ago
Also to note on the driver side when recoonecting the fuel line make sure you connect the lines back to how they where and not reversed.if you do you�ll immediately know by the car hesitation to start and any throttle response will shut the car off. I know, just did this about 20 mins ago
Now I need to find a black driver seat, my lumbar and heated seat(bottom) stopped working


Awesome write up. Noticed a leak under my car a few days ago and got under the car and spent 30 min looking for the source. After wrecking my brain, decided on checking up top and noticed a leak from there. But still took another 20min online searching what the part was. Never thought it to be yet another "fuel pump". I'll be doing this very soon. Thanks.

Driver School Candidate
I will probably need to do this as well. To be clear, you did the steps to reduce pressure in the fuel lines (you mention it at the start) and just didn't list them? Specifically this is removing the circuit opening relay from the front passenger side fuse box under the hood and starting the engine and letting it die from running out of fuel, demonstrated in this video (4:30-6:00)-
His directions in the video discuss removing the rear seat and disconnecting the (in fuel tank) fuel pump electrical connector and opening the tank lid but I don't think he does that, he even says "it is not what we're doing with this engine type" and then proceeds to do the steps I listed above already.
Your steps are definitely much more succinct than the video - I think I'll replace the valve cover gaskets at the same time so I'll probably have to do more of what the video does to get things out of the way.
Hi,
I let the car sit over night and removed the fuel cap. I did not pull any relays or fuses. I just disconnected the battery.
I let the car sit over night and removed the fuel cap. I did not pull any relays or fuses. I just disconnected the battery.
Well, not as soon as I expected but tackled this today from the instructions given above. Right to the point and well explained. Took me about 3 hours to do both sides from start to finish. This included removing the relay, letting the car idle until it turned off and removing the battery. Not as bad as I thought.Thank you
Driver School Candidate
Quote:
Hello, did you replace the o rings too? If so where did you find them. Did you run into any issues in that 3 hour span lbvs?Originally Posted by 305Busa
Well, not as soon as I expected but tackled this today from the instructions given above. Right to the point and well explained. Took me about 3 hours to do both sides from start to finish. This included removing the relay, letting the car idle until it turned off and removing the battery. Not as bad as I thought.Thank you