


Glove Box Adjustment DIY
Thread Starter
Lexus Champion
Joined: May 2010
Posts: 1,817
Likes: 89
From: Orlando STRONG!!
sick of lookin at my droopy glovebox door i decided to disassemble it an see what was going on back there... if the dealer can "adjust it" so can i...
here goes.. u'll need a 10mm socket,phillips head screw driver, plastic panel remover(or plastic pry), a clamp (or vise grip) black sharpie,wire cutters and a screw gun w a drill bit..
If your not comfortable w/detailed parts DONT TRY THIS..
1st: remove the passenger side console trim panel(reach under an gently pull towards passenger door) as well as the under dash panel(use finger to unlock clips). then gently pry the corner trim next too knee airbag system... with the glovebox door open pop off the passenger side dash trim panel an wood grain trim.. (use plastic pry gently start from end of dash an work towards the center) pulling out as u go..
Thread Starter
Lexus Champion
Joined: May 2010
Posts: 1,817
Likes: 89
From: Orlando STRONG!!
then remove the three 10mm bolts(2 are next to the console behind the corner trim u removed 1 upper 1 lower) 3rd is on other side of dash) holding the knee airbag in place (DO NOT UNPLUG AIRBAG!!!!!!!!!!) gently lay it on the floor an work around it.... once the bolts are out remove the 2 bottom screws to glovebox as well as 3 top screws..glove box comes straight out.. it has 2 or 3 plug in back unplug them..
Thread Starter
Lexus Champion
Joined: May 2010
Posts: 1,817
Likes: 89
From: Orlando STRONG!!
once the glovebox is out turn the center side out an you see 2 screws..loosen the 2 screws..then holding the glovebox door closed as tightly as possible move the arm top as close to the release tab as possible..(release tab is white and angular at its tip) re-tighten the screws.. (drivers side is done unless ur **** like i am) i took off the arm and opened the 2 guide post holes.. popped out the top metal guide ring cut the end off for a lil more travel) then put it all back together..
pass side is a lil more diff.. pull the tension cable out an unhook it.. open glovebox door, pop off cover panel to guide screws.. loosen the screws then while holding the top of the arm all the way to open position (1 hand) at the same time press the glovebox lid closed as much as possible (i used my knee..lol) then tighten the screws back up.. (with other hand..lol yoga finally paying off)
pass side is a lil more diff.. pull the tension cable out an unhook it.. open glovebox door, pop off cover panel to guide screws.. loosen the screws then while holding the top of the arm all the way to open position (1 hand) at the same time press the glovebox lid closed as much as possible (i used my knee..lol) then tighten the screws back up.. (with other hand..lol yoga finally paying off)
Thread Starter
Lexus Champion
Joined: May 2010
Posts: 1,817
Likes: 89
From: Orlando STRONG!!
lastly i removed the cable tension device.. only 2 screws.. in the rest position take a sharpie an mark the closest spot to the opening.. then pull the cable out as far as possible.. an clamp it.. tie a knot or 2(1 behind the other not on top of one another) behind the gold oem clamp ring.. but before the black sharpie line.. unclamp cable an reinstall to glovebox housing an reconnect to the tab it came from..
then with 2 or 3 screws (at least 1 bottom) reinstall glovebox an wood trim (to test fit) if its too ur liking put it all together.. if not keep playing til u get it as close a u can..
hope this helps.. Good Luck...
then with 2 or 3 screws (at least 1 bottom) reinstall glovebox an wood trim (to test fit) if its too ur liking put it all together.. if not keep playing til u get it as close a u can..
hope this helps.. Good Luck...

Pole Position
Joined: Apr 2007
Posts: 266
Likes: 5
From: CA
Wow,  . Awesome job, that's a lot of work to tighten up the glove box lid. I had the glove box replaced at the dealer when it was still under warranty.
One thing that still bothers me with my glove box lid is the character line going across still does not match up. I noticed this poor alignment on many 07-09 LS swb's. Not so much on the leather dash lwb. I personally think it's just poor fit and finish. I noticed on yours, even after the realignment, still has the misalignment, just like mine. Why can't Lexus just use a simple latch like on my 4Runner, it clicks on solid and no misalignment. Lexus may have gotten overly clever and failed due to complexity. I say "KISS" Lexus.
. Awesome job, that's a lot of work to tighten up the glove box lid. I had the glove box replaced at the dealer when it was still under warranty. One thing that still bothers me with my glove box lid is the character line going across still does not match up. I noticed this poor alignment on many 07-09 LS swb's. Not so much on the leather dash lwb. I personally think it's just poor fit and finish. I noticed on yours, even after the realignment, still has the misalignment, just like mine. Why can't Lexus just use a simple latch like on my 4Runner, it clicks on solid and no misalignment. Lexus may have gotten overly clever and failed due to complexity. I say "KISS" Lexus.
Last edited by bsl888; Apr 29, 2012 at 01:04 PM.
Trending Topics
ClubLexus Stories
Celebrating Lexus & Toyota from Around the Globe

Lexus NX 350h: A Fuel-Sipping Secret Hot Hatch???
Michael S. Palmer
5 Best & 5 Worst Lexus Daily Drivers
Joe Kucinski
Top 5 Hottest Lexus & Toyotas in 2026 (Hardest To Buy)
Brett Foote
2026 Lexus IS 350 F Sport Review: The Last of Its Kind Still Rocks
Michael S. Palmer
Top 10 Most Confusing Things Lexus Has Ever Done!
Joe Kucinski
2026 Lexus ES Review: Lexus Re-Embraces Founding Principles
Michael S. Palmer
10 Lexus Bargains That are Cheaper Than a New Toyota RAV4
Joe Kucinski
8 Weirdest Things Lexus Has Ever Built
Verdad Gallardo
10 Lexus Designs That Have Aged Like Fine Wine
Verdad Gallardo
Thread Starter
Lexus Champion
Joined: May 2010
Posts: 1,817
Likes: 89
From: Orlando STRONG!!
Wow, . Awesome job, that's a lot of work to tighten up the glove box lid. I had the glove box replaced at the dealer when it was still under warranty.
One thing that still bothers me with my glove box lid is the character line going across still does not match up. I noticed this poor alignment on many 07-09 LS swb's. Not so much on the leather dash lwb. I personally think it's just poor fit and finish. I noticed on yours, even after the realignment, still has the misalignment, just like mine. Why can't Lexus just use a simple latch like on my 4Runner, it clicks on solid and no misalignment. Lexus my have gotten overly clever and failed due to complexity. I say "KISS" Lexus.
. Awesome job, that's a lot of work to tighten up the glove box lid. I had the glove box replaced at the dealer when it was still under warranty. One thing that still bothers me with my glove box lid is the character line going across still does not match up. I noticed this poor alignment on many 07-09 LS swb's. Not so much on the leather dash lwb. I personally think it's just poor fit and finish. I noticed on yours, even after the realignment, still has the misalignment, just like mine. Why can't Lexus just use a simple latch like on my 4Runner, it clicks on solid and no misalignment. Lexus my have gotten overly clever and failed due to complexity. I say "KISS" Lexus.

Rookie
Joined: Sep 2011
Posts: 80
Likes: 0
From: Virginia
My glove box rattles on road bumps, complained to the dealer, he said only way to fix it is replacing the glovebox. The glove box TSIB was completed couple of years ago already. It is now not covered under the extended warranty, even though I have only 45K miles on the car since I am out more than 4 years, my regular warranty exipred.
I called Lexus corporate and complained they asked me to back to the dealership the following week and replaced it free to charge.
I called Lexus corporate and complained they asked me to back to the dealership the following week and replaced it free to charge.


Thread Starter
Lexus Champion
Joined: May 2010
Posts: 1,817
Likes: 89
From: Orlando STRONG!!
yeah but it really shouldnt need to be adjusted... i've never had any issues with a simple piano hinge and a latch
on my other cars(an they opened a bit wider too)...lol.. i guess this is the new high tech everything is smaller an not quite as good as the original...
on my other cars(an they opened a bit wider too)...lol.. i guess this is the new high tech everything is smaller an not quite as good as the original...
Lexus Test Driver
Joined: Mar 2014
Posts: 1,365
Likes: 32
From: Massachusetts
I know I'm reviving an old thread, but I have reasons lol. I followed this thread in order to repair my glovebox as I wasn't paying a grand for a new one. Followed it exactly with a few added details,
When removing the panel from the side of the center console, you have clips that pull straight towards the drivers door, but also there are clips on the back of the piece towards the rear of the car that have to go forward towards the engine.
When I removed my glovebox, I had 2 wire connections on it. I had to remove both in order to get the glovebox free. They are clipped to the glovebox, and can be easily removed by prying on one side similar to the electrical connectors.
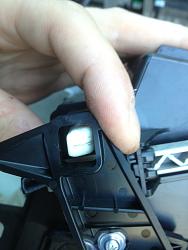
Once I got the glovebox removed, I tried to figure out what the issue was. Here is a picture showing the issue. When closed, by glovebox had this much gap. The black plastic piece should have been flush with the back of the white piece. By loosening the screws and moving the black piece, it takes up that gap and tightens the glovebox.
On the passenger side of the glovebox, I did it slightly different. I removed the screws from the metal bracket, and two from inside the plastic on the outside portion of the glovebox. This allowed me to take that entire piece off to get at the black bracket where the two screws are that need to be loosened. Does the same thing, I just found it easier.
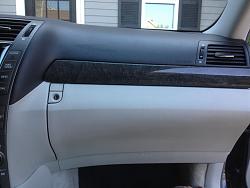
Once I put it all back together I was greeted with this. Looks great, and is nice and tight. The lines are close to being perfect, but I was happy. I did't want to push my luck loosening the screws too many times. It is a million times better than it was and it was free. Total time was about 45 minutes, and that was going slow. It looks like a big pain, but once you get going its fast.
When removing the panel from the side of the center console, you have clips that pull straight towards the drivers door, but also there are clips on the back of the piece towards the rear of the car that have to go forward towards the engine.
When I removed my glovebox, I had 2 wire connections on it. I had to remove both in order to get the glovebox free. They are clipped to the glovebox, and can be easily removed by prying on one side similar to the electrical connectors.
Once I got the glovebox removed, I tried to figure out what the issue was. Here is a picture showing the issue. When closed, by glovebox had this much gap. The black plastic piece should have been flush with the back of the white piece. By loosening the screws and moving the black piece, it takes up that gap and tightens the glovebox.

On the passenger side of the glovebox, I did it slightly different. I removed the screws from the metal bracket, and two from inside the plastic on the outside portion of the glovebox. This allowed me to take that entire piece off to get at the black bracket where the two screws are that need to be loosened. Does the same thing, I just found it easier.
Once I put it all back together I was greeted with this. Looks great, and is nice and tight. The lines are close to being perfect, but I was happy. I did't want to push my luck loosening the screws too many times. It is a million times better than it was and it was free. Total time was about 45 minutes, and that was going slow. It looks like a big pain, but once you get going its fast.

Last edited by greg3852; Jun 3, 2014 at 08:09 AM.

