When you click on links to various merchants on this site and make a purchase, this can result in this site earning a commission. Affiliate programs and affiliations include, but are not limited to, the eBay Partner Network.
I just received the above bushings today and don't want to get the vehicle up on stands and start a job I can't finish. The instructions included only say to remove the original bushings with a mallet and large punch. I've got a mallet not a punch though. Has anyone tackled this job themselves or knows of a DIY walkthrough. Haven't been able to find one is the SC430 close enough?
I installed them. It was a very easy DIY. However, be careful at removing REAR steering rack bushings (there are two of them in each hole) - they may get stuck on their way out. I suggest lifting the rack with scissor jack in order to get the job done.If they still dont come out even if you are using tools, try to apply some grease.
I installed them. It was aAS very easy DIY. However, be careful at removing REAR steering rack bushings (there are two of them in each hole) - they may get stuck on their way out. I suggest lifting the rack with scissor jack in order to get the job done.If they still dont come out even if you are using tools, try to apply some grease.
Thanks for the info. Did you use anything to help force them out?
Thanks for the info. Did you use anything to help force them out?
No problem. Here is more info for you to consider when doing this diy:
1) Use adjustable wrench or pry bar to remove the two rear bushings.
2) Use screwdriver to push the rear bushings from other side once you remove the front ones.
3) Be ready to move steering rack in different directions to free up the required space.
4) Use tons of chassis grease for lubricating non-rubber bushings to prevent squeaking.
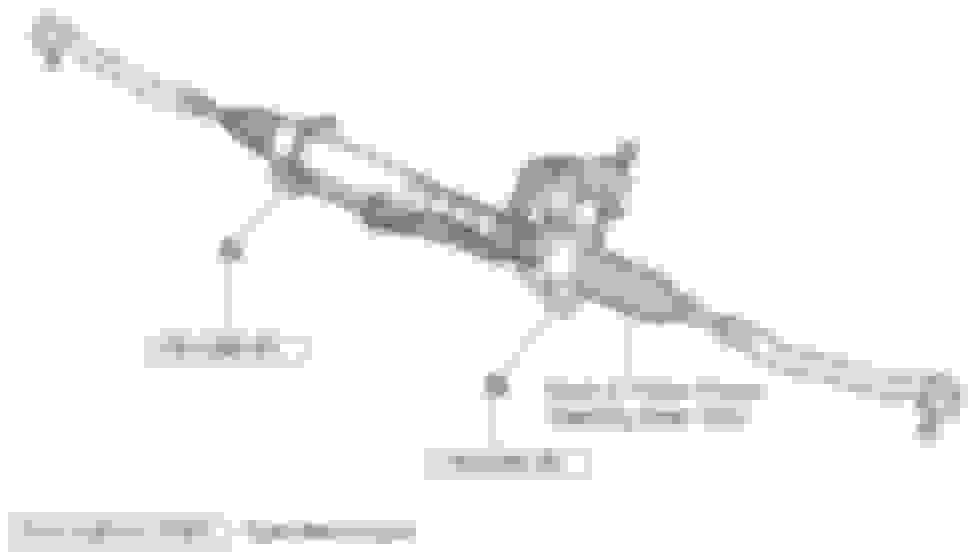
You can use the "Find" feature on Acrobat to search for the keywords "PS gear assembly". They should be torqued to 87 ft.lbf.
Thanks going off that list the stud bolt was only 25ft lbs. I'm having an issue where on the driver side once I torque the nut over the stud bolt there aren't any threads showing through the nut like on the passenger side. I just backed off the stud bolt a few turns because I was worried about the nut coming loose. Might look into finding a longer stud bolt.
Got it all wrapped up and finished. It actually wasn�t difficult to do once I removed the studs to drop the rack and pinion. I used a pair of channel locks to removed the old bushings front and rear. To press the new ones in with the center bolt tube, I first pushed them as much as I could by hand, the rear axle nes I used a rubber soft mallet to tap the mount boss for the bushing to knock the rear further in, the inserted the metal bolt tube, the slid the front bushings over that and used the soft mallet again. Once they were in a bit, I threaded the studs back in, put the washer in place over the top bushing and used the nut to work as a press while tightening the studs down until both bushings were fully seated. Removed the top nut and fully seated the stud, then installed the top nut again and torqued to 87 ft. lbs. Now the steering is life responsive with no tracking on the road. Only question is, I need to figure out how to recalibrate the steering.
Got it all wrapped up and finished. It actually wasn�t difficult to do once I removed the studs to drop the rack and pinion. I used a pair of channel locks to removed the old bushings front and rear. To press the new ones in with the center bolt tube, I first pushed them as much as I could by hand, the rear axle nes I used a rubber soft mallet to tap the mount boss for the bushing to knock the rear further in, the inserted the metal bolt tube, the slid the front bushings over that and used the soft mallet again. Once they were in a bit, I threaded the studs back in, put the washer in place over the top bushing and used the nut to work as a press while tightening the studs down until both bushings were fully seated. Removed the top nut and fully seated the stud, then installed the top nut again and torqued to 87 ft. lbs. Now the steering is life responsive with no tracking on the road. Only question is, I need to figure out how to recalibrate the steering.
Any chance you could summarize a DIY step by step?
No problem. Here is more info for you to consider when doing this diy:
1) Use adjustable wrench or pry bar to remove the two rear bushings.
2) Use screwdriver to push the rear bushings from other side once you remove the front ones.
3) Be ready to move steering rack in different directions to free up the required space.
4) Use tons of chassis grease for lubricating non-rubber bushings to prevent squeaking.
Do you have a DIY step by step to help a noob like me