


Frozen Navigation Screen Fix DIY
Hey all,
For those of you that have had the frozen navigation screen issue this is your one-stop shop for all of the information out there on fixing it yourself. Even though there are a ton of us that have hit this issue there doesn't seem to be a thread out there that explains this from start to finish (if there is a mod can move this to the appropriate thread, but I searched for awhile to no avail).
There is a well-known thread out on another forum about what to do once you get the navigation unit out on your table and how to do the electrical stuff, but there isn't much on how to get the thing out to begin with. So I'm combining the way that I got everything out with the information on doing the electrical repair.
First and Foremost:
Stuff You'll Need:
Instructions:
1) Remove the two silver trim pieces to the left and right of the shifter. They are held in by clips and come out by pulling them back toward the rear of the car.
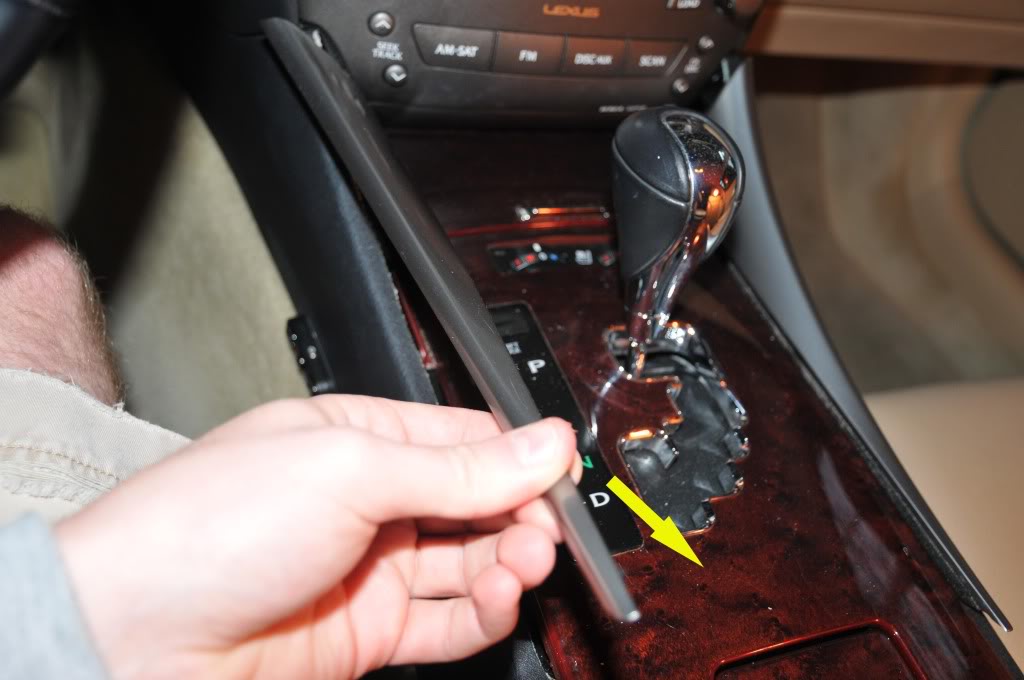
2) Remove the shift **** by turning it counter-clockwise.

3) Push the ashtray door, center console door, and the cup holder door into the "open" position and pry the center console piece up from the front. It is also held in by clips.
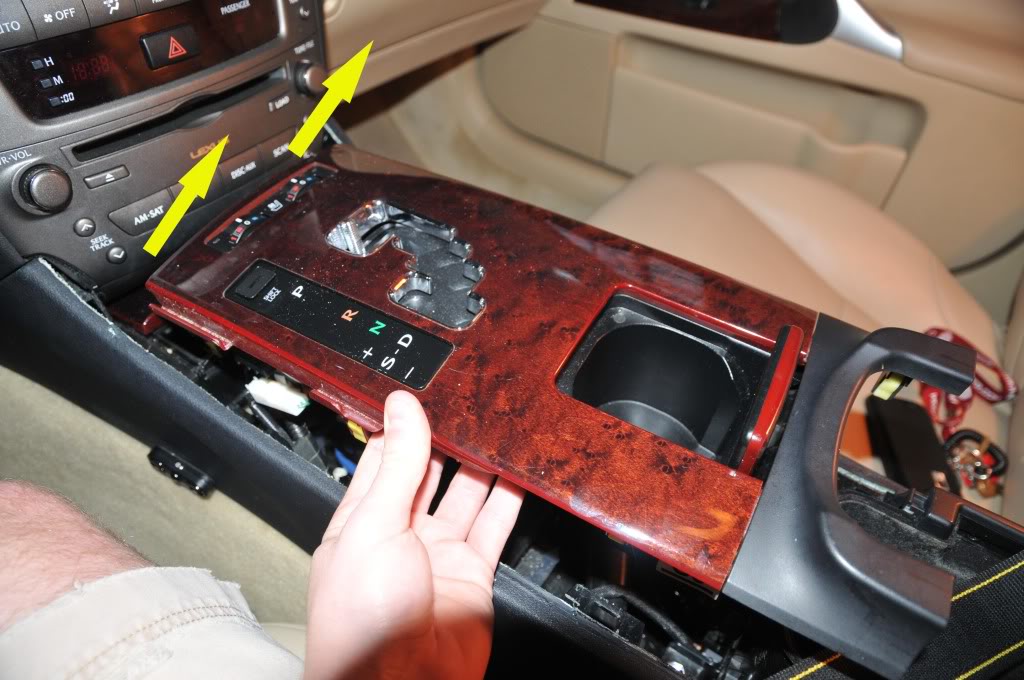
4) If your car is equipped with heated/cooled seats then you will need to unplug two harnesses under the center trim piece.
5) Remove the two screws that are holding the ashtray/cigarette lighter piece then pull the piece out.
6) Unplug the harness under the ashtray piece and set it aside with the other stuff.
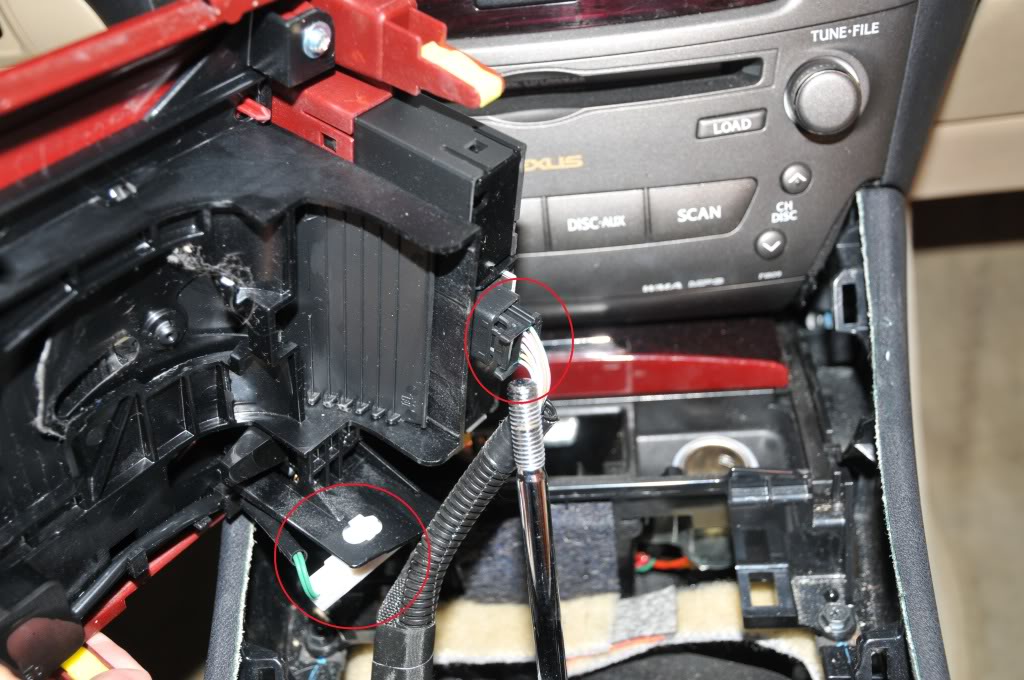
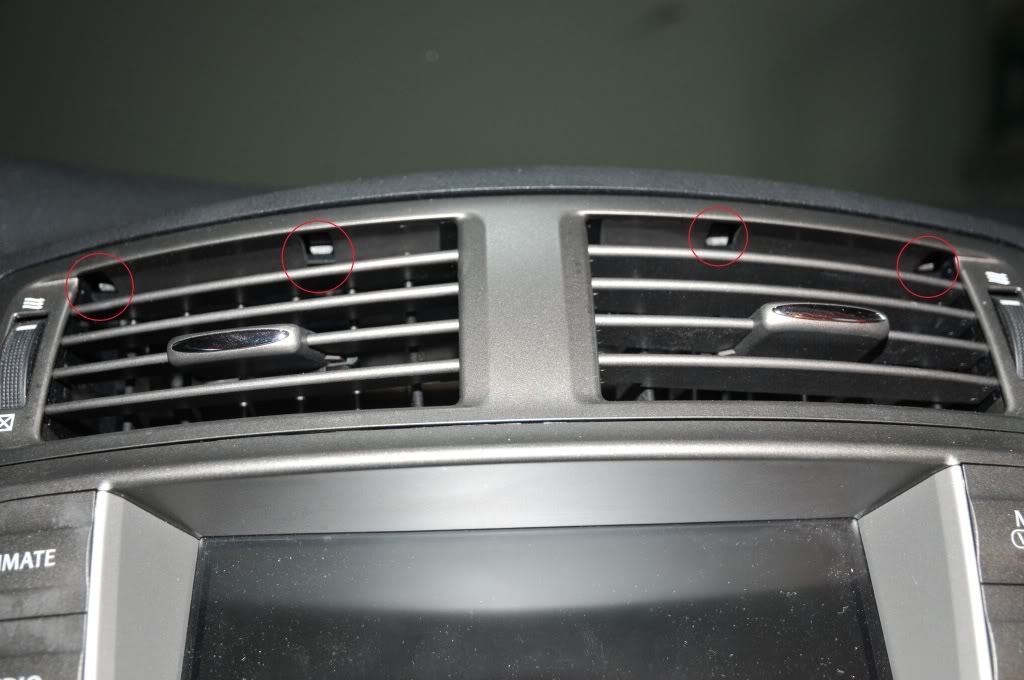
7) There are four clips holding the center air conditioner vents in. They need to be in the "down" position. Be very careful here as these clips will break pretty easily if you apply too much force. I accidentally broke one of them when it was still in the "up" position and it made it very difficult to pull the vents out. A very small piece of my dash was broken off in the process. It will take some wiggling to get the vents out just be patient.
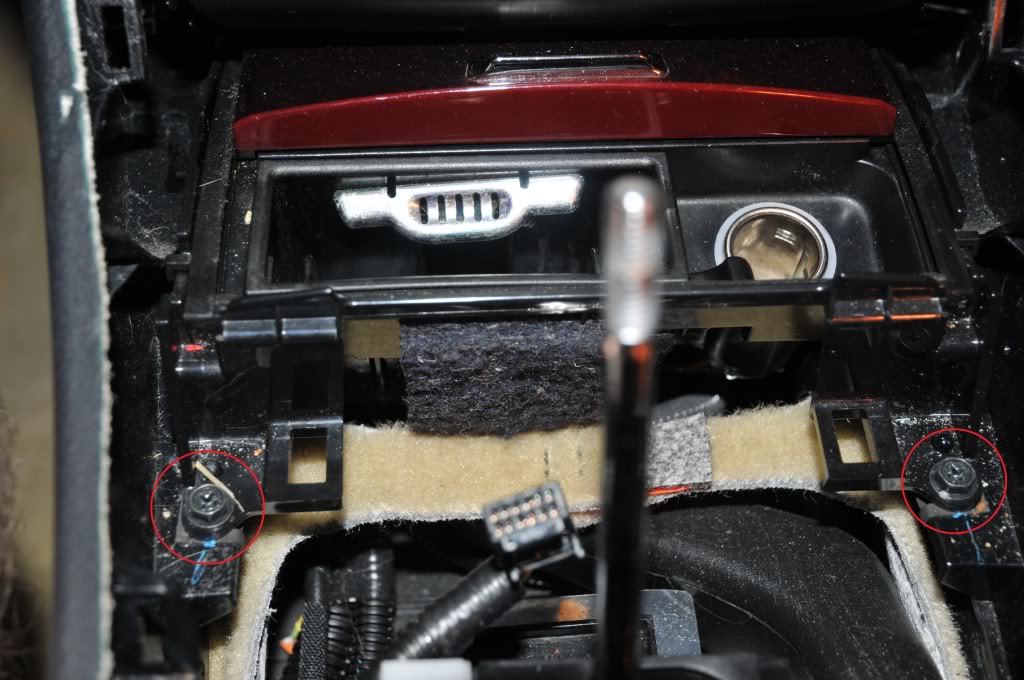
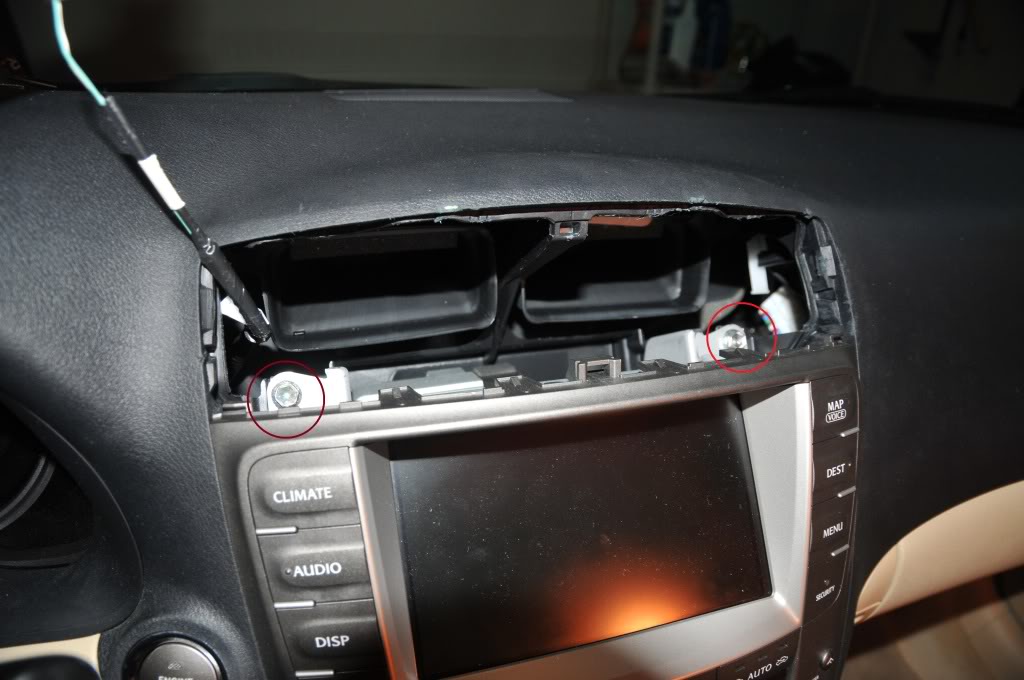
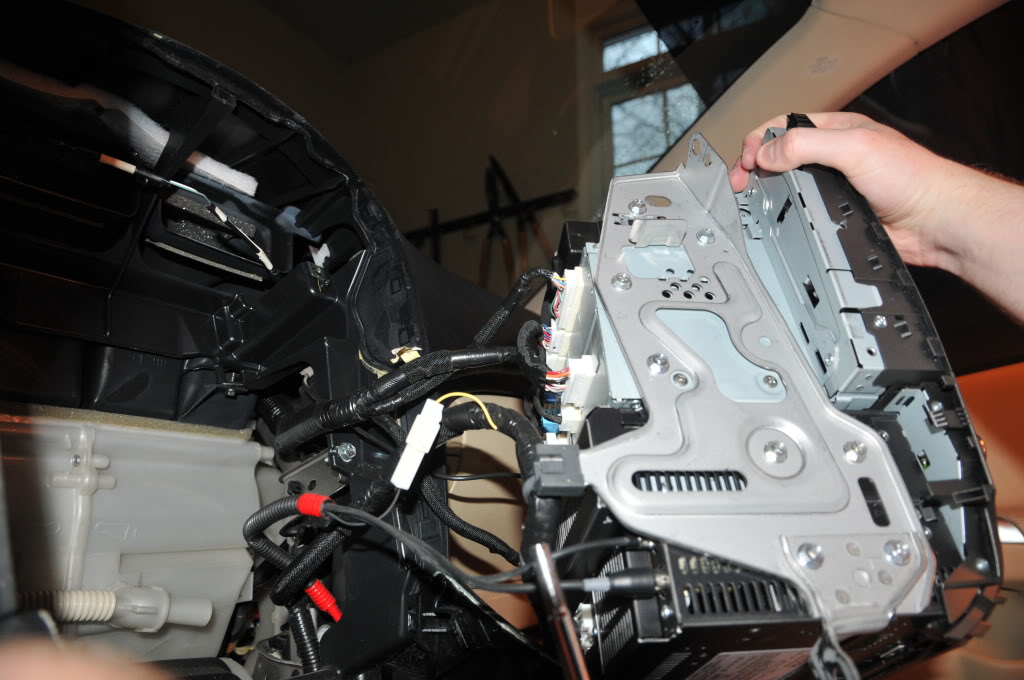
8) There are four 10mm bolts holding the navigation assembly in. There are two 10mm bolts on the top and two on the bottom.
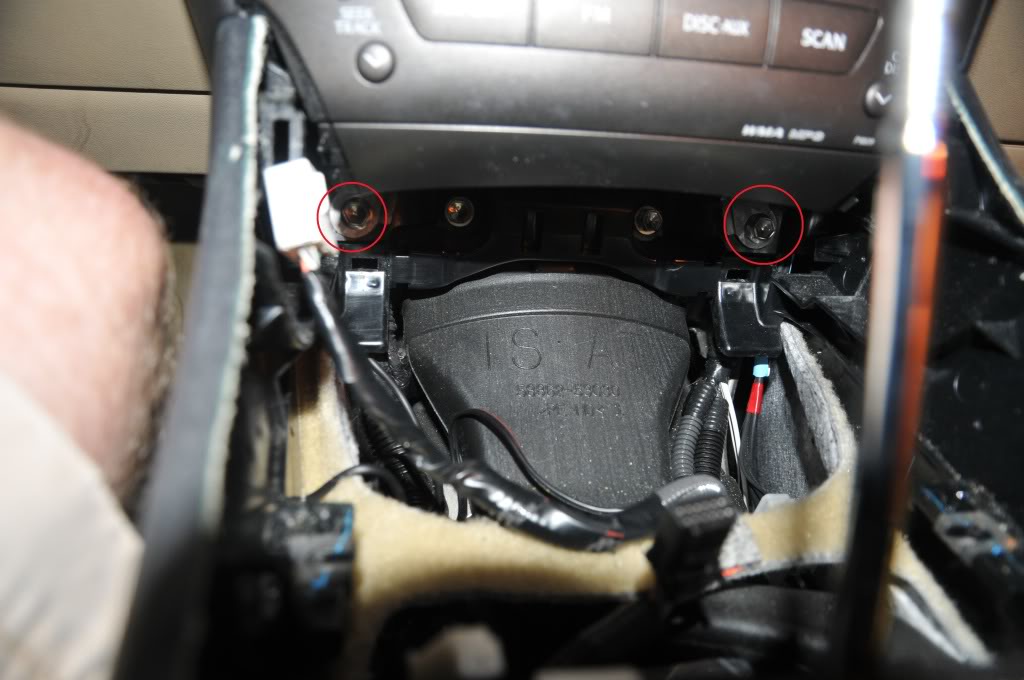
9) Once you pull the assembly out start unplugging everything.
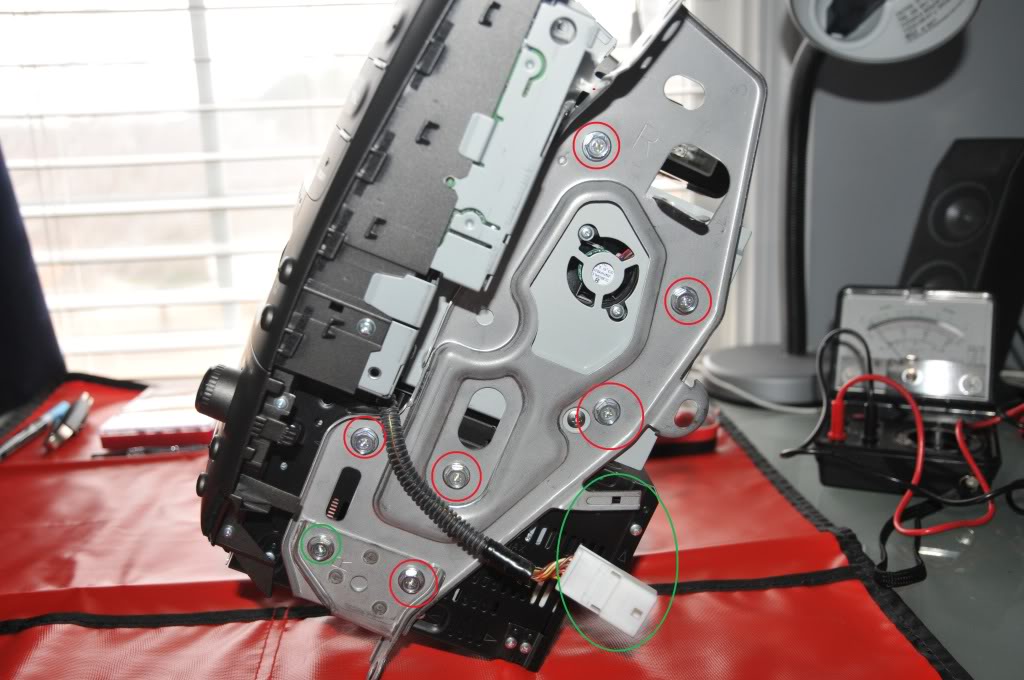
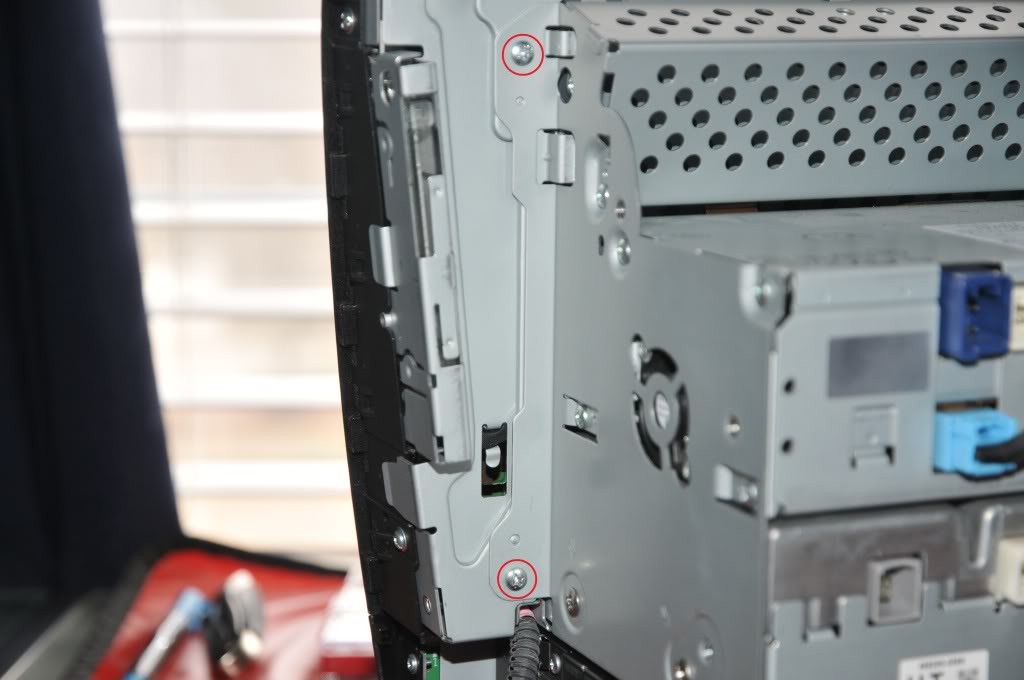
10) When you have the navigation assembly out you will need to remove the two metal brackets that are on both sides of the assembly. They are held in by a bunch of 8mm bolts. They also have Philips heads but they were too tight and began stripping when I used a screwdriver. One side has a wire that is held on the the bracket, you'll need to slide the harness right off.
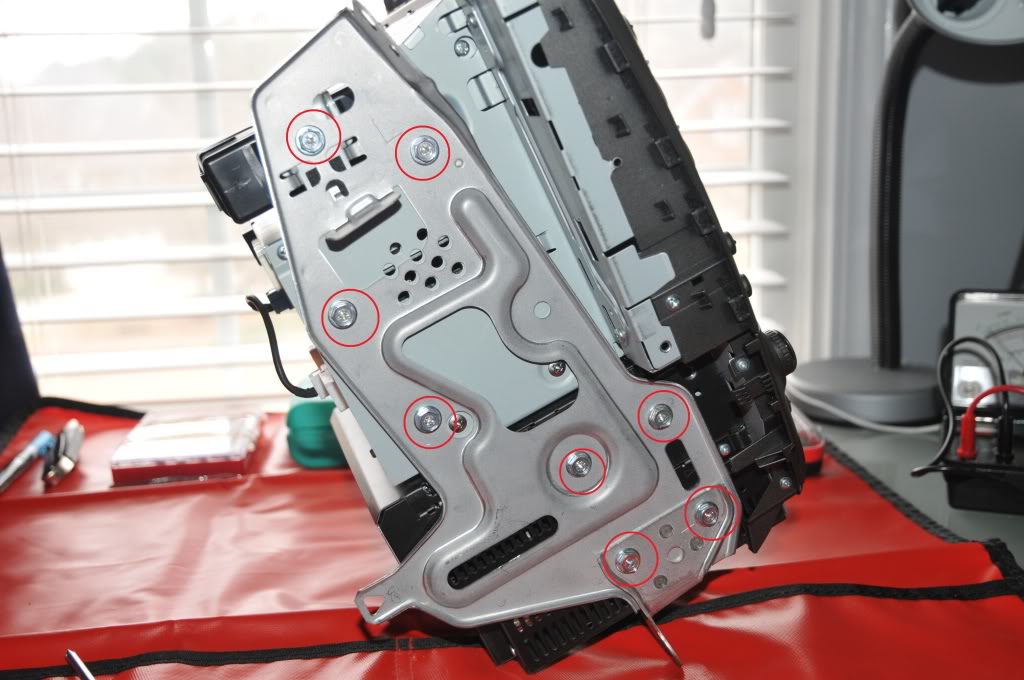
11) Remove the four Philips screws holding the navigation, CD, and radio hardware.
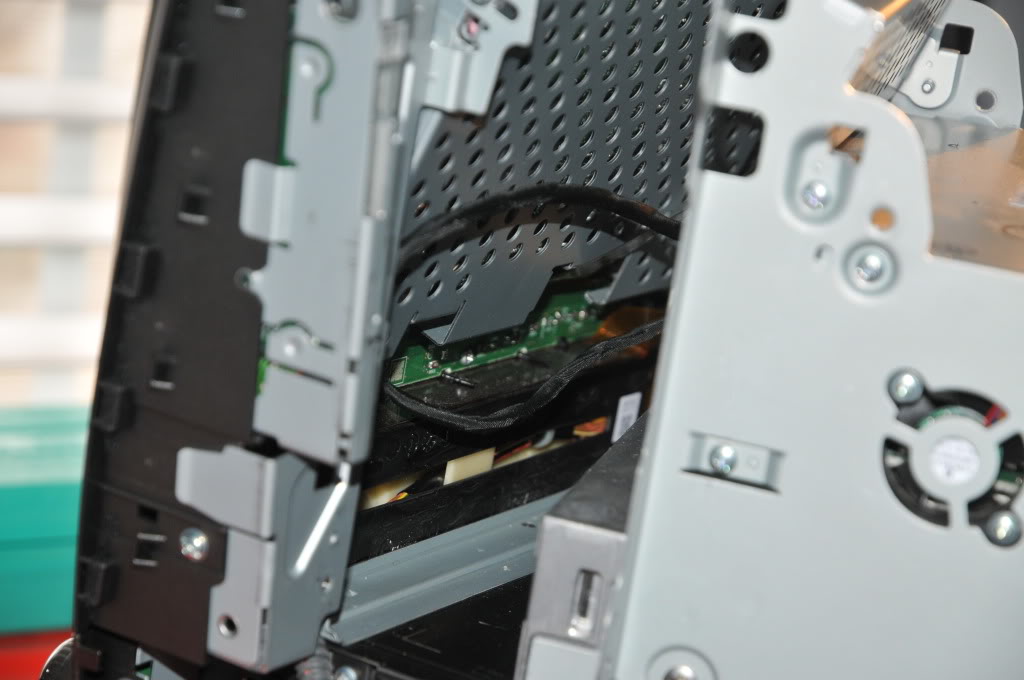
12) As you separate the pieces there are going to be 3 connections that need to be undone. Two are small wire harnesses and the other is a ribbon connector.
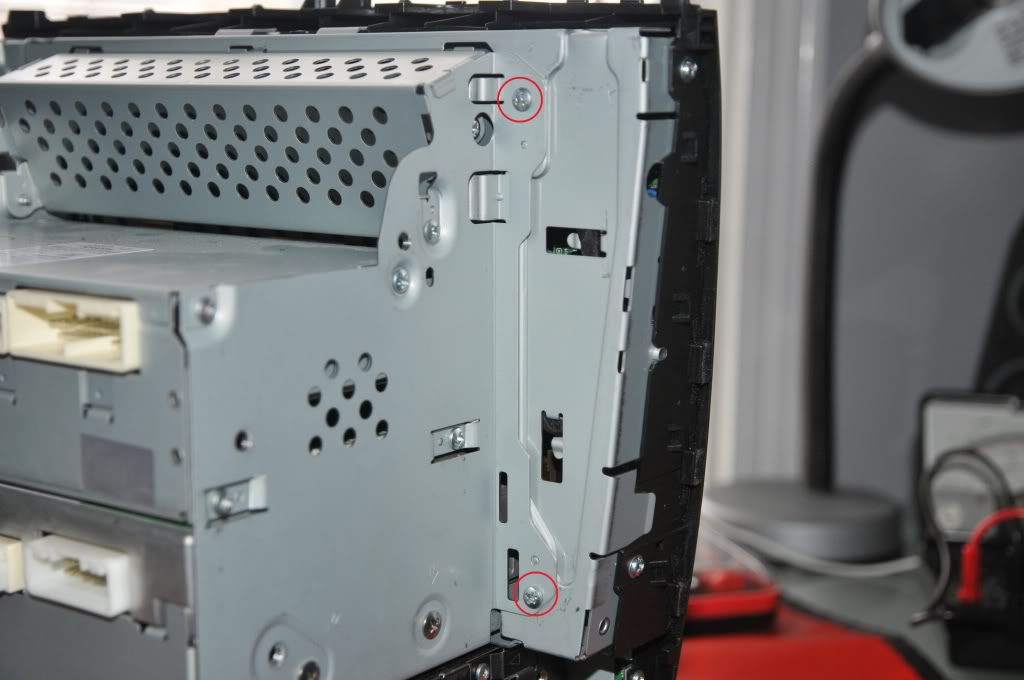
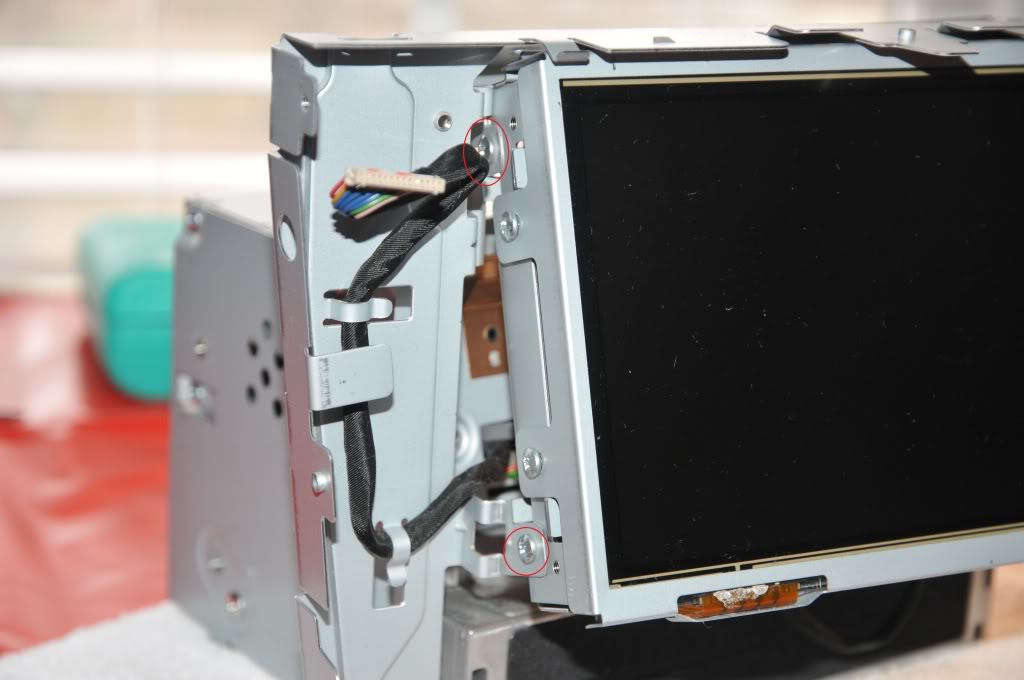
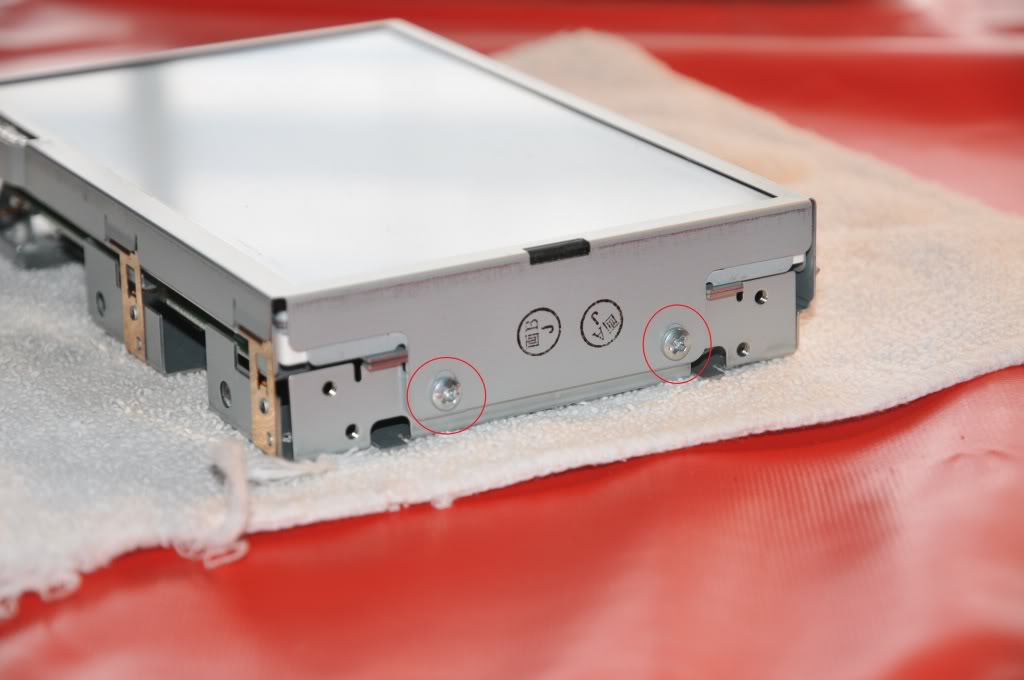
13) Almost done taking stuff apart! The navigation display assembly is held by four more screws.
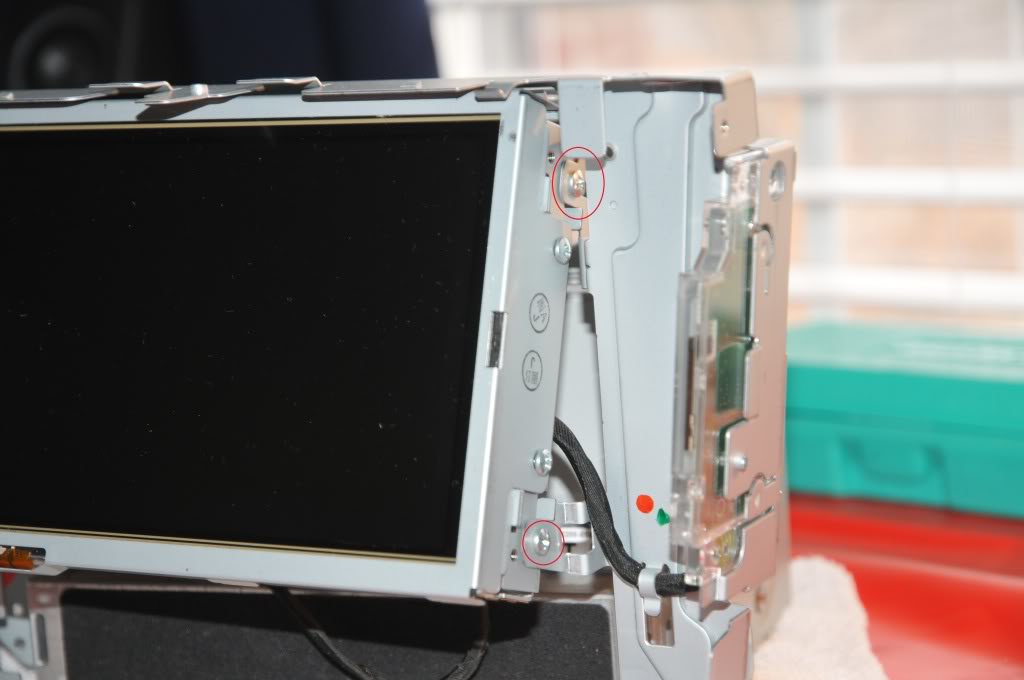
14) Once the display assembly is removed the last thing that you need to do is remove four screws that keep the display assembly together.
Now that everything is apart you can do the electrical part. I don't think that I can write this better than the other guy that did this so I'm just going to quote him.
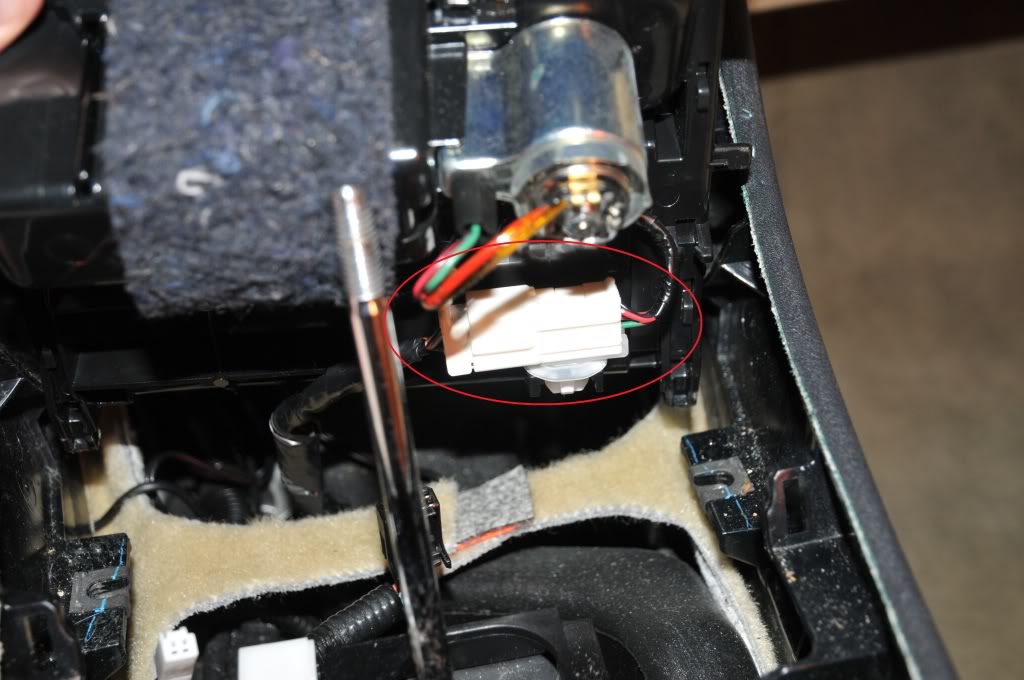
Here are the pics that go along with that.
Once you do all that putting everything together is just the reverse of taking it apart. Good luck!
http://us.lexusownersclub.com/forums...howtopic=69937
For those of you that have had the frozen navigation screen issue this is your one-stop shop for all of the information out there on fixing it yourself. Even though there are a ton of us that have hit this issue there doesn't seem to be a thread out there that explains this from start to finish (if there is a mod can move this to the appropriate thread, but I searched for awhile to no avail).
There is a well-known thread out on another forum about what to do once you get the navigation unit out on your table and how to do the electrical stuff, but there isn't much on how to get the thing out to begin with. So I'm combining the way that I got everything out with the information on doing the electrical repair.
First and Foremost:
- This fix is for the issue of the navigation screen not responding to touch commands.
- If your car is still under warranty stop reading and have the dealership fix this. It is covered under warranty.
- If you are not under warranty the dealership will charge you a lot to fix this. I was quoted almost $2,500.
- Try this at your own risk!
Stuff You'll Need:
- CircuitWriter pen ($19.99 at RadioShack)
- Flathead screwdriver
- Philips head screwdriver
- 10mm socket
- 8mm socket
- Multimeter
Instructions:
1) Remove the two silver trim pieces to the left and right of the shifter. They are held in by clips and come out by pulling them back toward the rear of the car.
2) Remove the shift **** by turning it counter-clockwise.
3) Push the ashtray door, center console door, and the cup holder door into the "open" position and pry the center console piece up from the front. It is also held in by clips.
4) If your car is equipped with heated/cooled seats then you will need to unplug two harnesses under the center trim piece.
5) Remove the two screws that are holding the ashtray/cigarette lighter piece then pull the piece out.
6) Unplug the harness under the ashtray piece and set it aside with the other stuff.
7) There are four clips holding the center air conditioner vents in. They need to be in the "down" position. Be very careful here as these clips will break pretty easily if you apply too much force. I accidentally broke one of them when it was still in the "up" position and it made it very difficult to pull the vents out. A very small piece of my dash was broken off in the process. It will take some wiggling to get the vents out just be patient.
8) There are four 10mm bolts holding the navigation assembly in. There are two 10mm bolts on the top and two on the bottom.
9) Once you pull the assembly out start unplugging everything.
10) When you have the navigation assembly out you will need to remove the two metal brackets that are on both sides of the assembly. They are held in by a bunch of 8mm bolts. They also have Philips heads but they were too tight and began stripping when I used a screwdriver. One side has a wire that is held on the the bracket, you'll need to slide the harness right off.
11) Remove the four Philips screws holding the navigation, CD, and radio hardware.
12) As you separate the pieces there are going to be 3 connections that need to be undone. Two are small wire harnesses and the other is a ribbon connector.
13) Almost done taking stuff apart! The navigation display assembly is held by four more screws.
14) Once the display assembly is removed the last thing that you need to do is remove four screws that keep the display assembly together.
Now that everything is apart you can do the electrical part. I don't think that I can write this better than the other guy that did this so I'm just going to quote him.
Unhook the 4-wire ribbon connector and you're ready to troubleshoot. Labor at this point should be under an hour if things have gone smoothly, but realistically two hours.
Here's where you need a good set of test probes for your multimeter - I found a set that worked perfectly at Radio Shack for about $20 - including lots of cool micro probes, clips, needles, etc. I couldn't have made the repair without these. Also, while there, pick up a silver CircuitWriter pen for about $11. That's what I used to repair the trace.
The resistance between pins 1 and 3, and 2 and 4 should be about 500 and 1700 ohms. The resistance between the other pairs of pins, say 1/2 or 1/4, or 3/4 should be infinite until the panel is touched. When touched the resistance between those should go to something under 2k ohms. From this info you can figure out which connector is faulty. In my case the connector failed right where the two pieces of glass are sandwiched together, and by using the needle probe, I was able to get a good resistance measurement on the touch panel by wedging the needle of the probe up into the crack where the two pieces of glass join. I found a bit of live connector. So then I took a razor blade and scratched off the coating on the ribbon connector, right up to the glass, and applied some of the CircuitWriter ink there. Note that it has to dry before it's conductive. When it does dry, the panel is repaired. Seal that back up, put it together, and everything's done.
When I did this, I actually used a razor blade to completely separate the touch panel from the display, and in so doing sliced part of the ribbon connector. You can't use the CircuitWriter pen to fix that, because it has no strength. So I had to buy a $35 tube of silver conductive epoxy, and was able to repair it. This may have been better all around, but the epoxy isn't runny like the circuit writer ink, and it might have helped get under the glass panel being runny.
When I put the unit all back together (probably about two hours, being cautious, using the right screws, not forgetting any connectors, etc). The unit fired up and worked perfectly. All the warning lights on the dash were gone, and I only needed to reset the radio stations.
Financial disaster averted! I'll post some pictures of this if anyone's interested.
Once you do all that putting everything together is just the reverse of taking it apart. Good luck!
http://us.lexusownersclub.com/forums...howtopic=69937
Trending Topics
ClubLexus Stories
Celebrating Lexus & Toyota from Around the Globe

10 Lexus Bargains That are Cheaper Than a New Toyota RAV4
Joe Kucinski
8 Weirdest Things Lexus Has Ever Built
Verdad Gallardo
10 Lexus Designs That Have Aged Like Fine Wine
Verdad Gallardo
8 Tips for Improving Your Hybrid or Plug-in Hybrid's Efficiency!
Michael S. Palmer
10 Best Lexus Models No One Remembers
Joe Kucinski
TRD Off-Road Premium: Best 2026 4Runner, Except This One Thing
Michael S. Palmer
Top 10 Lexus & Toyotas to Drive Before You Die!
Joe Kucinski
Top 10 Lexus/Toyotas With The LEAST 5-Year Depreciation
Joe Kucinski
Lexus LC500 Convertible Auction: A Preview of Rising Values?
Brett Foote


This is awesome - thank you everyone who contributed to this. Excuse the ignorant question, but could someone please touch further on the actual repair process using the circuit writer pen. I have never used, or seen one so I am not sure what you do with it exactly? Thanks guys,
Jonny
Jonny