When you click on links to various merchants on this site and make a purchase, this can result in this site earning a commission. Affiliate programs and affiliations include, but are not limited to, the eBay Partner Network.
the directions to remove this start at post # 7 since when i posted this i wasnt sure what it was and had already take it apart/out
im just wondering....someone told me to take it out and clean it (which i did and man was it nasty) and it might help with my ac/heat issue but i dunno wtf this is or what it does....it's a little hole above the drivers pedal on the kick panel...below the ignition! kinda square shaped and it seems to pull a vacuum when the air is on
ok this is the sensor
this is where it sits behind on the kick panel
this is the hose it goes into
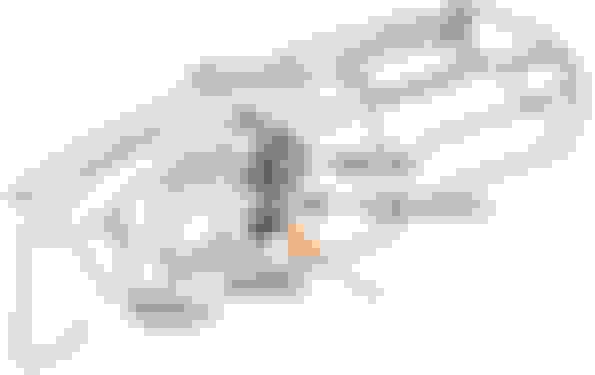
everything you need to remove to get to it
future projects to come (more DIY'S) JUST SOME TEASERS
Brian add some verbage and we can add this to the DIY section. I thinks it will make a great addittion. You already have the pictures just edit in the words as needed.
Brian, that was a great effort for you to do all that for friends here in forum..It will come handy one day if anyone ever needed to figure out what it does and what it is...Great work buddy!!
It's the cabin temp sensor for the "auto" mode. It senses the cabin temp and adjusts accordingly to the set temp when in "auto" mode.
thank u sir!
Originally Posted by nsf0607
Brian add some verbage and we can add this to the DIY section. I thinks it will make a great addittion. You already have the pictures just edit in the words as needed.
Let me know.
How did things work out with the nav stuff?
Thanks
Nigel
im really not sure what difference this thing does i was just told its part of our hvac system and now i know what it is/does but i will clean it up for the sticky nigel. it really wont do much but if ne1 ever wants to change/clean it it will be helpful. OMFG guys i almost bet no1 has cleaned/changed it and man this thing was DIRTY
....oh i got some more coming soon for the sticky pics taken just waiting on my lazy or busy *** to do them and since our servo now blocks photobucket its gonna take me a min
...nav stuff is worked out. but between having to pay the irs this year and the fact that my company started laying off today im on hold with ALL mods....
Brian, that was a great effort for you to do all that for friends here in forum..It will come handy one day if anyone ever needed to figure out what it does and what it is...Great work buddy!!
thanks joel but as i stated unless someones wanting to change/clean it its kinda a lame mod and didnt get the help with my hvac i was hoping to. i guess i give it up and take it BACK to the dealer and see if they can address it
will update it soon
i still love my ALMOST (ones a glock 23 ones a glock 22 both are 40 cal) twins on the passenger seat. jeffTsai has his twins and i have mine
i will post directions/pics on removing panelling etc l8r 2nite
ok i tried to get on last night but it seems the site was having issues as i could access every other website i went to but this one
1st step: start by popping the ignition cover off (i didn't use my key i just forgot to take actual pic) use a butter knife (NOT A FLATHEAD) or if you have one a interior/panel puller (audio shops have/use these)
2nd step: pull ignition cover piece downwards it will just unsnap....its held on by 3 prongs
3rd and 4th step: simple Phillips head screws
5th step: simply unscrew bulb (just twist it and pull it out) then push obd II port out....it has 2 clips on backside
6th step and 7th step:i forget if these are 10mm or 12mm just unscrew these. im pretty sure they are 10mm though
8th step: again i forget if these are 10mm or 12mm just unscrew these 3 bolts. im pretty sure they are 10mm though
9th step: i forget if this is a 10mm or 12mm just unscrew this. im pretty sure they it's a 10mm though
10th step: unhook brake cable from this clasp (sorry crappy pic)
11th step: slide brake cable out of this hole
12th step: pull panel out now and you'll see this still attached
13th step:unplug the plugs with the red arrows.....IT IS NOT NEEDED TO UNPLUG THE ONE NEXT TO THE BLUE ARROW so i just didn't do it
14th step:you'll see this section hanging down on the other side
15th step: unplug this plug and then unscrew sensor
16th step: use a contact cleaner or a electrical parts cleaner to clean this. i used a product called CBC II (circuit board & contact cleaner) we sell at work. (i used q-tips but not sure if this is best thing to use as they can leave fibers) don't spray directly on sensor but up tube and in top of cleaner than swab q-tips in it and clean tube,sensor,housing, etc
It's near the driver's right knee. Small panel with horizontal bars.
Remove the lower under-dash panel from the driver's side and remove the sensor by hand.
Last edited by DundukovEM; Feb 19, 2024 at 03:04 PM.


 pics taken just waiting on my lazy or busy *** to do them and since our servo now blocks photobucket its gonna take me a min
 and the fact that my company started laying off today im on hold with ALL mods....


 oh no the pictures are gone