Lexus IS: How to Replace Fuel Pump
Learn how to repair your Lexus IS 250's faulty fuel pump from the comfort of your driveway.
This article applies to the Lexus IS 250, IS 350 (2005-2014).
The fuel pump is key to keeping your car running, as no fuel means no power. Replacing the fuel pump can be an expensive task after you factor in parts and labor, but if you're mechanically inclined you can do it yourself and save a few hundred dollars. Symptoms of a failing pump can include a buzzing or whining sound coming from the back seat, the car feeling likes it dying out under acceleration, and the car cranking but not starting. With the exception of the sound, these symptoms are pretty similar to a clogged fuel filter. If you have these symptoms only, minus the sound, you should change the filter before the pump as it's much cheaper and easier to do as well.

Materials Needed
- Pliers
- Paper towels
- 8, 10, 12mm sockets
- Putty knife or similar tool
Step 1 - Gain access
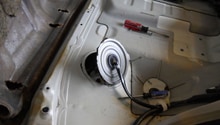
This step will vary based on your car's year, however, we'll cover the two main ways you'll be able to gain access. The third less-used way is to solely work from under the vehicle, but this requires more work and adds an extra 2-3 hours to the job, so we don't recommend it. First, remove the bottom of the back seat. The seat bottoms are held to the body by two metal clips. Feel under the seat until you find the two metal clips where the seat bottom meets the floorboard. Tug on the clips until you hear a pop. From there you'll be able to remove the seat easily. To gain access to the pump, locate the fuel pump access cover on the passenger side; it will look like a slightly rounded triangle shape. Unbolt the three bolts holding it in place and remove the cover.

Figure 1. Rear seat clip locations. 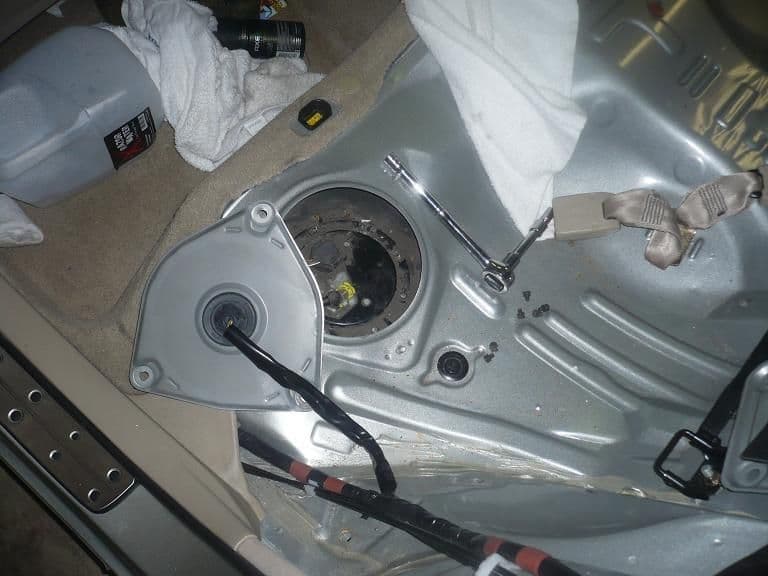
Figure 2. Fuel pump access panel.
Step 2 - Remove the fuel pump
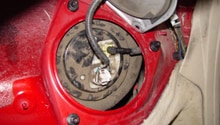
- Around the fuel pump you'll see a ring with bolts on it, usually 8 of them. Remove all of these bolts.
- To remove the first fuel line, you'll need to remove the yellow clip holding it in place. It's easiest to grasp it from the back and slowly twist it back and forth while pulling back and eventually it'll come off. See Figure 3 for it's location.
- You'll want to line the area around the top of the pump and the inside of the car with paper towels. If there is gas still in the lines, they might spill a little bit and the paper towels will help to avoid a mess. Next, pull up on the line from the base that you just removed the clip from and it should pop free.
- The next hose is hidden so you'll need to pull the pump up to see it. It's held on with a band style clamp. To remove it, use pliers to slowly slide it down and off. You could also slide under the vehicle and try to loosen it that way.
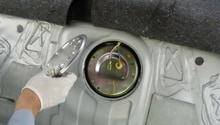
- The last thing in the way is the fuel level indicator. With the hose removed in step 4, you should be able to rotate this around to where it will clear the opening in the car to remove the pump. To rotate it, you'll need to reach your hand down around the fuel pump and partially into the tank. See Figure 4 for its location on the side of the pump.
- With the pump pulled through the opening, you can now easily disconnect the electrical connector on it.
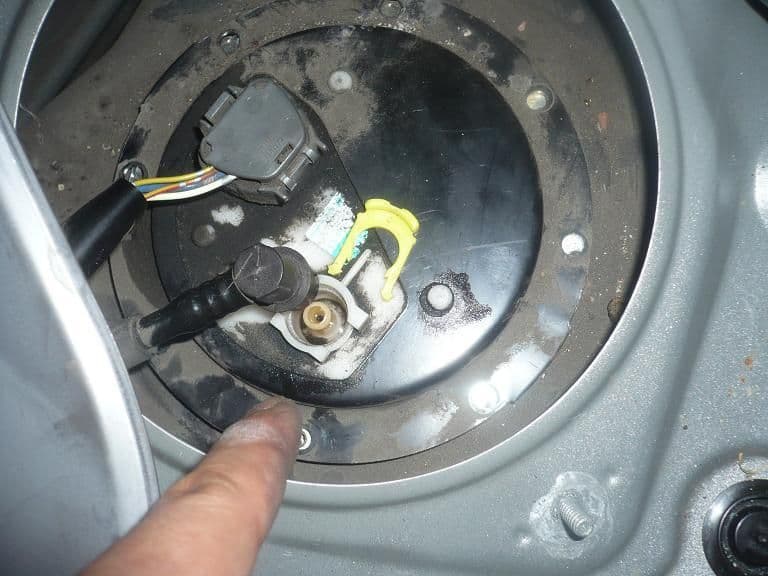
Figure 3. Fuel line and retainer clip removed. 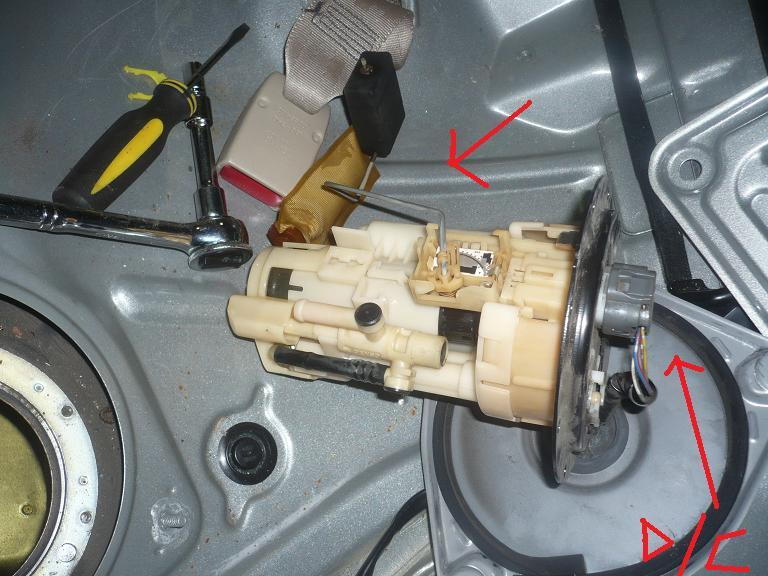
Figure 4. Fuel level indicator and electrical connector location.
Pro Tip
Depending on your situation, it's recommended to run the gas tank as low as possible to prevent any gas spilling inside of your car. However, if the pump is dead, this won't be possible. We recommend lining around the pump with paper towels when removing the lines to help prevent it from spilling everywhere.
Step 3 - Install the new pump
Installing the pump is pretty straightforward: simply go in the reverse of removal. The fuel level indicator will reset itself into the proper location once there is fuel in the tank to put pressure on it. If you have trouble getting the hose back on with the band clamp, or you bent it during removal, just pull it off and purchase a new one. It's better to be safe than end up with a fuel leak. After install be sure to check for any leaks. We recommend running the vehicle before you finish bolting on the cover and re-installing the seat.
Featured Video: How to Tell if Your Fuel Pump is Failing
Related Discussion and Sites
- ISx50 Fuel Pump Upgrade Options - ClubLexus.com
- Lexus IS Repair Costs - Repairpal.com
- Partial Recall - Lexus.com