
PSB/ADUS Caster arm bushing install

Pole Position
Joined: Jan 2012
Posts: 255
Likes: 0
From: Little Saigon, SoCaLi
A time-saving word of advice for those doing this...forget cutting/grinding out the OEM bushing...I used one of these: http://www.harborfreight.com/propane-torch-91033.html Just connected it to my BBQ propane tank. 2 minutes of torching and it turned the OEM rubber into dust leaving the arm and insert clean.
Used a standard vice for pressing in the bushing and sleeve.
The bushings got rid of my alignment issue and the brake shudder when braking from above 50mph. Fig's product is probably better, we'll see how these hold up.
Used a standard vice for pressing in the bushing and sleeve.
The bushings got rid of my alignment issue and the brake shudder when braking from above 50mph. Fig's product is probably better, we'll see how these hold up.

 two minutes
Just for thought. if we cut the rubber off and separate the inner shell and leave the outer shell still attached to the arm. Burn the inner and the outer shell separately. That will exposed both shells to a lesser amount of heat = to less heat treated, reducing the chance of deforming the arm. I think I got to much time on my hands.
Last edited by GS714; Feb 13, 2012 at 10:09 PM. Reason: asking for pics

I didn't take any pics, sorry. The install procedure has been pretty well documented. The arm and insert steel are heavy enough that the torch did not deform at all.
The bushings feel tighter than OEM for sure and fixed my suspension/breaking issues.
The bushings feel tighter than OEM for sure and fixed my suspension/breaking issues.

A time-saving word of advice for those doing this...forget cutting/grinding out the OEM bushing...I used one of these: http://www.harborfreight.com/propane-torch-91033.html Just connected it to my BBQ propane tank. 2 minutes of torching and it turned the OEM rubber into dust leaving the arm and insert clean.
I am assuming these arms are cast iron. I could be wrong. Does the heat deform the arm at all? What is it feel like with the new PolyHoly bushing? how about some picture? $68 for a pair of bushing is decent. Don't know when FIGS gonna release to the market and at what price?. Anyway, I think you came up the best time setting record and cost saving. two minutes
Just for thought. if we cut the rubber off and separate the inner shell and leave the outer shell still attached to the arm. Burn the inner and the outer shell separately. That will exposed both shells to a lesser amount of heat = to less heat treated, reducing the chance of deforming the arm. I think I got to much time on my hands.
two minutesJust for thought. if we cut the rubber off and separate the inner shell and leave the outer shell still attached to the arm. Burn the inner and the outer shell separately. That will exposed both shells to a lesser amount of heat = to less heat treated, reducing the chance of deforming the arm. I think I got to much time on my hands.
BTW 98-2000 guys i have 3 inner sleeves (2 still joined with outer sleeves if anyone wants them to save them some time of cutting off their old ones. (i mean you would need to cut them out of the rubber i have them in but you could do it before your install yours if you wanted.....free just pay shipping)
Pole Position
Joined: Jan 2012
Posts: 255
Likes: 0
From: Little Saigon, SoCaLi
so my oxy-aceteline torch wont reduce it to ash and dust burning on it for about 5 mins but that thing that doesnt get half as hot as my torches, yet in 2 minutes reduced yours to nothing? ok....
that $68 is for each bushing not the pair....
BTW 98-2000 guys i have 3 inner sleeves (2 still joined with outer sleeves if anyone wants them to save them some time of cutting off their old ones. (i mean you would need to cut them out of the rubber i have them in but you could do it before your install yours if you wanted.....free just pay shipping)
http://lexus.sewellparts.com/accesso...2001/4685.html
This is what I bought from Sewell.
Last edited by GS714; Feb 16, 2012 at 07:40 PM. Reason: add more info

Carson maybe selling it at $48 each. That is why I ordered it from Sewell even thought I live in California.
http://lexus.sewellparts.com/accesso...2001/4685.html
This is what I bought from Sewell.
http://lexus.sewellparts.com/accesso...2001/4685.html
This is what I bought from Sewell.
They used to not be like that.... notice sewell has the red line now, that says "One bushing required per control arm. 2 bushings included in set.' yeah it used to not say that and they used to charge that much for each bushing
carson is selling these for $48 each
http://www.l-tunedparts.com/product/?id=3297
when i bought these to install my FIGS trac links i was dumbfounded that the bushings were $48 each for the bushings and actually i think i paid $68 a bushing for them

http://www.l-tunedparts.com/product/?id=3322
BTW if you'll think $70 for those bushings is steep, you probably wont be buying FIGS spherical ones cause i dont know his price on them but i cant see them being under $125-$150 (although i guess its possible we'll have to wait till he releases them and see)

Driver School Candidate
Joined: Nov 2005
Posts: 41
Likes: 0
From: ky
i know i am going to sound like an idiot on this one but, what are they meaning by outer shell? are they talking about the outer shell with the rubber bushing inside and then inner sleeve. just want to clear that up for idiots like me that is new to the lex scene. because i am planning on buying me some new bushings and need to know exactly word for word and pic by pic to get an absolute understanding on the process of uninstall and install procedures. because all i see in the pixs here is bushings, bushings pressed in and the oem inner sleeve in the new bushings. just a little confused. enlighten me if you can thanks.
i know i am going to sound like an idiot on this one but, what are they meaning by outer shell? are they talking about the outer shell with the rubber bushing inside and then inner sleeve. just want to clear that up for idiots like me that is new to the lex scene. because i am planning on buying me some new bushings and need to know exactly word for word and pic by pic to get an absolute understanding on the process of uninstall and install procedures. because all i see in the pixs here is bushings, bushings pressed in and the oem inner sleeve in the new bushings. just a little confused. enlighten me if you can thanks.

https://www.clublexus.com/forums/sus...s-of-pics.html
The ONLY difference between the above diy is if you're getting the bushings from Sewell you dont hammer out this lip:

With the bushing from Sewell you need that lip. Best way to get that rubber out and save the outer sleeve is to press out the rubber with a bushing press (or cut it out) the press will tear the rubber and push it out. Then use a wire brush attachment or dremel tool to shave all the rubber away. I suggest finding a wire brush attachment, with a dremel tool you can mark the hell out of the sleeve on the inside (not sure if that matters) I just did all this last week, boy was it fun.
")
Too bad you arent closer, i could have helped
dont know how much more information can be given than this DIY and the link in the first post to another DIY and the sticky on top of the suspension page
https://www.clublexus.com/forums/sus...s-of-pics.html
The ONLY difference between the above diy is if you're getting the bushings from Sewell you dont hammer out this lip:
With the bushing from Sewell you need that lip. Best way to get that rubber out and save the outer sleeve is to press out the rubber with a bushing press (or cut it out) the press will tear the rubber and push it out. Then use a wire brush attachment or dremel tool to shave all the rubber away. I suggest finding a wire brush attachment, with a dremel tool you can mark the hell out of the sleeve on the inside (not sure if that matters) I just did all this last week, boy was it fun.
Too bad you arent closer, i could have helped
Did u get the bushings from Sewell? Was the new version have the built-in inner sleeve? Was gettin the old bushings out harder than putting the new ones in? Wat method did u use to press the new bushings in? Thanks in advance for any input from u.
Instructor


Joined: Nov 2011
Posts: 1,224
Likes: 57
From: CA
A time-saving word of advice for those doing this...forget cutting/grinding out the OEM bushing...I used one of these: http://www.harborfreight.com/propane-torch-91033.html Just connected it to my BBQ propane tank. 2 minutes of torching and it turned the OEM rubber into dust leaving the arm and insert clean.
Used a standard vice for pressing in the bushing and sleeve.
The bushings got rid of my alignment issue and the brake shudder when braking from above 50mph. Fig's product is probably better, we'll see how these hold up.
Used a standard vice for pressing in the bushing and sleeve.
The bushings got rid of my alignment issue and the brake shudder when braking from above 50mph. Fig's product is probably better, we'll see how these hold up.
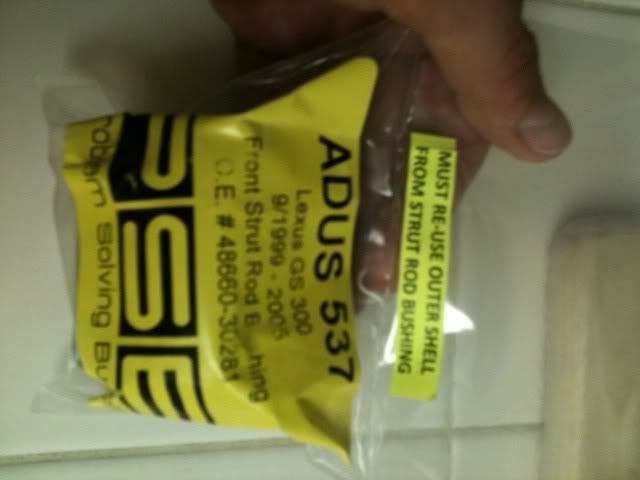
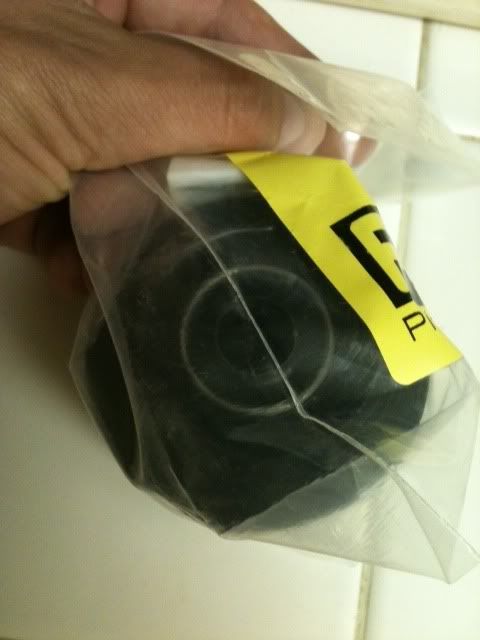
And just for reference, my Sewell PSB caster bushings arrived today (#537) and they had the inner sleeves included:
Last edited by BayAreaLex; Sep 27, 2012 at 09:28 PM.

I did this install over the weekend as a DIY project took a couple hours. Hardest part was putting the bolts back into the car where the arm bolts in!! Hard to get the new rubber to move!!!! But it's all done.
It's been 3 days and now I have a clunking sound coming from that area of the car now when I go into my driveway or exit from parking lots etc. Anybody have any suggestions on what I should inspect now?
Thx
It's been 3 days and now I have a clunking sound coming from that area of the car now when I go into my driveway or exit from parking lots etc. Anybody have any suggestions on what I should inspect now?
Thx
Driver School Candidate
Joined: Mar 2014
Posts: 34
Likes: 2
From: Wisconsin
How did you guys maneuver the arm to get the bolts in. The bushing is difficult enough with the new sewell ones that come with inner sleeve i cannot get the arm bolts back in and i am so frustrated. Any help would be great.

Thread
Thread Starter
Forum
Replies
Last Post
k7q
2Gen GS430 / 400/ 300 Classifieds (98-05)
1
Apr 1, 2018 03:17 PM
terminater
2Gen GS430 / 400/ 300 Classifieds (98-05)
0
Jun 14, 2017 01:43 PM
flipside12
2Gen GS430 / 400/ 300 Classifieds (98-05)
7
Oct 26, 2014 07:23 PM
Solo_D33A
Suspension and Brakes
2
Nov 18, 2009 12:39 AM