
GS430 L-Tuned Suspension Install

Lead Lap
Joined: Sep 2002
Posts: 422
Likes: 0
From: CA
It's not really that bad. Follow the pics as shown (like I did, props to jonathancl!!  ) and if you have the tools (if you work on your car, you NEED TOOLS!) and follow my added pointers, it should be cake. I've worked on cars before but am not a mechanic by any means. This is my first GS that i've worked on so I was unfamiliar with the setup but I understood how cars work. Set aside a weekend for doing it your first time. I could see how guys say it could be done in a few hours, but not the first time. I did the whole thing myself. If you have a buddy who knows what he's doing, it would chop the time down a lot.
It's really just nuts and bolts but the most important part is to MEASURE WHERE THE TOP AND BOTTOM of the stock assemblies line up before you take them apart. That will save so much time because you assemble the setup outside of the car and you want it to just slide in after it all together.
A little long winded but hope it helps.
Tony
) and if you have the tools (if you work on your car, you NEED TOOLS!) and follow my added pointers, it should be cake. I've worked on cars before but am not a mechanic by any means. This is my first GS that i've worked on so I was unfamiliar with the setup but I understood how cars work. Set aside a weekend for doing it your first time. I could see how guys say it could be done in a few hours, but not the first time. I did the whole thing myself. If you have a buddy who knows what he's doing, it would chop the time down a lot. It's really just nuts and bolts but the most important part is to MEASURE WHERE THE TOP AND BOTTOM of the stock assemblies line up before you take them apart. That will save so much time because you assemble the setup outside of the car and you want it to just slide in after it all together.
A little long winded but hope it helps.
Tony
damn i've done my solara suspensions oo many timesand alway do it myself but this looks challengign with all these bushigns and stuff and upper arms.. lol i may have a lexus tech at my dealership do it haha
Lexus Champion

Joined: Jun 2004
Posts: 3,609
Likes: 1
From: WA
Originally Posted by jonathancl
I wondered if it would be possible to remove the shock with the suspension arm still attached.
The shop manual says to detach it. But then the shop manual said to remove the ABS speed sensor and brake caliper, which I didn't do.
The shop manual says to detach it. But then the shop manual said to remove the ABS speed sensor and brake caliper, which I didn't do.
Originally Posted by jonathancl
Suspension is installed!! My car travels straight down the road, but i will probably get a alignment anyways.
Here are some added pointers for anyone doing this themselves:
1. mark the the upper strut plate and the end of the lower part of the spring perch so you can re-align them how they need to be. DO THIS ON THE FACTORY SETUP BEFORE TAKING IT APART SO YOU KNOW WHERE TO MARK THE NEW ONES. Don't worry about marking the spring, it won't match up with the L-Tuned anyways. I never took the other front apart yet and it should go 10x faster this way.
2. The ltuned symbol faces forward and when putting on the compressors. put the compressors on either side of the sybol so it's centered between the two compressors. that way you can test fit them on the car before you decompress them. on the driver side the L-Tuned symbol will face towards the car so you can't see it, but the placement of the compressors holds true.
3. I would almost say air tools are necessary with this type of compressor. maybe im just weak, but it would take some serious strength to compress the last little bit needed when putting them together. Ditto for the rear lower suspension bolts. I added a pipe to the end of the breaker bar to get them loose.
4. i used wood boards when lowering the car off the jack, even with my 20's, the jack wanted to catch on the plastic undercover.
That's about it. I spent about 9 hours total, including breaks and raising/lowering the car and going slow since I haven't done this before. I wasted a good amount of time getting the first front assembly aligned because I never marked the perch and strut cap before disassembling them, so you should be able to get this done in a lot less time.
I'll get some pics up sometime next week, 'cause my car is going in for a detail on monday
Tony

Lexus Champion
Joined: Jun 2004
Posts: 3,609
Likes: 1
From: WA
Originally Posted by jonathancl
Detach upper suspension arm from steering knuckle
NOTE: Several people have said this is NOT necessary, that it is possible to slide the shock out with the steering knuckle still attached. Flossn did it by turning the wheel, avoiding stress on the brake line in the process.

Remove the pin. Remove the nut. Now it gets fun.
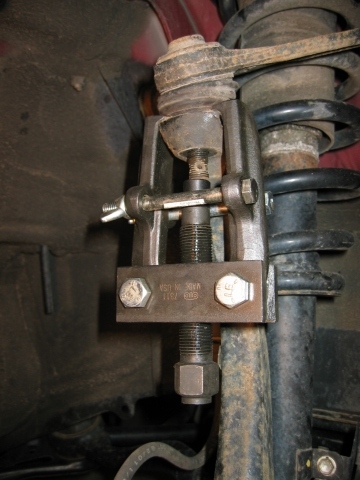

I used a pitman arm puller to press out the stud. You just turn it slowly...slowly...slowly...and then BANG! the stud releases.
The rotor and brake assembly now moves freely, supported only by the lower ball joint. Secure the assembly with string to avoid pressure on the ball joint.
NOTE: Several people have said this is NOT necessary, that it is possible to slide the shock out with the steering knuckle still attached. Flossn did it by turning the wheel, avoiding stress on the brake line in the process.
Remove the pin. Remove the nut. Now it gets fun.
I used a pitman arm puller to press out the stud. You just turn it slowly...slowly...slowly...and then BANG! the stud releases.
The rotor and brake assembly now moves freely, supported only by the lower ball joint. Secure the assembly with string to avoid pressure on the ball joint.

Lexus Champion
Joined: Jun 2004
Posts: 3,609
Likes: 1
From: WA
Well friends the front is all done. I finished the front passanger side today and front driver side yesterday. So one for every day but it's all cool. Learned alot and saved $300 bucks.
It's not that hard at all, just follow the directions. The hardest part is re-aligning the spring/shock to fit back in. Flossn's tip is the most important:
The front right now looks low and I love it but I know that the rear is higher thus forcing the front of the car down.
I'm supposed to start my new job tomorrow (Monday) and hope to finish the rear driver side after work and maybe also the rear passanger side
It's not that hard at all, just follow the directions. The hardest part is re-aligning the spring/shock to fit back in. Flossn's tip is the most important:
1. mark the the upper strut plate and the end of the lower part of the spring perch so you can re-align them how they need to be. DO THIS ON THE FACTORY SETUP BEFORE TAKING IT APART SO YOU KNOW WHERE TO MARK THE NEW ONES. Don't worry about marking the spring, it won't match up with the L-Tuned anyways. I never took the other front apart yet and it should go 10x faster this way.
I'm supposed to start my new job tomorrow (Monday) and hope to finish the rear driver side after work and maybe also the rear passanger side
Last edited by NoS; Jun 19, 2005 at 09:36 PM.
I did this myself also...took two evenings....I eyeballed the alignments and then adjusted it while the springs were compressed...saved some money..but i do have some casualties...my 3/4 snap-on socket umm...split...and i broke an extension, nice thing about snap-on...free replacement.....i have the tanabe nf210's on and i like the drop...looks good...will post some pics tomorrow i didnt have my camera till tonight and its too dark
...i have the tanabe nf210's on and i like the drop...looks good...will post some pics tomorrow i didnt have my camera till tonight and its too dark
Lexus Champion
Joined: Jun 2004
Posts: 3,609
Likes: 1
From: WA
flossn / jonathancl have you had any noise problems with the L-Tuned (yellow) bumb rubber? I am using that instead of the stock black bump rubber. 
---------------------------------------------------------------------
FINISHED!!!
2 finger gap all around from what I can tell. Ride is PERFECT just like stock but feels more like the car is griping the road. I used the L-Tuned bump rubber and NO noise (I am leaning towards this happening to a certain group of people such as those who have heavy systems in the trunk or certain rim sizes).
All that is left is to have a alignment but the car feels like it already has it done
Thanks for the guide and for saving me $300 bucks, learning the suspension of the GS, and having a blast doing it
BTW Took me 4 days, 1 per a day. I get off work at 5 and it took around 2 to 3 hrs for one.
Last edited by NoS; Jun 21, 2005 at 10:59 PM.

Thread Starter
Racer


Joined: May 2004
Posts: 1,733
Likes: 383
From: Philadelphia
Originally Posted by NoS
flossn / jonathancl have you had any noise problems with the L-Tuned (yellow) bumb rubber? I am using that instead of the stock black bump rubber.
Lexus Fanatic
Joined: Aug 2004
Posts: 6,947
Likes: 4
From: Florida
hey jonathancl,
just curious, where did you find these torque specs?
just curious, where did you find these torque specs?
FRONT
Lower shock bolt: 116 ftlbs (wow)
Upper suspension arm bolt: 64 ftlbs
Strut tower bolts: 41 ftlbs
Piston rod lock nut: 20 ftlbs
Stabilizer bar nut and bolt: 41 ftlbs
REAR
Torques
Stabilizer bar link nut: 22 ftlbs
Lower shock absorber bolt: 81 ftlbs
Lower suspension arm nut: 81 ftlbs
Mid shock absorber bolts: 13 ftlbs
Strut tower bolts: 47 ftlbs
Piston rod lock nut: 20 ftlbs