When you click on links to various merchants on this site and make a purchase, this can result in this site earning a commission. Affiliate programs and affiliations include, but are not limited to, the eBay Partner Network.
I didn't really see a thread on this so will start one. I plan to do this when I service the diffs and TC a few weekends out. Lots of other threads on other Toyota sites. I assume things are very similar to any of the torsen diff based /AWD 4Runners models.
Owner's manual says this:
I need to crawl under and look or check FSM.
Zerks
(1) Front Slide Yoke
(1) Rear Slide Yoke
(2) Up front one for each u-joint/spider
(2) Two each u-joint/spider in rear
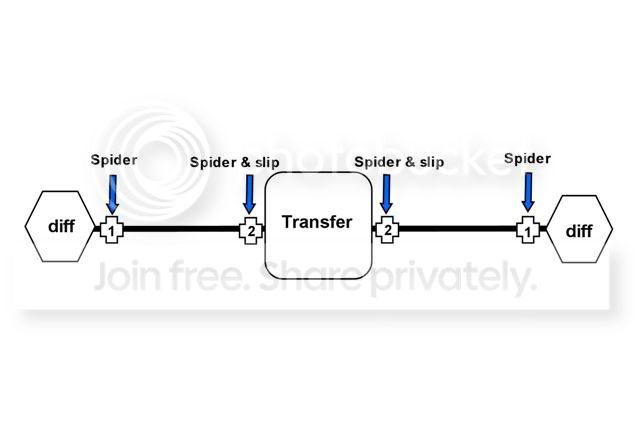
S - Y -S (Transfer Case) S - Y - S
REAR DIFF <-> U-Joint/Spider <-> Rear Slide Yoke <-> U-Joint/Spider <-> TRANSFER CASE <-> U-Joint/Spider <-> Front Slide Yoke <-> U-Joint/Spider <-> FRONT DIFF
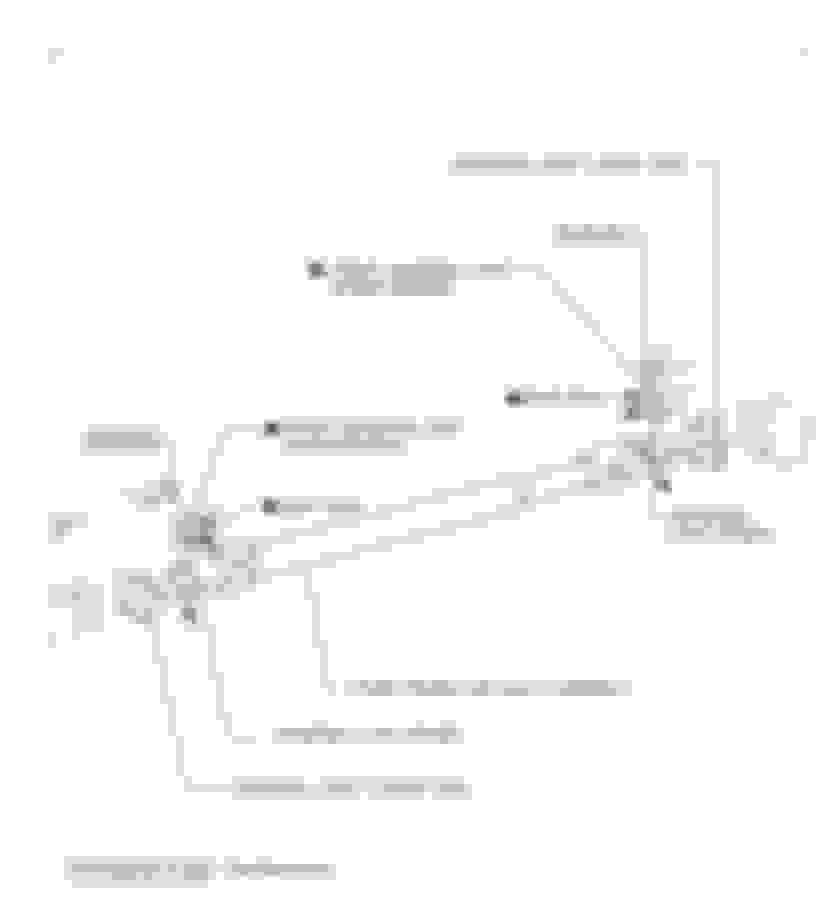
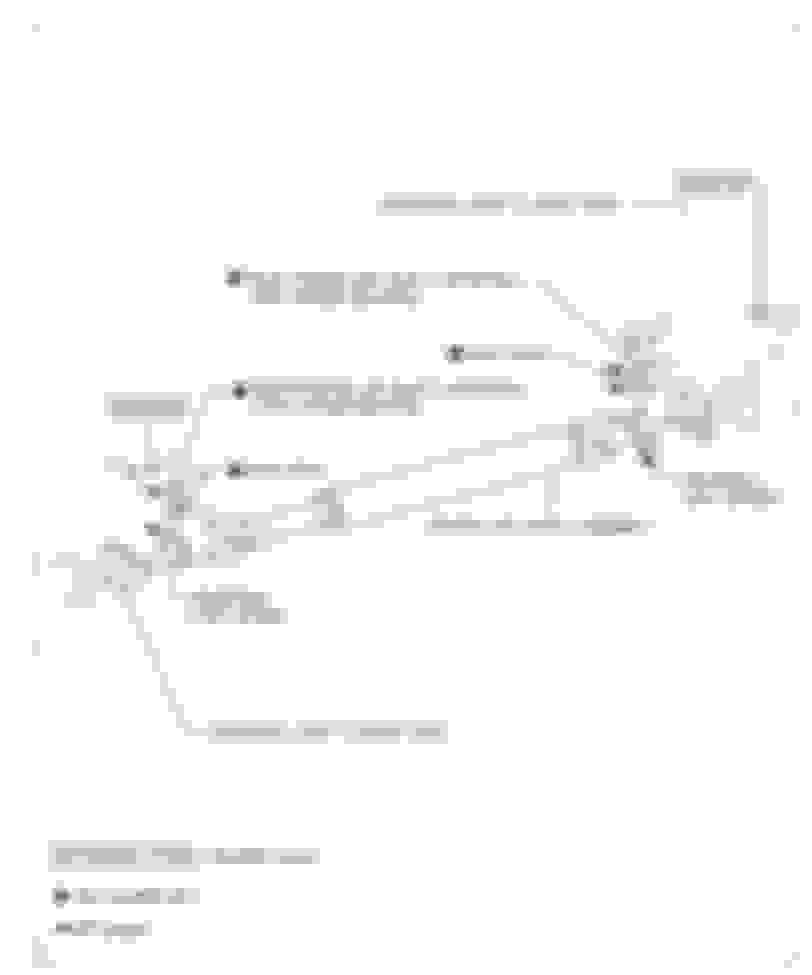
This time I didn't put my friend's GX in neutral. I just put the truck on jacks (all 4 corners) and turning the drive shaft was relatively easy. Neutral is only if the any of the wheels are touching the ground. The pics below are captioned. Just quick notes, (1) denotes the slide yoke zerk fitting and (2) is the spider U-joint zerk fitting. The pics are also in the order I did it, which is rear to front. Why do I do it from rear to front? In my garage, the passenger side is 2-3 feet from the wall while the driver side has plenty of room. When I slide under the truck from the driver side, it's just easier for me to start from the rear and then shimmy my way towards the front. This is only the second time I've done this job. My friend's GX has 125,000 miles and I swear on my life it drives just like mine which only has 32,000 miles after doing this job. I also did his oil, oil filter, coolant, steering, brake, engine air filter, cabin air filter, and tire rotation. The whole thing took me a little less than 5 hours total, but I made zero mess. Only spider U-joint zerk fitting (2) all the way to the back of the truck where the rear differential is. Close up shot of the spider U-joint (2) all the way to the rear of the truck. The other end of that rear drive shaft right before the transfer case has a slide yoke (1) and a spider U-joint zerk fitting (2). Here's another angle of the rear drive shaft behind the transfer case. The LockNLube quick detach/attach is at a weird angle going up and over, but it was very doable for the slide yoke zerk (1). The quick detach/attach was too long however to slide into and reach the spider U-joint (2). In this angle of the same part of the rear drive shaft, since I couldn't reach the spider U-joint with the LockNLube quick detach/attach, I turned the drive shaft so that the zerk fittings pointed towards the passenger side. This is a close up of the same thing. Now, I'm able to reach the spider U-joint (2). The front of the truck is to the left and the rear is to the right. This shows the drive shaft before the transfer case. If you turn the drive shaft so that both zerk fittings point towards the driver side, it's a piece of cake to reach with the LockNLube quick attach/detach. The LockNLube is on the slide yoke (1) here. Another angle of the same thing, but this time I have the LockNLube on the spider U-joint (2). There's only a spider U-joint zerk fitting (2) all the way to the front of the front drive shaft. Here's another angle of the very front of the front drive shaft. The accessibility for the LockNLube is perfect.
Saw this promoted on Tundra forums as excellent option for the slide yokes and has moly in it as well. It sounds like you only want to put in 4-6 pumps on the slide yokes and steer clear of pumping grease until you see it ooze out.
Lubed the zerks today. Here is what you will actually find.
Zerks
(1) Front Slide Yoke
(1) Rear Slide Yoke
(2) Up front one for each u-joint/spider
(2) Two each u-joint/spider in rear
S - Y -S (Transfer Case) S - Y - S
There aren't two on u-joints in rear as I originally thought.
Not sure what is included with Lexus 30K service but these zerks look factory virgin. I am doubtful previous owner received a Lexus service they paid for. Exactly a reason I like doing this myself... I really don't find car maintenance fun at all but I like know it is done right and saving a few $$$ never hurts either.
Thank you, I asked a dealer about it and they were not aware of grease fittings...made me wonder if they skip it for customers unless they ask specifically. I guess it's very rare now to have zerks in a vehicle.
Lubed the zerks today. Here is what you will actually find.
Zerks
(1) Front Slide Yoke
(1) Rear Slide Yoke
(2) Up front one for each u-joint/spider
(2) Two each u-joint/spider in rear
S - Y -S (Transfer Case) S - Y - S
There aren't two on u-joints in rear as I originally thought.
Not sure what is included with Lexus 30K service but these zerks look factory virgin. I am doubtful previous owner received a Lexus service they paid for. Exactly a reason I like doing this myself... I really don't find car maintenance fun at all but I like know it is done right and saving a few $$$ never hurts either.
Touch�!
Thank you for posting this. Sadly "dealer service" is held up on a much misinformed pedastal. The techs can be shady and, like any time pressed human being, cut corners where they can get away with it.
My rig has 52k on it so will be doing this service sometime in the summer.
The chassis lubrication is even listed in the owners manual too... just want to make everyone aware of it.
On the yokes only like 10 pumps.. those you don't want to over-grease or it can create a vibration problem... you will find threads on 4R forums about it.
What would the issues be if we only used 1 type of grease? The chasis lubrication screenshot you posted shows Lithium NGLI #2 suitable for both the spiders and the slide yokes.
I am assuming greasing everything will help with the transmission jolt/jerk during stop and go traffic? Currently 2nd start is used to help with slower stop and go city driving.
From what I can tell both should be fine but the moly based grease may end up lasting longer if you let maintenance slip. Either grease though you just don't want to over grease the yokes as these are continually expanding and contracting as you drive.
From 4R forum:
"When you over fill it, the grease takes up the space inside the driveshaft where the yoke is supposed to slide into. Air compresses, grease doesn't (easily), so it is now acting more like a solid driveshaft. "
i actually started the process this past weekend. I was underneath (checking a different issue, the leaning) and saw the zerks lined up on the rear drive shaft so I went ahead and greased them with the valvoline synthetic grease (what several forums on the 100 series recommend).
i did not over grease like it is recommended on the 100 series (to help with a �clunk� on most cruisers). I couldn�t believe it myself but it actually worked. From this I did learn that the shaft zerk (not the u joints) have an overflow so if you overfil them they will release grease so I don�t think a vibration would start from that.
Def stick to a moly synthetic grease and you�ll be alright. Don�t think oem is necessary just don�t go with a non syn grease as they simply just don�t last a long time.


 This is only the second time I've done this job. My friend's GX has 125,000 miles and I swear on my life it drives just like mine which only has 32,000 miles after doing this job. I also did his oil, oil filter, coolant, steering, brake, engine air filter, cabin air filter, and tire rotation. The whole thing took me a little less than 5 hours total, but I made zero mess.