


Vizualogic DVD Headrest Installation - Full Writeup

Thread Starter
Driver School Candidate
Joined: May 2010
Posts: 11
Likes: 1
From: TX
BACKGROUND
As a proud 3-day owner of a 2010 Matador Mica RX350, I found the only thing missing from it was rear seat entertainment. The dealer installed option would run $2,200 which seems way too steep for the benefit. I was going to just roll with portable dvd players for the kids (3 & 6) but then did a little googling.
I ran across the Power Acoustik HDVD-9BG system on Amazon. 2 headrest DVDs plus remotes plus wireless headphones for $548. Current link as of this writing is: http://www.amazon.com/Power-Acoustik...4332182&sr=8-6
I read the reviews and figured I would gamble that they might match color good enough and actually work. It turns out, they do! Over $1,500 cheaper than a dealer option, and approximately $1,100 cheaper than the Invision 'perfect-match' system you can find online.
A pic of the new ride:

This details how to install a set of Power Acoustik generic DVD headrests into a 2010 Lexus RX350/450. Since they are generic, the leather and headrest is not an exact match for the vehicle. In my case, the car has a beige leather interior. When they arrived I lined them up to see how different they were. There is definitely a difference. The Power Acoustik headrest is a darker, less yellow beige. It is easily noticeable when sitting side by side outside the vehicle as shown here. Sitting in the car it is noticeable but not so much that it made me want to spend an extra $1,200-1,500 to get exact matches from the dealer or a system like Invision.
Comparison of Power Acoustik headrest to stock:

The leather (or probably faux leather, not sure how to tell for sure) seems to be decent. The headrest is definitely harder than the stock one when you put your head against it and a good deal larger. Probably not something you would want to take a nap on, but that's not the point. It fit straight into the headrest sockets out of the box, but the way its notched does not work well with the Lexus. Once its in, it's staying at the lowest setting. If you try to raise it up, it'll just slip back down. Again, not a problem for what I needed.
Video quality is decent but certainly not spectacular. While it has 1100+ lines horizontally it only has 234 vertical lines of resolution. This is for my kids though, who don't really appreciate the awesomeness of High Definition yet
Once nice piece that I wasn't expecting. On most units I've seen, the included 'wireless' headphones work off of infrared beams so you have to be sitting directly in front of the unit or you get static or choppy sound. On these, I started a DVD playing, then went in the house to get batteries for the headphones. While still in the house I put them on to see how they felt, and lo and behold, I heard audio from the unit perfectly. They operate on a 900Mhz spectrum so the range is very solid and clear. The headphones aren't the most comfortable in the world and their 'shortest' setting is still too big to be comfortable for a young kid, but will work. You can always just plug a wired set of headphones directly into the face of the unit.
Obviously I can't comment on the longevity of the system as I'm writing this up a few hours after I completed the installation. I do hope they last a while as it looks very promising so far.
TOOLS REQUIRED
ESTIMATED TIME
It took me about 3 hours total to do both sides. I am relatively mechanically inclined but have never installed a headrest DVD system before, nor have I ever even sat in a Lexus RX prior to 5 days ago. (I'm traditionally a Nissan/Infiniti guy )
)
INSTALLATION
I started with the passenger side headrest. Note that the DVD slot is side mounted, so make sure you get the headrest for either side where the DVD slot is toward the center of the car. If you get them switched it will probably be difficult or impossible to load a DVD with the clearance by the door frame. The steps for installation are identical for each side.
The first thing I did was test that the DVD actually worked by plugging the power harness in and touching the leads directly to the positive and negative terminals on the battery. Both checked out fine in my initial tests.
Step 1: Move the seat as far forward as possible with the seat back reclined about halfway to have vertical clearance to remove the headrest. Remove the existing headrest by pressing the tab on the base in and pulling straight up.
Step 2: Move the seat back fully upright.
Step 3: Unlatch the lower carpeting on the bottom rear of the seat. It is held in place by two elastic straps that are hooked on the bottom of the seat. The picture shows these straps after being unhooked. Reach up under the seat and you will feel them.

Step 4: Pull the carpet piece forward and look up under the seat back. Unscrew the two philips screws holding the bottom of the seat back in place. The picture below shows what they look like, although on the panel after removal. Once it is off, remove the carpet piece from the seat by lifting up to remove the two clips from a horizontal bar on the seat back.

Step 5: There are 2 clips that hold the upper seat back in place. They clip upward onto a horizontal bar running across the interior of the seat back. The picture below shows one of the clips after the back has been removed.

Slip your hand into the top of the seat back and gently push down to unclip them. Continue pushing down and pulling back to release the seat back. Set it to the side.

after release:

Step 6: Recline the seat again for clearance to install the Power Acoustik headrest. In my case the posts were spaced perfectly for the vehicle. It is possible to move them, although I'm not sure exactly how as I didn't need to do it. It is mentioned in the manual. To install run the cords through the holes in the seat top and snake them down the back of the seat. The base of the headrest posts has a rubber grommet thing which is to protect the cables I assume. It's a bit of a tight fit to get that in the holes but it will go. It also is not likely to stay where it is supposed to be on the bottom of the post and will probably just be hanging loose below it. I left them alone as even if you reposition them, moving the headrest up or down after installation will knock them loose again. Once the posts are in, slide the headrest all the way down.
Seat reclined and ready

Installation in progress

New headrest in place

Step 7: On the passenger side, the 'INPUT' wire where the power harness goes is on the side closest to the center console. Interestingly my wires on that unit were BOTH labelled OUTPUT. So much for quality control Snake the wires for both sides down through the back of the seat roughly as shown in the image to position the INPUT wire for power and ground.
How I ran the 'output' side.

Step 8: Wiring power. You need 12V switched power to run the player. It turns out on the lower part of the seat there is a harness which can be easily separated to reveal 3 wires. The red one is switched power. I simply removed a section of insulation from the red wire and did a military splice with the stripped end of the red wire on the headrest power harness. I then soldered that connection to make sure it was solid, wrapped it in electrical tape, and then tucked the wires back into the original harness sheath nicely.
Shows the correct wiring bundle after removing it from the sheath and removing a section of insulation.

How to do a military splice:
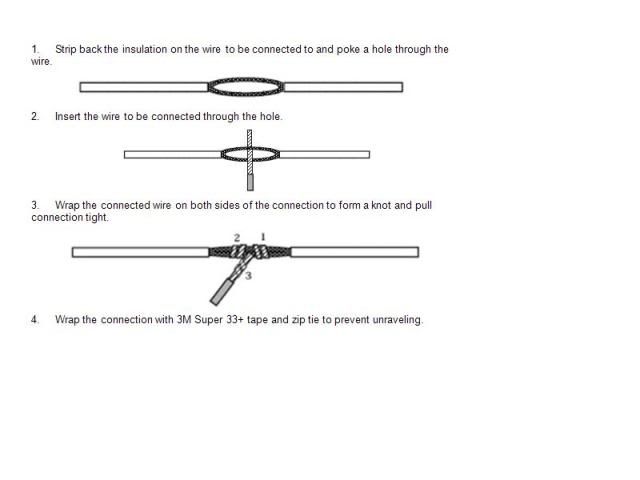
Results of the military splice

Step 9: Remove the cover from the rear center-side seat rail. A 14mm bolt secures the seat rail to the chassis. This can be used as the ground for the power harness. I found that based on where I spliced into power, the ground wire was not long enough to run to the bolt. I soldered some additional wire to the end of it to give enough length. I ran this wire through the lower corner of the seatback and down the outside of the seat rail. Remember the seat is all the way forward so give just enough wire to reach the bolt. Make sure the wire is not in a position to get pinched by the seat as it moves back and forth on the rail. I used a piece of electrical tape to secure it to the underside of the rail. Unscrew the bolt a bit and put the stripped end of the ground wire under the washer. Re-secure tightly and replace the trim cover.
This image shows how I ran the ground wire. The upper arrow shows where I needed to splice an extra length of wire in. Lower arrow points to the seat rail bolt where the ground wire terminates.

Step 10: At this point, you should have full power. Plug the power harness into the INPUT side wire of the DVD unit. Push the Start button on the vehicle twice to get full accessory power and press the power button on the headrest unit. If it does not fire up, re-check all your connections. I also suggest actually putting a DVD in and start it playing. On my first attempt, I had power but when it started playing a DVD the screen would fade in and out due to a sub-par power splice. Once I re-did the splice it worked great.

Step 11: Position the remaining cable however you like. For the INPUT side, I pulled all slack cable back into the seat back, rolled it up, and tucked it away. Be sure that it doesn't interfere with the seat back cooling fan. On the output side I pulled the slack out the bottom of the seat, coiled the wire up and re-secured with a wire-tie. I then laid that bundle under the seat on the floor of the vehicle.
Step 12: Re-install the lower carpet piece onto the seat by re-clipping the two upper clips.
Step 13: Re-install the seat back by sliding the back in and up to re-clip the upper clips on the horizontal bar. Finish seatback installation by replacing the 2 philips screws on the bottom side.
Step 14: Re-hook the two elastic straps on the carpet piece back underneath the seat bottom.
Look Ma! No Wires!

Installing the driver's side is identical to the passenger side with one small difference. Rather than an elastic loop holding the carpet piece under the seat, there are two elastic straps with plastic hooks on the end, as shown in the picture. Also, in case things are mis-labelled, the INPUT side where the power harness connects to is also inboard next to the center console.

Final notes: I used an audio/video cable to run from the output side of the passenger headrest to the input side of the driver headrest by snaking it under the passenger inboard seatrail, around the center console, under the driver inboard seatrail. The part that ran around the center console I just tucked under the rear floor mats to hide it (mostly). I also ran an audio RCA to pin jack cable from the OUTPUT side of the driver headrest, under the inboard seat rail, up and into the center console to the AUX input for the stereo. This provides 3 things:
A few additional pictures:
Leather comparisons...


Installed and working (and being enjoyed!)

Both screens from the rear

I hope some of you find this useful, as my official second post on the forum.
Greg (Dallas)
As a proud 3-day owner of a 2010 Matador Mica RX350, I found the only thing missing from it was rear seat entertainment. The dealer installed option would run $2,200 which seems way too steep for the benefit. I was going to just roll with portable dvd players for the kids (3 & 6) but then did a little googling.
I ran across the Power Acoustik HDVD-9BG system on Amazon. 2 headrest DVDs plus remotes plus wireless headphones for $548. Current link as of this writing is: http://www.amazon.com/Power-Acoustik...4332182&sr=8-6
I read the reviews and figured I would gamble that they might match color good enough and actually work. It turns out, they do! Over $1,500 cheaper than a dealer option, and approximately $1,100 cheaper than the Invision 'perfect-match' system you can find online.
A pic of the new ride:
This details how to install a set of Power Acoustik generic DVD headrests into a 2010 Lexus RX350/450. Since they are generic, the leather and headrest is not an exact match for the vehicle. In my case, the car has a beige leather interior. When they arrived I lined them up to see how different they were. There is definitely a difference. The Power Acoustik headrest is a darker, less yellow beige. It is easily noticeable when sitting side by side outside the vehicle as shown here. Sitting in the car it is noticeable but not so much that it made me want to spend an extra $1,200-1,500 to get exact matches from the dealer or a system like Invision.
Comparison of Power Acoustik headrest to stock:
The leather (or probably faux leather, not sure how to tell for sure) seems to be decent. The headrest is definitely harder than the stock one when you put your head against it and a good deal larger. Probably not something you would want to take a nap on, but that's not the point. It fit straight into the headrest sockets out of the box, but the way its notched does not work well with the Lexus. Once its in, it's staying at the lowest setting. If you try to raise it up, it'll just slip back down. Again, not a problem for what I needed.
Video quality is decent but certainly not spectacular. While it has 1100+ lines horizontally it only has 234 vertical lines of resolution. This is for my kids though, who don't really appreciate the awesomeness of High Definition yet
Once nice piece that I wasn't expecting. On most units I've seen, the included 'wireless' headphones work off of infrared beams so you have to be sitting directly in front of the unit or you get static or choppy sound. On these, I started a DVD playing, then went in the house to get batteries for the headphones. While still in the house I put them on to see how they felt, and lo and behold, I heard audio from the unit perfectly. They operate on a 900Mhz spectrum so the range is very solid and clear. The headphones aren't the most comfortable in the world and their 'shortest' setting is still too big to be comfortable for a young kid, but will work. You can always just plug a wired set of headphones directly into the face of the unit.
Obviously I can't comment on the longevity of the system as I'm writing this up a few hours after I completed the installation. I do hope they last a while as it looks very promising so far.
TOOLS REQUIRED
- Philips screwdriver
- Wire strippers
- Ratchet + 14mm socket
- Soldering pen/iron/torch
- Solder
- Electrical tape
- Multimeter (somewhat optional since I point you to the right places already)
ESTIMATED TIME
It took me about 3 hours total to do both sides. I am relatively mechanically inclined but have never installed a headrest DVD system before, nor have I ever even sat in a Lexus RX prior to 5 days ago. (I'm traditionally a Nissan/Infiniti guy
)INSTALLATION
I started with the passenger side headrest. Note that the DVD slot is side mounted, so make sure you get the headrest for either side where the DVD slot is toward the center of the car. If you get them switched it will probably be difficult or impossible to load a DVD with the clearance by the door frame. The steps for installation are identical for each side.
The first thing I did was test that the DVD actually worked by plugging the power harness in and touching the leads directly to the positive and negative terminals on the battery. Both checked out fine in my initial tests.
Step 1: Move the seat as far forward as possible with the seat back reclined about halfway to have vertical clearance to remove the headrest. Remove the existing headrest by pressing the tab on the base in and pulling straight up.
Step 2: Move the seat back fully upright.
Step 3: Unlatch the lower carpeting on the bottom rear of the seat. It is held in place by two elastic straps that are hooked on the bottom of the seat. The picture shows these straps after being unhooked. Reach up under the seat and you will feel them.
Step 4: Pull the carpet piece forward and look up under the seat back. Unscrew the two philips screws holding the bottom of the seat back in place. The picture below shows what they look like, although on the panel after removal. Once it is off, remove the carpet piece from the seat by lifting up to remove the two clips from a horizontal bar on the seat back.
Step 5: There are 2 clips that hold the upper seat back in place. They clip upward onto a horizontal bar running across the interior of the seat back. The picture below shows one of the clips after the back has been removed.
Slip your hand into the top of the seat back and gently push down to unclip them. Continue pushing down and pulling back to release the seat back. Set it to the side.
after release:
Step 6: Recline the seat again for clearance to install the Power Acoustik headrest. In my case the posts were spaced perfectly for the vehicle. It is possible to move them, although I'm not sure exactly how as I didn't need to do it. It is mentioned in the manual. To install run the cords through the holes in the seat top and snake them down the back of the seat. The base of the headrest posts has a rubber grommet thing which is to protect the cables I assume. It's a bit of a tight fit to get that in the holes but it will go. It also is not likely to stay where it is supposed to be on the bottom of the post and will probably just be hanging loose below it. I left them alone as even if you reposition them, moving the headrest up or down after installation will knock them loose again. Once the posts are in, slide the headrest all the way down.
Seat reclined and ready
Installation in progress
New headrest in place
Step 7: On the passenger side, the 'INPUT' wire where the power harness goes is on the side closest to the center console. Interestingly my wires on that unit were BOTH labelled OUTPUT. So much for quality control
Snake the wires for both sides down through the back of the seat roughly as shown in the image to position the INPUT wire for power and ground.How I ran the 'output' side.
Step 8: Wiring power. You need 12V switched power to run the player. It turns out on the lower part of the seat there is a harness which can be easily separated to reveal 3 wires. The red one is switched power. I simply removed a section of insulation from the red wire and did a military splice with the stripped end of the red wire on the headrest power harness. I then soldered that connection to make sure it was solid, wrapped it in electrical tape, and then tucked the wires back into the original harness sheath nicely.
Shows the correct wiring bundle after removing it from the sheath and removing a section of insulation.
How to do a military splice:
Results of the military splice
Step 9: Remove the cover from the rear center-side seat rail. A 14mm bolt secures the seat rail to the chassis. This can be used as the ground for the power harness. I found that based on where I spliced into power, the ground wire was not long enough to run to the bolt. I soldered some additional wire to the end of it to give enough length. I ran this wire through the lower corner of the seatback and down the outside of the seat rail. Remember the seat is all the way forward so give just enough wire to reach the bolt. Make sure the wire is not in a position to get pinched by the seat as it moves back and forth on the rail. I used a piece of electrical tape to secure it to the underside of the rail. Unscrew the bolt a bit and put the stripped end of the ground wire under the washer. Re-secure tightly and replace the trim cover.
This image shows how I ran the ground wire. The upper arrow shows where I needed to splice an extra length of wire in. Lower arrow points to the seat rail bolt where the ground wire terminates.
Step 10: At this point, you should have full power. Plug the power harness into the INPUT side wire of the DVD unit. Push the Start button on the vehicle twice to get full accessory power and press the power button on the headrest unit. If it does not fire up, re-check all your connections. I also suggest actually putting a DVD in and start it playing. On my first attempt, I had power but when it started playing a DVD the screen would fade in and out due to a sub-par power splice. Once I re-did the splice it worked great.
Step 11: Position the remaining cable however you like. For the INPUT side, I pulled all slack cable back into the seat back, rolled it up, and tucked it away. Be sure that it doesn't interfere with the seat back cooling fan. On the output side I pulled the slack out the bottom of the seat, coiled the wire up and re-secured with a wire-tie. I then laid that bundle under the seat on the floor of the vehicle.
Step 12: Re-install the lower carpet piece onto the seat by re-clipping the two upper clips.
Step 13: Re-install the seat back by sliding the back in and up to re-clip the upper clips on the horizontal bar. Finish seatback installation by replacing the 2 philips screws on the bottom side.
Step 14: Re-hook the two elastic straps on the carpet piece back underneath the seat bottom.
Look Ma! No Wires!
Installing the driver's side is identical to the passenger side with one small difference. Rather than an elastic loop holding the carpet piece under the seat, there are two elastic straps with plastic hooks on the end, as shown in the picture. Also, in case things are mis-labelled, the INPUT side where the power harness connects to is also inboard next to the center console.
Final notes: I used an audio/video cable to run from the output side of the passenger headrest to the input side of the driver headrest by snaking it under the passenger inboard seatrail, around the center console, under the driver inboard seatrail. The part that ran around the center console I just tucked under the rear floor mats to hide it (mostly). I also ran an audio RCA to pin jack cable from the OUTPUT side of the driver headrest, under the inboard seat rail, up and into the center console to the AUX input for the stereo. This provides 3 things:
- By default on DVD input, both headrests operate independently, and each kid can watch what they want.
- If both want to watch the same thing, the passenger headrest is the master (put the DVD there) and change the mode on the driver headrest to AV1 input, which will then show the same video as the passenger side.
- if both kids are watching the same thing, turning the vehicle stereo to AUX input will play the DVD audio for everyone.
A few additional pictures:
Leather comparisons...
Installed and working (and being enjoyed!)
Both screens from the rear
I hope some of you find this useful, as my official second post on the forum.
Greg (Dallas)
Last edited by GregDallas; May 30, 2011 at 06:16 PM. Reason: Changed all references from 'Vizualogic' to 'Power Acoustik'. These are not Vizualogic units.
wow, i will need to read it again to get to the details, but thank you so much for the FANTASTIC write up!!!!!!! this is purely awesome!!!!!! a lot of great info!!!!!!  !!!!
!!!!
!!!!
Thread Starter
Driver School Candidate
Joined: May 2010
Posts: 11
Likes: 1
From: TX
Thread Starter
Driver School Candidate
Joined: May 2010
Posts: 11
Likes: 1
From: TX
They are the stock 19" rims in a chrome finish. The dealer had them as an option for $1,599. Not using anything for cleaning and waxing yet because the car is only 3 days old (thus the shininess!) Once it's necessary I use a variety of things, but I'm happy with Meguiar's NXT for the wax along with Clearkote Bodyshine as a quick detailer. They have worked very well on my other vehicles.
Trending Topics
ClubLexus Stories
Celebrating Lexus & Toyota from Around the Globe

Top 10 Lexus & Toyotas to Drive Before You Die!
Joe Kucinski
Top 10 Lexus/Toyotas With The LEAST 5-Year Depreciation
Joe Kucinski
Lexus LC500 Convertible Auction: A Preview of Rising Values?
Brett Foote
GX 550 vs TX 550: Best 3-Row Luxury Lexus Family Hauler
Michael S. Palmer
9 Best Lexus Models You Can Buy for Half Price (And 1 You Shouldn't!)
Joe Kucinski
2026 Lexus NX Buyer's Guide: Models, Features, Prices & More!
Brett Foote
Top 10 Reasons to Buy a Lexus TX 550h+ (& 3 Reasons to AVOID!)
Michael S. Palmer
Top 10 Lexus & Toyota Models of the 1990s RANKED!
Joe Kucinski
10 Great Toyotas That Could Have Been Lexus Models
Joe Kucinski
Lead Lap
Joined: Feb 2006
Posts: 452
Likes: 5
From: NC
They are the stock 19" rims in a chrome finish. The dealer had them as an option for $1,599. Not using anything for cleaning and waxing yet because the car is only 3 days old (thus the shininess!) Once it's necessary I use a variety of things, but I'm happy with Meguiar's NXT for the wax along with Clearkote Bodyshine as a quick detailer. They have worked very well on my other vehicles.

Driver
Joined: Aug 2010
Posts: 105
Likes: 0
From: TN
Hi there--
I'm new to the forum, having just purchased a CPO 2010 Rx 450h. I'm also considering putting in a headrest DVD, but was wondering how replacing the OEM headrests might affect the anti-whiplash design of the headrests? It appeared from the promotional video that the headrests are designed to bend a certain way when involved in a collision, and I assume that it had something to do with how the headrests are mounted into the seat back . Maybe that's why Lexus installs the DVD screens behind the headrest(?) Any insight would be greatly appreciated!
I'm new to the forum, having just purchased a CPO 2010 Rx 450h. I'm also considering putting in a headrest DVD, but was wondering how replacing the OEM headrests might affect the anti-whiplash design of the headrests? It appeared from the promotional video that the headrests are designed to bend a certain way when involved in a collision, and I assume that it had something to do with how the headrests are mounted into the seat back . Maybe that's why Lexus installs the DVD screens behind the headrest(?) Any insight would be greatly appreciated!
Instructor

Joined: Dec 2009
Posts: 873
Likes: 53
From: NH
Very cool. $500 seems really cheap for a mod like this too, especially for two headrests + headphones + remotes. The leather looks to match really well too. This would be a cool mod but I never have anyone in the back seats that would watch a movie, but it'd still be cool, especially if I just had it display a Lexus logo or something. Very cool writeup though, I like the color selection on your RX too 

Driver School Candidate
Joined: Oct 2010
Posts: 8
Likes: 0
From: ca
excellent write-up. One question, is this really made by Vizualogic? because it appears to me this Power Acoustic has nothing to do with Vizualogic which has totally different lines of products.

Driver School Candidate
Joined: Dec 2010
Posts: 1
Likes: 0
From: PA
Quick question. I have a 2004 Rx330 and the step with taking the back of the seat off and on is similar to mine. How did you put the seat back on? I read the instructions and tried to do the same, I clipped the back to the metal bar and screw the two phillips from the bottom back on. However, when I pull on the magazine holder, the back pops back out?
