

My car is now over 100K and I believe the belt was never changed (I bought it at 90K) ... I found the below link on how to do it. Looks straight forward ... Just wondering if anyone has tried it and if the they could add to the below instructions. Thanks!
https://www.clublexus.com/how-tos/a/...ne-belt-366262
https://www.clublexus.com/how-tos/a/...ne-belt-366262

Driver School Candidate
yes it's straight forward...the link has pretty much everything you need. I took a couple of pictures of the belt layout just in case and the job took about an hour. If i have to do it again it'll take about 15mins.

Driver School Candidate
Quote:
https://www.clublexus.com/how-tos/a/...ne-belt-366262
Did mine on the 2007 this past weekend.Originally Posted by thomasfx10
My car is now over 100K and I believe the belt was never changed (I bought it at 90K) ... I found the below link on how to do it. Looks straight forward ... Just wondering if anyone has tried it and if the they could add to the below instructions. Thanks! https://www.clublexus.com/how-tos/a/...ne-belt-366262
There is an additional pulley to the left missing from the first photo.

If you have skinny hands it could take you as little as 5 minutes to change - with a cold engine.
It took me about a 1/2 hour.
Driver School Candidate
Hope this helps.
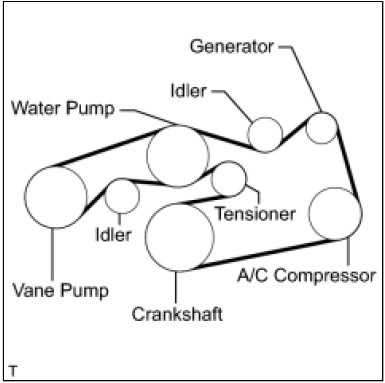
Thanks everyone for your tips! I am going to try it tomorrow.
Driver School Candidate
As for tips...
I found it easiest to go over the water pump pulley first, the "vane pump" second and then back to the top right and around finishing at the tensioner.
A 14mm ratchet won't fit for releasing the tensioner - you will need a box end wrench - the longer the better.
Good luck!
I found it easiest to go over the water pump pulley first, the "vane pump" second and then back to the top right and around finishing at the tensioner.
A 14mm ratchet won't fit for releasing the tensioner - you will need a box end wrench - the longer the better.
Good luck!
Just finished putting this on ... took less than 2 hours and that is because I had to draw out the belt map. Coluccim map is the most accurate.
I still went ahead and made a belt loop diagram and took some pics ... It looks a little daunting at first and I almost did not do it but once I loosened the tension-er the belt came off no problem. At that point there was no turning back. I started from the top and worked my way to the bottom. Took less than 10 minutes to put the belt on and I did refer to my drawing a few times as well ...
A couple quick notes ... You will need a flat wrench (14 mm I believe) ... You cannot use a socket on it with a ratchet ... Not enough room. Also ... Make sure you have plenty of lighting. I had my office light which worked well.
I still went ahead and made a belt loop diagram and took some pics ... It looks a little daunting at first and I almost did not do it but once I loosened the tension-er the belt came off no problem. At that point there was no turning back. I started from the top and worked my way to the bottom. Took less than 10 minutes to put the belt on and I did refer to my drawing a few times as well ...
A couple quick notes ... You will need a flat wrench (14 mm I believe) ... You cannot use a socket on it with a ratchet ... Not enough room. Also ... Make sure you have plenty of lighting. I had my office light which worked well.
Quote:
I found it easiest to go over the water pump pulley first, the "vane pump" second and then back to the top right and around finishing at the tensioner.
A 14mm ratchet won't fit for releasing the tensioner - you will need a box end wrench - the longer the better.
Good luck!
Found out the hard way ... I am glad I had a boxed end wrench. Thanks for the post.Originally Posted by coluccim
As for tips...I found it easiest to go over the water pump pulley first, the "vane pump" second and then back to the top right and around finishing at the tensioner.
A 14mm ratchet won't fit for releasing the tensioner - you will need a box end wrench - the longer the better.
Good luck!
Driver School Candidate
Quote:
Good job!Originally Posted by thomasfx10
Found out the hard way ... I am glad I had a boxed end wrench. Thanks for the post.
Yes, the photos in the write up are missing the idler and power steering pulley (vane pump?) to the left.
Mine looked like the second diagram I posted, just more compact from left to right.


Great DIY! Regarding the DIY link on the OP's first post, I have a question regarding the "5mm bi-hexagon wrench". Is this the same as an Allen key? What is the purpose of this wrench? Does it keep the tension loose, so that one can remove and replace the belt?
Also, what brand belt is everyone using? I'm thinking about using the gator back belt.
Thanks guys.
Also, what brand belt is everyone using? I'm thinking about using the gator back belt.
Thanks guys.
Driver School Candidate
Quote:
Also, what brand belt is everyone using? I'm thinking about using the gator back belt.
Thanks guys.
Once you release the tension on the belt, the Allen key (yes, Allen key) keeps the tensioner from retracting. You'll understand when you get in there.Originally Posted by CPMD
Great DIY! Regarding the DIY link on the OP's first post, I have a question regarding the "5mm bi-hexagon wrench". Is this the same as an Allen key? What is the purpose of this wrench? Does it keep the tension loose, so that one can remove and replace the belt?Also, what brand belt is everyone using? I'm thinking about using the gator back belt.
Thanks guys.
I used an Autozone bought belt - something marketed with "W" shaped ribs or some other nonsense. I am sure any belt will be fine.
Quote:
I used an Autozone bought belt - something marketed with "W" shaped ribs or some other nonsense. I am sure any belt will be fine.
Thanks. I've changed the serpentine belt in my gs, and that didn't have this tensioner locking mechanism, so it's a new concept for me.Originally Posted by coluccim
Once you release the tension on the belt, the Allen key (yes, Allen key) keeps the tensioner from retracting. You'll understand when you get in there.I used an Autozone bought belt - something marketed with "W" shaped ribs or some other nonsense. I am sure any belt will be fine.
I'm trying to visualize this before doing this in a few days. When installing the belt, do you attach the belt at the a/c compression, generator, and idler from the same passenger wheel well area, or from the engine bay? I've read your comment and will start at the water pump pulley first.
Since I'm ordering some other oem parts for my GS, I'll just get the oem belt.
The serpentine belt change on my GS 300 is a joke compared to this. There is direct access from the front of the car. There is no need to jack the car up, remove the tire, and maneuver in tight spaces.
Driver School Candidate
Quote:
I'm trying to visualize this before doing this in a few days. When installing the belt, do you attach the belt at the a/c compression, generator, and idler from the same passenger wheel well area, or from the engine bay? I've read your comment and will start at the water pump pulley first.
Since I'm ordering some other oem parts for my GS, I'll just get the oem belt.
The serpentine belt change on my GS 300 is a joke compared to this. There is direct access from the front of the car. There is no need to jack the car up, remove the tire, and maneuver in tight spaces.
When you move the tensioner there is a hole at the bottom of it that lines up with another hole. You slip the Allen key through so that the tensioner wont retract. It doesn't have to be a 5mm Allen key or any Allen key for that matter - it just has to be smaller than 5mm. You can see the hole about 2 inches down from the tensioner in the first color photo I posted above.Originally Posted by CPMD
Thanks. I've changed the serpentine belt in my gs, and that didn't have this tensioner locking mechanism, so it's a new concept for me.I'm trying to visualize this before doing this in a few days. When installing the belt, do you attach the belt at the a/c compression, generator, and idler from the same passenger wheel well area, or from the engine bay? I've read your comment and will start at the water pump pulley first.
Since I'm ordering some other oem parts for my GS, I'll just get the oem belt.
The serpentine belt change on my GS 300 is a joke compared to this. There is direct access from the front of the car. There is no need to jack the car up, remove the tire, and maneuver in tight spaces.
Most of the work will be done through the wheel well.