When you click on links to various merchants on this site and make a purchase, this can result in this site earning a commission. Affiliate programs and affiliations include, but are not limited to, the eBay Partner Network.
do you know how to test the switches why are you guessing ?
Your post added zero value. I am following a logical set of steps to diagnose an electrical issue. A weak battery and corrosion can cause many odd electrical issues. On another thread i started on this issue, others agree with this approach. We only want to hear from people that are here to help. For instance, i was writing to add that my issue has been slowly getting worse and worse for over a year and no longer needs to be cold. Otherwise, i would have read about the switches and only chimed in if i tried it and had feedback.
I'll check the door switches. I've been reading about this issue for over a year and this is the first I've heard about this possible solution. Someone had written that replacing the cluster fixed it. I think I'll start with the cheaper and easier door switch solution first. Thank you!
Someone had written that replacing the cluster fixed it. I think I'll start with the cheaper and easier door switch solution first.
I was all ready to send out my cluster to get some electronics repair performed. I've read that the older LS had an issue with electrolytic capacitors dying in the instrument cluster. In my specific case, this does not appear to have been the issue. Good luck with the switches; hopefully it's the same for you
Finally received the switches and installed them a few days ago. So far so good, but I can't consider this an exhaustive test as it's been "warm" here in the high 30s/low 40s during the day. The doors are definitely detected more reliably and quickly though as being open or closed. A few other things I noticed:
I had expected to find corrosion of some sort between the bolt and the switch, or the bolt and the body, but there was nothing of the sort. It doesn't seem that wear on these parts breaks the circuit.
With the new switches the open state is reached even a bit before full extension of the plunger. The failed driver's door switch had to be 100% extended and then wiggled around to trigger the car.
I still cleaned the threads of each bolt and applied some dielectric grease to the threads and the exposed switch metal under the bolt head before re-installing.
The vinyl plunger and switch cover wraps around to the back of the switch and acts as a kind of gasket against the body of the car. The car body is painted behind the switch, so the current flows through the bolt into the body and not directly from the switch body to the car body.
Based on all of this I'm guessing there must be wear inside the switch itself, or the grease inside has dried out in a way that breaks continuity. I haven't had time to break one open yet but I'm going to hold on to the four old switches and check if they can be cleaned and repaired. That said, even if I had to replace all the switches every 8 to 10 years, at $25 for all four that's not a big deal.
Still getting a parasitic draw while the car is idle, as evidenced by the cluster issue and lack of interior illumination after sitting overnight in the cold. I noticed that I failed to reconnect a module when I installed my Grom VL2 unit by the glove box; it's generating an error and the red LED for Lexus Link is lit. I'm going to start with just plugging that back in and see if that helps, but if not I'm thinking I'm going to pick up a quality Fluke multimeter and start measuring current on different circuits.
DIsconnect the negative battery terminal and then connect an ammeter across the -ve battery terminal and the -ve battery cable. Report what the current draw is.
Yes, that's the plan, but I'm a bit embarrassed to admit that I don't currently have a high enough amperage multimeter, just a $30 cheapie. I'm looking to pick up a Fluke 88V or similar...
I thought that the 12v battery powers the gauges and many other systems. That means you can look for a phantom draw on the 12v system with any cheap multimeter. I agree that the high voltage system might require a special meter.
I owe somebody a beer! I couldn't get your door switch test to show me anything conclusive, but I had a Amayama order going anyway, so I added 4 door switches to it. Worth $24 just to not do any more diagnosis. They came in today. Took less than 5 minutes to change them all out. It's 39 degree right now. Started the car up and the cluster came right on - didn't reboot. I need to drive it around, but that usually does not matter. I'll be honest - I didn't think it would fix it, but I stand corrected. I'm very happy. Well done, guys! Thank you!
UPDATE: I spoke too soon. The cluster worked great for two whole days. Then early Monday, I had to hit the road @ 27 degree and it started again. Oh well - I've paid more for less excitement than I got from that almost win. Back to the drawing board.
Bringing this up again as the weather has gotten colder.
Before temperatures warmed up I had established to my satisfaction that the battery was not being drained overnight. The interior illumination was not coming on because it's controlled by the central module in the instrument cluster.
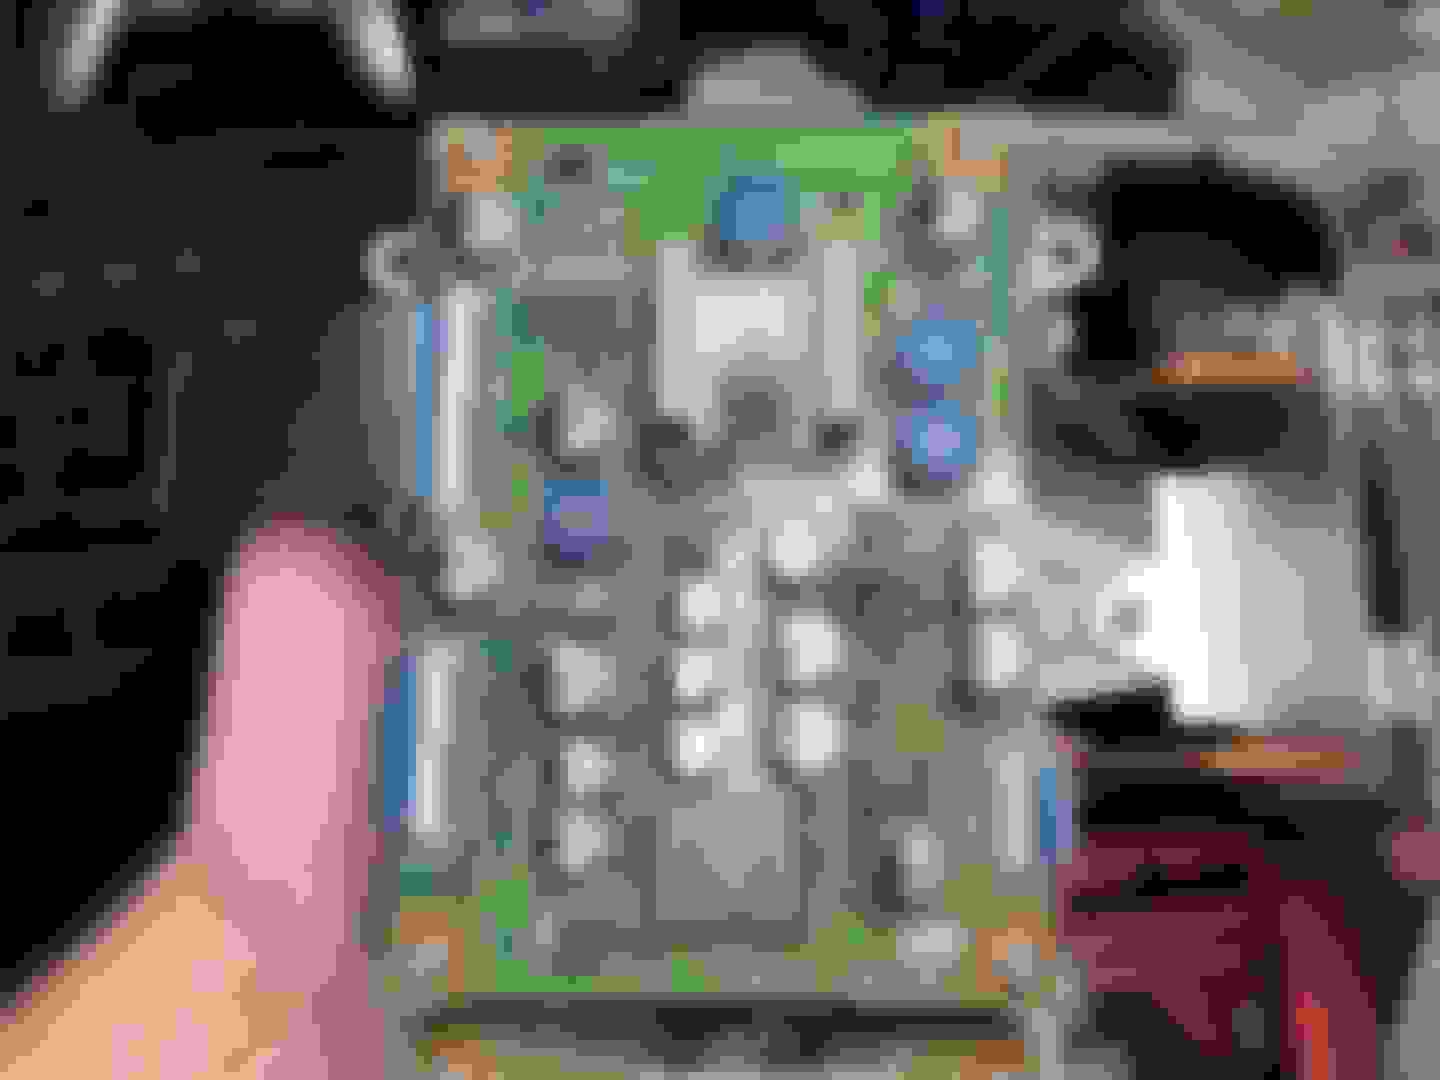
I know that capacitors can be flaky in response to temperature fluctuations, and previous generations of the LS had issues with bad capacitors, so I decided to replace them all. It turns out that Denso/Toyota actually used pretty high-end caps, as they all are from either Panasonic or Chemi-Con. Here are some shots of the 5 boards:
There are five in total:
- An upper board on the right (car side) hosting the connector and an unidentified QFP controller of some sort
- The lower board on the right for the right-side gauges
- The left-side board for its respective gauges
- An upper power supply board under the metal shield at the back of the central display
- A lower board hosting the display controller components
The display and its controllers are all Sharp components, and the display has a large heatsink protruding to the left. The display is a regular rectangular shape; about half of it is just covered up when installed and the displayed information is designed around this fact.
If you have a quality iron this isn't a particularly difficult job. I took the opportunity to upgrade to a professional Metcal station and it made the job a relative snap. All of the electrolytic capacitors are SMD components, but they're large enough to be an easy manual job. I've become a big fan of the "twist and snap" method:
- Grip the old capacitor with decent serrated pliers, apply gentle inward pressure against the board, and gently but firmly twist until the cap snaps off
- Remove the leg remnants with a soldering iron
- Use some soldering wick to remove residual solder, then wipe clean with pure isopropyl alcohol
- Install the replacement capacitor. I like to tack one side with a dab of solder, then do the other side completely, then come back to the first side and finish it off
Even springing for polymer aluminum replacements, all in the caps only come to about $60 tops. I'm attaching a catalog of the capacitors, their values, and the replacements I used.
My repair was successful, as my cluster still functions like it should, but the problem with cold sensitivity was not resolved 🤬
Next I decided to power on the cluster outside of the car, using some freeze spray to narrow down the problem component(s). I didn't do this initially because I didn't have a way to safely hook up the cluster to power. The pins are pretty small in size, and these clusters went for $4k+ when they were last available, so I wasn't keen on potentially shorting anything. However, I discovered another thread on the boards which identified the connector's part number: Instrument cluster 24 pin diagram
The Toyota part (90980-12554) can be found for less than $10 but you're unlikely to find one locally. Toyota doesn't sell the uncrimped terminals, only already crimped pigtails at $20+ a pop. However, if you decide to go that way, the part numbers are 82998–12870 for a plain tin terminal, or 82998–12860 for a gold-plated terminal.
However, with a little research I found out that the connectors are manufactured by TE Connectivity, a company manufacturing a lot (most?) of vehicles' electrical wiring. The TE part number for the plug is 1717112-1 and the terminals are 1674311-7; the prices are $1.07 and $0.1036 each respectively at DigiKey. Using these I put together a small harness to bench test the cluster. The following pins should be wired and connected:
- Pins 17 and 18 to negative/ground
- Pin 13 to constant +12V
- Pin 14 to switched +12V, indicating ignition on
The needles will remain static and most every warning lamp will illuminate, but this is enough for testing purposes.
Once the cluster was powered on I very quickly found the culprit: the large QFP controller on the upper-right cluster board. Hit it with some freeze spray, and the board immediately dims and flickers off. As it warms back up, the backlighting flickers until it stays on.
Unfortunately, none of the marks have led me to what it is exactly. There are a few Chinese chip suppliers with similar part numbers, some of them claim it's a NEC part, but nothing concrete yet. I'm going to be reaching out to some repair shops to see if anyone knows this component and can replace it. If I'm lucky, it's just some cold solder joints and reworking the component will fix it. If I'm unlucky, they're NLA and it can't be repaired.
Anyone know what this part is? I realize I could always buy a used cluster and get the mileage matched, but then I'd be wondering if the same problem is going to come up again...
Great work. Man, you really got into it. I'm happy to jump in to help search for the part, although considering your contribution, i feel less capable than you. When you refer to the QFP board, are you referring to the one with the number 457789-0723 stamped on it? I'll do what I can to help.