


mud flaps
Racer


Joined: Aug 2005
Posts: 1,770
Likes: 16
From: TX, CA
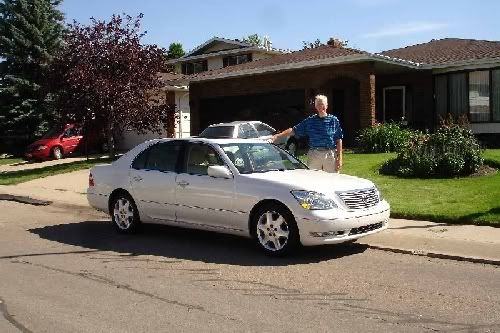
My wife and I live in Edmonton, Alberta. We recently imported into Canada a Silky White '05 from the Deerfield Beach, Fla area that has 17K miles. The car is literally like new and we'd like to keep it in as good a condition as possible here in Endless-Winter country, so this thread caught my eye.
Has anyone purhcased Lexus mud guards from myautofashion.com and, if so, did you have a good experience? That place seems to have the best price that I can find, so we'd buy from them if they've worked out OK for other buyers.
Thanks for any input.
Here are a couple of photos of our car:
Has anyone purhcased Lexus mud guards from myautofashion.com and, if so, did you have a good experience? That place seems to have the best price that I can find, so we'd buy from them if they've worked out OK for other buyers.
Thanks for any input.
Here are a couple of photos of our car:
Last edited by imherenow; May 14, 2011 at 01:11 PM.

Driver School Candidate
Joined: Apr 2010
Posts: 41
Likes: 1
From: Alberta
About the best I can do is to provide another illustration. The OEM mudflaps I installed on a 90 LS400 and a 00 LS400 both came with Japanese-only instructions. I think you will find installation intuitively obvious when you hold a mudflap against the rear of a fender well. They will fit perfectly so it's virtually impossible to install the in the wrong place.
You will probably have to remove the back wheels but there should be enough clearance to install the front mudflaps if you alternately turn the front wheels all the way to the side.
A bit of drilling was required on my 90 and/or 00 LS but don't know if that will be required on your LS430 ... but how to do that was intuitively obvious too. If installation is like on my 00 LS400, you will need a set of small metric hex wrenches. Your LS430 mudflaps may have come with fasteners that will replace existing ones and they may be slightly longer to allow for the thickness of the mudflaps.
I don't remember much about the 90 LS mudflap install (21 years ago!) but I remember the install on my 00 LS was super easy - maybe about one hour total.
The hardware kit that comes with the mud flaps contains screws and their fastening clips. There are 2 larger screws and clips and 8 smaller. The two larger screws and clips match those four already on the portion of the front body panel inside the wheel well, so, after drilling one new appropriately-located hole on each front side, that's where I installed them. The remaining 8 screws and clips all go in new holes drilled in the rear wheel wells, right on the inside edge of the rear panels. Using the two screws already present in the front panels, I secured the front flaps, marked the locaion of the new holes, drilled them, installed the clips, then installed all six screws. For the rear, I placed the flap in the proper position, marked the holes, removed the flaps, drilled the holes, installed the clips, put the flap back in place and screwed in all the screws. Voila! The photos of the flap are the rear of the car. (BTW, I was able to install the fronts without jacking the car and removing the wheels. For the rear, however, I had to jack the car and remove the wheels, using the differential as the jacking point . If you happen to have a right-angle drill, you will be able to do the job without taking the rear wheels off.)
Driver School Candidate
Joined: Apr 2010
Posts: 41
Likes: 1
From: Alberta
2. "Exporting" the car from the US was a snap and, if I remember right, was virtually free.
3. Getting the car into Canada requires submitting the car into the Registry of Imported Vehicles program, which, of course, has a rather steep fee, for what you get. After that, we paid the 5% GST on the full purchase price, then, on top of that, there's a 6% fee for importing a car manufactured in Japan. The latter fee is nothing but legalized extortion, as far as I'm concerned.
4. Once we got the vehicle back to Edmonton, we had to get two inspections done which cost almost $300.
For the amount of money we ended up spending, we probably could have found a vehicle in Canada of that year, but its mileage and physical condition would not have been anywhere near that of the Florida vehicle. The odometer has just now passed the 18,000 mile mark and to this date, the vehicle has never been driven in snow. While putting on the rear mud flaps today, with the rear wheels off the vehicle, I couldn't help but notice that all of the suspension components look like new! Roads in Florida never get frost heaves, so the suspensions of autos that spend their lives in Florida last a very long time. Consequently, the car still rolls down the road like a tight new vehicle.
Anyway, if we had it all to do over again, we'd do exactly the same thing. As far as I'm concerned, we have a brand new Lexus LS430 for far less than the price of a new, entry-level Accord. (And my extra long legs can't fit in the new Accord, Camry or Avalon, while I'm very comfortable in our new Florida bagel barge.)

Driver School Candidate
Joined: Oct 2010
Posts: 11
Likes: 0
From: PA
If you do not mind, can you share with me where you purchased your mud guards?
Thanks, Scott
Thanks, Scott
Thanks very much for the information and advice. With it and the Japanese instructions I was able to install the flaps in about 2 hours. I took my time and did everything very carefully.
The hardware kit that comes with the mud flaps contains screws and their fastening clips. There are 2 larger screws and clips and 8 smaller. The two larger screws and clips match those four already on the portion of the front body panel inside the wheel well, so, after drilling one new appropriately-located hole on each front side, that's where I installed them. The remaining 8 screws and clips all go in new holes drilled in the rear wheel wells, right on the inside edge of the rear panels. Using the two screws already present in the front panels, I secured the front flaps, marked the locaion of the new holes, drilled them, installed the clips, then installed all six screws. For the rear, I placed the flap in the proper position, marked the holes, removed the flaps, drilled the holes, installed the clips, put the flap back in place and screwed in all the screws. Voila! The photos of the flap are the rear of the car. (BTW, I was able to install the fronts without jacking the car and removing the wheels. For the rear, however, I had to jack the car and remove the wheels, using the differential as the jacking point . If you happen to have a right-angle drill, you will be able to do the job without taking the rear wheels off.)
The hardware kit that comes with the mud flaps contains screws and their fastening clips. There are 2 larger screws and clips and 8 smaller. The two larger screws and clips match those four already on the portion of the front body panel inside the wheel well, so, after drilling one new appropriately-located hole on each front side, that's where I installed them. The remaining 8 screws and clips all go in new holes drilled in the rear wheel wells, right on the inside edge of the rear panels. Using the two screws already present in the front panels, I secured the front flaps, marked the locaion of the new holes, drilled them, installed the clips, then installed all six screws. For the rear, I placed the flap in the proper position, marked the holes, removed the flaps, drilled the holes, installed the clips, put the flap back in place and screwed in all the screws. Voila! The photos of the flap are the rear of the car. (BTW, I was able to install the fronts without jacking the car and removing the wheels. For the rear, however, I had to jack the car and remove the wheels, using the differential as the jacking point . If you happen to have a right-angle drill, you will be able to do the job without taking the rear wheels off.)
Driver School Candidate
Joined: Apr 2010
Posts: 41
Likes: 1
From: Alberta
After finding out that Lexus no longer makes the flaps with our car's 072 paint code, I bought a set with the 062 pait code from a private eBay seller. I then acquired two cans of custom-mixed paint -- base coat and top coat -- then, after the flashing of each coat, I applied about 4 coats of clearcoat. After about 5 days of drying, I wet-sanded with 1500 grit, then 2000, then polished to a high-gloss finish with System One. I think the color match is very good.

Driver School Candidate
Joined: May 2010
Posts: 48
Likes: 0
From: BC
So I inquired about these mudguards at Sewell, and they directed me to a mudguard set they had on clearance - part number 08414-50010-C0. Bought them back in October, and only just recently took them to the dealer to get them installed - problem is, these ones do NOT sit flush so they're unable to be mounted without some cutting/modification.
I tried looking up this part number on some online databases, but the only thing I could come up with was a Japanese auction for the same set, so I'm thinking these sets were meant for the Japanese Celsior, not the North American LS430. I guess the part numbers earlier in this thread starting with 766xx are the ones I should've ordered.
Now I'm stuck with a part I can't install. Sewell's policy is that they don't take back anything on clearance, which sucks for me since they recommended the part to me (yes, my fault for taking so long to trying to install them after ordering). I tried e-mailing them (apparently their website is devoid of phone numbers) but they haven't replied in a week.
So... anyone want a black mudguard set for cheap, or think Sewell would be willing to bend the rules for me?
ClubLexus Stories
Celebrating Lexus & Toyota from Around the Globe

Lexus NX 350h: A Fuel-Sipping Secret Hot Hatch???
Michael S. Palmer
5 Best & 5 Worst Lexus Daily Drivers
Joe Kucinski
Top 5 Hottest Lexus & Toyotas in 2026 (Hardest To Buy)
Brett Foote
2026 Lexus IS 350 F Sport Review: The Last of Its Kind Still Rocks
Michael S. Palmer
Top 10 Most Confusing Things Lexus Has Ever Done!
Joe Kucinski
2026 Lexus ES Review: Lexus Re-Embraces Founding Principles
Michael S. Palmer
10 Lexus Bargains That are Cheaper Than a New Toyota RAV4
Joe Kucinski
8 Weirdest Things Lexus Has Ever Built
Verdad Gallardo
10 Lexus Designs That Have Aged Like Fine Wine
Verdad GallardoLead Lap


Joined: Jan 2004
Posts: 3,595
Likes: 271
From: Kansas
I've bought a lot of stuff from Sewell - I didn't think they sold stuff for non-U.S. cars.
The phone number I have for their parts department from a receipt I got when I bought from their website is 214-353-2056.
Funny, the cheapest source of the last Lexus LS mudflaps I bought was a dealer in BC - Metro in Victoria.
The phone number I have for their parts department from a receipt I got when I bought from their website is 214-353-2056.
Funny, the cheapest source of the last Lexus LS mudflaps I bought was a dealer in BC - Metro in Victoria.
Driver School Candidate
Joined: May 2010
Posts: 48
Likes: 0
From: BC
Well, to make a long story short I imported a US-spec vehicle if there's a difference between the American and Canadian vehicles then that wouldn't be applicable to me in this case.
Then again, I was searching parts databases and the 766xx part number looks like it's used in both American/Canadian models so that should be a moot point.
Thanks for the phone number. I'll try giving them a ring on Monday.
Then again, I was searching parts databases and the 766xx part number looks like it's used in both American/Canadian models so that should be a moot point.
Thanks for the phone number. I'll try giving them a ring on Monday.
Lead Lap
Joined: Jan 2004
Posts: 3,595
Likes: 271
From: Kansas
Well, to make a long story short I imported a US-spec vehicle if there's a difference between the American and Canadian vehicles then that wouldn't be applicable to me in this case.
Then again, I was searching parts databases and the 766xx part number looks like it's used in both American/Canadian models so that should be a moot point.
Then again, I was searching parts databases and the 766xx part number looks like it's used in both American/Canadian models so that should be a moot point.

Thanks very much for the information and advice. With it and the Japanese instructions I was able to install the flaps in about 2 hours. I took my time and did everything very carefully.
The hardware kit that comes with the mud flaps contains screws and their fastening clips. There are 2 larger screws and clips and 8 smaller. The two larger screws and clips match those four already on the portion of the front body panel inside the wheel well, so, after drilling one new appropriately-located hole on each front side, that's where I installed them. The remaining 8 screws and clips all go in new holes drilled in the rear wheel wells, right on the inside edge of the rear panels. Using the two screws already present in the front panels, I secured the front flaps, marked the locaion of the new holes, drilled them, installed the clips, then installed all six screws. For the rear, I placed the flap in the proper position, marked the holes, removed the flaps, drilled the holes, installed the clips, put the flap back in place and screwed in all the screws. Voila! The photos of the flap are the rear of the car. (BTW, I was able to install the fronts without jacking the car and removing the wheels. For the rear, however, I had to jack the car and remove the wheels, using the differential as the jacking point . If you happen to have a right-angle drill, you will be able to do the job without taking the rear wheels off.)
The hardware kit that comes with the mud flaps contains screws and their fastening clips. There are 2 larger screws and clips and 8 smaller. The two larger screws and clips match those four already on the portion of the front body panel inside the wheel well, so, after drilling one new appropriately-located hole on each front side, that's where I installed them. The remaining 8 screws and clips all go in new holes drilled in the rear wheel wells, right on the inside edge of the rear panels. Using the two screws already present in the front panels, I secured the front flaps, marked the locaion of the new holes, drilled them, installed the clips, then installed all six screws. For the rear, I placed the flap in the proper position, marked the holes, removed the flaps, drilled the holes, installed the clips, put the flap back in place and screwed in all the screws. Voila! The photos of the flap are the rear of the car. (BTW, I was able to install the fronts without jacking the car and removing the wheels. For the rear, however, I had to jack the car and remove the wheels, using the differential as the jacking point . If you happen to have a right-angle drill, you will be able to do the job without taking the rear wheels off.)
Hello, may I ask where you got the screws from?
Because I bought OEM mud flaps for my LS430, but I didn't get the screws with it.
Thanks.

Rookie
Joined: Jun 2008
Posts: 52
Likes: 0
From: MI
I read this without looking at the dates of the OP.
I guess the next best thing to eternity is to start a post here.
Still, info provided is useful. I would like to put some mud flaps on my 03. The $500 price tag seems pretty steep but like everything for our cars-value is in the eye of the beholder.
I guess the next best thing to eternity is to start a post here.
Still, info provided is useful. I would like to put some mud flaps on my 03. The $500 price tag seems pretty steep but like everything for our cars-value is in the eye of the beholder.

Thread
Thread Starter
Forum
Replies
Last Post