
Headlight adjustment help.


Rookie
Joined: Oct 2012
Posts: 73
Likes: 4
From: TX
User-manual-man to the rescue, once again... 
See below. The manual doesn't say which direction to turn the bolts to aim the headlights higher, so I guess you'll have to find that out through trial and error. Please report back with your findings if possible.
See below. The manual doesn't say which direction to turn the bolts to aim the headlights higher, so I guess you'll have to find that out through trial and error. Please report back with your findings if possible.
Rookie
Joined: Oct 2012
Posts: 73
Likes: 4
From: TX


Trending Topics

Pole Position
Joined: Oct 2011
Posts: 206
Likes: 0
From: Houston, TX
anyone know the answer to this? i had to adjust my headlights
i found the adjustment for U/D but cant find the one for R/L
why do they go up and down when u turn on the lights if they dont auto level themselves?
i know its a old thread
i found the adjustment for U/D but cant find the one for R/L
why do they go up and down when u turn on the lights if they dont auto level themselves?
i know its a old thread
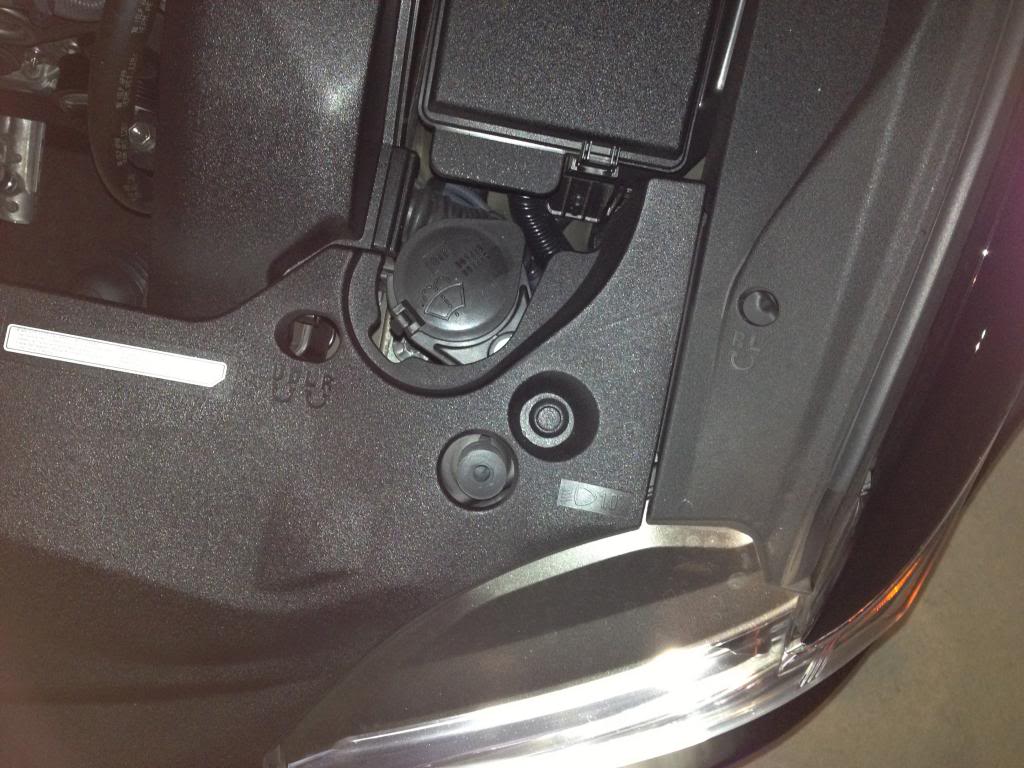
On the right of the picture (toward side fender) you'll notice a hole with R (clockwise) and L (counterclockwise). I'm assuming that adjust the lights right or left.
Now the confusing part is the other hole on the left side of picture next to the wiper fluid refill. There are two little diagrams. One says U and D, the other says L and R. I'm assuming that's up down left and right. But on the same hole? How can you adjust two variables with just one adjustment screw?
Now to make it even more confusing, the passenger side of the engine compartment looks like this:
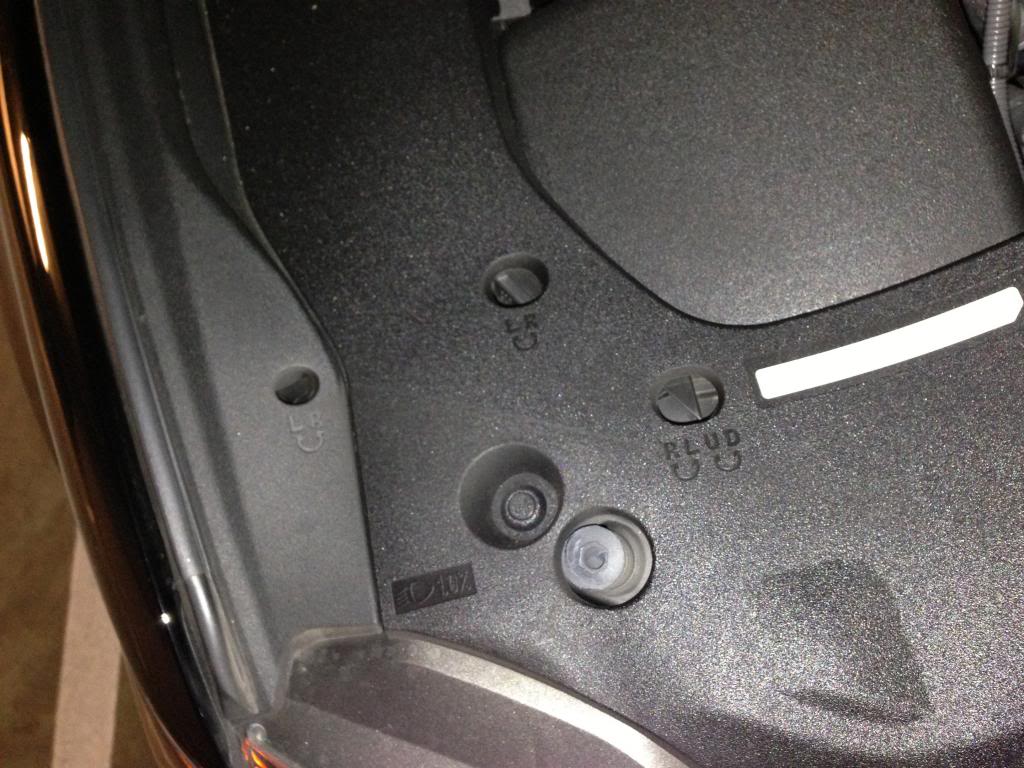
You have the same L R hole near the fender, the R L and U D toward the middle of the car. But between these two there is now a third hole with the L R label that was not present on the driver side of the car? Anyone has any clue?
But I'm still looking for an answer as to what the inner U/D L/R screw does. Does the inner screw go up down OR left right?
Also I can tell you guys that at the factory I think Lexus aimed the lights too low. Last night I while parking the car at 25ft from the wall, I noticed the lights (hot spots) were 4" below the level of the bulbs/headlights. Most people suggests aiming it 2-2.5" below the center of the headlights. What that means is we're not seeing as far down the road as we could.
Just adjusted my headlights up about 2-2.5 inches at 25 ft.
So on the driver side, when you turn the middle screw (labeled U D L R) clockwise. I think it means the light goes UP and also to the LEFT. Keep track of the number of turns.
You then turn the fender screw (labeled R L) clockwise the same number of turns because now it will turn the light back toward the RIGHT. Thus the net effect is the lights go UP while still being centered.
Anyways, I like it much better afterward. I can see much farther down the road and standing in front of the car the glare is minimal. Less than all SUV's out there.
Driver School Candidate
Joined: Jan 2013
Posts: 43
Likes: 0
From: TX
Maybe I'm missing something, as I don't see the screw to adjust for Up/Down adjustments on each side. I do see the white screws on the left and right for Right/Left adjust. I do have a 20" Philps screw driver for the job. What color is the main screws?
____________________
2013 GS350 F-Sport: Starfire Pearl/Cabernet Red | NAV | ML Audio | HUD | BSMS | IPA | DHS.DRS | Remote Engine Start | ISSForged FM10R Gloss Black/Polished 20"x9" +38 & 20"x10.5" +45 | Nitto NT555 245/35R20 & 275/30R20 | Swift Springs | Prestigious Society NAV Override | JDM Fog Light Kit w/PIIA Yellow Bulbs

Instructor

Joined: Jan 2013
Posts: 869
Likes: 6
From: CA
It looks kinda like a gear.
Courtesy of GSthe4th:

Courtesy of GSthe4th:
Maybe I'm missing something, as I don't see the screw to adjust for Up/Down adjustments on each side. I do see the white screws on the left and right for Right/Left adjust. I do have a 20" Philps screw driver for the job. What color is the main screws?
____________________
2013 GS350 F-Sport: Starfire Pearl/Cabernet Red | NAV | ML Audio | HUD | BSMS | IPA | DHS.DRS | Remote Engine Start | ISSForged FM10R Gloss Black/Polished 20"x9" +38 & 20"x10.5" +45 | Nitto NT555 245/35R20 & 275/30R20 | Swift Springs | Prestigious Society NAV Override | JDM Fog Light Kit w/PIIA Yellow Bulbs
____________________
2013 GS350 F-Sport: Starfire Pearl/Cabernet Red | NAV | ML Audio | HUD | BSMS | IPA | DHS.DRS | Remote Engine Start | ISSForged FM10R Gloss Black/Polished 20"x9" +38 & 20"x10.5" +45 | Nitto NT555 245/35R20 & 275/30R20 | Swift Springs | Prestigious Society NAV Override | JDM Fog Light Kit w/PIIA Yellow Bulbs