
Replace the rear tweeter


Thread Starter
Driver School Candidate
Joined: May 2013
Posts: 4
Likes: 0
From: NY
Hi,
How can I replace the rear tweeters ( I am not sure what they are called but I mean the two small speakers in the back next to subwoofer)?
part no 86160-0WC70
How can I replace the rear tweeters ( I am not sure what they are called but I mean the two small speakers in the back next to subwoofer)?
part no 86160-0WC70

Driver
Joined: Jun 2013
Posts: 195
Likes: 42
From: CT
I highly suggest you get the proper trim removing tools before doing this. A screw driver and some tape will probably work but its a lot easier with the proper tools and they are only a few dollars online.

Rookie
Joined: Jan 2013
Posts: 58
Likes: 0
From: NY
Remove the rear deck and they are easy to get to. I found pictures somewhere but basically you have to remove the rear seat and the pillars at the back next to the rear window along with the third break light. After all that is out the rear deck is held down by a white clip in the middle of the rear deck towards the front. I don't have a rear sunshade but I don't think you have to take out the third break light if you have a rear sunshade.
I highly suggest you get the proper trim removing tools before doing this. A screw driver and some tape will probably work but its a lot easier with the proper tools and they are only a few dollars online.
I highly suggest you get the proper trim removing tools before doing this. A screw driver and some tape will probably work but its a lot easier with the proper tools and they are only a few dollars online.

Intermediate

Joined: Jan 2005
Posts: 425
Likes: 8
From: ID
^^ In the ML system they specify:
14 Speaker System
Center Channel:
(1) 2.5” metal cone midrange center channel speaker within instrument panel
Three-way, Biamped Left and Right Channels:
(2) 6.5” woofers in front doors
(2) 2.5” metal cone midranges in instrument panel
(2) 1.0” titanium tweeters in instrument panel
Side Channels:
(2) 6.5” woofers in rear doors
(2) 1.0” tweeters in rear doors
Left and Right Surround Channels:
(2) 2.5” metal cone midranges on rear deck
Subwoofer:
(1) 10” cast basket subwoofer on rear deck
Rookie
Joined: Jan 2013
Posts: 58
Likes: 0
From: NY
^^ In the ML system they specify:
14 Speaker System
Center Channel:
(1) 2.5� metal cone midrange center channel speaker within instrument panel
Three-way, Biamped Left and Right Channels:
(2) 6.5� woofers in front doors
(2) 2.5� metal cone midranges in instrument panel
(2) 1.0� titanium tweeters in instrument panel
Side Channels:
(2) 6.5� woofers in rear doors
(2) 1.0� tweeters in rear doors
Left and Right Surround Channels:
(2) 2.5� metal cone midranges on rear deck
Subwoofer:
(1) 10� cast basket subwoofer on rear deck
I will need to look into getting the 2.5" metal cone midranges on rear deck.
Trending Topics
Lexus Test Driver
Joined: Mar 2008
Posts: 823
Likes: 6
From: UT
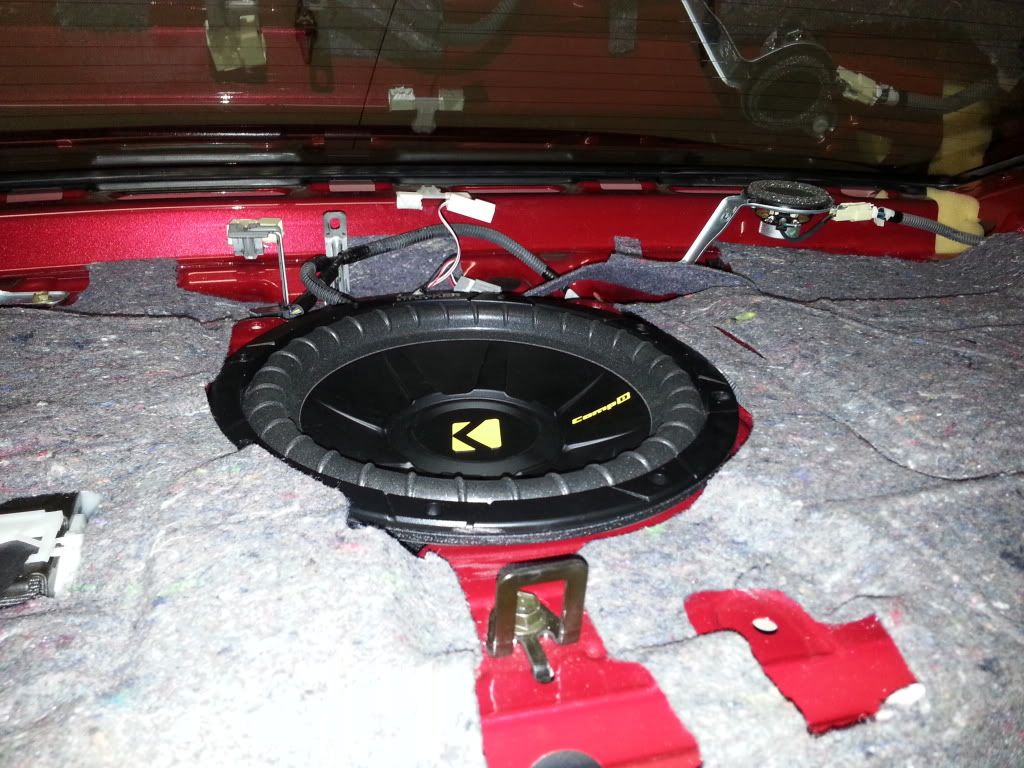
Well I was able to figure it out, and of course my phone was dead, so I don't have pics. Here's how I got it done:
Remove lower seat, no bolts, pull gently but with some force.
Remove lower bolts of seat upper at the bottom of the seat upper
Remove seatbelt bolts
Remove 2 bolts under the center armrest.
No need to pull the seat upper completely out.
Now it gets a little tricky.
C pillar panels have to be removed. Take a plastic wedge tool and GENTLY pull off the panels on the C pillar.
I was able to get the tray out far enough to access the rear tweeters without completely removing the third brake light but partially.
unplug the speaker wire by pushing the trigger down, and then out.
unbolt the one 10mm bolt from the metal tray it's attached to
Use the plastic wedge tool to lift up the plastic pin that holds the one side in place
Lift up carefully ensuring that you don't tap the glass, I saw once a window getting broken once this way.
Replace the speaker.
Put all back in reverse order.
Be careful not to mar up the felt that is on the C pillar covers as they are light and can stain easily.
Hope this helps
Lexus Test Driver
Joined: Feb 2012
Posts: 1,158
Likes: 23
From: PA
Hello CL. I'm glad this thread was made. I've been looking for this something related to this for a few days now. Yes those rattling tweeters in the rear are driving me crazy. I'm thinking about just removing them both. And hearing my audio without those. I already removed the front one. In the center by the windshield. The quality isn't at its peak. But hey to not here those rattling noises I can live without them.


Driver School Candidate
Joined: Nov 2006
Posts: 14
Likes: 0
From: Fl
My driver rear tweeter started making that dreaded cracking noise recently. I just fixed the dust cap on my front center speaker. This is the 4th speaker I will be fixing in this car. I am a little disappointed because for a high end system I didn�t think I would have to be making these type of repairs so soon.

Racer


Joined: Mar 2015
Posts: 1,631
Likes: 299
From: TX
The rear deck with the window shade is two pieces. You have to remove one before you can remove the other since the main deck clips into the smaller deck piece.
Pit Crew
Joined: Jun 2010
Posts: 163
Likes: 7
From: GA
How do you undo the 3rd brake light from the 2nd deck?
I just replaced my LR speaker and never found a connection to undo. The Wire harness comes from the light > to a holding clip in front > back to a holding clip in the back (under the window) > then runs into the body. There is not a connection anywhere that I could see.
I just had to pop out the front clip, cut the tape holding the wire harness in the back clip, and that gave me enough play in the wiring harness to move the deck out of the way so I could get to the speaker bolt.
I'm sure I missed something, and should have taken pictures . . . . but I swear, I never saw another disconnect anywhere . . .

