
Carbon Fiber wrap Galore!!! (Lots of pics)
 04-16-09, 03:26 PM
#1

Hello all,
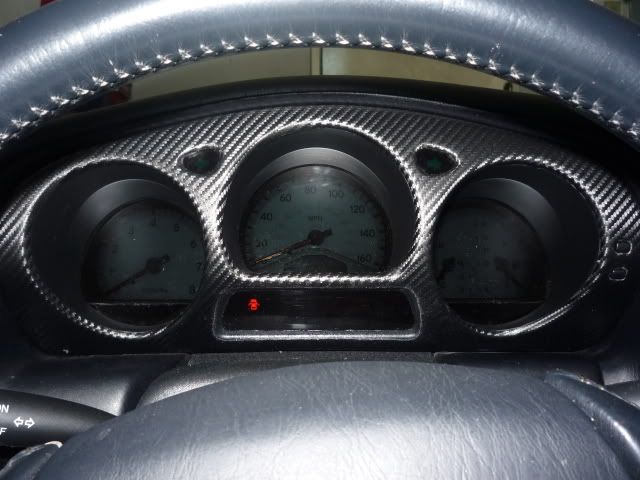
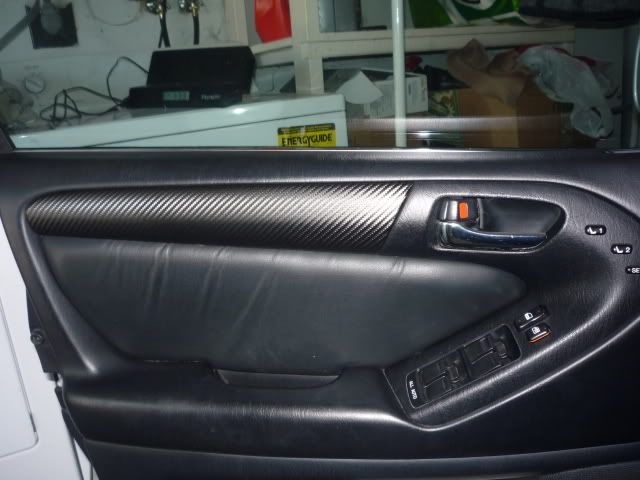
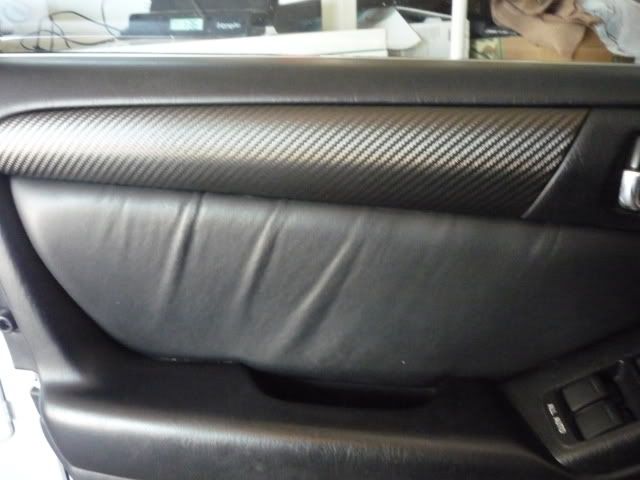
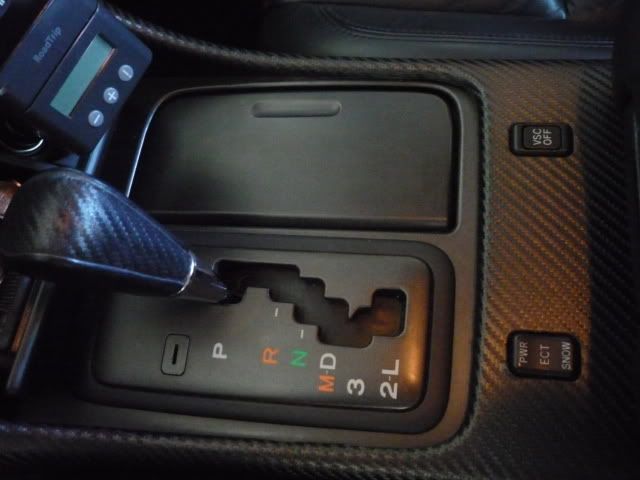
As some of you may know, I am taking my car down the "sporty," "sportdesign-ish" road. I am also growing tired of the walnut trim. I have always wanted a blackwood interior or carbon fiber interior. Both are hard to find and very expensive (to me). Tony (CarbonGS) had "one-off" custom carbon fiber interior pieces that I wanted but he took it off the market. =0( Blackwood kits sometimes don't match perfectly or kits are incomplete. So after Jimmy (istundra) provided a link to truciet's thread over at the 2IS subforum, I decided to try and carbon fiber fabric wrap my own interior.
If you're tired of reading at this point... Please scroll down for pictures.
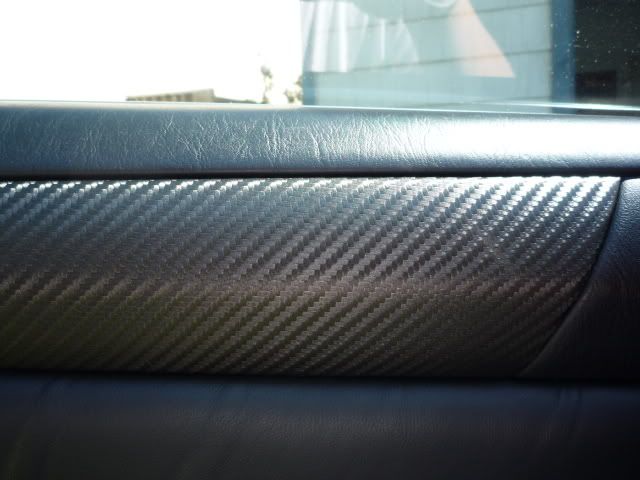
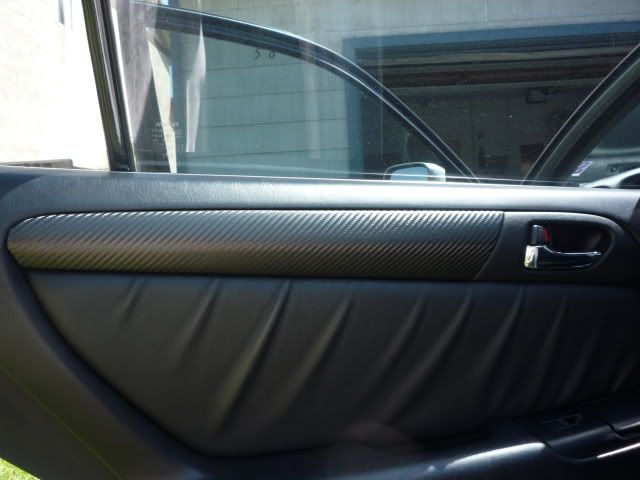
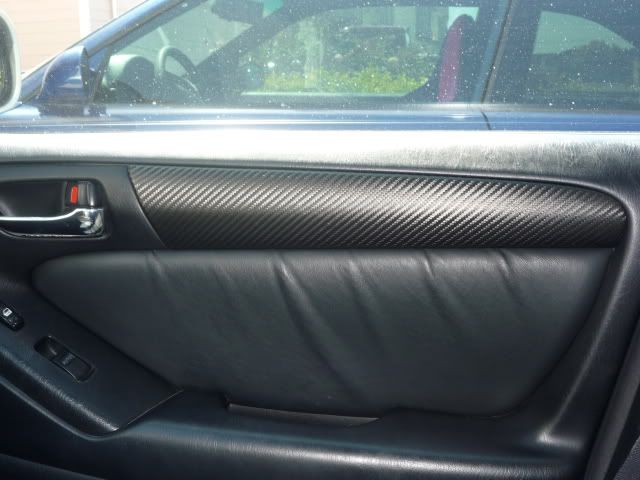
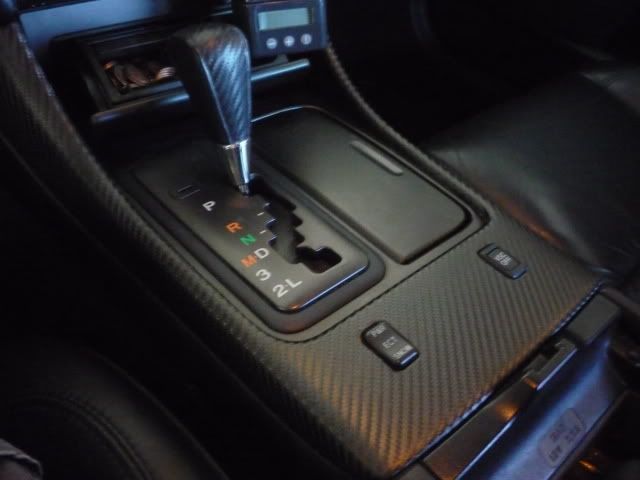
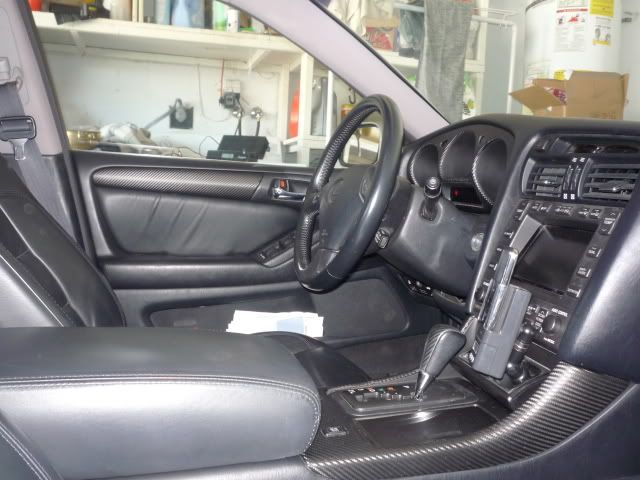
So, this is carbon fiber fabric which is flexible and reasonably stretchy. It is NOT real carbon fiber. The top layer of the fabric has been printed or stamped to resemble a true CF weave. It looks very good though. The surface feels silk-like and you can feel the stamping pattern. To complete the project only required very basic tools and materials.
Here's a list:
-Masking or painter's tape
-box cutter and scissors (you will need to press hard to cut. CF is tough!)
-3M adhesive spray #77
-Goo gone (Use sparingly and carefully. Preferably with Q-tip)
-Philips screwdriver and flathead
-A lot of prep work... This is very important. There are no shortcuts for this type of project. I spent ~14-15 hours for all the pieces you see below.
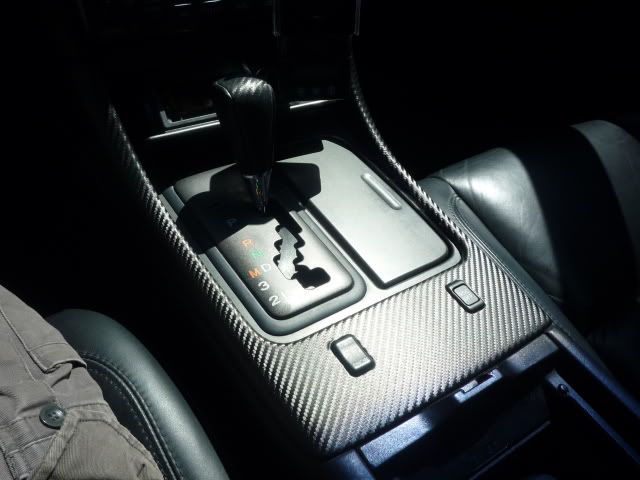
The most important things? You will need steady hands, a lot time, and a lot of patience!! It would help if you have some kind of arts & crafts skill because working with a large single piece of carbon fiber fabric (especially for the gauge cluster bezel and center console trim) requires a lot of tacking and untacking, smoothing, repositioning, cutting, and improvising. I kind of rushed this and it didn't end up the way I exactly wanted but still came out pretty good IMO. This was the first time I took apart my interior. It was a bit scary but I just decided to dive right in with the help of BananaGS' site.
I realize that not all of you may like it, but so far, I like it a lot. It is subtle against my leather and provides a nice contrast and sporty look. The raw finish gives it a nice matte look. I hope it holds up well against wear, hot and cold weather.
The cost for the carbon fiber fabric is $40 per 3 feet by 3 feet (I think) and $37.50 for any additional yard. This should be enough to do the same interior pieces as me (if you cut templates wisely). However, I ordered 6 feet by 3 feet (for my roommates and friends to use, or if I messed up). You can purchase from a place called Reloaded Autosports, that is where I got mine. It comes available in charcoal (which I have), silver, or black.
Judging by the amount of CF fabric material I used, plus adhesive spray and tape, etc., this project cost me about $45.
Let me know if you have any questions or comments. Just post it up and this thread and I will respond. And no..... I did not do a documented write-up with photos. There is not much time for that, after you spray the adhesive, you only have a limited time to work with the carbon fiber fabric.
Please enjoy!
-Theo
Pictures with flash, no-flash, indoors, and outdoors.


As some of you may know, I am taking my car down the "sporty," "sportdesign-ish" road. I am also growing tired of the walnut trim. I have always wanted a blackwood interior or carbon fiber interior. Both are hard to find and very expensive (to me). Tony (CarbonGS) had "one-off" custom carbon fiber interior pieces that I wanted but he took it off the market. =0( Blackwood kits sometimes don't match perfectly or kits are incomplete. So after Jimmy (istundra) provided a link to truciet's thread over at the 2IS subforum, I decided to try and carbon fiber fabric wrap my own interior.
If you're tired of reading at this point... Please scroll down for pictures.
So, this is carbon fiber fabric which is flexible and reasonably stretchy. It is NOT real carbon fiber. The top layer of the fabric has been printed or stamped to resemble a true CF weave. It looks very good though. The surface feels silk-like and you can feel the stamping pattern. To complete the project only required very basic tools and materials.
Here's a list:
-Masking or painter's tape
-box cutter and scissors (you will need to press hard to cut. CF is tough!)
-3M adhesive spray #77
-Goo gone (Use sparingly and carefully. Preferably with Q-tip)
-Philips screwdriver and flathead
-A lot of prep work... This is very important. There are no shortcuts for this type of project. I spent ~14-15 hours for all the pieces you see below.
The most important things? You will need steady hands, a lot time, and a lot of patience!! It would help if you have some kind of arts & crafts skill because working with a large single piece of carbon fiber fabric (especially for the gauge cluster bezel and center console trim) requires a lot of tacking and untacking, smoothing, repositioning, cutting, and improvising. I kind of rushed this and it didn't end up the way I exactly wanted but still came out pretty good IMO. This was the first time I took apart my interior. It was a bit scary but I just decided to dive right in with the help of BananaGS' site.
I realize that not all of you may like it, but so far, I like it a lot. It is subtle against my leather and provides a nice contrast and sporty look. The raw finish gives it a nice matte look. I hope it holds up well against wear, hot and cold weather.
The cost for the carbon fiber fabric is $40 per 3 feet by 3 feet (I think) and $37.50 for any additional yard. This should be enough to do the same interior pieces as me (if you cut templates wisely). However, I ordered 6 feet by 3 feet (for my roommates and friends to use, or if I messed up). You can purchase from a place called Reloaded Autosports, that is where I got mine. It comes available in charcoal (which I have), silver, or black.
Judging by the amount of CF fabric material I used, plus adhesive spray and tape, etc., this project cost me about $45.
Let me know if you have any questions or comments. Just post it up and this thread and I will respond. And no..... I did not do a documented write-up with photos. There is not much time for that, after you spray the adhesive, you only have a limited time to work with the carbon fiber fabric.
Please enjoy!
-Theo
Pictures with flash, no-flash, indoors, and outdoors.
Last edited by sleeper408; 04-23-09 at 02:18 PM.


Trending Topics
04-16-09, 04:02 PM
#8

 04-16-09, 05:33 PM
#11
Looks Great Theo. So are you going to let me see it for real at the BOS5 meet in June ? 
https://www.clublexus.com/forums/nor...thread-11.html
Also where is Reloaded Autosports? I have a different use for the CF then you.
Oh and as far as the blackwood, you never saw it in my car? I've had it for years. Had it all matched.
https://www.clublexus.com/forums/nor...thread-11.html
Also where is Reloaded Autosports? I have a different use for the CF then you.
Oh and as far as the blackwood, you never saw it in my car? I've had it for years. Had it all matched.
Last edited by RMMGS4; 04-16-09 at 05:39 PM.
04-16-09, 05:48 PM
#13
Lexus Champion

Join Date: Jan 2003
Location: GA
Posts: 2,537
Likes: 0
Received 0 Likes
on
0 Posts
I was wondering how it would look without clear coat over it, but it came out very nice. Sporty yet subtle. You did a very clean and professional looking job!!! That is SICK!!!
04-16-09, 06:01 PM
#15
Looks Great Theo. So are you going to let me see it for real at the BOS5 meet in June ?
https://www.clublexus.com/forums/nor...thread-11.html
Also where is Reloaded Autosports? I have a different use for the CF then you.
Oh and as far as the blackwood, you never saw it in my car? I've had it for years. Had it all matched.
https://www.clublexus.com/forums/nor...thread-11.html
Also where is Reloaded Autosports? I have a different use for the CF then you.
Oh and as far as the blackwood, you never saw it in my car? I've had it for years. Had it all matched.