


TTe installation
Thread Starter
Pole Position
Joined: Jan 2004
Posts: 362
Likes: 0
From: Pennsylvania
So I am finally going to install my tte lip this weekend, well I am going attempt. I got the driller and the epoxy from PePboys. It looks like i have to mix it up or something, it came in 2 packets and I have 5 mins to install it before it sets once its mixed. Is this the right kind? I still have to go get the sand paper.
Any advices before I start my saturday project?
Thank you.
Any advices before I start my saturday project?
Thank you.
Last edited by NesTea420; Jul 14, 2005 at 06:16 AM.
Originally Posted by NesTea420
So I am finally going to install my tte lip this weekend, well I am going attempt. I got the driller and the epoxy from PePboys. It looks like i have to mix it up or something, it came in 2 packets and I have 5 mins to install it before it sets once its mixed. Is this the right kind? I still have to go get the sand paper.
Any advices before I start my saturday project?
Thank you.
Any advices before I start my saturday project?
Thank you.
please post a pic of exactly what bonding agent you intend to use for if its the wrong agent your lip will fall off while driving at hwy speeds
you should be using a urethene to urethene bonding/sealing agent that does not req mixing and takes a few hrs to cure

Rookie
Joined: Jan 2003
Posts: 52
Likes: 0
From: Florida
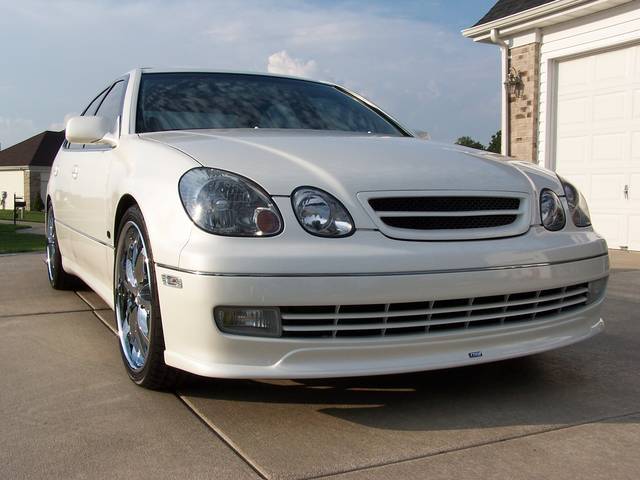
Hey man, congrats with the spoiler. That is one of the best looks for for the GS. The best thing you can do to intall this item is as follow. You are going to need someone to hepl.
1- Place spoiler in place under bumper. Once in place take a wax pencil, outline location.
2- Take sand paper (80-120) sand are below pencil mark until rough. Clean area w/ degreacer.
3- Put back spoiler in place, double check line.
4- Apply screws at bottom & ends of spoiler.
5- Believe or not use clear silicon from Home Depot, aplly a line (1/4" thick) of it at 3/16" to 1/4" from wax line.
6- With your partner's help, lift spoiler in place, use 2" blue masking tape & start taping from center out to each end. Place pieces of tape ( 30" long) in 3" increments from bottom of spoiler to top of bumper. Pull tape until spoiler is in place.
7- Place car in area that can stay overnight (garage, etc.), use a 50" piece of 2x4, place in under
spoiler. Place jack under 2x4 & apply gentel preassure to it.
8- Next morning, remove jack, tape & cut out excess silicon carefully & you should be good to go.
I hope this can help you. It should look great with no screw holes visible. Good luck!
Last edited by Eliel; Jul 14, 2005 at 08:02 AM.
Thread Starter
Pole Position
Joined: Jan 2004
Posts: 362
Likes: 0
From: Pennsylvania
Originally Posted by Eliel
Hey man, congrats with the spoiler. That is one of the best looks for for the GS. The best thing you can do to intall this item is as follow. You are going to need someone to hepl.
1- Place spoiler in place under bumper. Once in place take a wax pencil, outline location.
2- Take sand paper (80-120) sand are below pencil mark until rough. Clean area w/ degreacer.
3- Put back spoiler in place, double check line.
4- Apply screws at bottom & ends of spoiler.
5- Believe or not use cleas silicon from Home Depot, aplly a line (1/4" thick) of it at 3/16" to 1/4" from wax line.
6- With your partner's help, lift spoiler in place, use 2" blue masking tape & start taping from center out to each end. Place pieces of tape ( 30" long) in 3" increments from bottom of spoiler to top of bumper. Pull tape until spoiler is in place.
7- Place car in area that can stay overnight (garage, etc.), use a 50" piece of 2x4, place in under
spoiler. Place jack under 2x4 & apply gentel preassure to it.
8- Next morning, remove jack, tape & cut out excess silicon carefully & you should be good to go.
I hope this can help you. It should look great with no screw holes visible. Good luck!
Thread Starter
Pole Position
Joined: Jan 2004
Posts: 362
Likes: 0
From: Pennsylvania
Originally Posted by lexforlife
please post a pic of exactly what bonding agent you intend to use for if its the wrong agent your lip will fall off while driving at hwy speeds
you should be using a urethene to urethene bonding/sealing agent that does not req mixing and takes a few hrs to cure
you should be using a urethene to urethene bonding/sealing agent that does not req mixing and takes a few hrs to cure
I don't think I have right stuff. It said rubber and plactic bonding...so I am not sure now. I'll check it when I get home.
Where would I get urethene bonding agent? PepBoyz?
Instructor


Joined: Jul 2002
Posts: 1,216
Likes: 71
From: South Florida
Originally Posted by Eliel
Hey man, congrats with the spoiler. That is one of the best looks for for the GS. The best thing you can do to intall this item is as follow. You are going to need someone to hepl.
1- Place spoiler in place under bumper. Once in place take a wax pencil, outline location.
2- Take sand paper (80-120) sand are below pencil mark until rough. Clean area w/ degreacer.
3- Put back spoiler in place, double check line.
4- Apply screws at bottom & ends of spoiler.
5- Believe or not use cleas silicon from Home Depot, aplly a line (1/4" thick) of it at 3/16" to 1/4" from wax line.
6- With your partner's help, lift spoiler in place, use 2" blue masking tape & start taping from center out to each end. Place pieces of tape ( 30" long) in 3" increments from bottom of spoiler to top of bumper. Pull tape until spoiler is in place.
7- Place car in area that can stay overnight (garage, etc.), use a 50" piece of 2x4, place in under
spoiler. Place jack under 2x4 & apply gentel preassure to it.
8- Next morning, remove jack, tape & cut out excess silicon carefully & you should be good to go.
I hope this can help you. It should look great with no screw holes visible. Good luck!
1- Place spoiler in place under bumper. Once in place take a wax pencil, outline location.
2- Take sand paper (80-120) sand are below pencil mark until rough. Clean area w/ degreacer.
3- Put back spoiler in place, double check line.
4- Apply screws at bottom & ends of spoiler.
5- Believe or not use cleas silicon from Home Depot, aplly a line (1/4" thick) of it at 3/16" to 1/4" from wax line.
6- With your partner's help, lift spoiler in place, use 2" blue masking tape & start taping from center out to each end. Place pieces of tape ( 30" long) in 3" increments from bottom of spoiler to top of bumper. Pull tape until spoiler is in place.
7- Place car in area that can stay overnight (garage, etc.), use a 50" piece of 2x4, place in under
spoiler. Place jack under 2x4 & apply gentel preassure to it.
8- Next morning, remove jack, tape & cut out excess silicon carefully & you should be good to go.
I hope this can help you. It should look great with no screw holes visible. Good luck!
Now that is a thorough write up on a TTE Lip install!! You would almost think that Eliel wrote the manual.
actually eliel and i did our gs together back in the day but his instructions as laid out are correct but with one exception , you cannot use silcone to bond the top , it will not bond or create a strong enough bond for the lip to withstand hwy winds nor heat
you must use a urethene to urethene bonding agent similar to what tte sent but the one we used , if you remember eliel, was a stronger more permant kind ,
you must use a urethene to urethene bonding agent similar to what tte sent but the one we used , if you remember eliel, was a stronger more permant kind ,
Trending Topics
Originally Posted by NesTea420
I don't think I have right stuff. It said rubber and plactic bonding...so I am not sure now. I'll check it when I get home.
Where would I get urethene bonding agent? PepBoyz?
Where would I get urethene bonding agent? PepBoyz?
try a car glass shop they use this exact stuff to install windsheilds on cars thats who gave me mine twice when we did eliel, mine and alsilverbuller, pmatrix and indios cars
ClubLexus Stories
Celebrating Lexus & Toyota from Around the Globe

10 Lexus Bargains That are Cheaper Than a New Toyota RAV4
Joe Kucinski
8 Weirdest Things Lexus Has Ever Built
Verdad Gallardo
10 Lexus Designs That Have Aged Like Fine Wine
Verdad Gallardo
8 Tips for Improving Your Hybrid or Plug-in Hybrid's Efficiency!
Michael S. Palmer
10 Best Lexus Models No One Remembers
Joe Kucinski
TRD Off-Road Premium: Best 2026 4Runner, Except This One Thing
Michael S. Palmer
Top 10 Lexus & Toyotas to Drive Before You Die!
Joe Kucinski
Top 10 Lexus/Toyotas With The LEAST 5-Year Depreciation
Joe Kucinski
Lexus LC500 Convertible Auction: A Preview of Rising Values?
Brett Foote

Thread Starter
Pole Position
Joined: Jan 2004
Posts: 362
Likes: 0
From: Pennsylvania
Originally Posted by lexforlife
try a car glass shop they use this exact stuff to install windsheilds on cars thats who gave me mine twice when we did eliel, mine and alsilverbuller, pmatrix and indios cars
I'll got to a glass store then...I don't want my lip to fly off on the road.


Pole Position
Joined: Nov 2004
Posts: 266
Likes: 0
From: Massachusetts
 instead of tapeing up the car,, just borrow 3 sissor jack,(stock) and but 1 in the middle and 1 on each corner, then turn the jack till it is snug under the lip. take the jacks out of ur friends and family car, use more jacks if u can get ur hands on them. but the jacks work best, its ez and adjustable.
Thread Starter
Pole Position
Joined: Jan 2004
Posts: 362
Likes: 0
From: Pennsylvania
Originally Posted by PHML
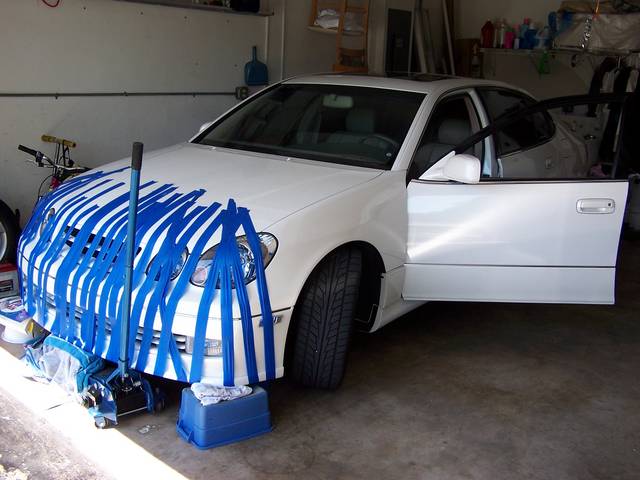
I remember seeing this pic awhile back.....this is Indio's pic....installing his TTE lip.
Dayam!!! Do you think he needs more tape?
Good luck!!
Pete
Dayam!!! Do you think he needs more tape?
Good luck!!
Pete
OGM!!

yeah thats indios car in my garage while i am installing his lip the tape is provide for pressure along the top edge of the lip while the bonding agent cures for 12hrs and hardens
no jokes about my garage please
no jokes about my garage please

Originally Posted by NesTea420
So I am finally going to install my tte lip this weekend, well I am going attempt. I got the driller and the epoxy from PePboys. It looks like i have to mix it up or something, it came in 2 packets and I have 5 mins to install it before it sets once its mixed. Is this the right kind? I still have to go get the sand paper.
Any advices before I start my saturday project?
Thank you.
Any advices before I start my saturday project?
Thank you.

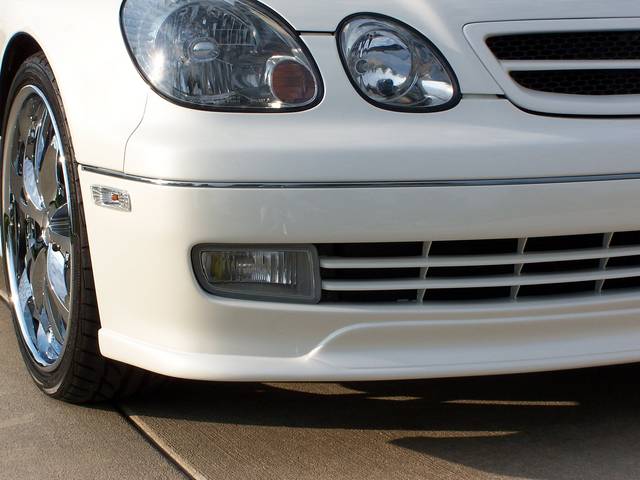
Closeup.
Last edited by Indio; Jul 15, 2005 at 01:02 AM.