When you click on links to various merchants on this site and make a purchase, this can result in this site earning a commission. Affiliate programs and affiliations include, but are not limited to, the eBay Partner Network.
93 GS Runs good on starting fliud... no gas? [Solved: ECU Caps]
Known good:
Spark, fuel pressure, compression.
Changed:
MAF Sensor
Jumped fuel pump on DLC, just to be sure
Seems to start momentarily, then quits running after 2 seconds.
Ran fine previously ( 2yrs ago ).
After sitting 2 years, drained gas tank + fresh fuel.
Started & ran, long enough to get into the position desired ( about 10ft )
changed radiator.
Then, would not run, except when spaying start fluid into intake...
Apparently, fuel is being cutoff somehow after fuel pump?
Any ideas?
Thanks,
mike
Last edited by mfigley; 04-08-20 at 02:06 AM.
Reason: Issue Solved
How do you know you have good fuel pressure? I know you jumped the pump and turned it on, but maybe the fuel filter is clogged? Also makes me wonder if the injectors are stuck. Do you have fuel in your oil?
To get a quick check on fuel pressure, we disconnected the fuel return line and inserted a gauge
on the rail side, this does not test the fuel pressure regulator, since the reg. has nowhere
do dump excess pressure. It read ~65PSI ( unregulated ).
Also, a simply regulator bypass did not enable starting - vise grips
on the return line, so fuel cannot dump.
I looked inside the fuel tank and it was surprisingly clean and no muck about the filter.
Since it started easily and ran recently ( long enough to reposition in driveway ),
I suspect an injector or other fuel control issue.
Would all/most injectors get stick at the same time?
( NOTE: I did add Seafoam with fresh gas )
OR, reading from the el-cheapo manual, a DFCO (Decelleration
Fuel Cutoff) mechanism is in place.
What's missing is how/where DFCO is implemented...
Last edited by mfigley; 06-04-19 at 06:21 PM.
Reason: unintentional duplication
I'm not sure whether its combined with the ECU or the fuel pump ecu.
Seafoam couldve dislodged something or stuck a few injectors. When I bought my 2nd gs300, it ran rough like a vacuum leak and it turned to have been one stuck injector dumping about a gallon of gas into the oil pan.
Do you have the original toyota manuals? I have PDF versions I could link you
Yep, did not think about seafoam loosening up crud..
I have a semi-lame manual from emanualsonline.
Real manuals would be greatly appreciated!
The pdf from emanuals does cover the basics and is easy to navigate,
though lacks detail for complex troubleshooting.
93 GS Runs good on starting fliud... no gas? [Solved: ECU Caps]
Folks, many thanks for your help.
I decided last winter to attempt ECU re-cap on my spring trip.
( If you want to do this without pro-equipment, I make some suggestions at post bottom. )
I ordered a small travel-size soldering iron and ordered caps from Mouser:
(2) C101,C103 661-EKZE500ELL100ME0 EKZE500ELL100ME07D United Chemi-Con 50 volt, 10uF 2 $0.30
(2) C501,C602 661-EKZE630ELL150ME1 EKZE630ELL150ME11D United Chemi-Con 63 volt, 15uF 2 $0.26
(2) C706,C724 661-EKZE101ELL470MJC EKZE101ELL470MJC5S United Chemi-Con 100 volt, 47uF 2 $0.55
(2) C106,C505 232-35ZLH100MEFC63X1 35ZLH100MEFC6.3X11 Rubycon 10 volt, 100uF 2 $0.30
(1) C105 647-UTT1C220MDD1TE UTT1C220MDD1TE Nichicon 16 volt, 22uF 1 $0.53
( There is a spreadsheet attached for more digestable format )
My capacitor selection is not ideal, in that the radial lead-spacing is not identical to
original caps. Specifically, new spacing is slightly smaller on some.
This was not a major problem, though several caps would not seat on board level.
( A small gap beneath the cap body, less than 1/8" )
After re-installation, one turn of the key was required to
start the engine, even tho it had been sitting for more than
9 months...
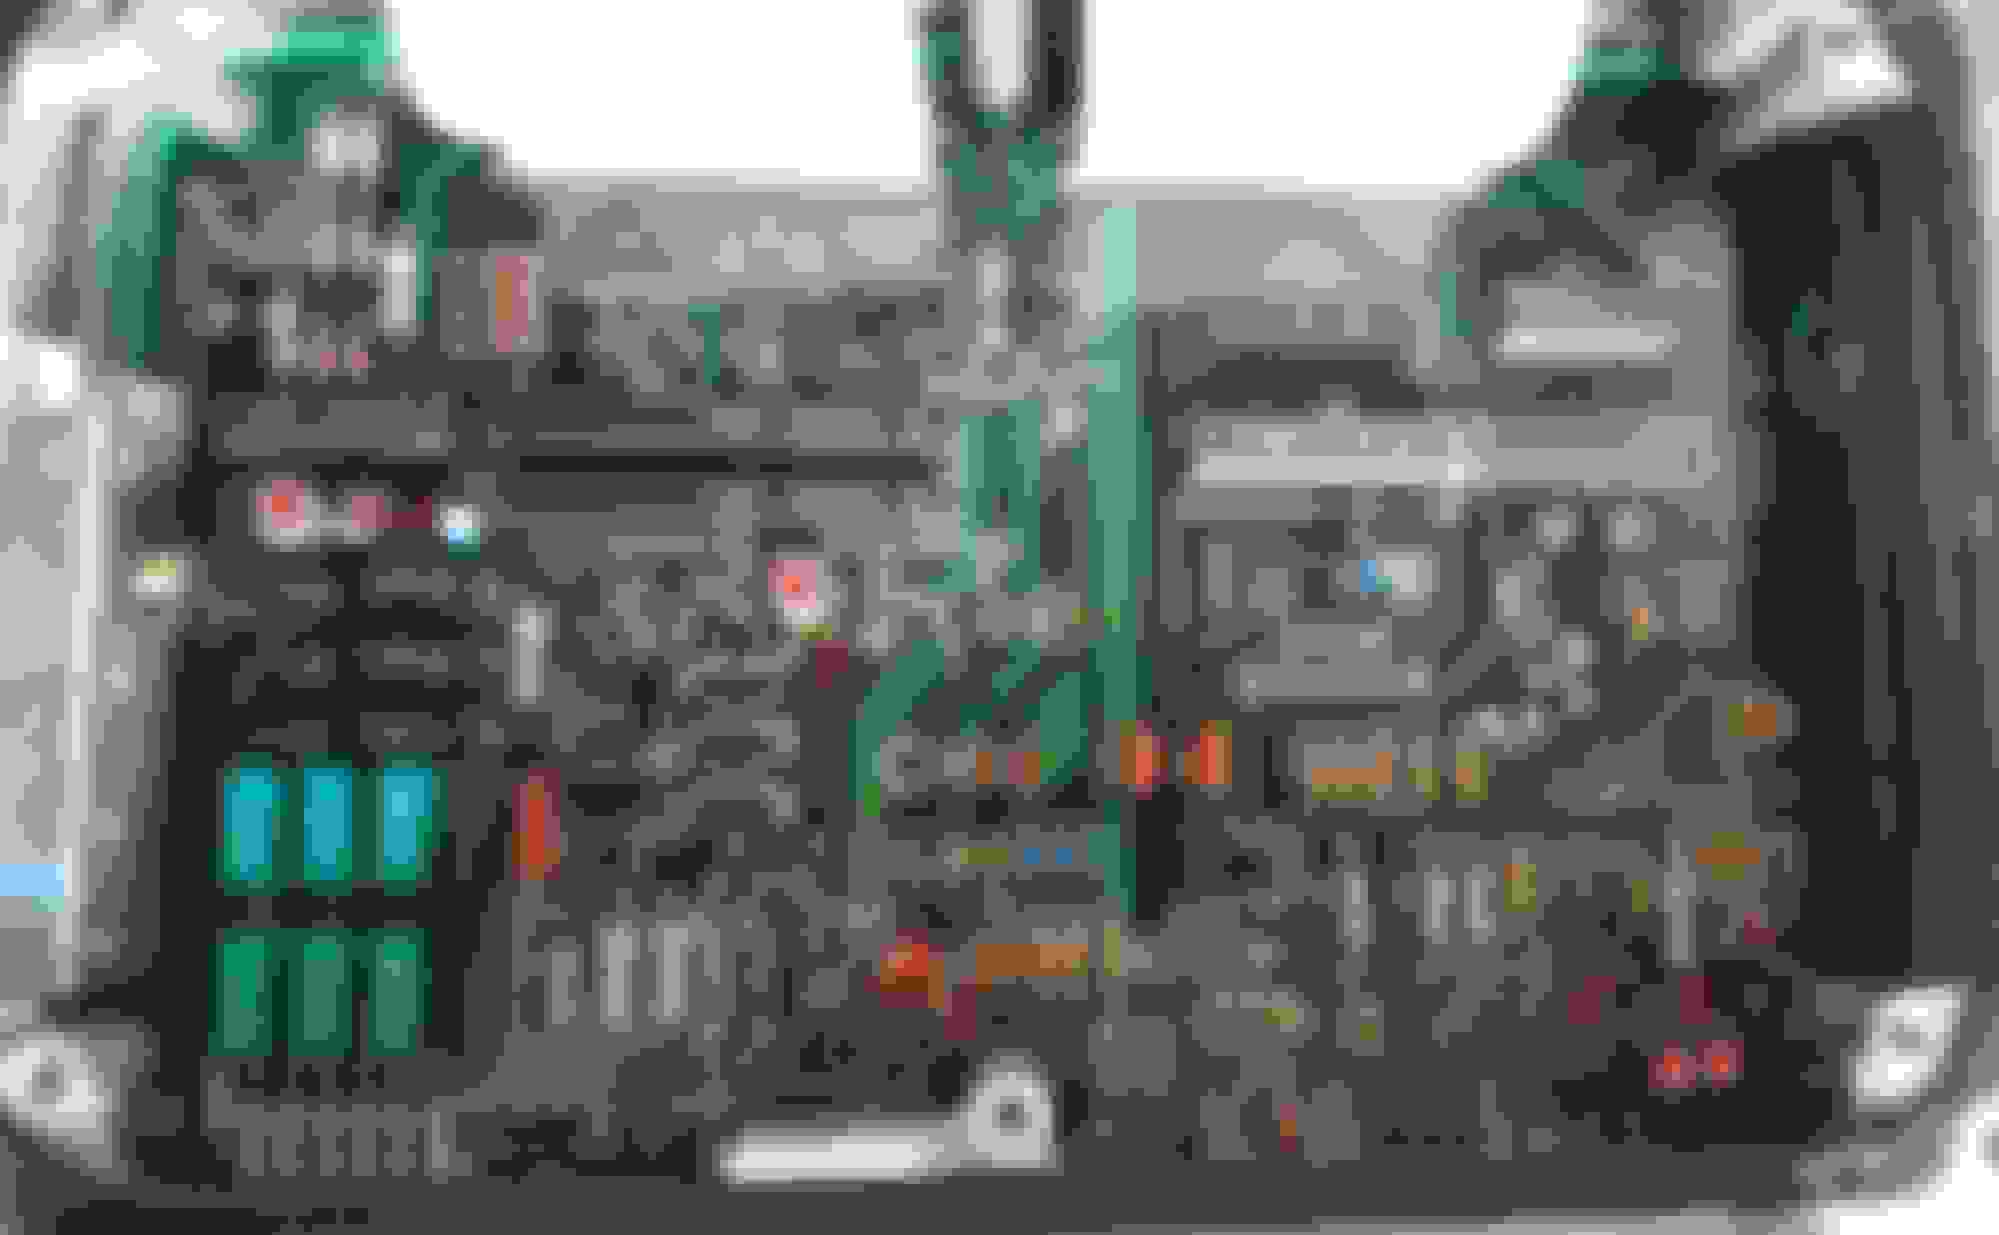
I did look at a youtube vid for ECU location and removal:
Reference photo-diagrams for visual indicators - if you zoom a bit you can see Refs and values.
1993 GS300 ECU PCB1
1993 GS300 ECU PCB2
Iron used: Pencil-style with integrated digital control ( banggood.com for ~ $20. )
De-soldring temp was ~430C ( mebbe because i did not get a wedge tip )
I did not attend solder-school but have some hobby experience.
#7 may be the most useful if you don't have the "right" equipment...
Get a wedge tip if possible
Use a bench-top or other vise to hold the assembly while de-soldering
Tin and clean iron tip frequently, especially important with small iron/tip, because it will have to be at very high temp to
heat the heavy board ( fast oxidation and burning )
I use a bronze-looking metal scrubber thing to clean tip ( and I use tip-tinner )
Get some good nippers/side-cutters to clip off the bent portion
of the lead on board-bottom - cut close to the board.
With a stiff brush or scrubber, clean the pad bottoms to be de-soldered
The board has a varnish-like coating - I tried to scrap/scrub/remove as much as possible
around the pads to be heated.
Re-tin the pads before removing the cap ( Put on solder )
If the hole fills up with solder when the cap lead is pulled out ( most of mine did ):
I used a length of stainless steel ( long enough that you don't need pliers to prevent finger burn )
Then, heat the pad while pushing the wire into the clogged hole.
When the solder melts and the wire slips in, keep it in motion as long as possible,
moving back and forth. It will get slightly stuck but will not bond to the pad -
pull it out by hand or plier and the hole is clear.
Obviously, wire size is significant here, ideally just slightly smaller that the hole size.
This will also work with copper wire, just not as good - the copper will tend to bond
quickly and get stuck unless you keep the wire moving fast once the solder melts and
the wire punches through.
Before re-populating the caps, clean the board with alcohol and a brush - i used a toothbrush,
remove varnish coating from around the base of the caps on the board top. ( And clean board after soldering )
I'm not re-coating the board with varnish, but it may be something to consider.
Just to be thorough - these are polar capacitors they will work in one orientation only - check the orientation before and mebbe after soldering just to make sure they are correct. The board is marked with "-" (minus) for the negative lead though some may be hard to see. Negative lead side has the light stripe. >->->->->
Last edited by mfigley; 04-08-20 at 02:05 AM.
Reason: Indicate as solution

 06-03-19, 01:51 PM