B Pillar Trim Removal
 11-03-14, 05:39 PM
#1
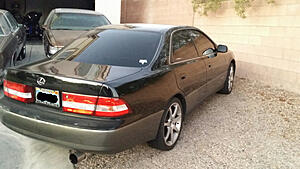
Third gen es300 (97 - 01)
I am not responsible for any damages you may cause to your vehicle.
So I've been on the forums a while, and have seen some users asking how to remove the exterior b pillar trim. I've decided to post this write up because I feel it is the best way to replace the piece, without breaking things
This is done on my 97 es. I already replaced the piece and don't feel like removing it again, lol.
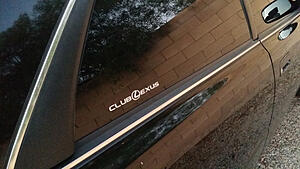
Side note: where can I get these stickers? Mine came with the car, and are falling apart...
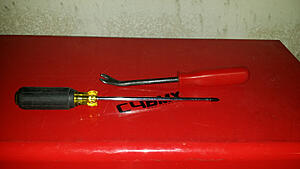
Tools needed are:
Phillips head screwdriver
Panel popper tool
Step 1
Roll down the back window.
Step 2
Wedge your fingers between the weatherstripping and the interior pillar plastic. Pull away CAREFULLY. You do not want to rip the rubber.
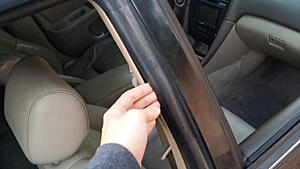
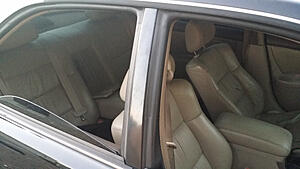
Step 3
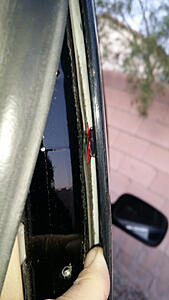
While CAREFULLY pulling the rubber away, undo these 3 screws.
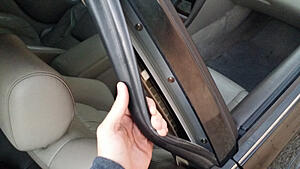
Step 4
Remove the metal retainer piece. Slide it up towards the top, pull the bottom out first, then pull out the top. Set this piece aside.
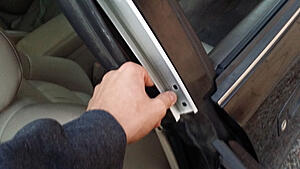
Step 5
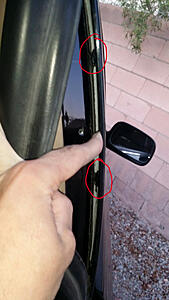
Now you should easily be able to see the clip retainers. Place your panel popper tool between these and the metal. CAREFULLY pry up starting from the bottom to the top.
Circled are the two middle clips/retainers. There is one on the bottom, not circled, and one up top not visible in this picture.
Once the piece is removed, you should be able to pop the new one in. Reverse the steps to put it back together.
Make sure the weatherstripping is seated back into the metal retainer, and tuck it back under the plastic interior pillar.
Hope this helps!
I am not responsible for any damages you may cause to your vehicle.
So I've been on the forums a while, and have seen some users asking how to remove the exterior b pillar trim. I've decided to post this write up because I feel it is the best way to replace the piece, without breaking things
This is done on my 97 es. I already replaced the piece and don't feel like removing it again, lol.

Side note: where can I get these stickers? Mine came with the car, and are falling apart...
Tools needed are:
Phillips head screwdriver
Panel popper tool

Step 1
Roll down the back window.

Step 2
Wedge your fingers between the weatherstripping and the interior pillar plastic. Pull away CAREFULLY. You do not want to rip the rubber.

Step 3
While CAREFULLY pulling the rubber away, undo these 3 screws.

Step 4
Remove the metal retainer piece. Slide it up towards the top, pull the bottom out first, then pull out the top. Set this piece aside.


Step 5
Now you should easily be able to see the clip retainers. Place your panel popper tool between these and the metal. CAREFULLY pry up starting from the bottom to the top.

Circled are the two middle clips/retainers. There is one on the bottom, not circled, and one up top not visible in this picture.

Once the piece is removed, you should be able to pop the new one in. Reverse the steps to put it back together.
Make sure the weatherstripping is seated back into the metal retainer, and tuck it back under the plastic interior pillar.
Hope this helps!
 11-06-14, 05:12 PM
#2
Awesome write up!
For anyone curious, here are the factory part numbers:
75505-33010 Drivers Side
75506-33010 Passenger Side
Each one retails for around $60-80, depending on where you get it. And here is another thread with a similar DIY tutorial.
https://www.clublexus.com/forums/es3...-you-help.html
For anyone curious, here are the factory part numbers:
75505-33010 Drivers Side
75506-33010 Passenger Side
Each one retails for around $60-80, depending on where you get it. And here is another thread with a similar DIY tutorial.
https://www.clublexus.com/forums/es3...-you-help.html
11-06-14, 06:21 PM
#3
Awesome write up!
For anyone curious, here are the factory part numbers:
75505-33010 Drivers Side
75506-33010 Passenger Side
Each one retails for around $60-80, depending on where you get it. And here is another thread with a similar DIY tutorial.
https://www.clublexus.com/forums/es3...-you-help.html
For anyone curious, here are the factory part numbers:
75505-33010 Drivers Side
75506-33010 Passenger Side
Each one retails for around $60-80, depending on where you get it. And here is another thread with a similar DIY tutorial.
https://www.clublexus.com/forums/es3...-you-help.html

Thread
Thread Starter
Forum
Replies
Last Post