
Kyle's GS300 2JZGTE Project Reboot

EV ftw!!!


Joined: Nov 2002
Posts: 9,032
Likes: 601
From: Lake Ontario
That's a whole can of worms there! There are dozens of pros and cons on both sides of that fence, all of which have been debated to death here for many years. NA-T is alot more involved than just slapping on some turbos, and a *Complete* Aristo swap is a bolt-in affair.. A PROPERLY Built and PROPERLY Tuned NA-T will cost much more than an OEM Aristo swap. Not really a clear winner either way, they are just vastly different in both execution and outcome.
To each his own, and to anyone else thinking whether to NA-T or GTE it's best to read, read, read, and form your own opinion before one makes a decision. And once you think you've decided, go back and read some more!
To each his own, and to anyone else thinking whether to NA-T or GTE it's best to read, read, read, and form your own opinion before one makes a decision. And once you think you've decided, go back and read some more!
Being as you have a 400, you've likely been content to stomp that linear powered gas pedal, where a GE 300 can barely get out of it's own way!


Well after driving for about a week, the car is doing great. I however still have some light tapping noise over bumps. As usual, Mike was spot on and new sway endlinks cleared that right up. For the record, for anyone doing a suspension refresh, go ahead and do these. They'll be easier to put in when you are re-assembling everything. After everything was buttoned down, the bracket that goes over the control arm, to which the shock mounts was a challenge to align for fitting the new endlink through.
On Saturday I got motivated after washing the car that I decided something need to be done with the front seats to clean them up. So I got my quality leather cleaner out and began scrubbing the vigorously. It did close to nothing. I decided quickly I needed another method. Saw a guy on youtube using purple power to clean leather. Seems harsh, but what do I have to lose on 17 year old seats... The years of grime and filth were wiped away. Following the cleaning I put some leather conditioner on them. The results were excellent!
Before:

After:

After cleaning the seats.I decided the seatbelts were too dirty. Besides, they weren't retracting very well and that was annoying me.
I'd read a bit about removing, cleaning, and re-winding them, so I gave it a shot. Maybe it was my lousy search skills, but the information I found on the process was less than stellar. That combined with my uncanny ability to make things more difficult than they are left me without a seatbelt until I could acquire a new tensioner mechanism.
So here's a quick tutorial:
1) Move seat fully forward and raised
2) Disconnect battery terminal
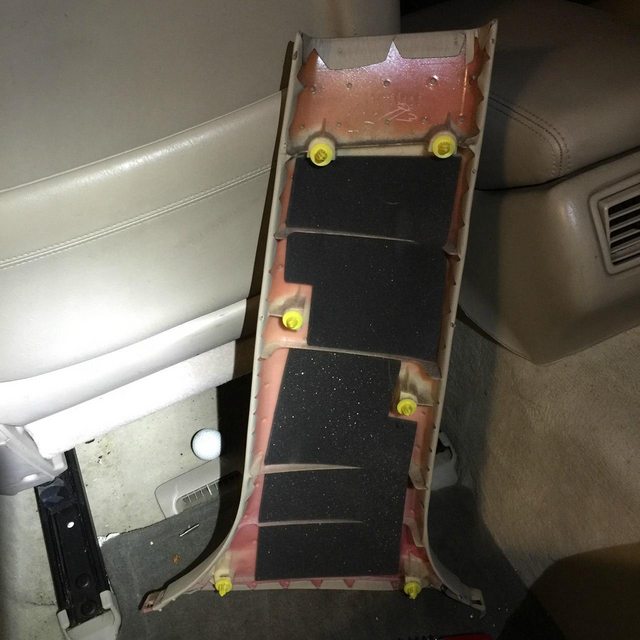
3) Pop lower portion of pillar off. It uses clips up and down and about an inch sits under the trim on each side. Removing it will leave this: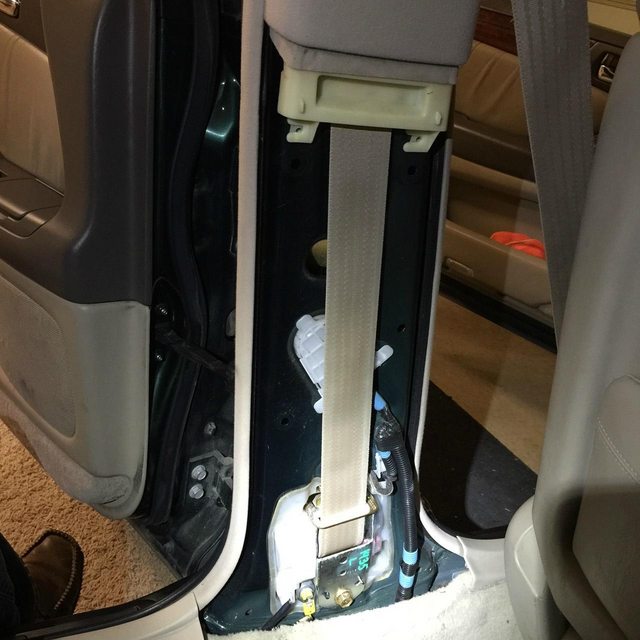
Here's what the back side of the panel looks like:
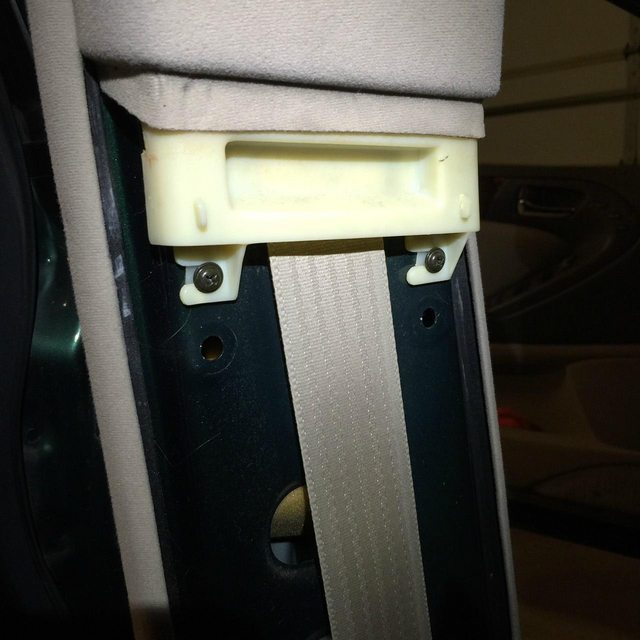
4) Unscrew the 2 screws that are on the lower side of the upper panel and then pop it off.
5) Remove the bolt that anchors the belt to the upper side of the pillar.
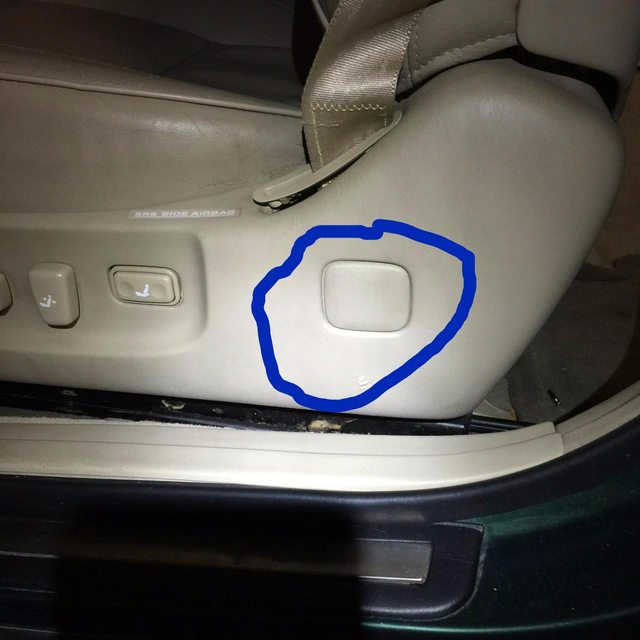
6) Pop the square cover for access to and remove the bolt that attaches the belt to the seat:
7) Thread the end of the seatbelt that was attached to the seat back up and through the upper panel. Set this panel out of your way.
--Now your seat belt should be fully exposed and accessible--
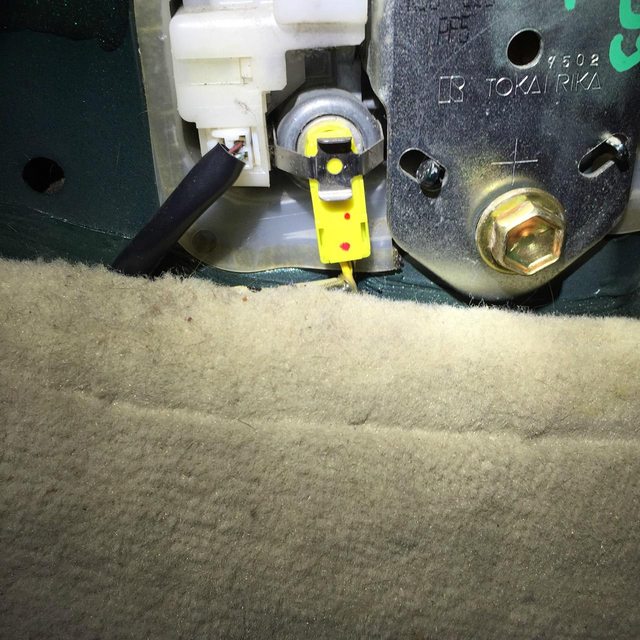
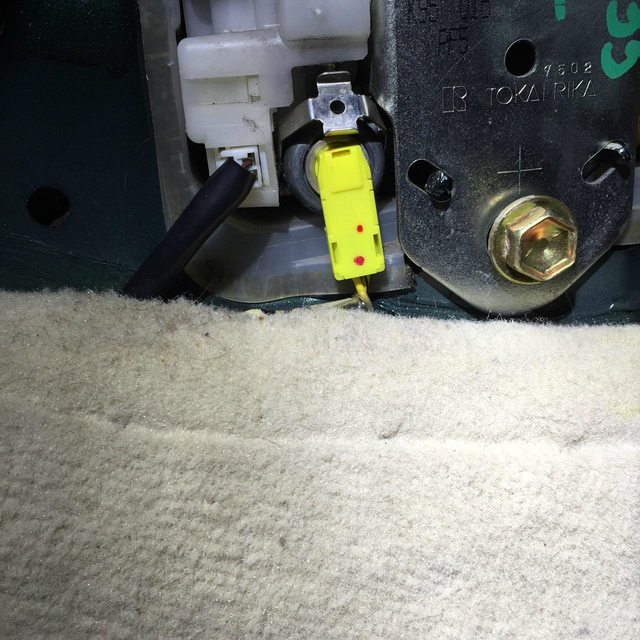
8) Remove the clips from the retractor mechanism. One is white one is yellow. The white clips comes off easily. The yellow is a little confusing. It has a metal clip around the back of it. Lift up on this clip to rotate it off the back of the plug and then you can pull the plug out.
9) Remove the 2 bolts holding the mechanism to the pillar. 10mm & 14mm bolts
Now you should have the belt and mechanism free. DO NOT remove any of the plastic covers on the side. There's no reason to do so. Some tutorials say to. I did and removed the wrong one. Ever wonder what the spring inside looks like when it's not inside anymore?

Now to remove your belt from the retractor:
What you do at this point is you pull the belt all the way out, unwinding the retractor. You'll have to hold the unit completely vertical to avoid the catch from locking as you pull the belt out. Don't worry, you won't pull the belt off the spindle.
Once the belt is all the way unwound, you'll see it sticking out of a slit in the spindle. You need to use something to pry it out of spindle. I used the can opener tool from my Swiss Army knife. You'll need an extra hand or a tool to keep the spindle from spinning under the force of the spring while you work at digging the belt out. Once you pry it out, you can see there is a steel pin through the belt that keeps it from slipping inside the spindle.
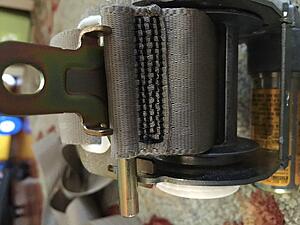
Remove this pin. And then you can pull the belt out of the spindle. NOTE - DO NOT LET THE SPINDLE / SPRING RELEASE. I've read bad things happen. Also, take note of the way the belt threads in so you don't put it in backward and have to rethread it. Now for those of you who have a seatbelt that isn't retracting as well as it should, now is the time you can wind the spindle. Wind it until you meet resistance. For the particular replacement unit I received off ebay, this was about 3-4 turns of the spindle. Your results may vary.
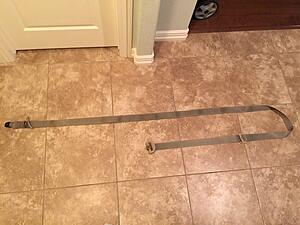
Now wash that dirty belt. I let mine soak for about 30 minutes in purple power and water the used a brush and a rag to clean it up and nice-like.
I've read some folks like to throw the in the washing machines. I didn't really care to have all those bits rattling around in the washing machine.
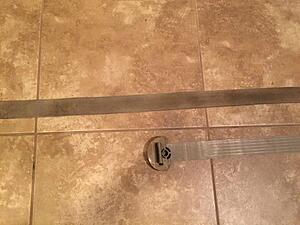
Before:
After: (dark areas are shadows)
Now put it all back together and enjoy a less funky ride.
On Saturday I got motivated after washing the car that I decided something need to be done with the front seats to clean them up. So I got my quality leather cleaner out and began scrubbing the vigorously. It did close to nothing. I decided quickly I needed another method. Saw a guy on youtube using purple power to clean leather. Seems harsh, but what do I have to lose on 17 year old seats... The years of grime and filth were wiped away. Following the cleaning I put some leather conditioner on them. The results were excellent!
Before:
After:
After cleaning the seats.I decided the seatbelts were too dirty. Besides, they weren't retracting very well and that was annoying me.

I'd read a bit about removing, cleaning, and re-winding them, so I gave it a shot. Maybe it was my lousy search skills, but the information I found on the process was less than stellar. That combined with my uncanny ability to make things more difficult than they are left me without a seatbelt until I could acquire a new tensioner mechanism.
So here's a quick tutorial:
1) Move seat fully forward and raised
2) Disconnect battery terminal
3) Pop lower portion of pillar off. It uses clips up and down and about an inch sits under the trim on each side. Removing it will leave this:
Here's what the back side of the panel looks like:
4) Unscrew the 2 screws that are on the lower side of the upper panel and then pop it off.
5) Remove the bolt that anchors the belt to the upper side of the pillar.
6) Pop the square cover for access to and remove the bolt that attaches the belt to the seat:
7) Thread the end of the seatbelt that was attached to the seat back up and through the upper panel. Set this panel out of your way.
--Now your seat belt should be fully exposed and accessible--
8) Remove the clips from the retractor mechanism. One is white one is yellow. The white clips comes off easily. The yellow is a little confusing. It has a metal clip around the back of it. Lift up on this clip to rotate it off the back of the plug and then you can pull the plug out.
9) Remove the 2 bolts holding the mechanism to the pillar. 10mm & 14mm bolts
Now you should have the belt and mechanism free. DO NOT remove any of the plastic covers on the side. There's no reason to do so. Some tutorials say to. I did and removed the wrong one. Ever wonder what the spring inside looks like when it's not inside anymore?

Now to remove your belt from the retractor:
What you do at this point is you pull the belt all the way out, unwinding the retractor. You'll have to hold the unit completely vertical to avoid the catch from locking as you pull the belt out. Don't worry, you won't pull the belt off the spindle.
Once the belt is all the way unwound, you'll see it sticking out of a slit in the spindle. You need to use something to pry it out of spindle. I used the can opener tool from my Swiss Army knife. You'll need an extra hand or a tool to keep the spindle from spinning under the force of the spring while you work at digging the belt out. Once you pry it out, you can see there is a steel pin through the belt that keeps it from slipping inside the spindle.

Remove this pin. And then you can pull the belt out of the spindle. NOTE - DO NOT LET THE SPINDLE / SPRING RELEASE. I've read bad things happen. Also, take note of the way the belt threads in so you don't put it in backward and have to rethread it. Now for those of you who have a seatbelt that isn't retracting as well as it should, now is the time you can wind the spindle. Wind it until you meet resistance. For the particular replacement unit I received off ebay, this was about 3-4 turns of the spindle. Your results may vary.
Now wash that dirty belt. I let mine soak for about 30 minutes in purple power and water the used a brush and a rag to clean it up and nice-like.

I've read some folks like to throw the in the washing machines. I didn't really care to have all those bits rattling around in the washing machine.
Before:
After: (dark areas are shadows)

Now put it all back together and enjoy a less funky ride.
Last edited by KyleH; Feb 18, 2016 at 10:23 PM.

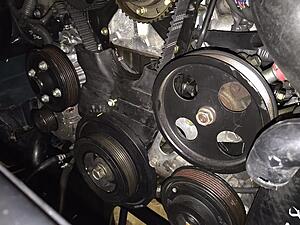
Well, I have put about 200 miles on the car. Unfortunately, it has developed an oil leak. I'm not sure where, but it appears it's originating on the front lower side of the engine. I'm guessing at the moment the front main seal, but it's still too early to tell. I began dismantling the front of the car this evening after draining the coolant. I'll see how far I can get tomorrow.
Here are a few pics of the oil leaks. I'm open to any ideas as to the cause.
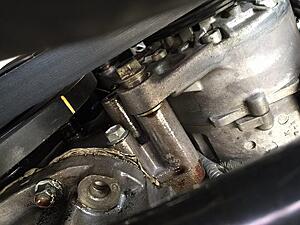
This is as far as I got this evening. I did get the crank bolt loose with the electric impact, so that's good.
Anyone have an FSM link for the Aristo 2JZGTE VVTI?
To be continued...
Here are a few pics of the oil leaks. I'm open to any ideas as to the cause.


This is as far as I got this evening. I did get the crank bolt loose with the electric impact, so that's good.

Anyone have an FSM link for the Aristo 2JZGTE VVTI?
To be continued...
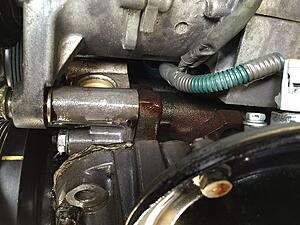
Wow. Can't believe it's been a month since my last update. I was able to chase my oil leak down to both seals where the cams exit the head.
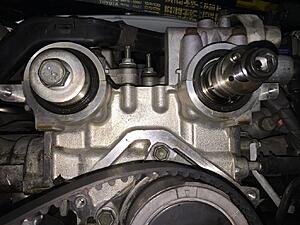
I replaced these as per guidance from Jeff's Garage - Servicing a 2JZ. Very helpful tutorial!
I've put an additional 200 miles on the car since the change, including a couple of short 30 mile highway drives and the new seals seem to be doing the trick. Kind of a frustrating problem to go after, but at least I think I have it licked. I'll plan to pull everything on the front end apart again this weekend so I can put the cam gear shield and timing belt cover back on.
My latest focus has been on getting my AC working again. The compressor that came on the new motor was deemed defective by the garage where I was having it serviced. So I swapped it for the original GE compressor which was working beautifully pre-engine swap. I've had some fits with it not working. Initially after the charge the shop told me the AC was charged but wouldn't kick on. Instead of paying them to trouble shoot it I figured I'd do it myself. After jumping one of the pin's on the compressor with a 12v source, the compressor kicked on. I then plugged the compressor back in and went and tried it from the switch inside. Lo and behold the AC started working! Makes no sense whatsoever to me. So for the past two days the AC has been working beautifully, for the most part. On two occasions I've found the AC light to start blinking and the AC not working. I'm not sure why. Cycling it on and off has made it work thus far. I don't think I'm out of the woods quite yet.
A few annoyances and things I still have to address:
I have a mystery clunk on the driver's side that seems to happen when the front wheel takes abrupt impact while handling a side load.
The idler pulley bearing on the serpentine tensioner is shot. I'll have to put my old one back on there.
Driver side temperature control is jacked. I'll need to remove and fix it.
Passenger side door lock actuator is defective. Seems worse in warm weather. I've read the writeups, but still not looking forward to it.
There's still a smidgen of play in the steering. It's noticeable mostly at high speed when going straight. Since I've replaced everything else, it would either be the rack itself or the inner tie rods at this point.
The original belly pan was so beat up and saturated with oil that I tossed it. I need to get a new one.
With all these quirks, the car is still putting a grin on my face when I mash the go pedal.
Glad you getting it all wrapped up.
The A/C needs a set of gauges put on it at a shop, if the charge is not correct the pressure switch will turn the compressor off. They couldn't have verified a proper charge when filling without the compressor engaging because they would not have a high pressure reading. The High/Low readings on a gauge set will tell the whole story.
The A/C needs a set of gauges put on it at a shop, if the charge is not correct the pressure switch will turn the compressor off. They couldn't have verified a proper charge when filling without the compressor engaging because they would not have a high pressure reading. The High/Low readings on a gauge set will tell the whole story.
Yeah. I don't know, Mike. The shop claimed that they put in the recommended amount of refrigerant and that when putting it in from the high pressure side, it's not necessary that the compressor be actively running. With that said, the AC has been working well, but twice this week I have had to cycle the button off and back on when it initially flashed at me when turning it on.
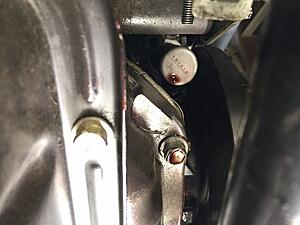
After finding no oil leaks after last week, I went ahead put the timing covers back on the front of the engine. Feels good to have that behind me.
Next step will be tracking down some gauge pods for my gauges I've not installed and then hooking up the boost control so I can dial up the fun a notch
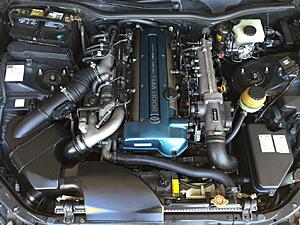
All cleaned up!
After finding no oil leaks after last week, I went ahead put the timing covers back on the front of the engine. Feels good to have that behind me.
Next step will be tracking down some gauge pods for my gauges I've not installed and then hooking up the boost control so I can dial up the fun a notch
All cleaned up!

Nothing major, but am happy to report no more mystery noises from the HVAC system. I worked on my passenger's side temp servo late last year because it was completely malfunctioning. I noticed the driver's side was also acting up, buzzing at me upon startup and also throwing a fault when I checked the codes on the HVAC display.
There is a great thread about addressing these. The passenger's side is much easier to dig out than the passenger's side. Just need to remove a couple of screws and drop the black kick panel above the pedals.
The first thing i did was clean off the contact area where the copper fingers run against he disk. It was really nasty (no before pics), but got it cleaned up nicely.
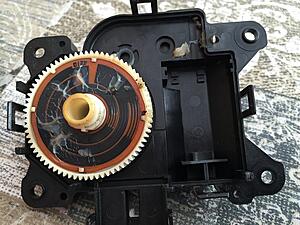
I put it back together, and re-installed but unfortunately my problem persisted. So I took the next step recommended in the thread and I applied some superglue to the shaft and base of the stem that comes out of the motor and re-inserted he worm gear that fits over it. The issue is that the worm gear is able to move up the shaft and off the ears that lock it in place.

The glue did the trick. I re-installed and have had flawless control and beautiful silence!
I've also been chasing gremlins (noises) in the front lower suspension since I reinstalled it. Much of this was a continually loosening front sway bar, which I finally addressed with lock-washers. But I noticed i still had clunking on the driver's side. So I jacked the car up and started putting wrenches on every bolt down there. I found that BOTH bolts that connect the rear caster arm to the lower control arm were loose. Tightened them back down and then immediately checked the other side to ensure they were still tight (they were). Moral of the story here is after making these suspension changes, check your bolts again after a few hundred miles and/or if you hear any noises. Can't tell you how much of a relief it is to have a clunk-free smooth riding Lexus!
Aside from this, I noticed my little courtesy lights that light the footwell area had expired, on both sides. Ordered these and installed them this evening.
Next up is a solution to install the boost gauge. I think I'm going to put it where the ash tray is, but haven't decided on how to fab something up.
Pole Position
Joined: Jun 2010
Posts: 340
Likes: 2
From: va
Great build thread with a lot of useful info...thanks for sharing! Reading all this makes me want to pull the trigger on an aristo swap. I've recently posted my GS for sale but it looks like I'll be keeping it. Need to reach out to Mike and Rick soon.

This is definitely one of my favorite builds, congrats! It literally looks like that engine came as a stock option in that car. It looks like a stock Aristo, especially because of the air intake.
I am with the other members, I just bought a GS but threads like this make me want to sell it, get a cheaper GS300, or SC300, and put a 2JZGTE in it.
I hope you don't mind some questions. Was this a JDM Aristo engine? How difficult was the wiring? If this is now the 4 speed transmission, what are your RPMs on the highway?
It seemed like you did this swap so smoothly, and it only took about 6 weeks. I recently cleaned my seatbelts too, after reading that it would help with them retracting. I was very surprised that it worked.
Last edited by GS400V8; Apr 18, 2016 at 10:23 PM.
Thank you all for the kind words. I'm hoping it does help folks. There are a lot of scattered bits of information (and mis-information) on these cars, and I am trying to aggregate all of my experiences into a cohesive account, should it be useful for others.
Folks like Mike are a life saver and really the only reason I was willing to take the plunge toward the Aristo swap. His experience is fantastic and his passion and willingness to help others is invaluable.
I don't mind the questions at all.
Yes this is a JDM Aristo engine. The wiring was a non-issue. I worked a deal out with Mike where he ran the RPM wire for me. From there, it was simply swaping some terminal caps from the Aristo body ECU to the GS300 body ECU (you retain the body ECU from your GS, you're only swapping in the Engine ECU from the Aristo). From there, it's pretty plug and play. You also swap over the ABS ECU from the Aristo. It fits up under the dash.
The transmission is indeed a 4 speed. I won't lie, I kind of miss the 5 speed that was in the GS, but this transmission is allegedly beefier. At 80MPH the RPM needle is just on the low side of the 3k RPM marker. I think top gear for both transmissions is about the same.
The swap did go pretty smoothly. Much of my time was spent on the details - putting in the fuel pump, return lines, redoing much of the front suspension bits, getting the heater core hoses removed and put back on, fabbing up rudimentary brackets for a transmission cooler, etc..
I do like the cleaner and better retracing seatbelts!
Thank you for taking the time to answer my questions!
That is so, so great that the electrical wiring is becoming easier and easier for people to do. Slightly under 3000 RPMs at 80mph really does not seem that bad at all. I believe my car with the 3.23 final drive ratio does about 2600 or so at 80mph, and that is in fifth. I believe 4th would be slightly higher at maybe 31-3200 if I remember that right.
The sad thing with the 1UZFE is you can only top out at about 280whp, unless you do porting, or forced induction which would be way more expensive in the long run.
I dream about a GS with the Supra's TT LSD and 2JZGTE with about 350-400whp which is very easy to do.
I just need a daily driver, so this could probably not happen unless I was constantly borrowing my family's cars for weeks on end while doing a swap. Ideally I would love to find a GS300 where some one has already done the swap, and if was as perfect as yours, it'd be golden. I'll be following your build, and thanks for sharing!
Respectfully, Ya'acov
Last edited by GS400V8; Apr 19, 2016 at 12:15 AM.