Clean400's Centrifugal Supercharged Nitrous 1UZ

 09-11-13, 04:01 PM
#17
Pole Position
Join Date: Dec 2012
Location: Bay Area CA
Posts: 381
Likes: 0
Received 0 Likes
on
0 Posts
It's definitely something that's crossed my mind many times. I'm kind of a gadget guy and the capabilities of the stock auto intrigue me. The a340 has so much potential with minor mods. It's much cheaper to go built auto than do a manual swap. I'm also a bang for the buck guy, and I can build this auto to hold a lot of WHP without much money. If I were to go manual it would be R154, V160 or T56. A manual swap once all is said and done is a significant investment. I'd rather be spending that money on my supercharger build right now. There are times that I wish I had manual but there are probably more times that I like the cruising enjoyment of the automatic. I'm not going to say no but for now but the plans are to go built auto. In the perfect world I would have both an auto SC and a manual SC. (and maybe I can make this happen one day haha).
so 6 transmissions to choose from, I wonder what will come next, a double clutch gearbox?
09-18-13, 12:04 AM
#19
Thanks for all the kind words! 
Very true forgot about the 350z tranny! Double clutch auto swap seems like it would be expensive as hell lolll
Yeah it wouldn't be the same bracket though. There are a bunch of clublexus users who slapped a vortech on a gs400.
So I was talking with my tuner about my idea to go non-intercooled and he was super against it. So I told him I would order an air to air intercooler then and he asked if I ever considered an water to air intercooler. I said I never did because I thought they would cost a lot. In the end it wouldn't be that much more or about the same as an air to air setup.
My idea is to use this piping setup that this 1uz supra vortech guy did in this youtube video. This piping setup is super simple. Where the pipe is straight after the supercharger, I'm going to put a water to air intercooler.
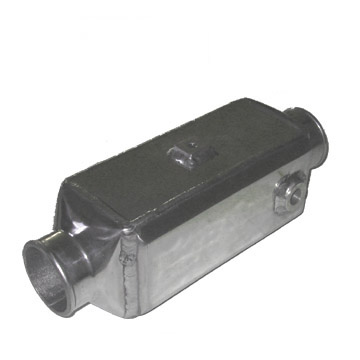
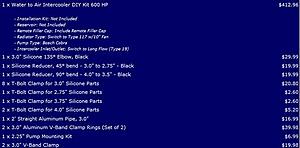
Ordered the water to air intercooler from frozenboost.com. I also ordered silicone bends, t-bolts, v-bands etc. from them. This should be all of the piping that I will need to complete the intake. I pretty much eyeballed everything from the supra 1uz supercharged youtube video lol. I'm working abroad and I don't have my car with me to do any measurements.
edit: **** just realized I ****ed up my order. It should have been a 3.5" clamp not a 3.75"! This is for the supercharger inlet.
Total cost $635
The intake before the supercharger will be designed like spf_lexus's build on lextreme. The intake will be a 90 degree 3.5" to 4" reducer silicone piece, that will connect to a 90 degree 4" aluminum bend. This will then connect to a 4" K&N. From what I read off spf_lexus's build the intake should be 1/4" to 1/2" larger than the supercharger inlet. Plus this will grab cold air versus hot air from inside the engine bay.
SPF_Lexus's Car (not mine)
Spectre 9798 90� Air Intake Tube $20

K&N Universal 4'' Air Intake Cone Filter 102mm RU-2510 $34
Ordered those spacers I was talking about before:
6 pieces @ $7.31/piece
Stainless T-304/304L
Seamless Tube
0.75" x 0.12" x 0.51"
Cut to: 4.1339"
-------------------------------------------------
1 piece @ $86.33/piece
Mild Steel A36
Hot Rolled Plate
0.25"
Cut to: 24" x 36"
Also ordered a plate of mild steel to make a copy of my friend's fishbracket. Total cost $168 from onlinemetals.com
Ordered two packs of 5 grade 8 bolts for $20. Only need 6 but they came in packs of 5.
Grade 8 Hex Cap Screw Bolts 7/16-14X5" 5PC
Ordered this MAF Sensor adapter. $23

Detailing all of the costs and parts to keep track. Also for everyone else thinking of doing this build
I think I'll be much happier with the water to air intercooled setup. The response should be much better using this shorter piping setup versus a longer air to air setup. My only concern is heatsoak with the intercooler being right between the radiator and engine. If there is significant heatsoak, the intercooler will be placed in the front bumper area, similar to where a standard FMIC setup would go. Hopefully the intercooler is fine where I'm planning on putting it, because this would be a very short piping setup which would give great response. It's also a much cheaper and easier piping route.
Now that I've ordered all the parts I'm more anxious than ever to get this build started. I'm only concerned with the stock MAF's ability to take boost because of all the problems I read with it. I'll put some sealant on the maf sensor plastic like spf_lexus did. If the stock MAF starts to be a pain, I'll switch over to standalone and map. For now the FIC 8 is the plan. I'm considering ordering 315cc injectors right away but I think I'll just start with the 250cc injectors for the 6psi break-in setup. Once everything is running properly I'll throw in the bigger injectors and a smaller pulley to try out 9psi. Before 9psi I will have to upgrade my exhaust though, it will be hurricane long tubes. I'm always thinking two steps ahead so I'll stop writing now lol!!! Let's just hope this all works for now!
Edit: Ordered a bit more.
Ordered Verocious Vacuum line starter kit.

$85. Replacing all the vacuum lines before the build starts.
Ordered a water to air installation kit from votionspeed

As well as 4" piping incase the K&N filter needs to go lower for clearance. I also ordered a 3.5" t-bolt and another 4" t-bolt. All this was $100 shipped. Votionspeed seemed to have all the exact same products as frozenboost. My water to air cooler kit I ordered from frozenboost was cheaper on votionspeed by about $20.
Anyways that's all for tonight! Have to go to work tired now after staying up so late figuring out which parts to order lol.
Yeah it wouldn't be the same bracket though. There are a bunch of clublexus users who slapped a vortech on a gs400.
So I was talking with my tuner about my idea to go non-intercooled and he was super against it. So I told him I would order an air to air intercooler then and he asked if I ever considered an water to air intercooler. I said I never did because I thought they would cost a lot. In the end it wouldn't be that much more or about the same as an air to air setup.
My idea is to use this piping setup that this 1uz supra vortech guy did in this youtube video. This piping setup is super simple. Where the pipe is straight after the supercharger, I'm going to put a water to air intercooler.
Ordered the water to air intercooler from frozenboost.com. I also ordered silicone bends, t-bolts, v-bands etc. from them. This should be all of the piping that I will need to complete the intake. I pretty much eyeballed everything from the supra 1uz supercharged youtube video lol. I'm working abroad and I don't have my car with me to do any measurements.

edit: **** just realized I ****ed up my order. It should have been a 3.5" clamp not a 3.75"! This is for the supercharger inlet.
Total cost $635
The intake before the supercharger will be designed like spf_lexus's build on lextreme. The intake will be a 90 degree 3.5" to 4" reducer silicone piece, that will connect to a 90 degree 4" aluminum bend. This will then connect to a 4" K&N. From what I read off spf_lexus's build the intake should be 1/4" to 1/2" larger than the supercharger inlet. Plus this will grab cold air versus hot air from inside the engine bay.
SPF_Lexus's Car (not mine)
Spectre 9798 90� Air Intake Tube $20
K&N Universal 4'' Air Intake Cone Filter 102mm RU-2510 $34
Ordered those spacers I was talking about before:
6 pieces @ $7.31/piece
Stainless T-304/304L
Seamless Tube
0.75" x 0.12" x 0.51"
Cut to: 4.1339"
-------------------------------------------------
1 piece @ $86.33/piece
Mild Steel A36
Hot Rolled Plate
0.25"
Cut to: 24" x 36"
Also ordered a plate of mild steel to make a copy of my friend's fishbracket. Total cost $168 from onlinemetals.com
Ordered two packs of 5 grade 8 bolts for $20. Only need 6 but they came in packs of 5.
Grade 8 Hex Cap Screw Bolts 7/16-14X5" 5PC
Ordered this MAF Sensor adapter. $23
Detailing all of the costs and parts to keep track. Also for everyone else thinking of doing this build
I think I'll be much happier with the water to air intercooled setup. The response should be much better using this shorter piping setup versus a longer air to air setup. My only concern is heatsoak with the intercooler being right between the radiator and engine. If there is significant heatsoak, the intercooler will be placed in the front bumper area, similar to where a standard FMIC setup would go. Hopefully the intercooler is fine where I'm planning on putting it, because this would be a very short piping setup which would give great response. It's also a much cheaper and easier piping route.
Now that I've ordered all the parts I'm more anxious than ever to get this build started. I'm only concerned with the stock MAF's ability to take boost because of all the problems I read with it. I'll put some sealant on the maf sensor plastic like spf_lexus did. If the stock MAF starts to be a pain, I'll switch over to standalone and map. For now the FIC 8 is the plan. I'm considering ordering 315cc injectors right away but I think I'll just start with the 250cc injectors for the 6psi break-in setup. Once everything is running properly I'll throw in the bigger injectors and a smaller pulley to try out 9psi. Before 9psi I will have to upgrade my exhaust though, it will be hurricane long tubes. I'm always thinking two steps ahead so I'll stop writing now lol!!! Let's just hope this all works for now!
Edit: Ordered a bit more.
Ordered Verocious Vacuum line starter kit.
$85. Replacing all the vacuum lines before the build starts.
Ordered a water to air installation kit from votionspeed
As well as 4" piping incase the K&N filter needs to go lower for clearance. I also ordered a 3.5" t-bolt and another 4" t-bolt. All this was $100 shipped. Votionspeed seemed to have all the exact same products as frozenboost. My water to air cooler kit I ordered from frozenboost was cheaper on votionspeed by about $20.
Anyways that's all for tonight! Have to go to work tired now after staying up so late figuring out which parts to order lol.
Last edited by Clean400; 09-18-13 at 03:01 AM.
10-14-13, 10:33 AM
#21
Driver School Candidate

Join Date: Oct 2013
Location: CA
Posts: 1
Likes: 0
Received 0 Likes
on
0 Posts
Clean400's Centrifugal Supercharged Nitrous 1UZ

Let's start off with the mods I've done so far.
Suspension Setup: NF210 / Tokico Blues
Comfortable suspension, more sporty than stock. Only a slight drop. Great for people who want to keep that Lexus feel. Suspension is very smooth. Inexpensive too. This combo was only $500. I chose it after it being so well recommended on these forums.
Poly eurathane Steering Rack Mounts made the car's steering feel much sportier, tighter and responsive.
Ebay front strut bar made a very small but noticeable difference. I didn't think I would actually notice it. Maybe it's a placebo lol
Wheels: TRD Sports18"
18x9.5 rear and 18x8.5 front. These are TRD Sports in Supra offset sizing with 40 front and 38 rear. They were sold to me as "TRD T3's" from this JDM shop near me but they are in fact TRD Sports wheels in Supra offset sizing. What's interesting is that TRD Sports wheels are not listed as coming in these offsets on the TRD website. My friend has TRD T3's and they are indeed a different design than the TRD Sports that I have.
http://www.trdparts.jp/english/parts_wheel-sport.html
Overall a great wheel. Only weigh 17-18 pounds a piece. Improved handling, acceleration and braking. Everything about the car felt better. Never realized good wheels would much such a difference.
Transmission & Differential Transgo HD2 Shift Kit, 4th Solenoid Mod, B&M Trans Cooler 70264, 2800RPM Torque Converter Converter, Torsen JDM Supra N/A 4.08 Gear Differential
I have the Transgo HD2 Shift kit on hot setting. Chirps the tires when it shifts. Car feels much faster with it. Best mod for the A340 transmission. This mod is a must if you're planning on boosting with the stock auto.
Link to Transgo Shift Kit Thread
I have the 4th solenoid mod wired on a switch. When the solenoid is off, you can really tell the increased line pressure through the transmission. By moving the shift lever from park to drive it really jerks hard into drive. With the solenoid on, it doesn't have this huge jerk. Since I have the Transgo Shift Kit I already have boosted line pressure so the effects of the 4th solenoid mod are more pronounced. Although I do notice the increased line pressure when switching from park to drive, the increased line pressure is not noticed when going WOT or changing gears. This is probably because the 4th solenoid is there to gradually increase the line pressure. So with the 4th solenoid set to on, my line pressure at a stop is normal and then increased to full line pressure when shifting at WOT. With the 4th solenoid mod off, my line pressure is at max all the time.
For these reasons, I actually just drive around with the 4th solenoid mod ON like stock. I have comfortable lexus like shifting at low speed and great crisp shifting with the Transgo at WOT. I have to do further testing if the increased pressure of the 4th solenoid mod gives me better times, but to be honest from a seat of the pants feeling it does not. I could see if someone did not have the Transgo kit, that the 4th solenoid mod would be a very small upgrade. The 4th solenoid mod however does not compare to the effect of the Transgo shift kit at all.
I have the Hot Rod setting on my Transgo kit. The hot rod setting is simply the size you drill the holes in your valve body. The kit comes with two drill bits; Truck sized and Hot Rod sized. The hot sized are larger and will make your auto chirp your tires during WOT shifts. It is a great setting for fun but for all out 1/4 mile time performance it is probably not. I think a drill size between truck and hot rod would be ideal. I've never tried truck setting, but if you were you could start with it and then go up from there. I'd imagine a drill bit size right under Hot Rod would be just perfect. I'm just worried when I slap on my supercharger that my rear is going to get squirly on shfits with Hot Rod settings. Transgo shift kit a huge thumbs up
2800rpm converter, Torsen differential and 4.08 gears were all installed at once. This made a dramatic effect on launch characteristics of the car. The combination of the three made flooring it off launch incredibly fun. The car felt a lot faster form a seat of the pants feeling. The driving characteristics of the Torsen are also much better than the open differential. For example, I had the shift kit installed with the open differential, and when it was raining I went full WOT 1-2 shift and the car bucked sideways completely. With the Torsen differential everything is smooth and in control, so you can have fun at the limit. Installed poly eurathane differential mounts as well. Overall these upgrades were a huge plus
Supra Mishimoto Radiator: Temps are cooler. Looks good. There is a thread somewhere on clublexus to show how to install it and use your stock fan shroud. You just have to flip the stock rad mounts upside down underneathe to raise the Mishimoto to the right height. Install looks spot on, looks like it was almost meant to be stock. Works great with the stock fan and shroud
Brakes: LS400 BBK, SS Lines, Semi-Metallic Pads (soon to be switched back to ceramic).
Great stopping power over stock. The LS400 calipers are much better than the stock sc400 fronts. The semi-metallic pads bite extremely hard. The only downfall of the semi-metallic pads is that they squeal. For this reason I will be switching back to ceramic pads, but if you want strong brake bite use semi-metallic you won't be let down.
Cosmetic:
Green Lip & B-Pillars: The matching B-pillars with the rest of the car bring the look up to date. The black b-pillars with the green looked kind of old school. Looks much better in my own opinion. The matching front lip with the rest of the car looks much sleeker.
95 Tails & High Beams: Glass high beams look better than plastic. 95 Tails are the nicest tails in my opinion. I have hyper blink which I will try to fix with some resistors one day.
ES300 Wood Steering: Great looking steering wheel. I had my steering wheel leather refinished to match the grey interior of the car. The wood model es300 steering wheel I chose matches the wood on the SC400 interior. Looks classy and much better than the original steering wheel.
Antennae delete: Had a bodyshop do this. Removed the entire antennae unit and still get radio reception. I only get the two major channels in my area now but I don't listen to radio anyways.
Audio:
F700BT Pioneer in modified metra bracket (see thread on clublexus. Metra bracket sucks without modification). Looks flush in the dash. Updates the look of the car over the stock radio. 6.5" Infinity Components and 10" Lightning Audio subwoofer powered by a 4 Channel Lightning Audio Amplifer. Modified the stock speaker pods on the doors to accommodate 6.5" speakers. Made brackets for 6.5" speakers in the rear deck. Amp and sub are not in the car right now but will be in soon. The stock Nakimichi system sounded amazing though, I still regret removing it. When my new amplifier gets intalled and my speakers get amplified again I'll be happy.
Nitrous: Nano Nitrous, Wet Kit, Zex Window Switch & TPS (Soon to be upgraded to NX Maximizer 4)
My Nitrous Guide Thread
I'm using a Nano Nitrous setup. It is a second bottle filled with compressed air that keeps the nitrous bottle constantly at 950psi. Usually a bottle warmer is needed to get the nitrous to this PSI. The advantage to this setup is that you are always ready to boost, it is easier to tune, it makes the nitrous hit harder and your PSI stays constant right until' the end of the run. Overall I couldn't be happier with the setup as it removes all the disadvantages of nitrous (except refilling the bottle). Currently my nitrous system is only using 50 shot jets. My current controller is a straight shot controller. My plan was to install a progressive system and run a 150 shot. My plans changed when I bought my supercharger though. New plan is to install 75 jets and use the NX 4 Maximizer controller to spray nitrous in 2nd and 3rd gear on top of the boost of the supercharger. Plans get upgraded but that's the safe plan for now.

Parts waiting to be installed
- AEM FIC 8: I will use one map for the supercharger and the other for supercharger + nitrous.
- AEM Failsafe Wideband
- NX Maxmizer 4: Progressive nitrous controller that I will spray nitrous in 2nd and 3rd gear. I will avoid spraying nitrous in 1st gear until' I upgrade the 2nd gear sprag. The 2nd gear sprag in the A340 can only handle about 340whp. With 6psi, will be around 300whp hopefully. The 75 shot of nitrous should get me close to 400whp because the boost increases the effect of nitrous. Once I build my auto with an ATF billet 2nd gear sprag and Red Alto HD clutches, I'll up the boost and the nitrous (but this will only be in a few years).
- GTspec Rear Strut Bar
- Denso Supra TT F/P
- Titan Line Lock Kit
- Two Jeniko Nitrous Bottle Brackets for easy removal of bottles
- Tweaked performance patch harness for FIC 8
Centrifugal Supercharger Build:
Bought a Vortech V3 Si off ebay for $650. It needs a rebuild though. I ordered the rebuild kit from superchargerrebuilds.com with a mechanical seal. Cost for the rebuild kit was $225.
So today I ordered a bunch of parts to get this fishbracket build going. It's called the fishbracket build because the bracket that holds the supercharger looks like a fish. Did a lot of research to find the right parts for the job. Thanks to members of Lextreme, Clublexus and Supraforums for all the info posted online.
Bypass Valve: Audi TT and Porsche 710N Bypass Valve
Part # 06A 145 710 N

This is what the mustang guys use to upgrade the bypass valve that comes with the vortech kits. The 710N has metal internals and is great bang for the buck. Only $50!
Dual Electric Fan Conversion:
Unfortunately for the SC400, the dual electric fan conversion is needed for space reasons. I don't think it's needed for the LS400 though. The stock fan setup of the SC400 is great, high flow and reliable so it's a shame to take it out. I had to do a lot of research to find a good bang for the buck setup. A lot of the shroud kits out there are not well rated by the Supra community except for one which is pretty pricey, it actually uses is300 fans which are really good.
In the end I ended up going witha two 14" Zirgo ZFU14S setup.

This dual Zirgo setup was well recommended by the supra community. Plenty of people use these two fans without a shroud, so I will be going down this route. Total cost for the two fans was $260
The fan controller I ordered was Flex-A-Lite 31163. This is a variable fan controller that has a lot of nice features for the money. It has good reviews online. Cost was $165

LS400 Fan Bracket and Pulley
This is needed for the fishbracket.

Cost was $57 shipped online. I ordered a cheap non-oem part. Hopefully it holds up.
The Pulley does not come with the fan bracket. The part number for the pulley is 16371. I ordered this from Lexus of South Atlanta for $70 shipped. That was the cheapest price I could find it.

Next up I need to choose my pulley for the supercharger. I plan to start with 6psi non intercooled. This should be plenty fun to start with and should give me an estimated 300whp. I plan to try to use my stock injectors, if I see they are not up to par I will upgrade them to 7M green injectors 315cc.
For the pulley I'm having difficulty in choosing the size I want to order. I'm thinking of ordering 3.48" to give me about 6psi. Any feedback would be much appreciated.
All that's left to buy is the vortech pulley, belt, piping and some miscellanious wiring to relocate the battery to the trunk. I also have to copy the EGR Delete & Fishbracket that my friend's have (would order from lextreme but parts ordering is hopefully only temporarily closed). Apparently the EGR delete is necessary or you won't build boost (you get boost leaks). From what I read I need 7/16" x 127mm bolts and 103mm spacers (the spacers I'm not 100% sure, this is from what I read on a forum). It's too bad I can't order the bolts and spacers directly from Lextreme right now.
This 6psi non-intercooled setup with a 75hp shot of progressive nitrous should be pretty fun. After enjoying this setup for a few years the plan is to go built auto, slap on an intercooler and crank up the boost. The neat thing about the nitrous is that I can spray in 2nd and 3rd gear and avoid busting the 2nd gear sprag on 1-2 shift which is the weak link of the stock A340.
Super excited to get this supercharger build started! I'm away from home for work until' October, so all I can do right now is read on forums and learn more about this setup. The plan is to get everything done before winter comes so that way I can enjoy the car at the start of next summer. Here's hoping everything goes well.
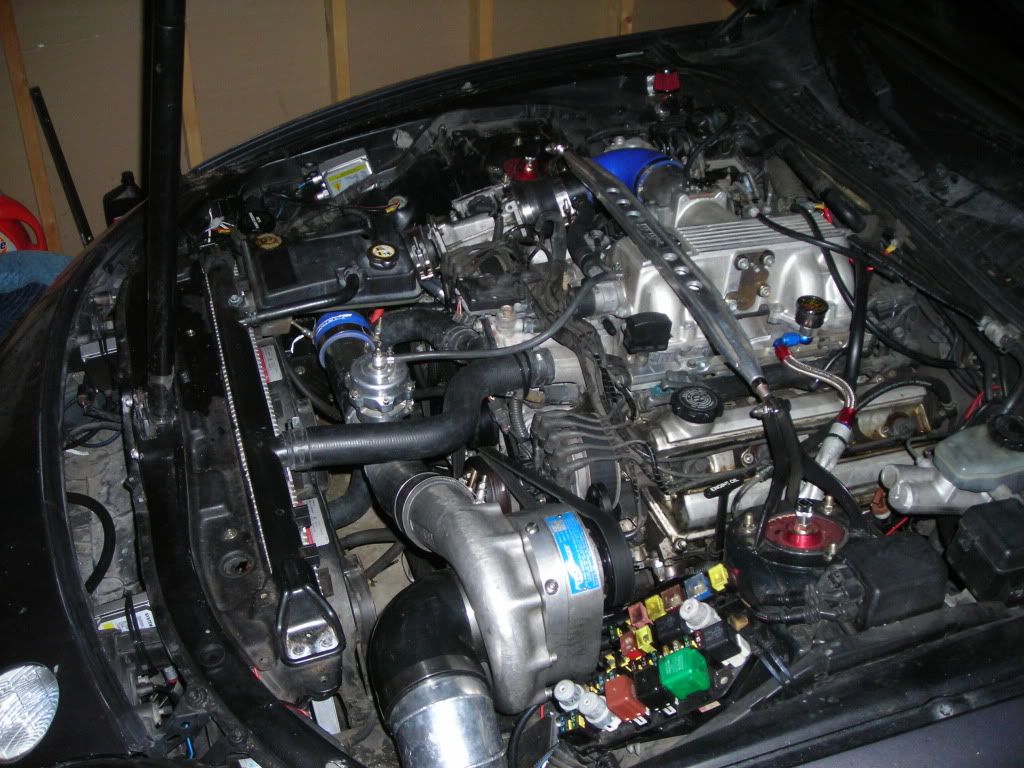
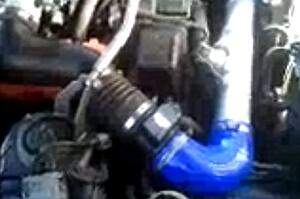
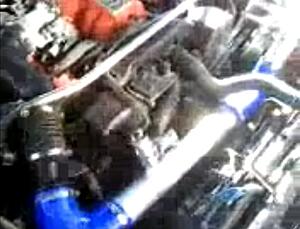
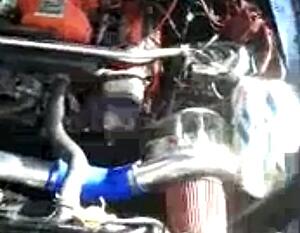
The plan is to have the supercharger piping setup looking like this (not my car):
 BOOOOOOSSTTTTT

 04-21-14, 05:12 PM
#23
I actually sold this build to a member on Lextreme.
I moved across the country and needed funds. I even sold my nitrous system
Fear not though, I'm still going FI. I will only create the thread about it once it's finished. I don't want to create another teaser thread and never follow through.
Looking back on this build I would probably just go water/meth instead of the more expensive water to air setup. Run no intercooler and use the water meth for cooling.
Here is a small write-up on how I would connect everything. I sent this to the person who bought my kit. Here is how I would connect everything.
Keep the stock intake.
Use the MAF adapter to 3" I sent you.
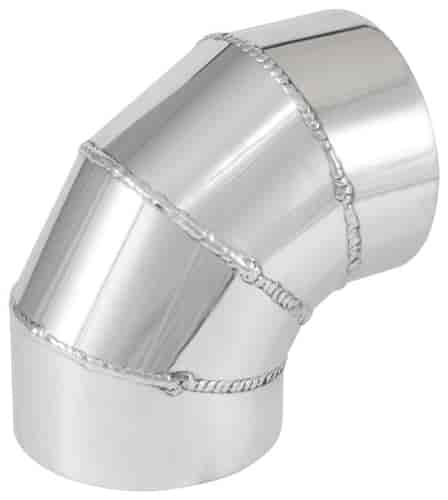
Buy a 3" silicone 135 degree elbow from the MAF adapter.
Use 3" piping and run it from the 135 degree elbow between your rad and the engine.

In the middle of this 3" piping you want to run your bypass valve. In the kit I sent you there is a T pipe (3" on both sides with a 1" hole for the bypass).
Purchase a 45 degree bend 3" to 2.75" (this will connect direct to the supercharger)
Replace the fan bracket on the motor with the LS400 fan bracket. The spacers for the supercharger are included. I will send you the bracket once I receive it.
For the intake you can put a simple Cone air intake. I would personally try doing something similar to a BFI intake (see Lextreme) but on the right hand side of the engine and scoop the air through the front bumper.
Or you could try this:
The intake before the supercharger will be designed like spf_lexus's build on lextreme. The intake will be a 90 degree 3.5" to 4" reducer silicone piece, that will connect to a 90 degree 4" aluminum bend. This will then connect to a 4" K&N. From what I read off spf_lexus's build the intake should be 1/4" to 1/2" larger than the supercharger inlet. Plus this will grab cold air versus hot air from inside the engine bay.
For cooling I would personally use a water/meth kit. The AEM multi injection kit can run off the injector duty cycle.
I moved across the country and needed funds. I even sold my nitrous system
Fear not though, I'm still going FI. I will only create the thread about it once it's finished. I don't want to create another teaser thread and never follow through.
Looking back on this build I would probably just go water/meth instead of the more expensive water to air setup. Run no intercooler and use the water meth for cooling.
Here is a small write-up on how I would connect everything. I sent this to the person who bought my kit. Here is how I would connect everything.
Keep the stock intake.
Use the MAF adapter to 3" I sent you.
Buy a 3" silicone 135 degree elbow from the MAF adapter.

Use 3" piping and run it from the 135 degree elbow between your rad and the engine.

In the middle of this 3" piping you want to run your bypass valve. In the kit I sent you there is a T pipe (3" on both sides with a 1" hole for the bypass).
Purchase a 45 degree bend 3" to 2.75" (this will connect direct to the supercharger)


Replace the fan bracket on the motor with the LS400 fan bracket. The spacers for the supercharger are included. I will send you the bracket once I receive it.
For the intake you can put a simple Cone air intake. I would personally try doing something similar to a BFI intake (see Lextreme) but on the right hand side of the engine and scoop the air through the front bumper.
Or you could try this:
The intake before the supercharger will be designed like spf_lexus's build on lextreme. The intake will be a 90 degree 3.5" to 4" reducer silicone piece, that will connect to a 90 degree 4" aluminum bend. This will then connect to a 4" K&N. From what I read off spf_lexus's build the intake should be 1/4" to 1/2" larger than the supercharger inlet. Plus this will grab cold air versus hot air from inside the engine bay.
For cooling I would personally use a water/meth kit. The AEM multi injection kit can run off the injector duty cycle.
Last edited by Clean400; 04-21-14 at 05:39 PM.
04-22-14, 10:27 AM
#24
Pole Position
Ok. I hope that you�ll be able to supercharge some time soon again! I really like the set up you had.
A couple of questions if you don�t mind:
1) Do you still have the AEM F/IC-8 running?* Are/were you happy with it?
*Does Tweaked�s harness make it completely plug�n play?
2)Did you run with stock injectors and stock fuel pump? fpr?
PS: Great mods on the rest of your car as well! I also run the transgo shift kit but I have to confess that I didn�t really like the hot rod drilling (felt sorry forry the sprags). Last weekend I switched from hot rod drilling to a valve body with 0.62 holes for 1-2 and 2-3. Far better than stock, but still a bit too lame, so I Think you�re right that the ideal size for 1-2 and 2-3 would be something between truck and hot rod. (sorry for hijacking your thread )
)
/Anders
A couple of questions if you don�t mind:
1) Do you still have the AEM F/IC-8 running?* Are/were you happy with it?
*Does Tweaked�s harness make it completely plug�n play?
2)Did you run with stock injectors and stock fuel pump? fpr?
PS: Great mods on the rest of your car as well! I also run the transgo shift kit but I have to confess that I didn�t really like the hot rod drilling (felt sorry forry the sprags). Last weekend I switched from hot rod drilling to a valve body with 0.62 holes for 1-2 and 2-3. Far better than stock, but still a bit too lame, so I Think you�re right that the ideal size for 1-2 and 2-3 would be something between truck and hot rod. (sorry for hijacking your thread
)/Anders

Thread
Thread Starter
Forum
Replies
Last Post
Dutchie101
LS - 3rd Gen (2001-2006)
1
09-03-11 06:26 PM