


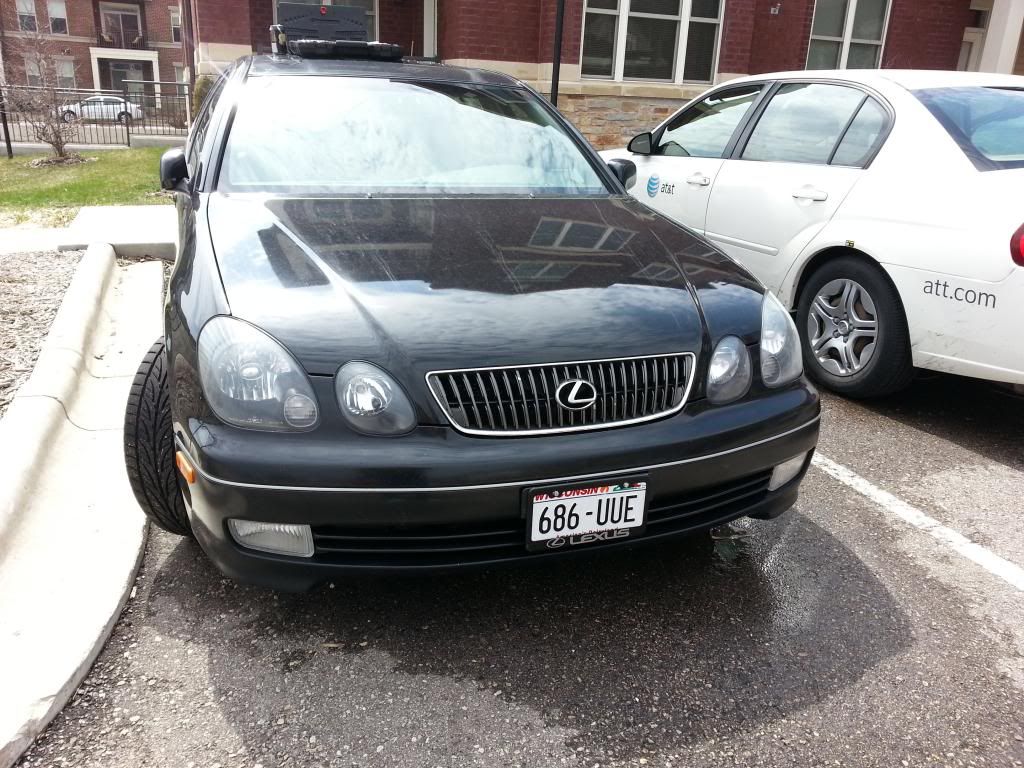
01 GS300, newbie
Admins/Mod's: It's not my intention to post ***** by copy and pasting all this. Just thought it'd be easier to do it this way.
I'm having issues uploading pictures, any suggestions? perhaps I'll try IE as I'm using Firefox
Hi guys, new to the forum, created my membership in February and figured it about time I posted. Bear with me as I'm going to copy and paste my postings from a Ford forum that I belong to, instead of retyping everything. I hope to learn some things over here as well as I've always been a Ford guy and haven't worked on many other brands of vehicles.
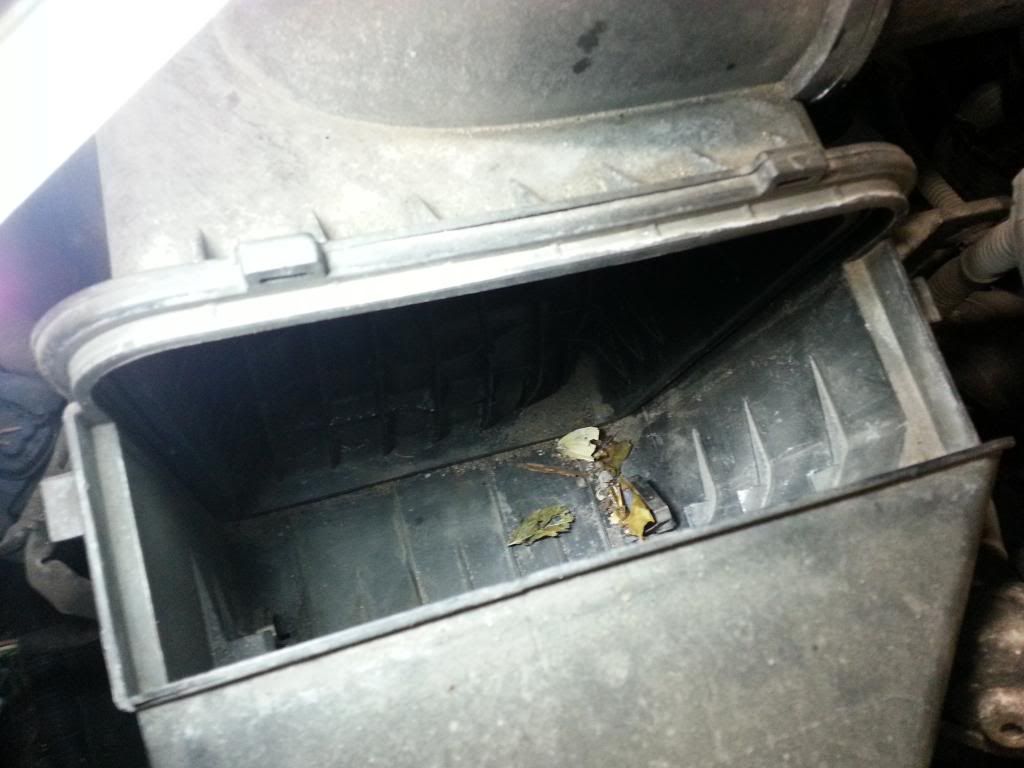
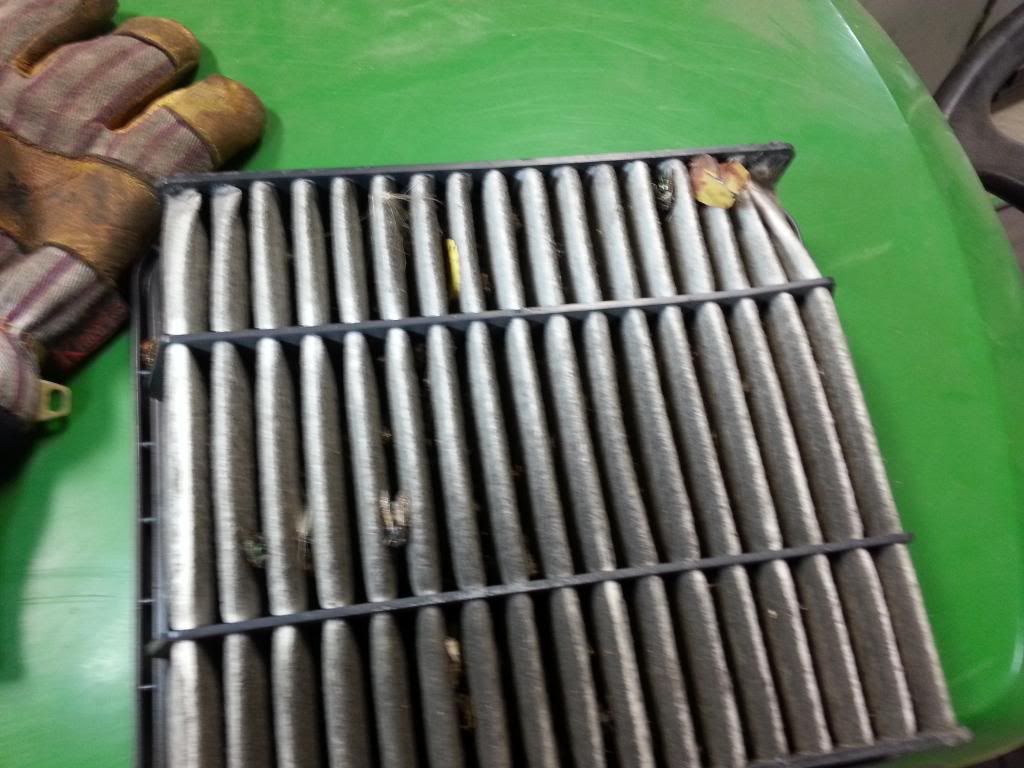
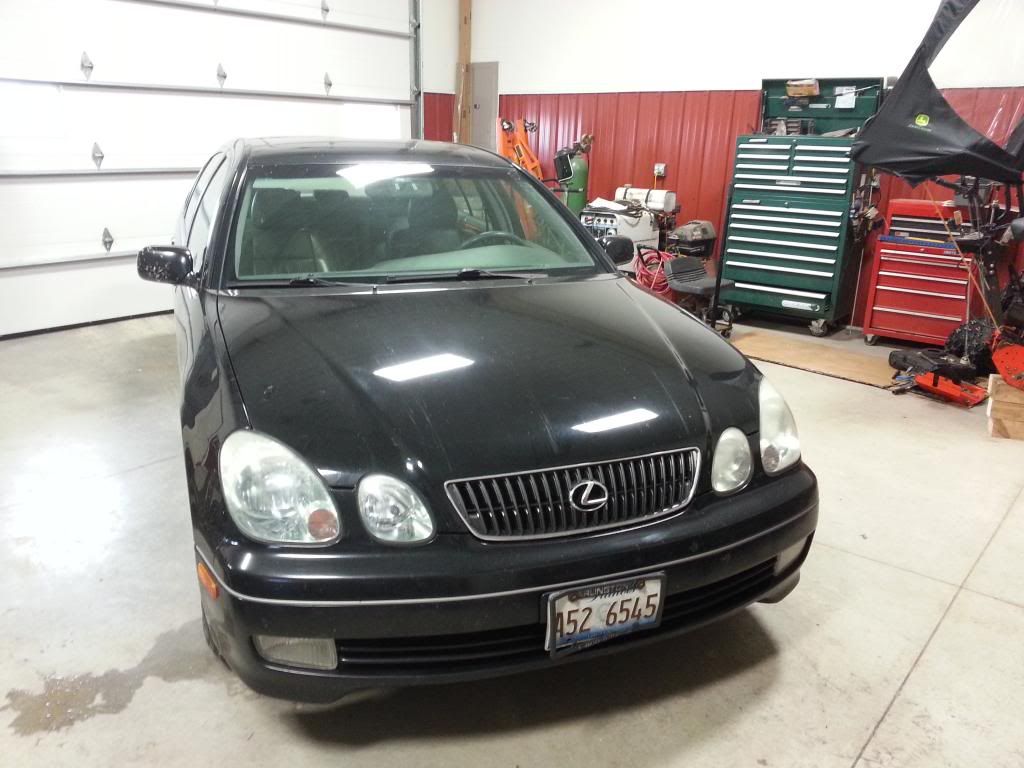
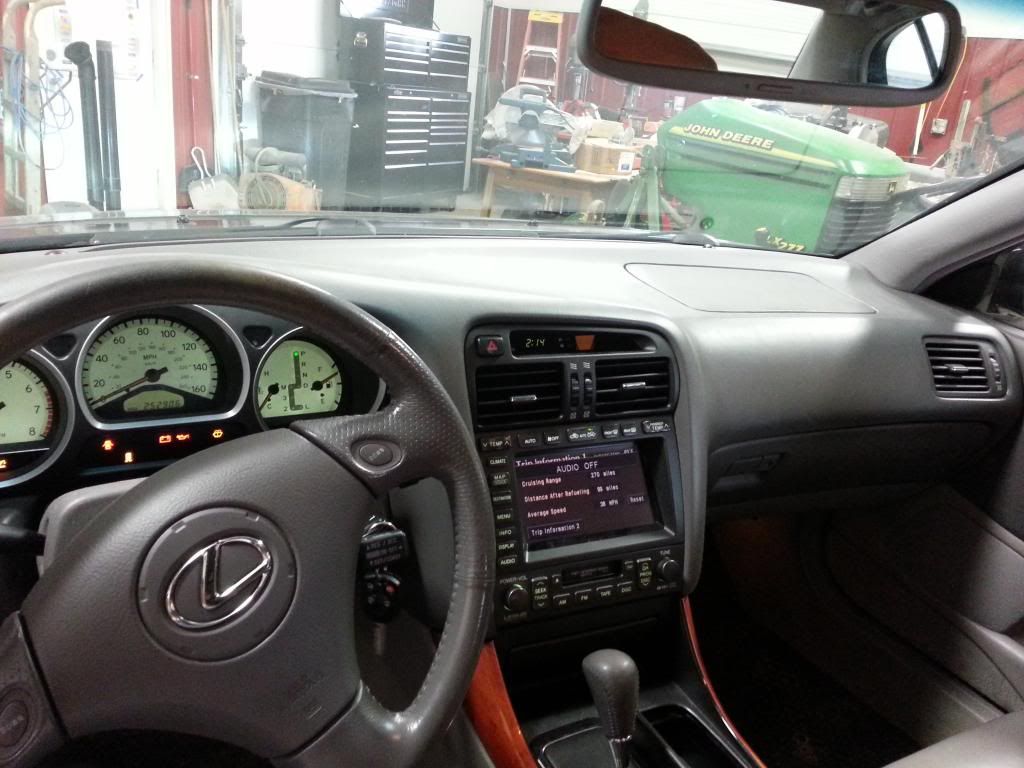
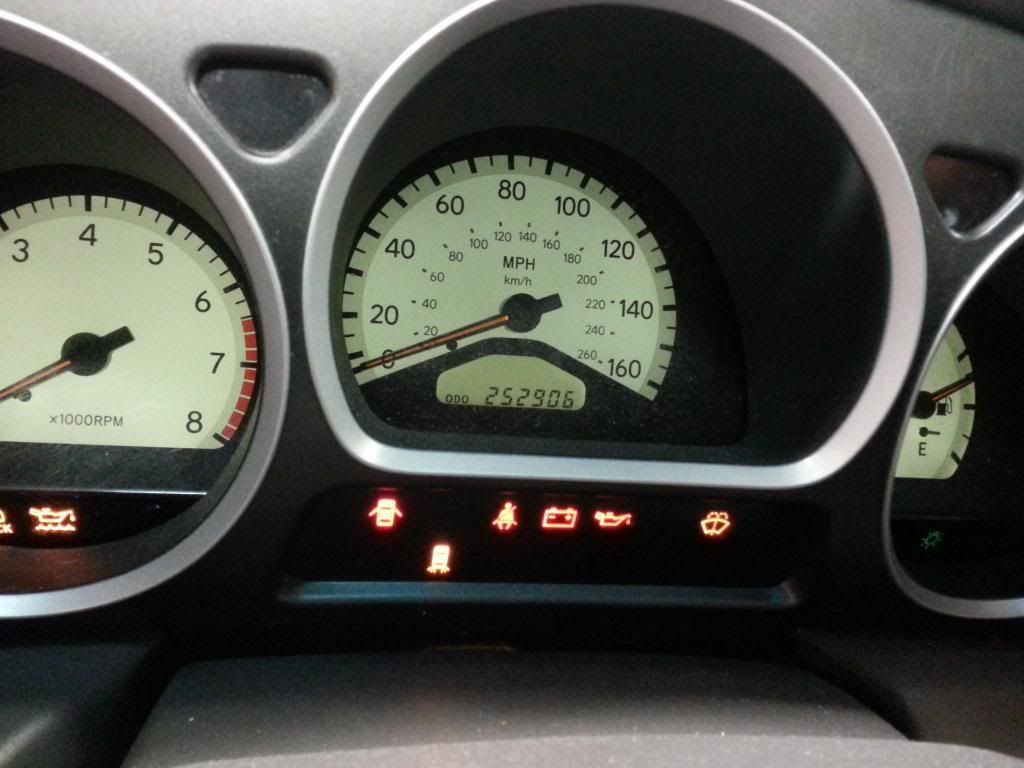
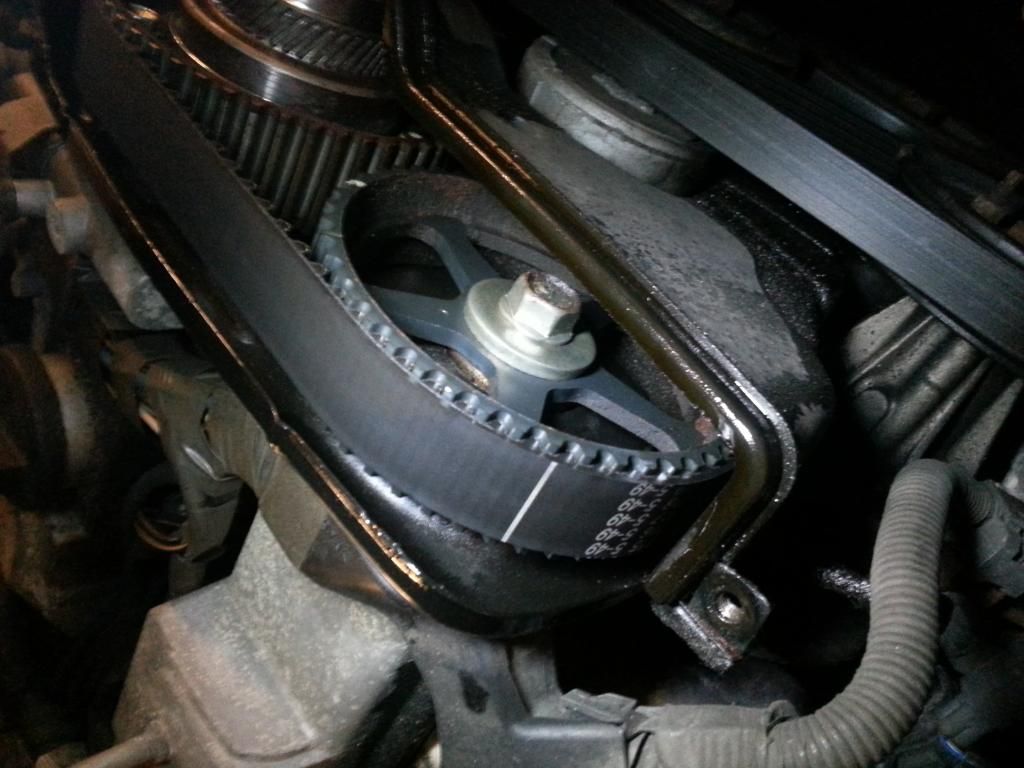
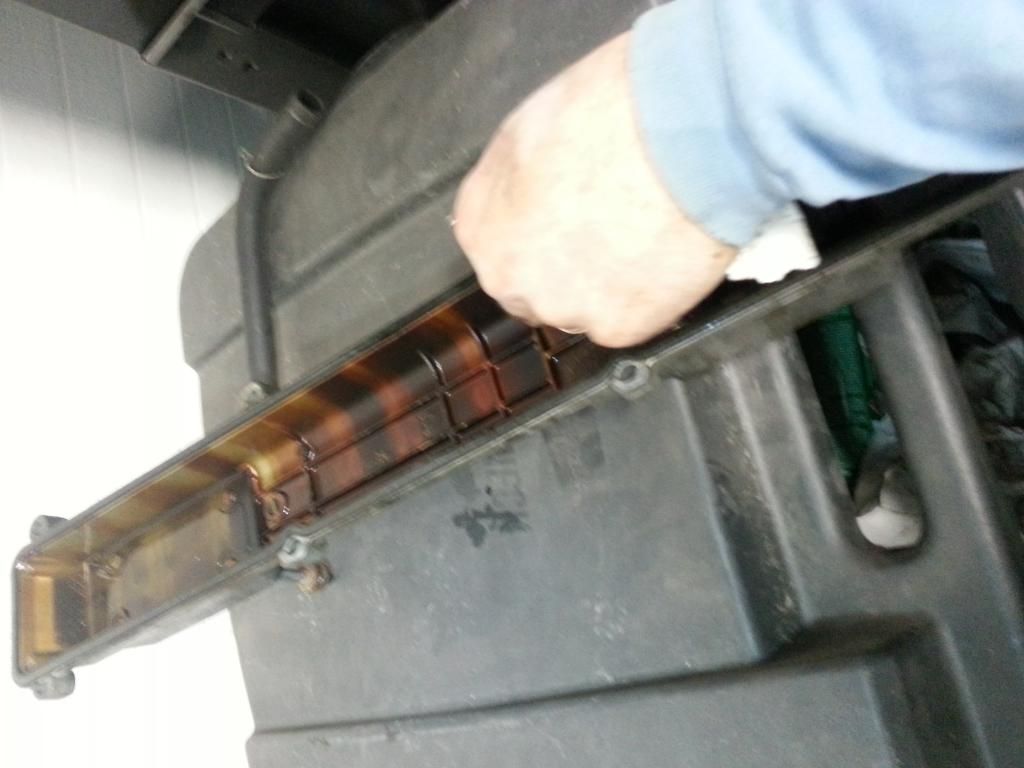
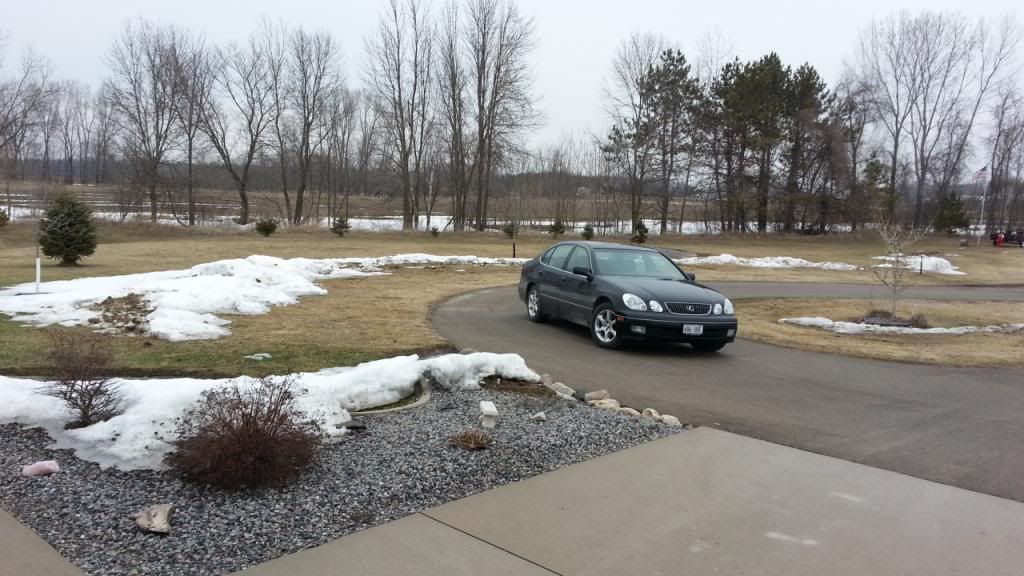
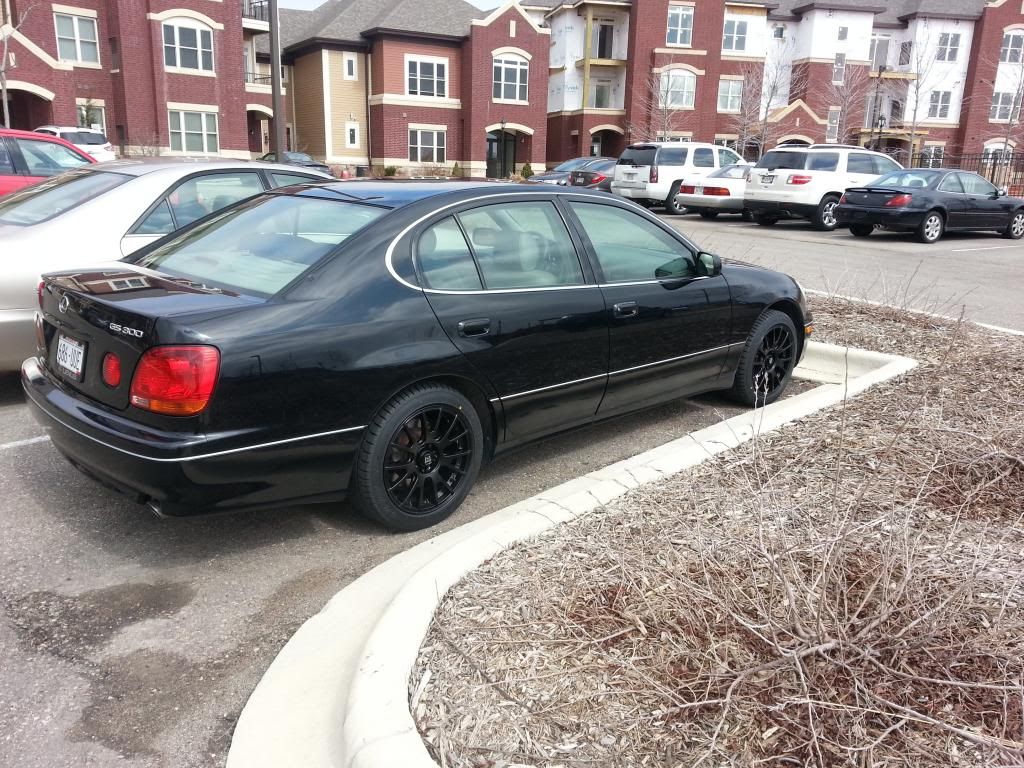
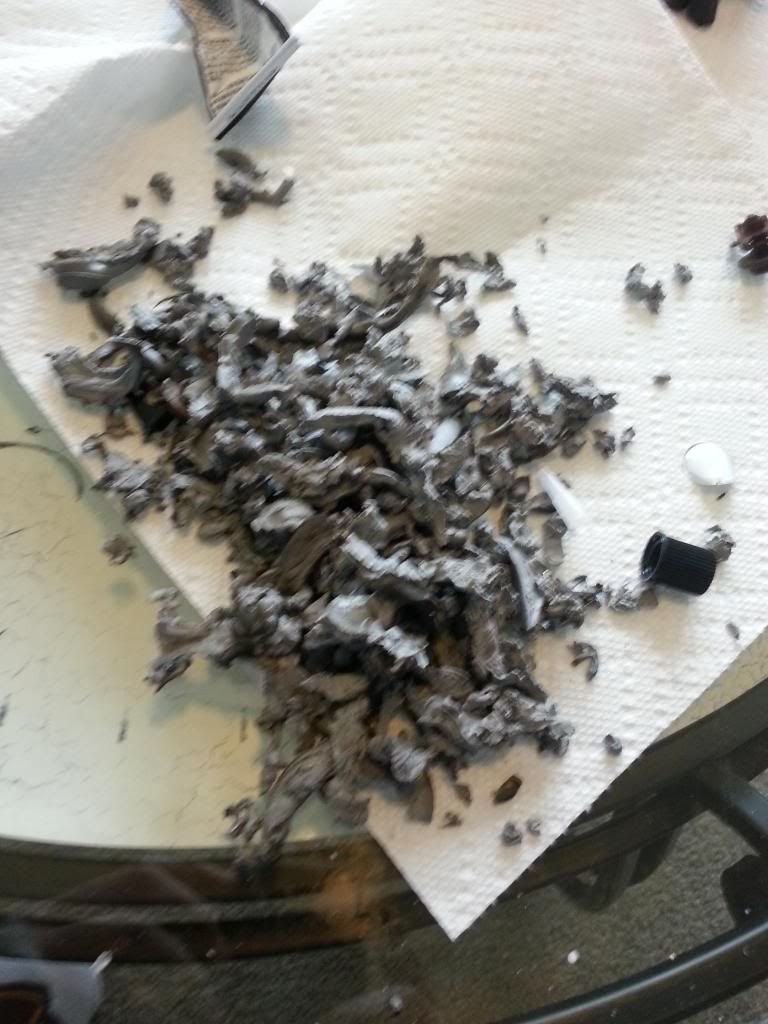
So I have a buddy that had this Lexus, he asked me if I was interested in it when he decided to upgrade. He has a large family and was going to get a large Lexus SUV. Because the car meant something to him and his business partner, he didn't really want to trade it in and wanted someone that would at least drive it and maintain it. I obliged. It has 252k+ miles on it. Having driven it back in August I knew it ran really good and was in really decent condition having spent a lot of time in Chicago. I did note that the PO had no idea about timing belt replacement having been done since he's had it (150k) and clearly their was a tie rod end and/or ball joint rattling around on the front end. Anyway, I picked up the car from him a couple weeks ago and finally got around to looking at it and driving it. I made several observations during my first long drive with it, it definitely needed a tie rod end/ball joint and I noticed for a split second the oil light flicker. Paranoid i pulled over and checked the dipstick...dry so I ran to the local station started filling. It took 2 qts. While under the hood I noted there was a service sticker on the timing belt cover noting the belt was replaced at 188k miles. #winning, therefore easing my mind about the timing needing done immediately, I can now wait until spring/summer to replace. The other thing I noted was the engine bay was filthy except for new shiny 02 sensors #winningagain. Also while first driving this vehicle I noted in the 25-40 mph range there's a distinctive high pitched tone coming into the cab, it would appear to be from the rear end. It appears to be driveline related. So this weekend I drove the car up to my dad's after ordering some brand new winter tires to have them installed and get underneath to get a better look at the steering/suspension and other things. I got the car up on the rack and found the driver's side tie rod end to be the cause of the rattle in the front end. To my surprise however all the suspension, balljoints, and sway bar end links are solid, intact, and in great condition with the exception of the one tie rod end. However I was hoping to feel a wheel bearing issue that would be causing my high frequency tone coming in the cab, however it does not appear to be the case. After installing the new tires I decided to replace the rear end gear oil. To my surprise the oil that came out was really clean and appeared to have been replaced recently. However I noted that I removed more oil that I put back in...either it was previously filled on an unlevel surface or I filled it on an unlevel surface...After i completed that i proceeded to take a look at the air filter...Hands down, this was/is the worst looking air filter I have seen, EVER. See pictures. This filter was BLACK, not because it's supposed to be, and CAKED in bugs. The filter cavity was also full of bugs and garbage. KNfilter on it's way...That's as far as I got, next I need to do a complete oil change, actually replaced the tie rod ends and have an alignment done, and replace the spark plugs as I'm sure they're just as bad as the air filter I will probably need new brake pads in spring/summer, I'll do those as well as the timing/water pump some weekend in Spring I'm sure. It also needs a serious detailing which I'll probably pay someone a good amount of money to do after the snow melts. I suck at detailing and I hate doing it. Enjoy some pictures.
I'm having issues uploading pictures, any suggestions? perhaps I'll try IE as I'm using Firefox
Hi guys, new to the forum, created my membership in February and figured it about time I posted. Bear with me as I'm going to copy and paste my postings from a Ford forum that I belong to, instead of retyping everything. I hope to learn some things over here as well as I've always been a Ford guy and haven't worked on many other brands of vehicles.
So I have a buddy that had this Lexus, he asked me if I was interested in it when he decided to upgrade. He has a large family and was going to get a large Lexus SUV. Because the car meant something to him and his business partner, he didn't really want to trade it in and wanted someone that would at least drive it and maintain it. I obliged. It has 252k+ miles on it. Having driven it back in August I knew it ran really good and was in really decent condition having spent a lot of time in Chicago. I did note that the PO had no idea about timing belt replacement having been done since he's had it (150k) and clearly their was a tie rod end and/or ball joint rattling around on the front end. Anyway, I picked up the car from him a couple weeks ago and finally got around to looking at it and driving it. I made several observations during my first long drive with it, it definitely needed a tie rod end/ball joint and I noticed for a split second the oil light flicker. Paranoid i pulled over and checked the dipstick...dry so I ran to the local station started filling. It took 2 qts. While under the hood I noted there was a service sticker on the timing belt cover noting the belt was replaced at 188k miles. #winning, therefore easing my mind about the timing needing done immediately, I can now wait until spring/summer to replace. The other thing I noted was the engine bay was filthy except for new shiny 02 sensors #winningagain. Also while first driving this vehicle I noted in the 25-40 mph range there's a distinctive high pitched tone coming into the cab, it would appear to be from the rear end. It appears to be driveline related. So this weekend I drove the car up to my dad's after ordering some brand new winter tires to have them installed and get underneath to get a better look at the steering/suspension and other things. I got the car up on the rack and found the driver's side tie rod end to be the cause of the rattle in the front end. To my surprise however all the suspension, balljoints, and sway bar end links are solid, intact, and in great condition with the exception of the one tie rod end. However I was hoping to feel a wheel bearing issue that would be causing my high frequency tone coming in the cab, however it does not appear to be the case. After installing the new tires I decided to replace the rear end gear oil. To my surprise the oil that came out was really clean and appeared to have been replaced recently. However I noted that I removed more oil that I put back in...either it was previously filled on an unlevel surface or I filled it on an unlevel surface...After i completed that i proceeded to take a look at the air filter...Hands down, this was/is the worst looking air filter I have seen, EVER. See pictures. This filter was BLACK, not because it's supposed to be, and CAKED in bugs. The filter cavity was also full of bugs and garbage. KNfilter on it's way...That's as far as I got, next I need to do a complete oil change, actually replaced the tie rod ends and have an alignment done, and replace the spark plugs as I'm sure they're just as bad as the air filter I will probably need new brake pads in spring/summer, I'll do those as well as the timing/water pump some weekend in Spring I'm sure. It also needs a serious detailing which I'll probably pay someone a good amount of money to do after the snow melts. I suck at detailing and I hate doing it. Enjoy some pictures.


Last edited by gittert; May 1, 2013 at 06:05 PM.
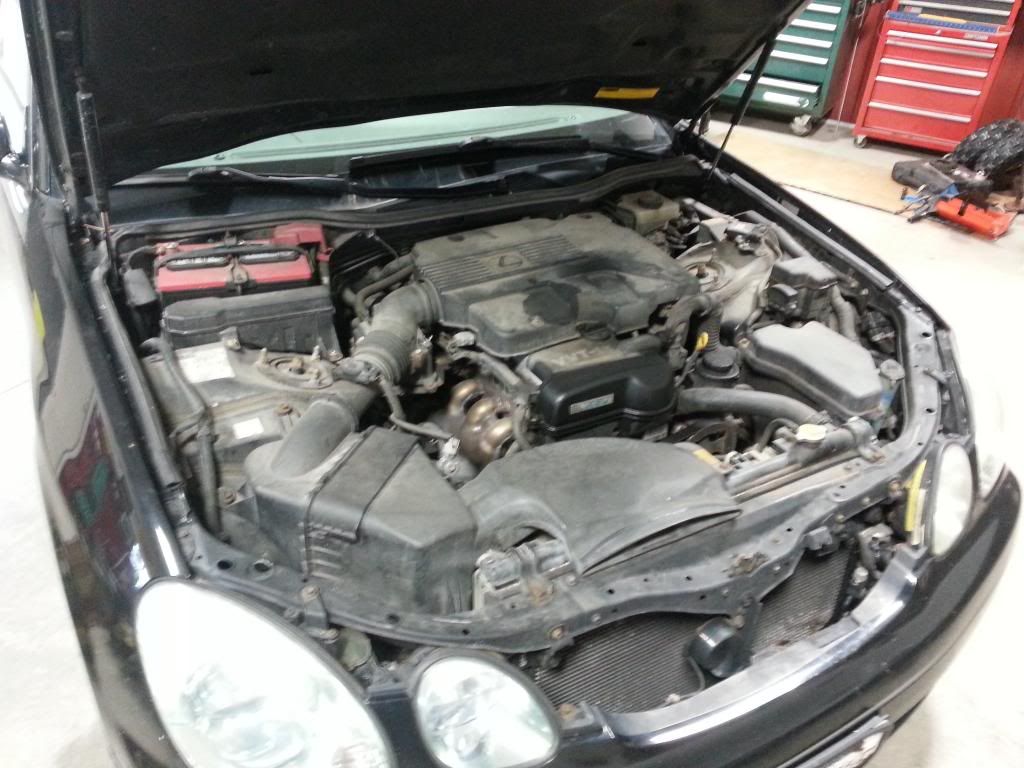
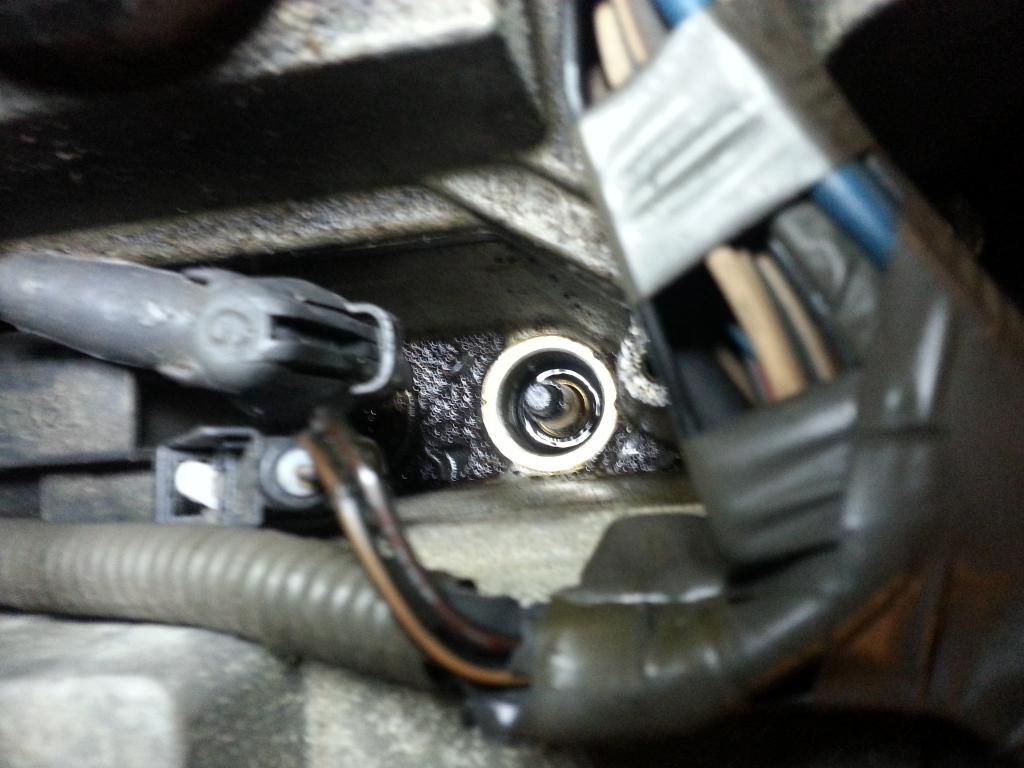
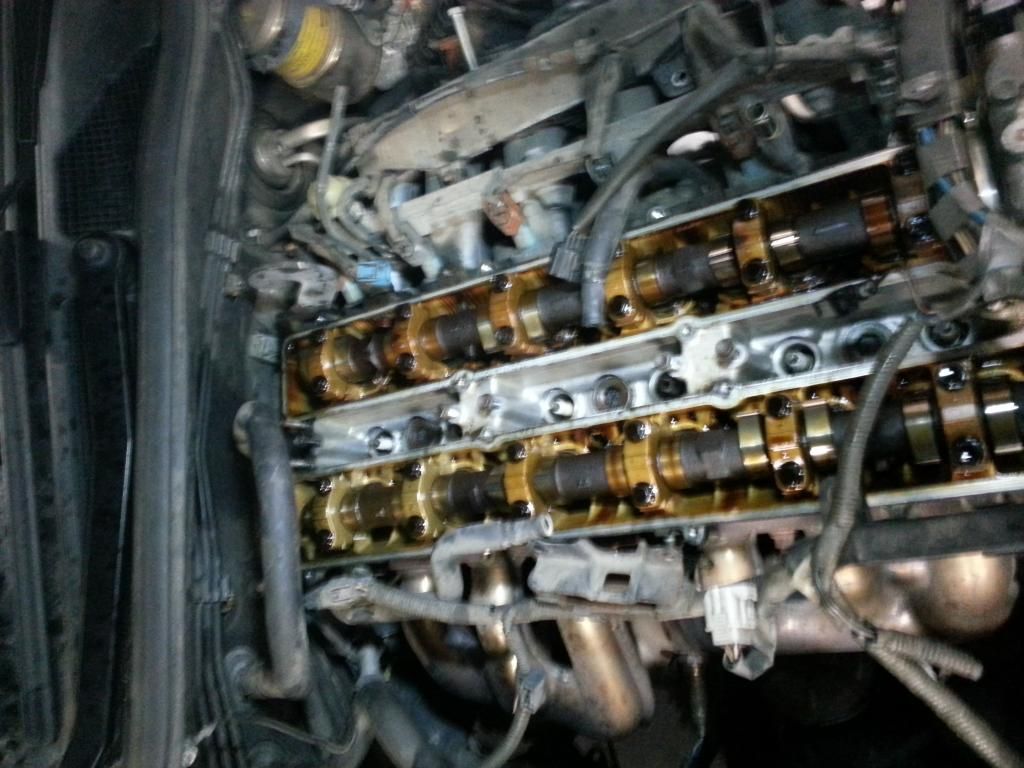
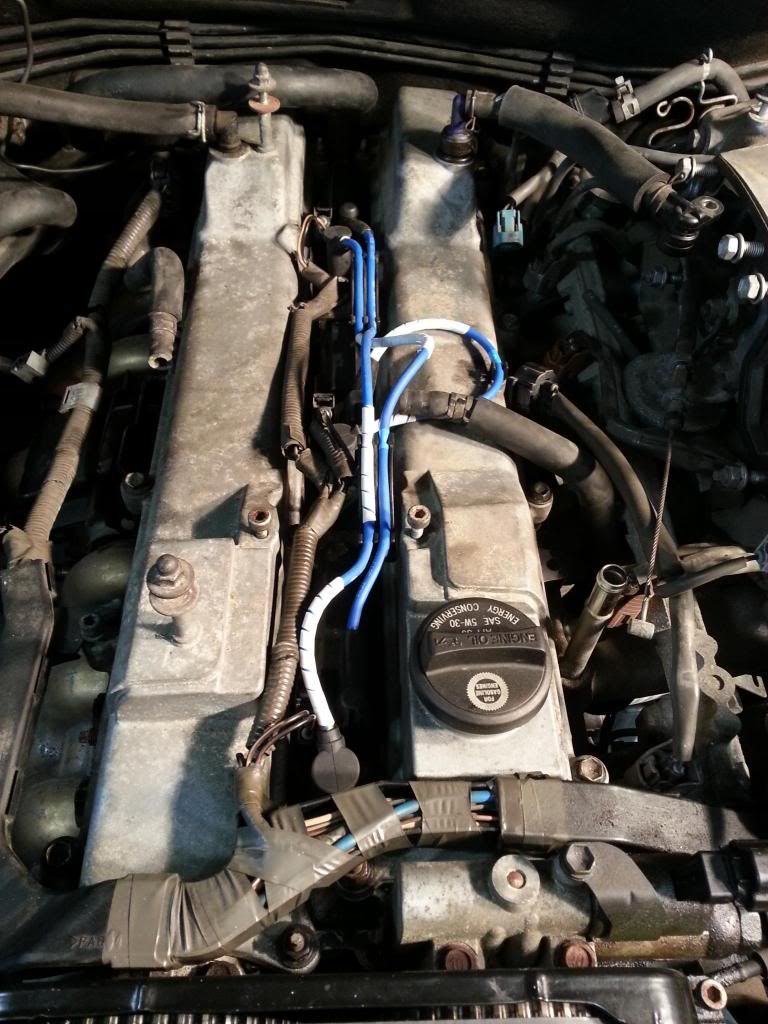
After exhaustively searching I was able to find a factory procedure for programming new keys using a process of using 1 Master key to program another Master or Slave key by depressing both brake and accelerator pedals. After several tries I was able to correctly program my extra key that was not allowing the car to start. The engine immobilizer system wouldn't recognize the security tag, and it needed to be registered with the ECU. This is typically done by a Lexus handheld programmer which the stealership charges you an outrageous amount of money to do. After this win I decided to replace the spark plugs. After removing the engine cover I noticed a lot of oil around the timing cover...which needed to come off anyway to access the plugs. After removing the timing cover I found my source of Engine oil loss. The Galley and spark plug holes are completely FULL of oil. Talk about an engine fire waiting to happen...the Valve Cover Gaskets are completely shot clearly. The plug wires appear to be original to he car as well. So I decided to button it all back up to tackle on a weekend at my dad's where ALL my tools are. It appears the upper portion of the intake manifold needs to be removed to get at the driver's side of the valve cover. So I ordered some new NGK wires from Amazon and COP boots and VC gasket from RockAuto. I will tackle this another day. Here's some pictures of the oil. Kind of hard to see.


Last edited by gittert; May 1, 2013 at 06:13 PM.
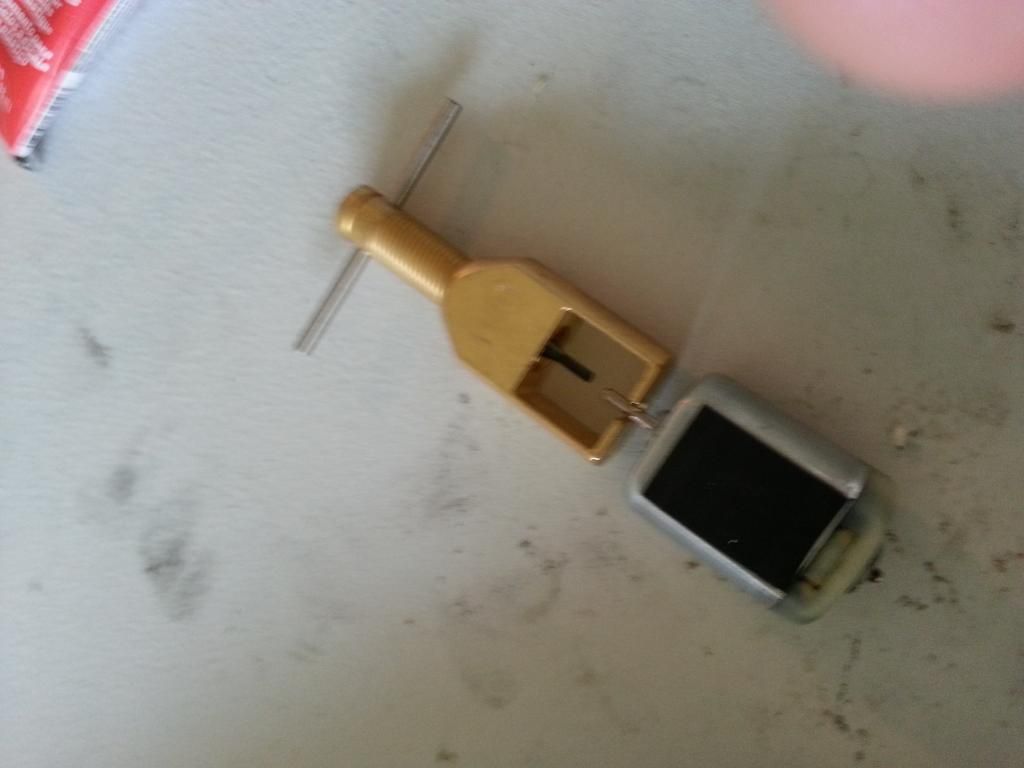
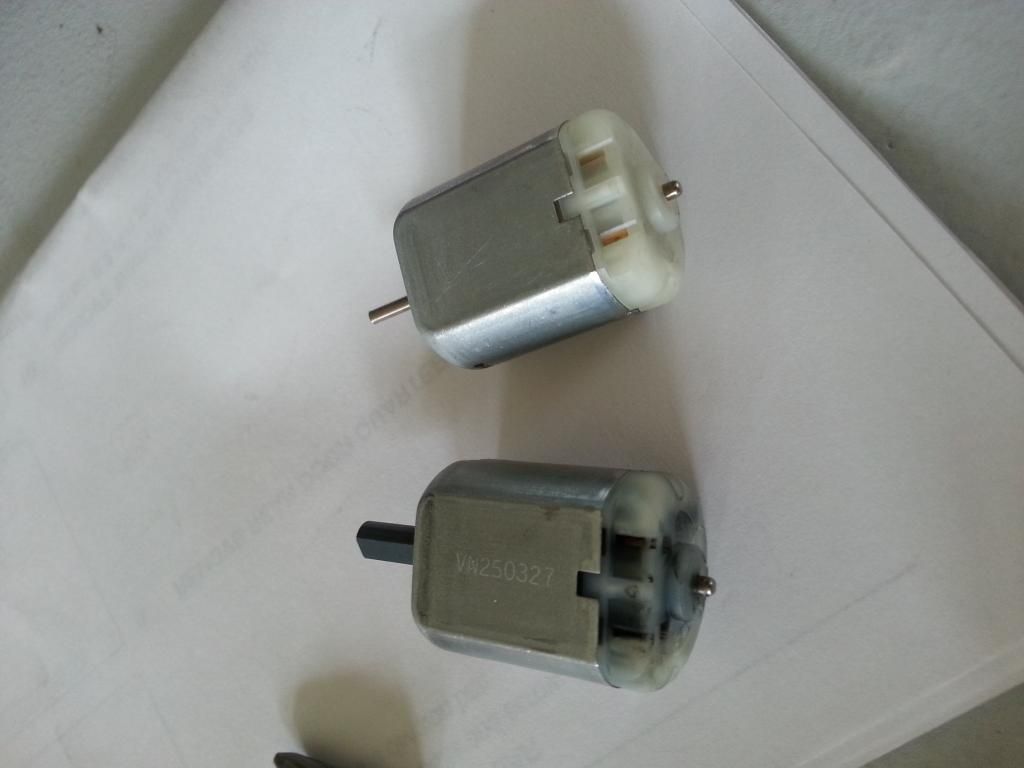
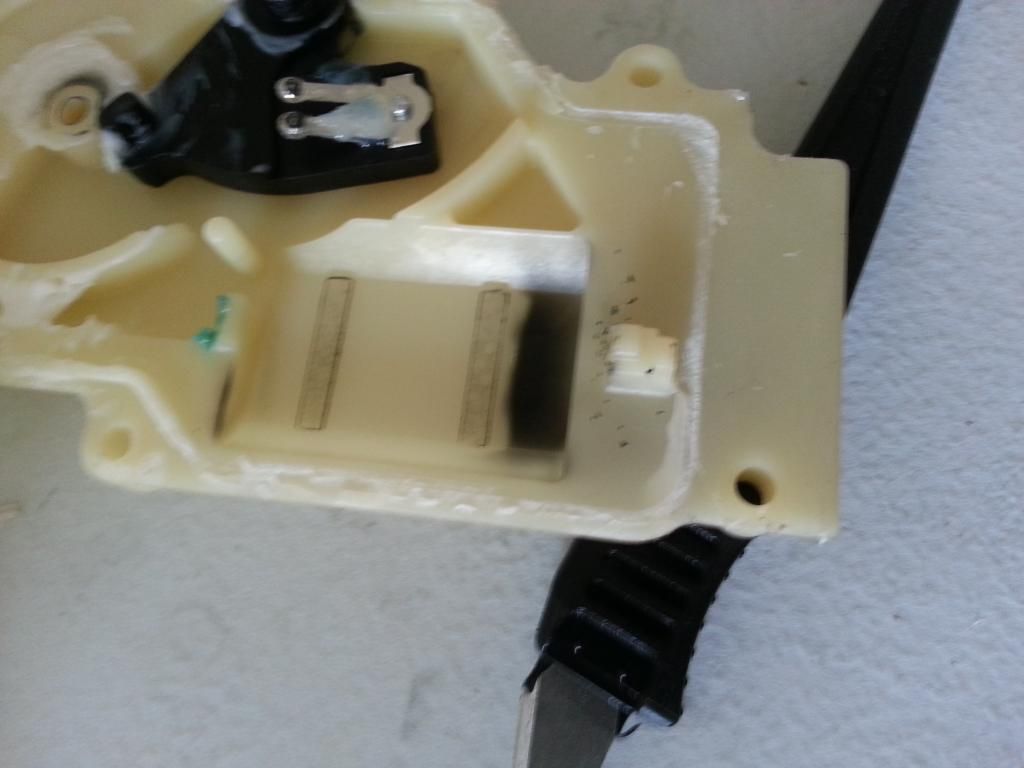
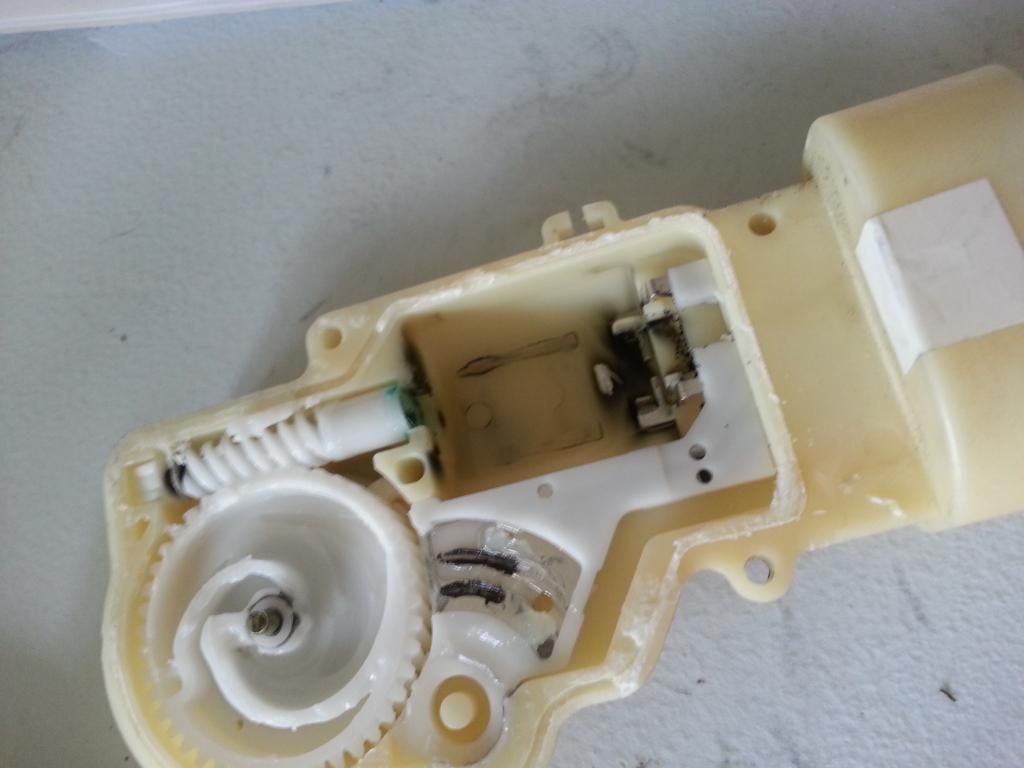
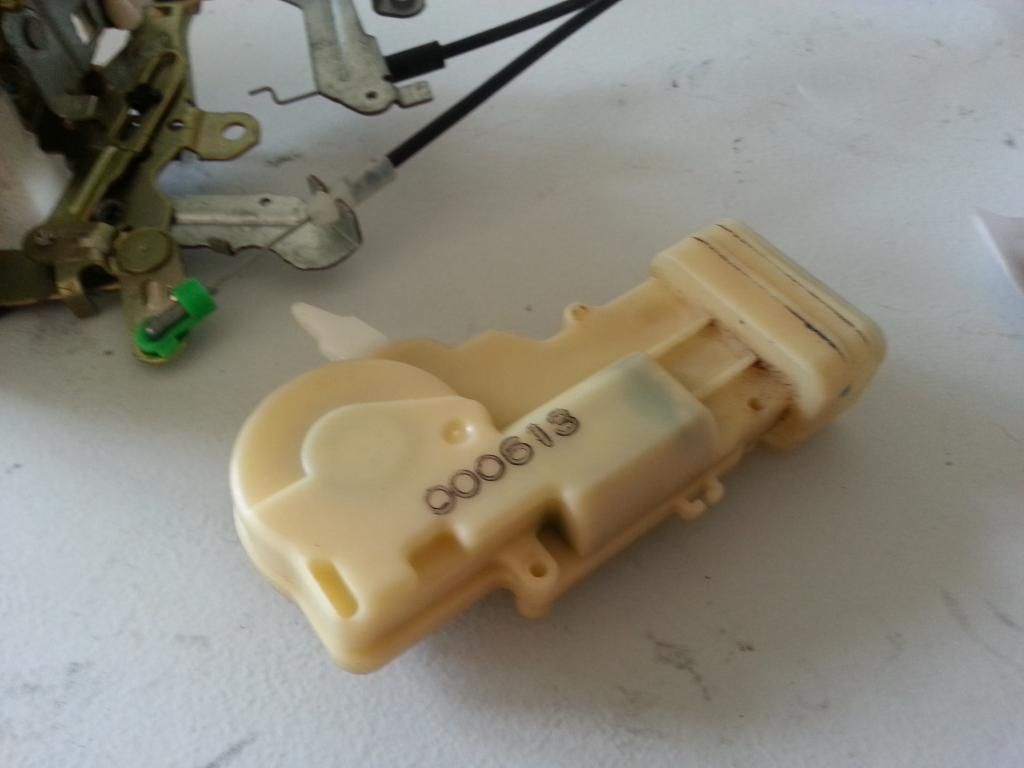
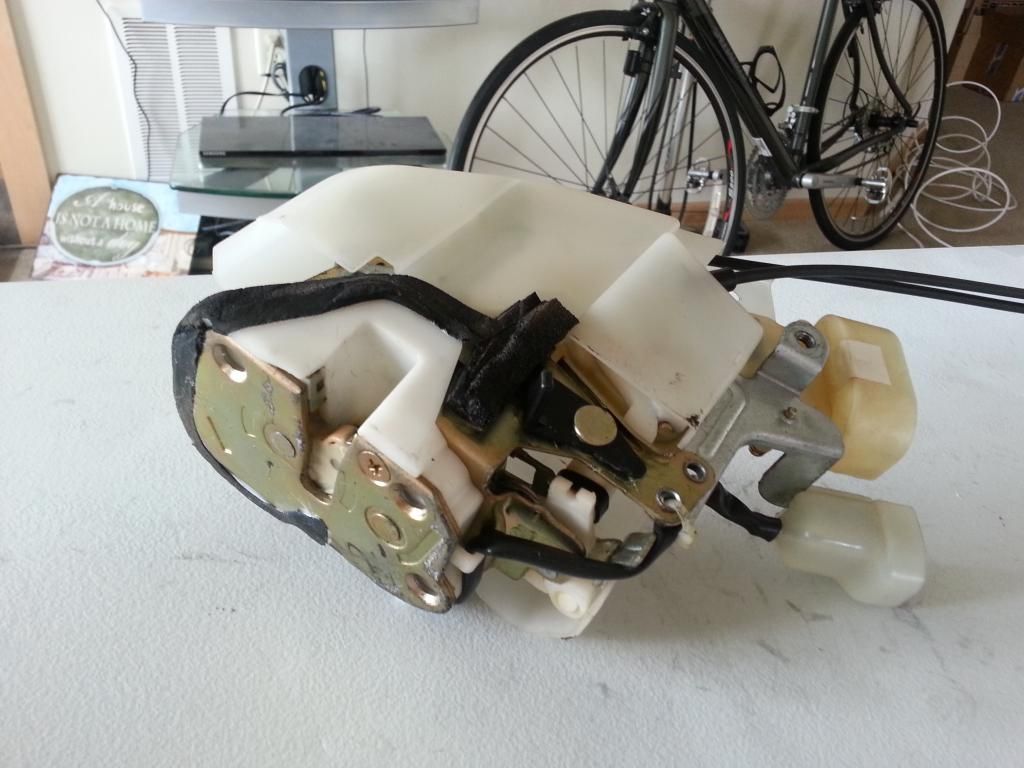
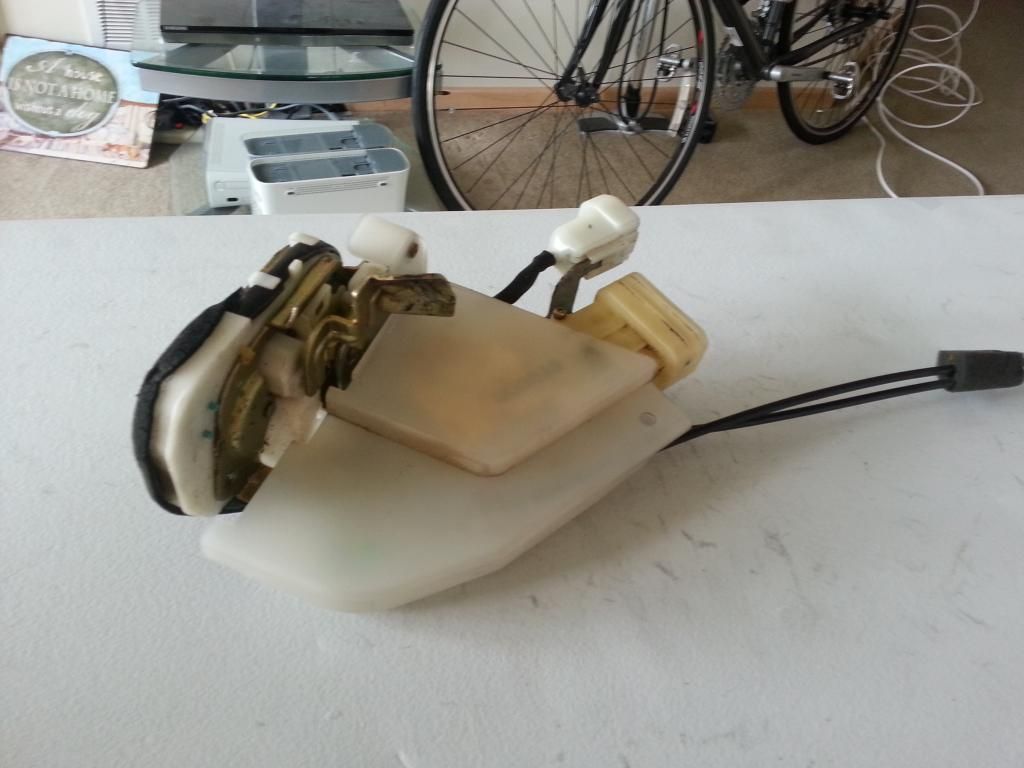
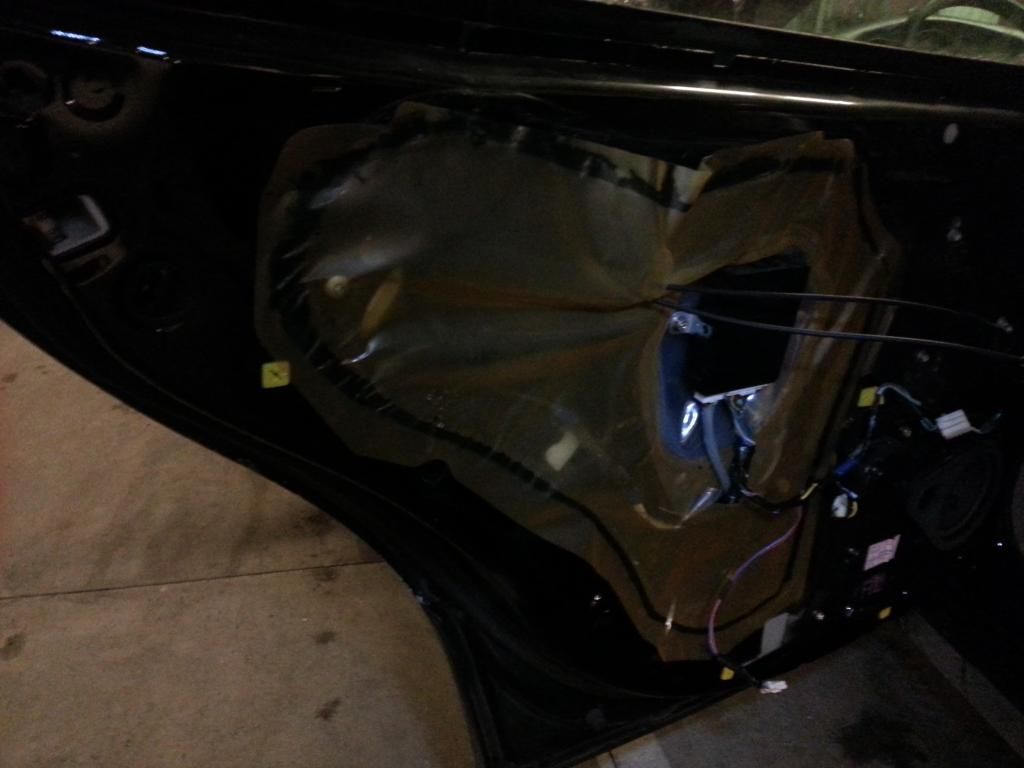
I got a chance to replace one of the rear door lock actuators. Will replace the other next week maybe the week after. Got 2 DC motors on eBay for 8 bucks. Tore the door apart, jiggled the actuator a bit to get it out. The hardest part was was cracking the plastic case open. Once open I found the old motor to be quite burned up. Oh ****. Forgot to pick up a small gear puller, had to call around everywhere I found a small RC performance shop that had one for 15 bucks. Score. Put the new motor in, put some glue around the seals and buttoned it up. Put it back in the car and it works awesome. Will do the righ rear soon.


Last edited by gittert; May 1, 2013 at 06:16 PM.
Well I haven't found any hidden cigarette cartons with oodles of money in them yet FML.
I did however fix the right rear door lock actuator the same way as the left rear. This one the case didn't crack and split open as well at first but eventually came through. This motor was similar to the other, clearly burned up. I like how the door panels on this car come apart, very snug and secure. After buttoning it all up it works great, started the car and the tail light indicator on the dash turned on, doh! Went out and looked, sure enough one of the tails burned out. Add that to my list...
Also, when I went out to start it to move it into the basement parking to let the snow/ice melt it was dead I already knew the battery was faux as the PO told me it was, however after jumping it initially it's been fine, so I've been rolling on it. But I decided to just go get another. The local Farm Supply store had their house brand (which has great reviews) on sale in the "GOLD" model with 675 CCA and 6 year warranty for $75. I thought about grabbing the Interstate battery for $125 but decided otherwise.
Next, this weekend, IF there's enough time after fixing the race car and repairing the car dolly I'll tackle fixing the leaky VC gaskets and replace the spark plugs/wires/COP boots as well as the upper manifold gasket as the upper manifold needs to come off to gain access to the VC.
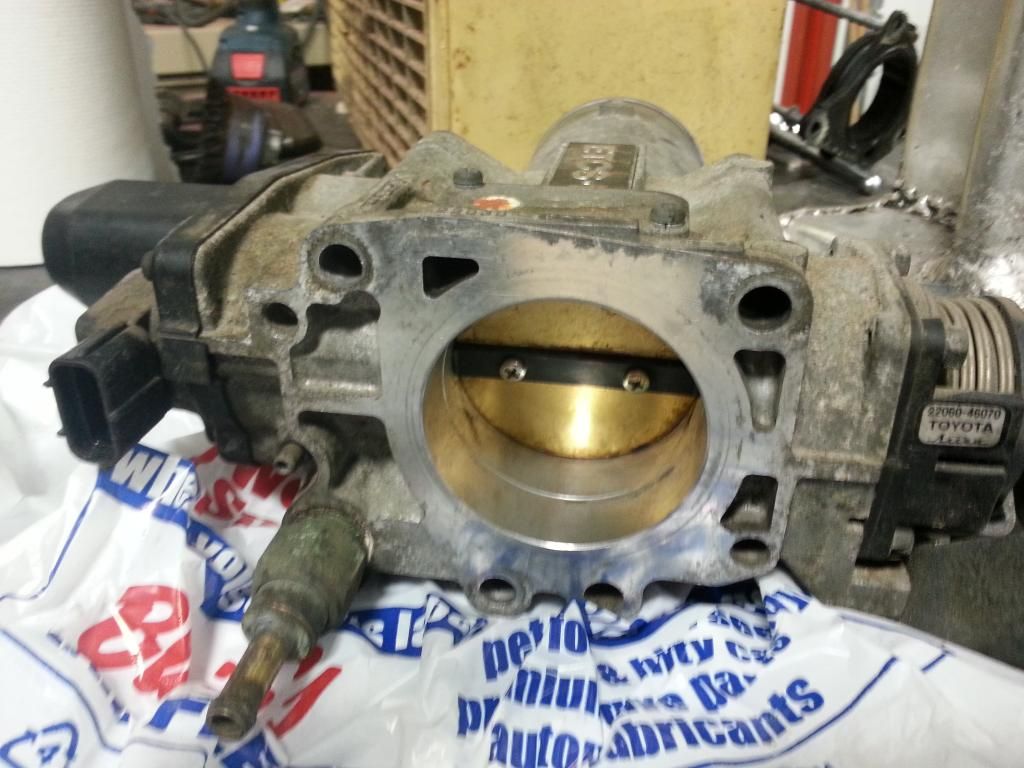
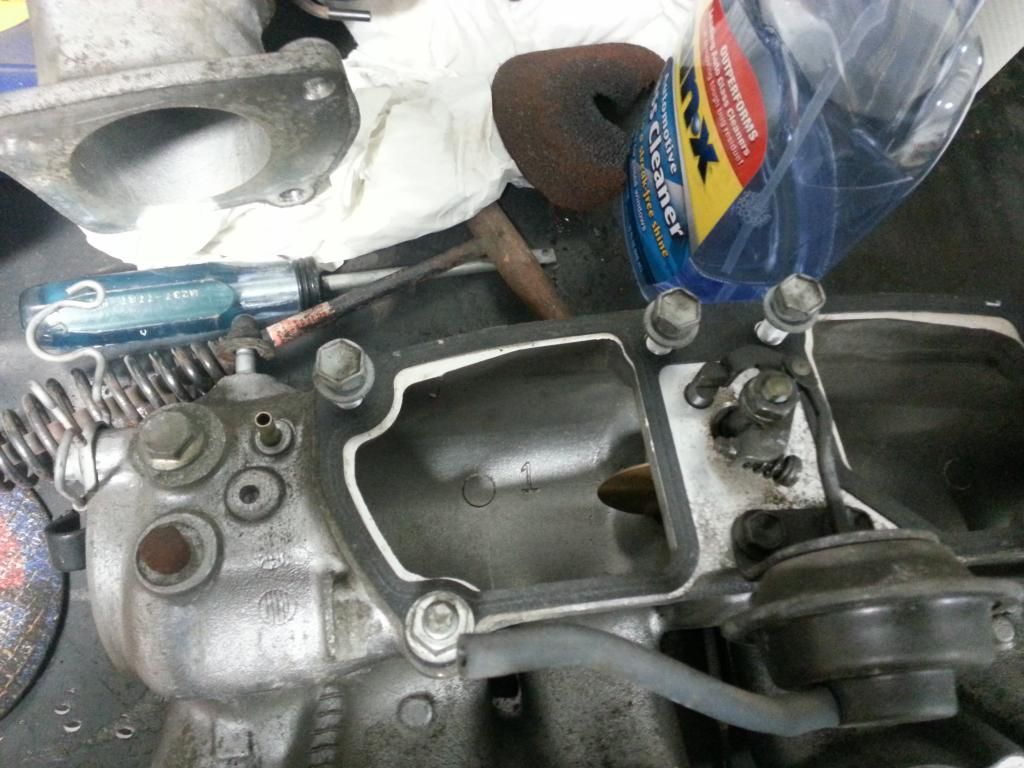
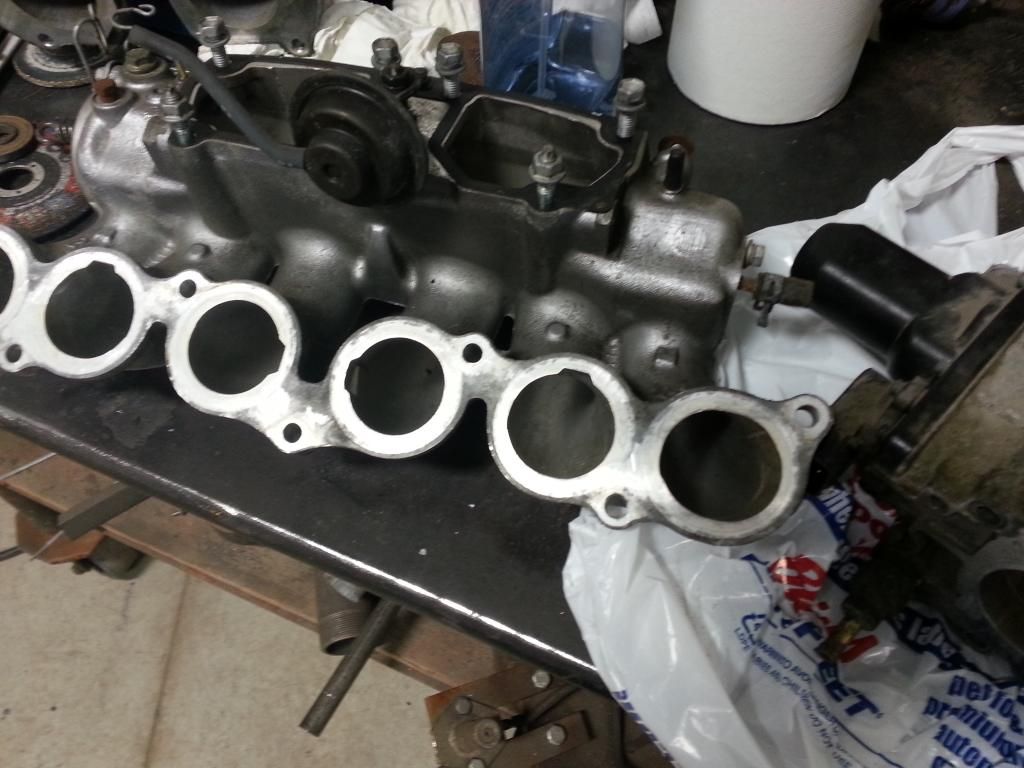
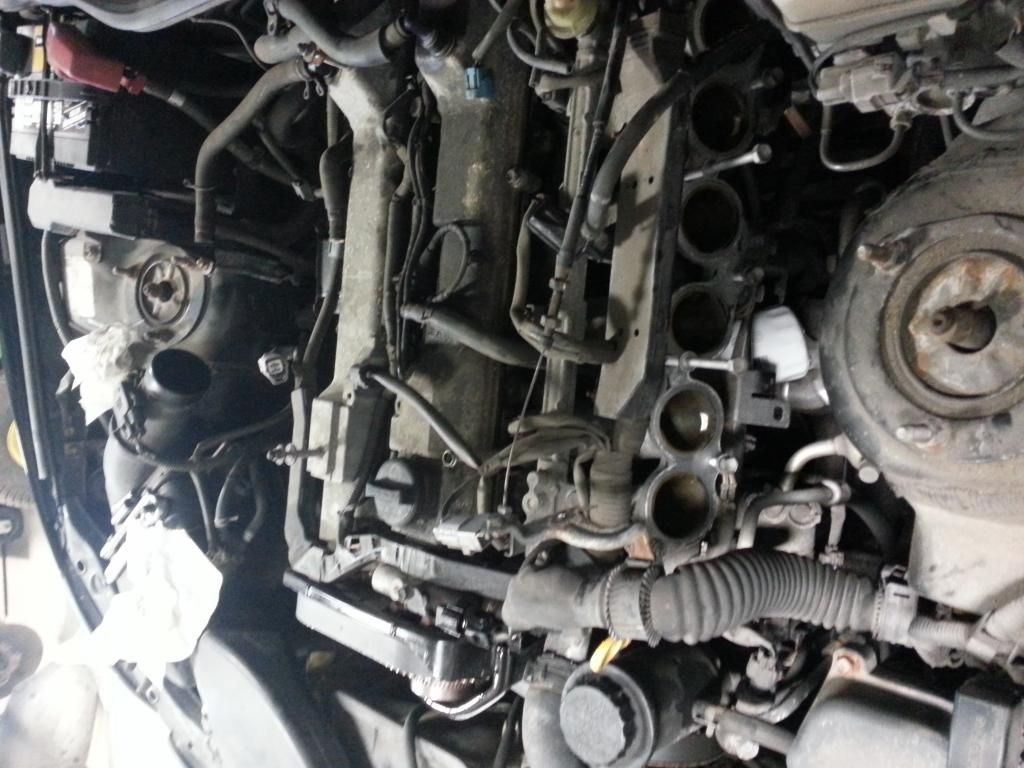
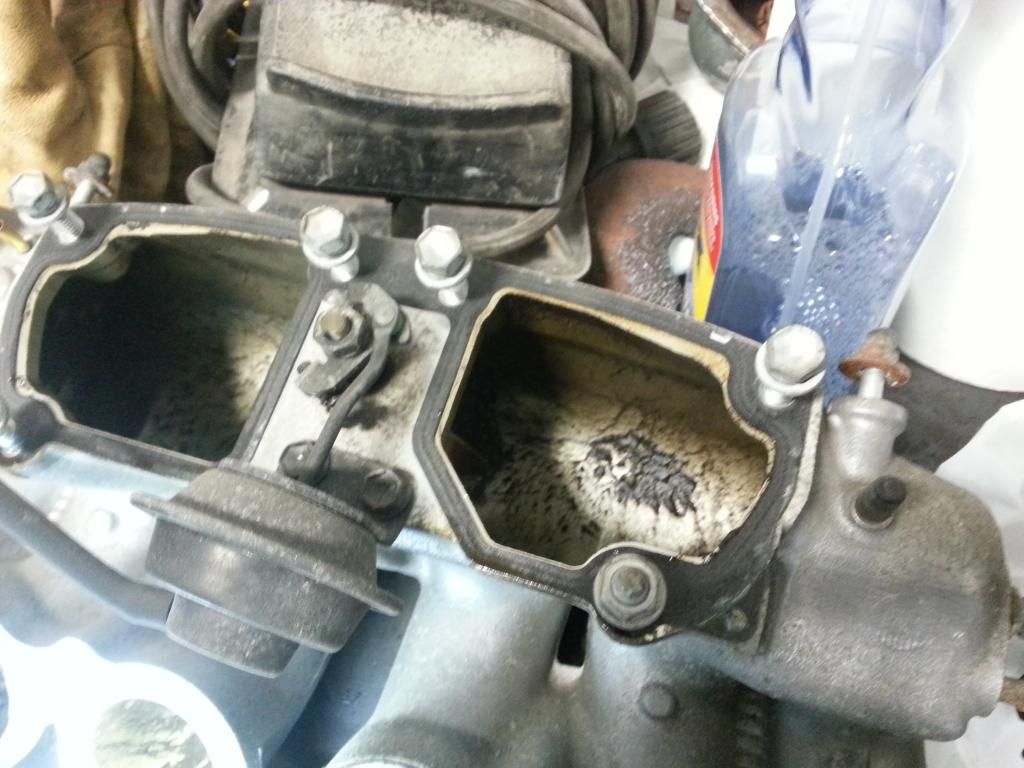
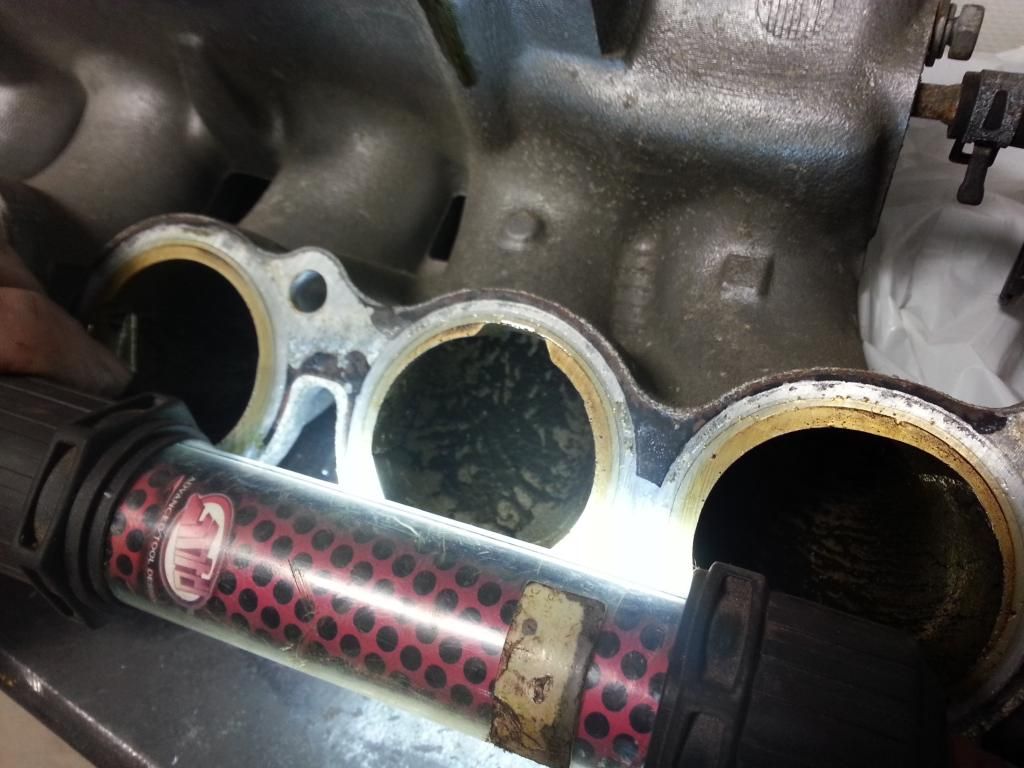
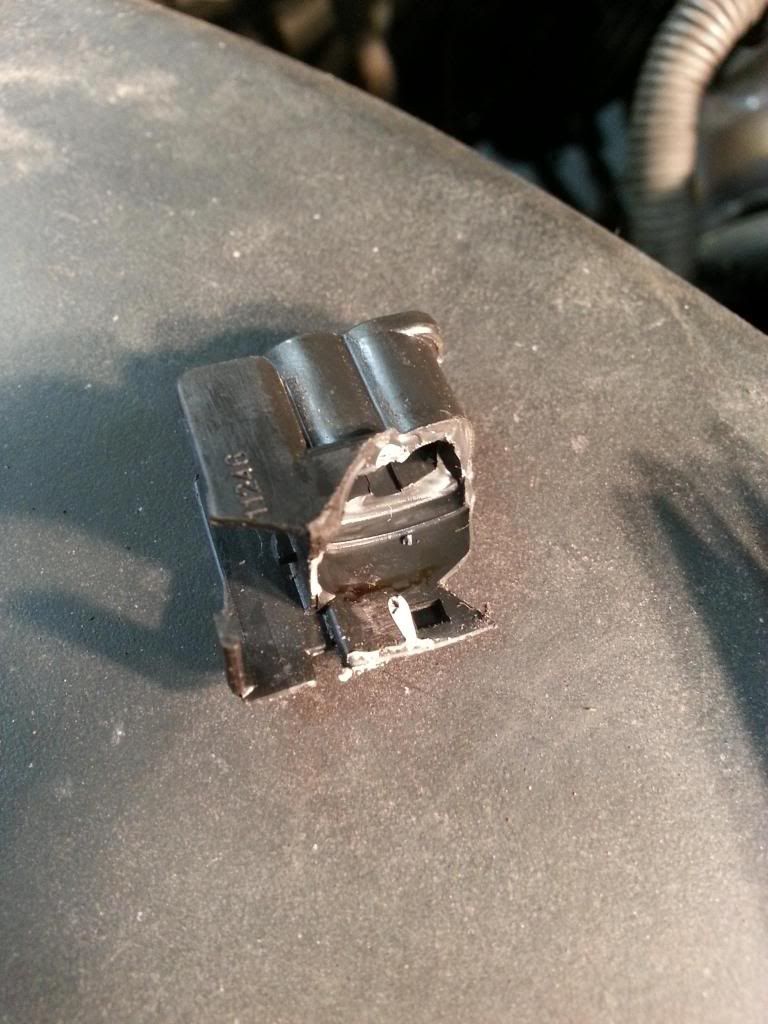
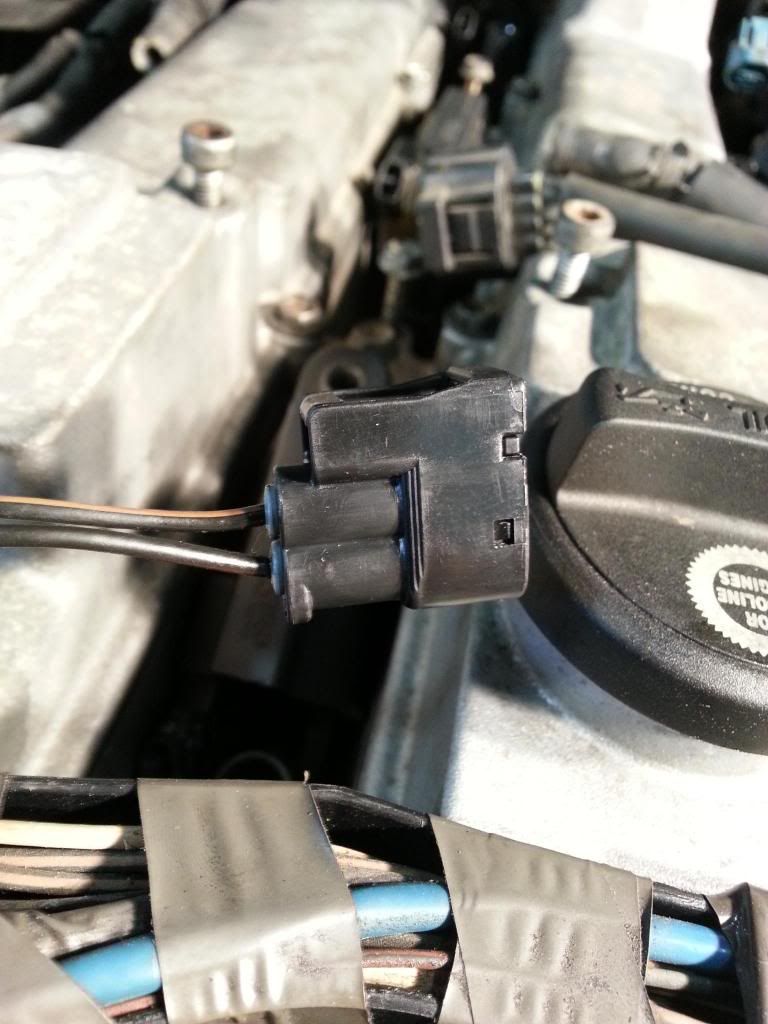
Got a lot accomplished today. One of those things was working on this Lexus. Tore into the engine bay, Found some seriously dirty/disgusting oil/sludge/splatter/diarrhea in the intake chambers, so had to clean those out. Definitely the original plug wires. One of the "fragile" coil plug connectors I found was broken under the PO's watch, after checking the spark plugs it was obvious they've been replaced. So what they did when they broke it, the siliconed it all back together. FUUUUUUUUUU. So I'll need a new connector. I think I was able to salvage the coil. I just need to get a new pigtail connector, which I'll have to get from Lexus/Toyota, they don't sell a pigtail only the connector housing and leads separately. I'll have to order one this week. For now the car will stay in my dad's shop, completely in the way. I put new NGK COP boots on the coils as well. The NGK-R plugs that were in there were in good shape, but they weren't the factory iridium which is what I put back in. So, the intention was to replace the valve cover gaskets as they were leaking oil into the plug valley, this was a huge mess. Before I could remove the plugs I had to clean it up or risk getting gunk down the plug holes. I initially shop-vac'd out the solids and then decided to spray an engine de-greaser in the plug valley and scrub with a parts brush...this did WONDERS. I then vac'd it out and repeated till I was comfortable removing the plugs. I found a few valve cover bolts to be merely finger tight. The gaskets were ROCK hard, clearly not doing there job, hell after 253k miles what do you expect. I couldn't get the PCV valve to come out of the valve cover. Supposedly it just pulls out but it definitely will not without excess force. I decided to suck it out and leave it be. Cleaned the gasket surfaces, reinstalled covers with new gaskets, torqued. Installed the upper manifold, and coil's minus 1. This is as far as I could go as I need the other gasket for the upper plenum that attaches to upper manifold and throttle body. Cleaned out both of these as well. here's some pics. Sorry this post is not very organized but hell I'm lazy.


Last edited by gittert; May 1, 2013 at 06:31 PM.
Went to the STEALERSHIP today to order a new housing and terminals for the broken coil pack connector. Online I find the list price to be $6.61 for the housing and $5.98 for a single terminal. So 1 connector equals 1 housing and 2 terminals. So I'm assuming 18.57 total so why not get an extra housing as well just in case. Went to the Toyota Stealer near me and they said 50 something dollars...I nearly **** my pants. He said the list price is $11.94 on the housing and $11.83 on the terminal. FML. So I just got a single housing and 2 terminals for a total of $37.56 with tax. Will get tomorrow but can't work on the car again until Saturday. I should have just ordered the bastard online and paid for expedited shipping. If I didn't NEED it by this weekend then what the hell. Grrr...not that I haven't blown 40 bucks on things way less useful, it still pisses me off.
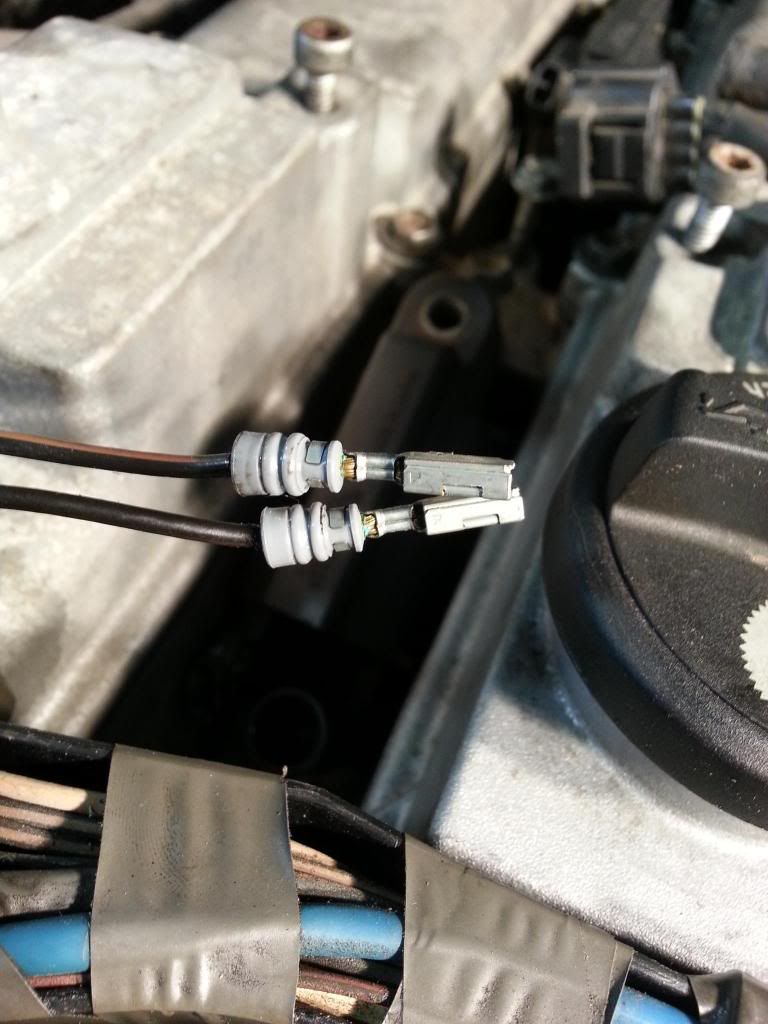
So I got to button up the car today. Got the connector repaired and installed. I have attached a picture of what it looked like after cleaning out the silicone, this thing was trashed. However the leads were salvageable so I didn't need to cut them off and splice in the new ones, woot! It actually was really easy the leads just "snapped" in to the new connector and then a white "plunger" is pushed in on the other sight, badda big badda boom, good as new. My dad had repair/reglued/epoxied this plastic piece that was broken that holds the spark plug wires, I needed to file down a little bit of the epoxy to have a solid surface for the bolt. He did a great job, although I broke the F'er trying to lay the wires into it...FUUUUUUUUU. The new wires are a bit longer than the OEM wires so they didn't sit all that well, but OH WELL. you don't see it anyway. got the manifold all retorqued and put it all back together and she purrrrrrrrs like a kitten, runs awesome. I also replaced both tie rod ends, they were clearly original to the car. I have NEVER had such a stuck tie rod end. Not the locknut, stuck on the knuckle. I was WAILING on the pickle fork repeatedly, take a brake, then come back to it and finally they would pop off. Thankfully didn't break anything. Also I was dead on with maintaining the alignment (I will still get an alignment), it's so good I'd hesitate to even pay to have it done! Also, the engine cover is now missing the Lexus symbol....it was clearly there before as the dust outline shows it. no big deal, but WHERE THE F DID IT GO?


Last edited by gittert; May 1, 2013 at 06:33 PM.
Trending Topics
Ran a couple bottles of seafoam in the tank and in the oil. Changed the oil for the first time. Mobil 1 full synthetic advanced high mileage. I ended up getting a Toyota filter from the dealer and they informed me that there is a little seal ring on the drain plug as well. Helpful dealer FTW! glad he brought it up as I may not have even saw it when I changed it. Car purrrrrrrs like a f'n kitten after all the tune-up. Pretty happy with it. The upper strut mounts up front (as far as I can tell) are making a bunch of clunking. Looking at new struts and some Eibachs, just not sure if it'll be worth the investment. I finally got the title changed over and the vehicle registered. Upon removing the license plate I realized the bolt was being held in with an epoxy of some sort because the PO stripped the threads or couldn't find the right bolt size. See pictures. I had to remove the inner trunk lid liner/carpet piece to get at the back side to see what I was dealing with. After determining what the thread should be I ran a 6mm-1 tap through after removing as much of the epoxy as possible. I was able to get enough clean thread to bolt in some new stainless hex cap screws and tighten it down. I also ordered some new black powdercoated license plate frames on eBay that say "Lexus" after not liking my choices from the Lexus dealer. Hopefully get those soon. Looked into OEM floor mats and they're about $115, looking for a cheaper set of used mats, but finding used anything for this car is near impossible.
Per my "Wanted" ad in the marketplace I found out the Gen 2/3 nav units are easily upgradeable to the Gen 4 nav units in other Toyota/Lexus vehicles, currently looking for a stupid good price on one so I can get an aftermarket Vaistech unit that easily adapters for iPod and Bluetooth phone use. The current setup is not even close to ideal and I'd really hate to tear it out just to put in an aftermarket unit
Per my "Wanted" ad in the marketplace I found out the Gen 2/3 nav units are easily upgradeable to the Gen 4 nav units in other Toyota/Lexus vehicles, currently looking for a stupid good price on one so I can get an aftermarket Vaistech unit that easily adapters for iPod and Bluetooth phone use. The current setup is not even close to ideal and I'd really hate to tear it out just to put in an aftermarket unit
ClubLexus Stories
Celebrating Lexus & Toyota from Around the Globe

Lexus NX 350h: A Fuel-Sipping Secret Hot Hatch???
Michael S. Palmer
5 Best & 5 Worst Lexus Daily Drivers
Joe Kucinski
Top 5 Hottest Lexus & Toyotas in 2026 (Hardest To Buy)
Brett Foote
2026 Lexus IS 350 F Sport Review: The Last of Its Kind Still Rocks
Michael S. Palmer
Top 10 Most Confusing Things Lexus Has Ever Done!
Joe Kucinski
2026 Lexus ES Review: Lexus Re-Embraces Founding Principles
Michael S. Palmer
10 Lexus Bargains That are Cheaper Than a New Toyota RAV4
Joe Kucinski
8 Weirdest Things Lexus Has Ever Built
Verdad Gallardo
10 Lexus Designs That Have Aged Like Fine Wine
Verdad Gallardo
OK, So I learned a few hard lessons today that I've learned multiple times and will learn a few more.
1.) Always, always, always confirm purchases online with pictures
2.) Always wear gloves even when your replacing something as stupid as a radio
3.) Always lie to your significant other when making large purchases (over $100), especially if it may come back to bite you in the ***.
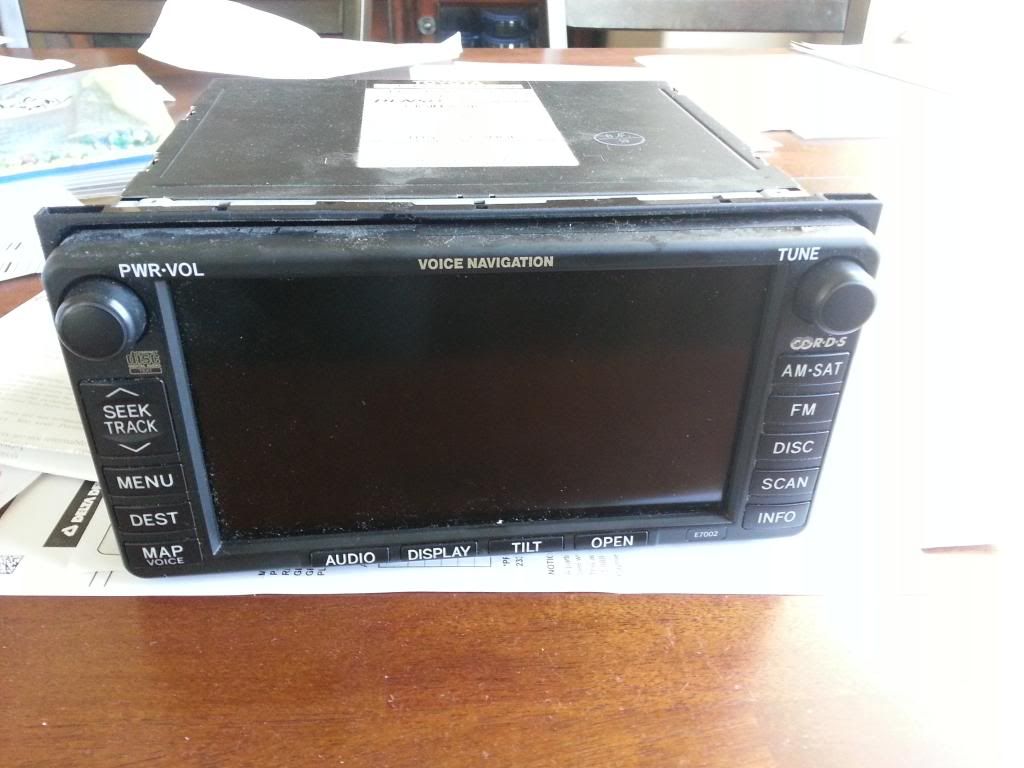
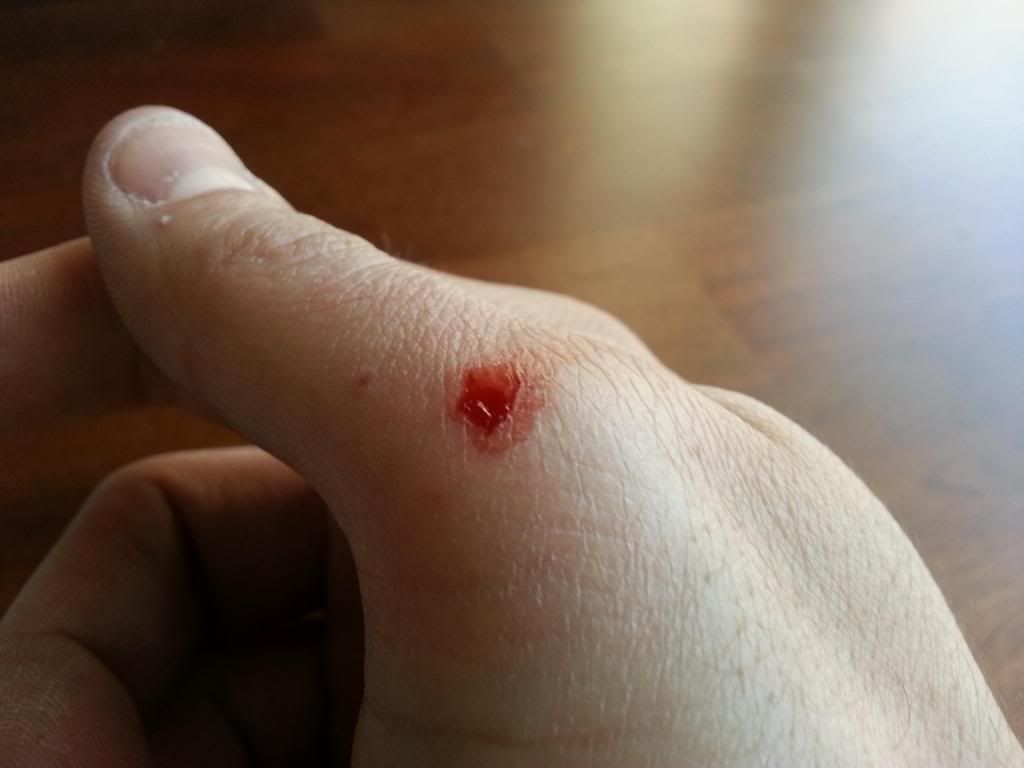
I received my Gen4 Lexux Navigation system from a 2005 ES330. Turns out this is not even close to what I thought it should be. This was a $350 mistake. Also while removing the factory radio I slit a good amount of skin off my thumb knuckle. no big deal, but enough to just add injury to insult.
So you know what the factory navigation looks like including the player in the trunk well this is what I received, having no idea what mistake I had made:
This is where I cut myself

So I will now be trying to sell this on eBay to recoupe some of my cost
1.) Always, always, always confirm purchases online with pictures
2.) Always wear gloves even when your replacing something as stupid as a radio
3.) Always lie to your significant other when making large purchases (over $100), especially if it may come back to bite you in the ***.
I received my Gen4 Lexux Navigation system from a 2005 ES330. Turns out this is not even close to what I thought it should be. This was a $350 mistake. Also while removing the factory radio I slit a good amount of skin off my thumb knuckle. no big deal, but enough to just add injury to insult.
So you know what the factory navigation looks like including the player in the trunk well this is what I received, having no idea what mistake I had made:

This is where I cut myself

So I will now be trying to sell this on eBay to recoupe some of my cost
Last edited by gittert; May 1, 2013 at 06:36 PM.
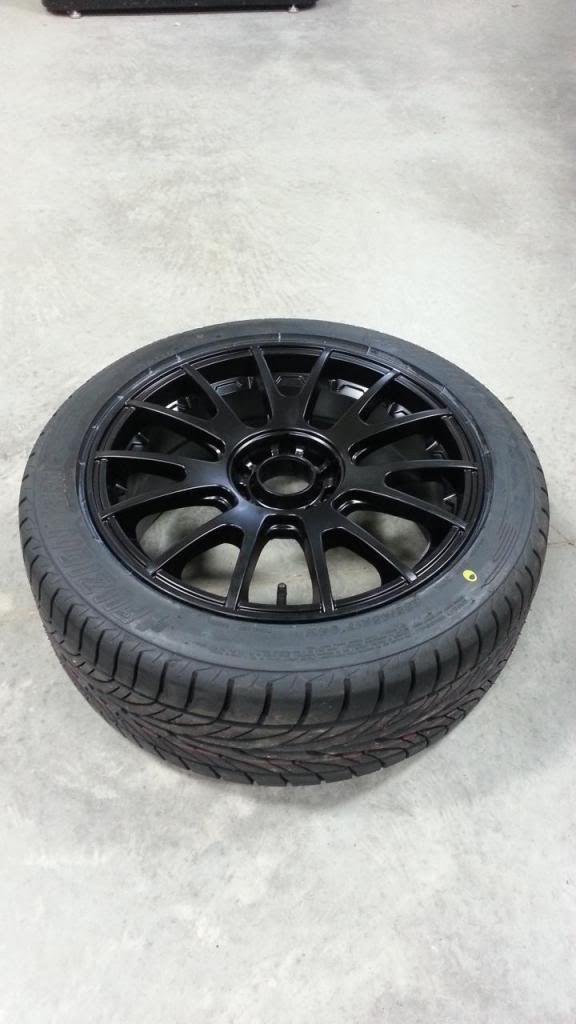
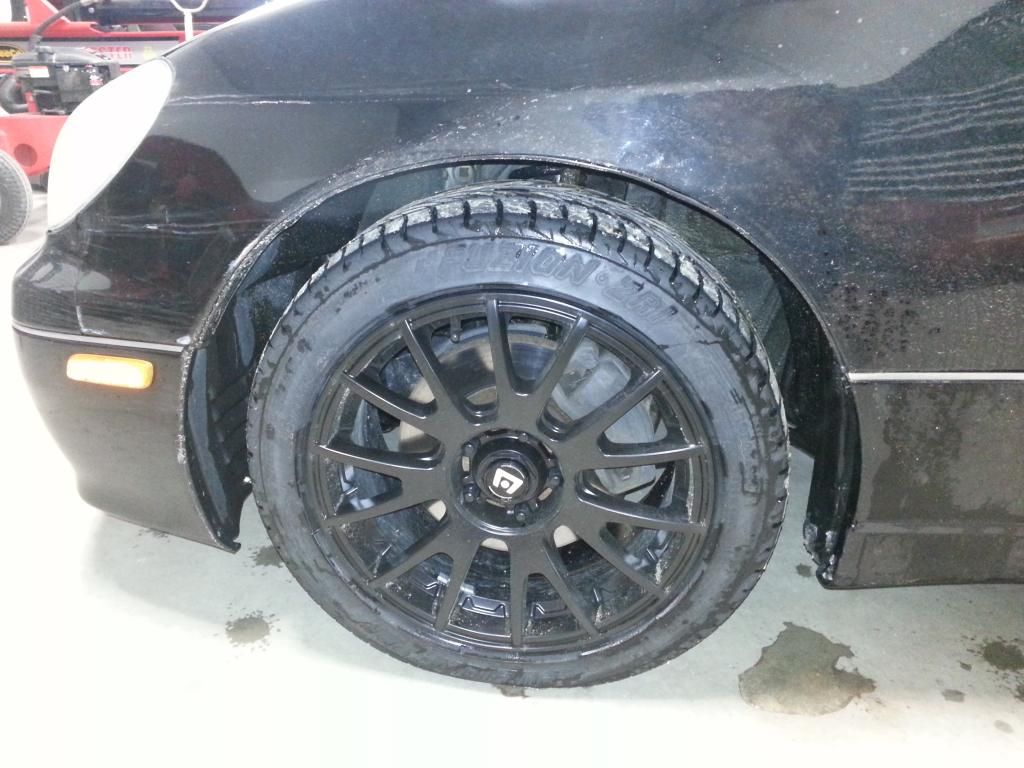
So my goal for Saturday was to get my new wheels and summer tires installed on my car. I woke up Saturday morning to find this.
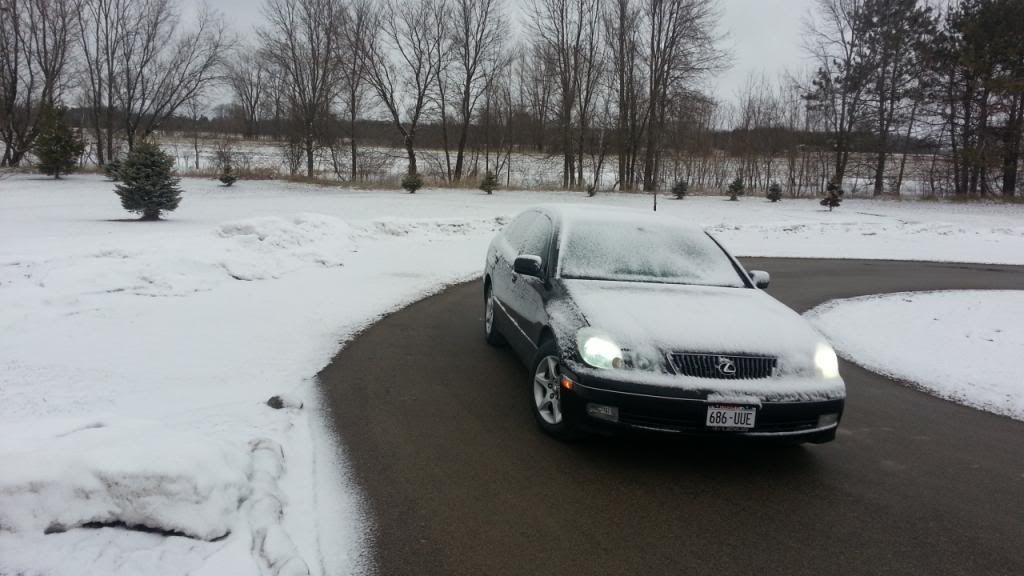
For comparison this was later in the day, same location, no more snow:
But it was going to be almost 50 degrees later in the day so I wasn't worried. I dropped the wheels and tires off to the tire guys...they took their SWEET TIME so in the mean time I did some shooting and had the goal of fixing my exhaust shield rattle. Put the car up and went underneath to look at the suspected shield. Found and removed this:
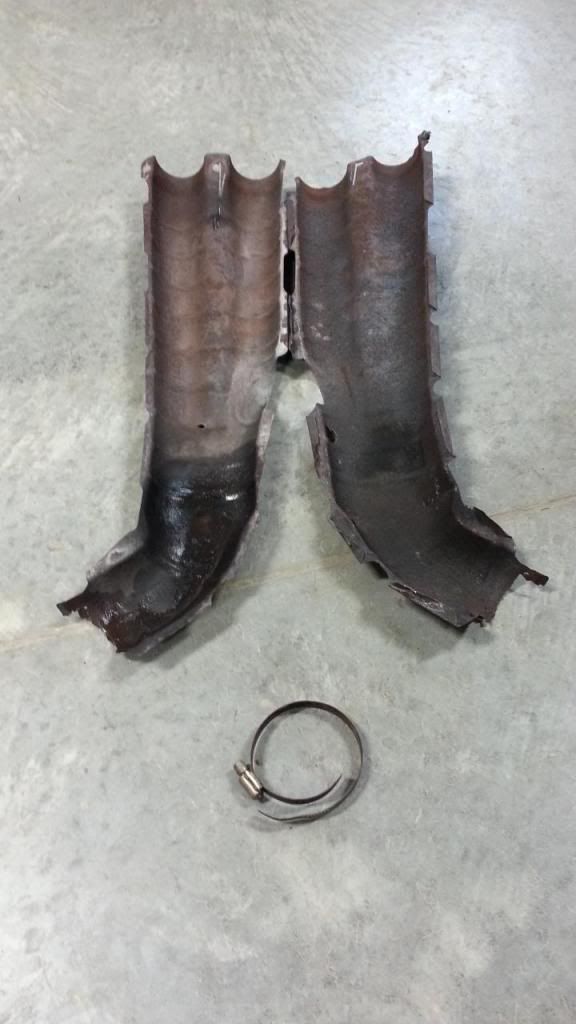
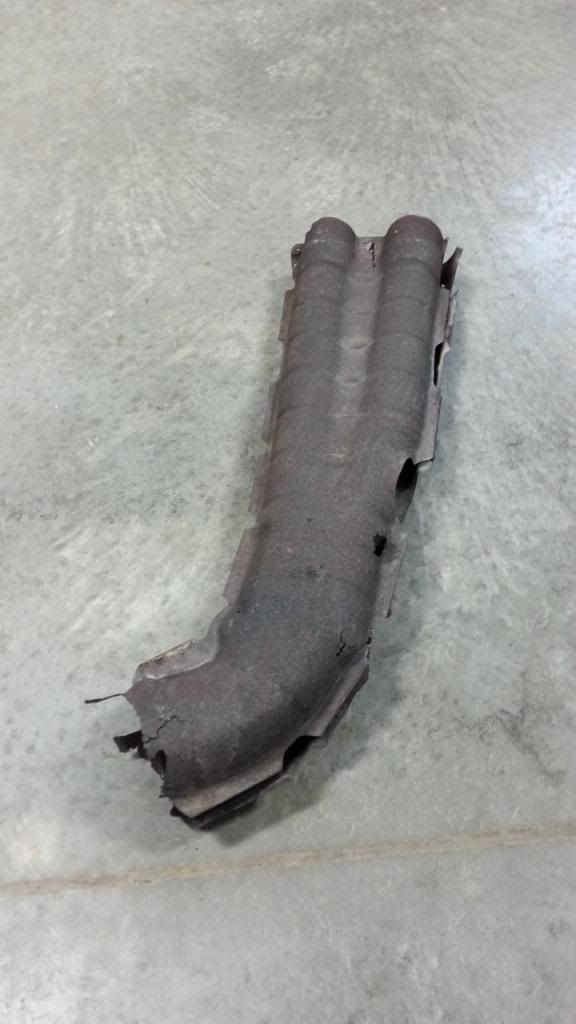
It's an "extra" shield on the joining of two pipes, it's weird because there's already a shield above there protecting the underside of the car. Apparently this is a known exhaust problem for these cars and most the dealers suggest just removing it. The shield is/was clamped in place on one end where you see the clamp in the photo and if you look close you'll see the shield is all rusted off right there. The shield is two pieces that is held together with integral tabs that are bent over and then on the other side of the clamp there is three welded 6mm bolts. I had to cut these off, not because they were rusted but because they were tack welded to the shield. I bent the tabs out slowly with a screwdriver and pry bar, then it just slid right out, actually didn't take me all that long. Less than 20 minutes. No moar rattle! Car doesn't sound like a pile of crap now.
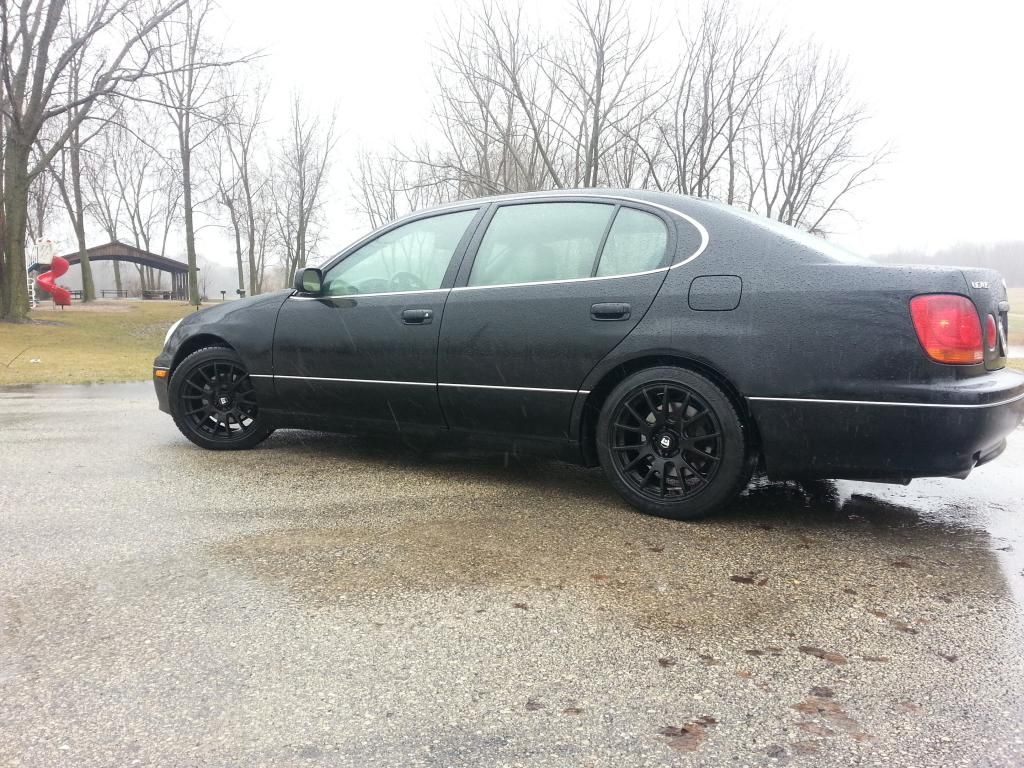
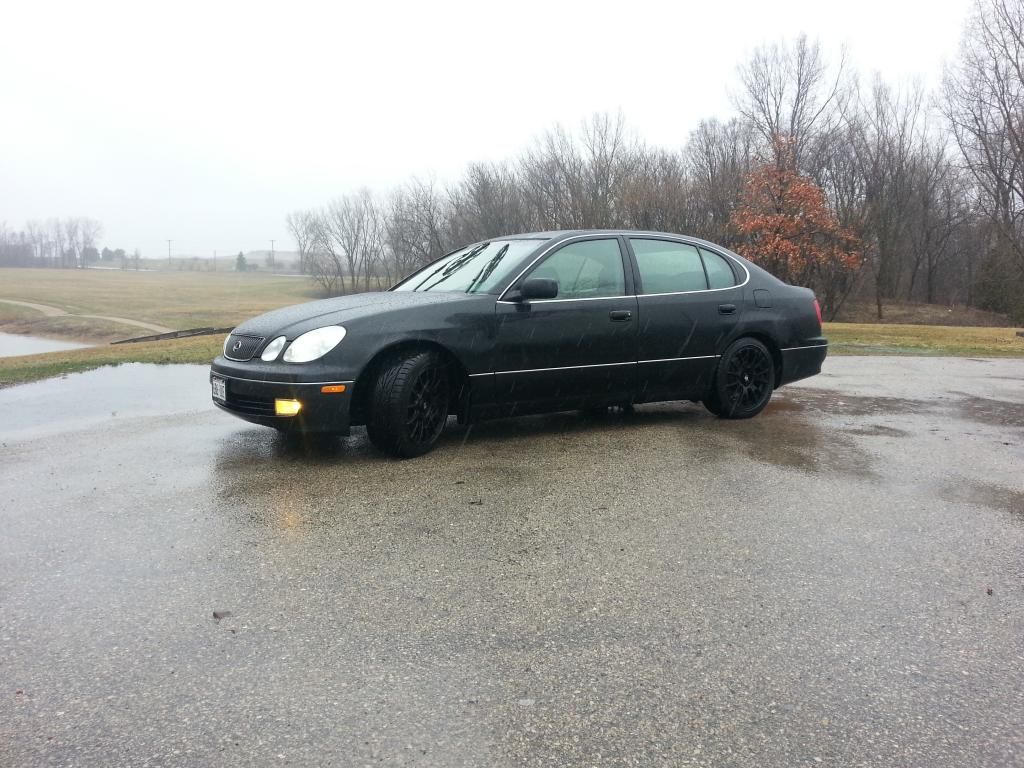
Then I finally got a call that my tires were ready, picked them up but decided to wait to put them on till this morning. Installed the hubcentric rings, installed with the gorilla lugs, ready to go. Clean wheels on dirty car So I washed it later when I got back home. Couldn't get a real good shot but I think they look good. Wish they were more of a semi-gloss or Flat black, but what the hell

For comparison this was later in the day, same location, no more snow:

But it was going to be almost 50 degrees later in the day so I wasn't worried. I dropped the wheels and tires off to the tire guys...they took their SWEET TIME so in the mean time I did some shooting and had the goal of fixing my exhaust shield rattle. Put the car up and went underneath to look at the suspected shield. Found and removed this:


It's an "extra" shield on the joining of two pipes, it's weird because there's already a shield above there protecting the underside of the car. Apparently this is a known exhaust problem for these cars and most the dealers suggest just removing it. The shield is/was clamped in place on one end where you see the clamp in the photo and if you look close you'll see the shield is all rusted off right there. The shield is two pieces that is held together with integral tabs that are bent over and then on the other side of the clamp there is three welded 6mm bolts. I had to cut these off, not because they were rusted but because they were tack welded to the shield. I bent the tabs out slowly with a screwdriver and pry bar, then it just slid right out, actually didn't take me all that long. Less than 20 minutes. No moar rattle! Car doesn't sound like a pile of crap now.
Then I finally got a call that my tires were ready, picked them up but decided to wait to put them on till this morning. Installed the hubcentric rings, installed with the gorilla lugs, ready to go. Clean wheels on dirty car So I washed it later when I got back home. Couldn't get a real good shot but I think they look good. Wish they were more of a semi-gloss or Flat black, but what the hell


Last edited by gittert; May 1, 2013 at 06:38 PM.
I went out in the rain, in 36 degrees to snap a few photos. I don't think they do the stance or car justice, but whatever. So, the install went fairly well.
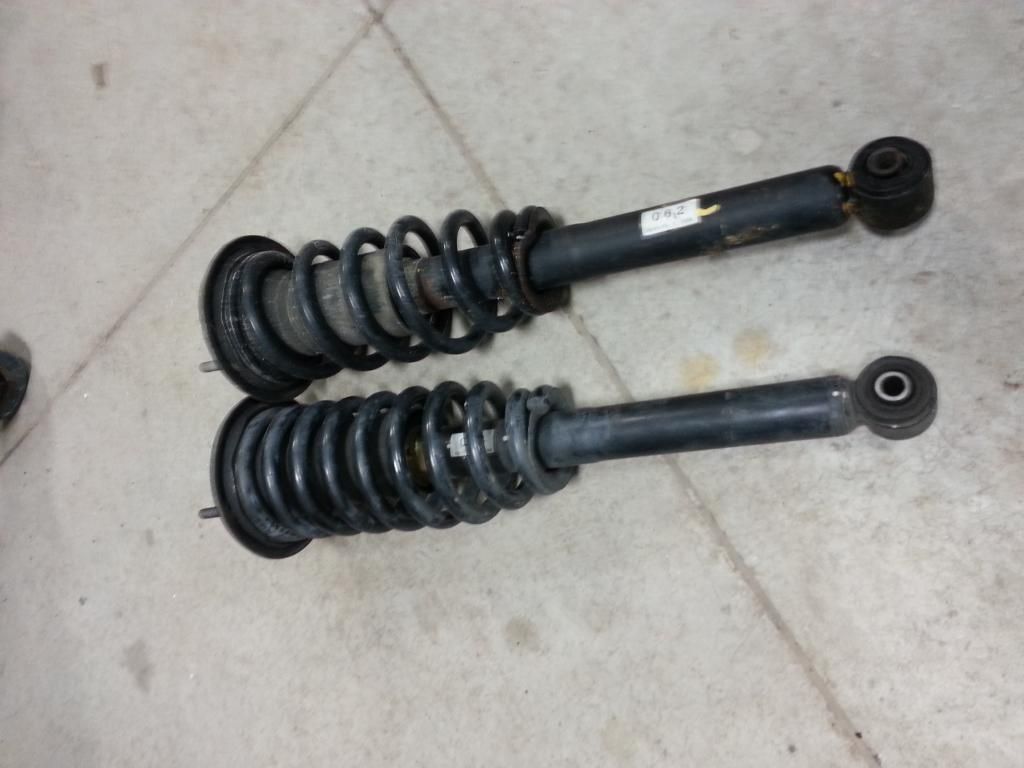
Here's a picture of one of the front assemblies next to the L-tuned assembly. You can clearly see the difference int he springs. The struts are built heavier as well. According to the date stamp on the old assemblies, these struts are original to the car. That's over 250k on the original struts
This is the left front before drop, of course I didn't take a left front after drop for comparison. I'll try to do that yet.
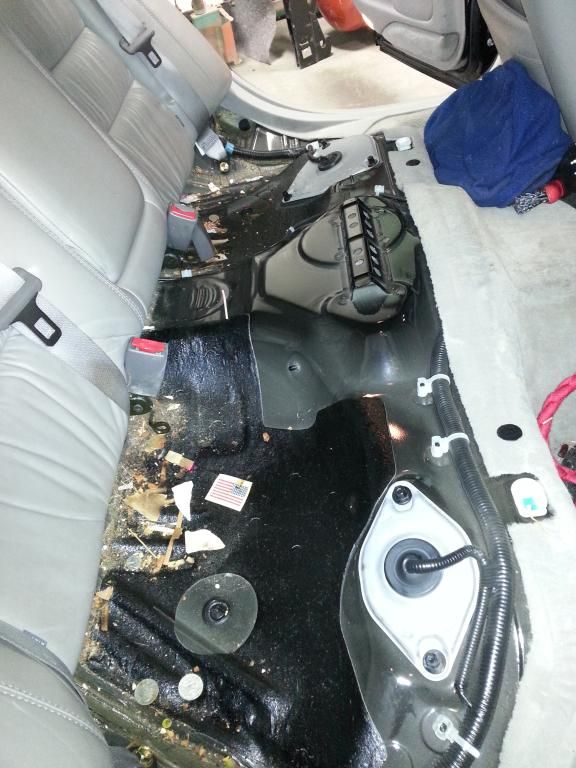
Here was my biggest complaint with this conversion. I followed a "how-to" on one of the Lexus forums for the rear struts. Upon closer inspection it appears it was posted in the correct section but typed the wrong generation car in the heading, with no one correcting it. The How-To told me that to access the rear upper strut mount I needed to remove the back seat. The seat bottom was NBD as it's just like the ZX2, lift up on the snaps with a hard jerk (hehehehe, hard jerk). This is what I found under the seat:
There were 2 pens, like $1.12 in change, used sucker stick, other random trash, and probably a small McDonald's fry worth of french fries
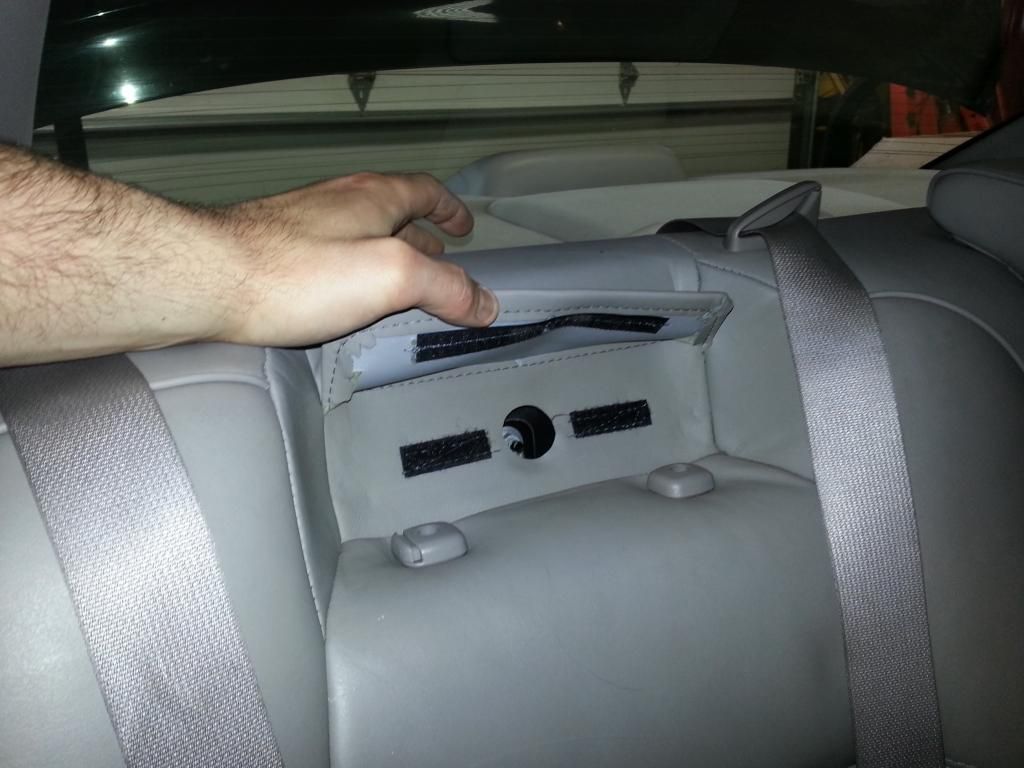
The rear seat back took more effort than thought, following the directions (again, turned out they weren't the right ones), the seat back should just lift straight up and out once the lower securing bolts were removed. After a good amount of time trying to figure it out, I began looking for something that was holding the upper part of the seat on as the lower was completely loose. Behold, behind the headrests (didn't even know these were adjustable until now), I see this flap in the leather.
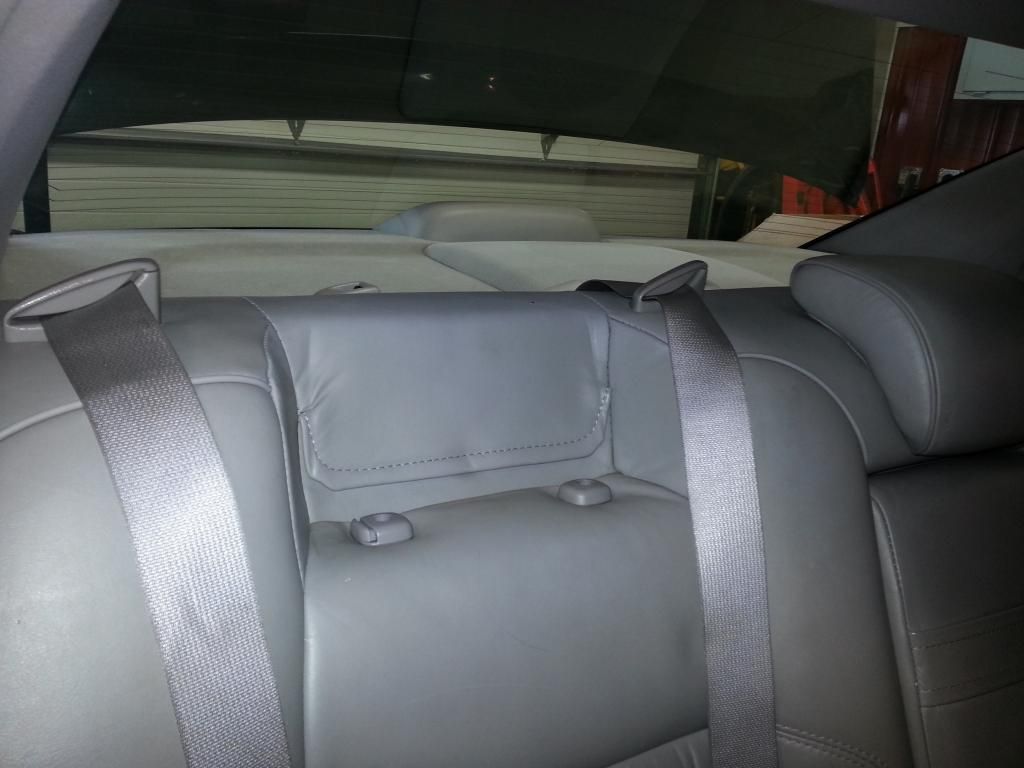
What's behind there? Oh noessss it's a nut! Once I removed the 2 nuts (one on each side) the seat came right out.
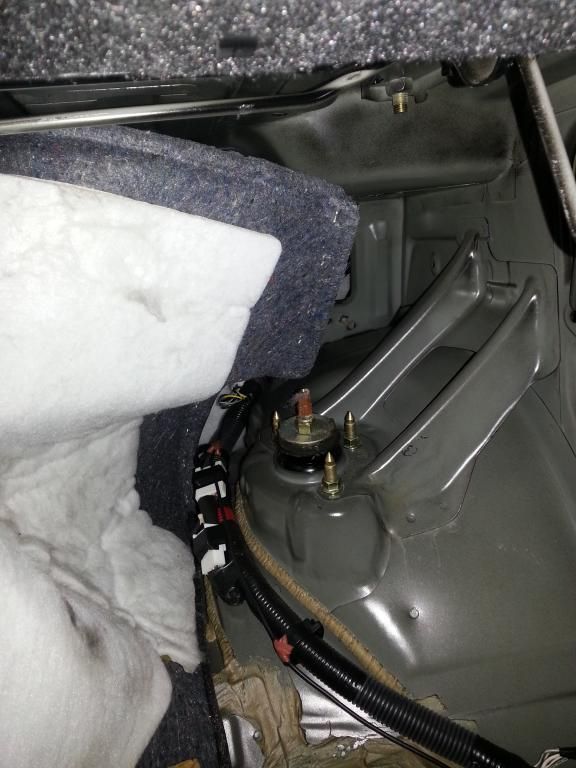
Upon digging, and digging and digging under the rear deck tray looking for the upper struts and making a huge mess, trying to remove the tray and undoing fasteners etc, I determined that its not possible the strut mounts are there and began to physically look at the struts with my eyes and determine where they come in. DOH! THEY HAVE TO BE IN THE TRUNK.
Oh what's this, just a few fasteners and removing the trunk carpet. Here it is:
Glad I wasted a good hour of my life looking for this. While in the trunk removing the carpet and other curiousness I found this:
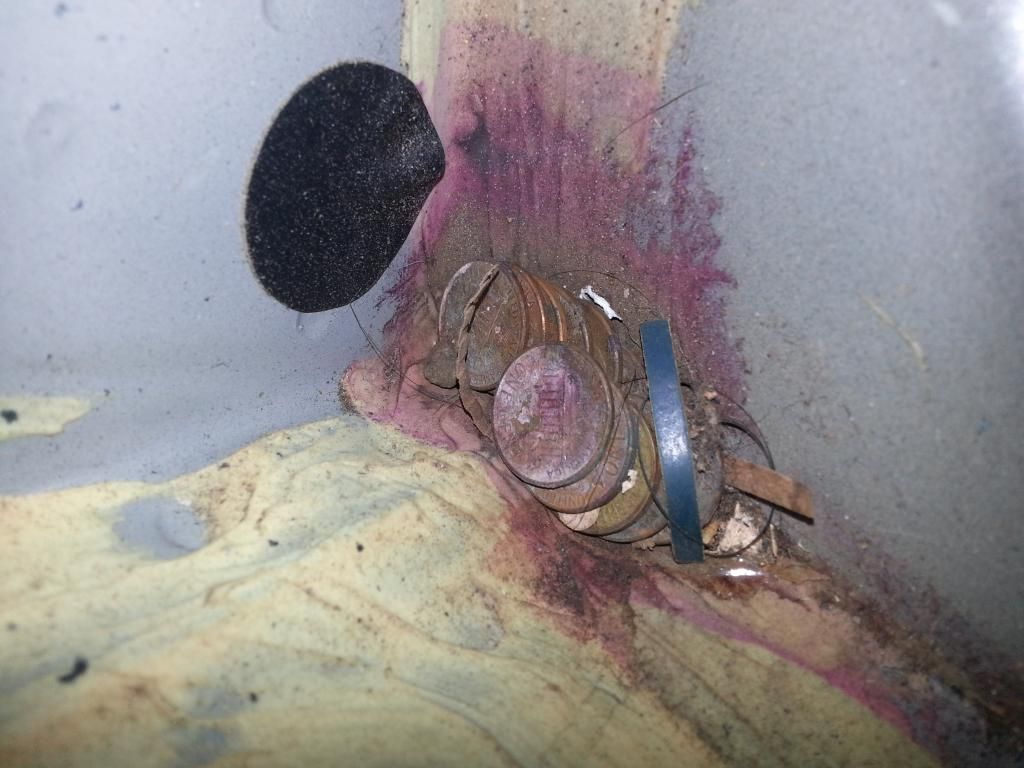
That's a pile of pennies completely tucked in a corner and well happy with themselves, wth were they doing there?
I also found this:
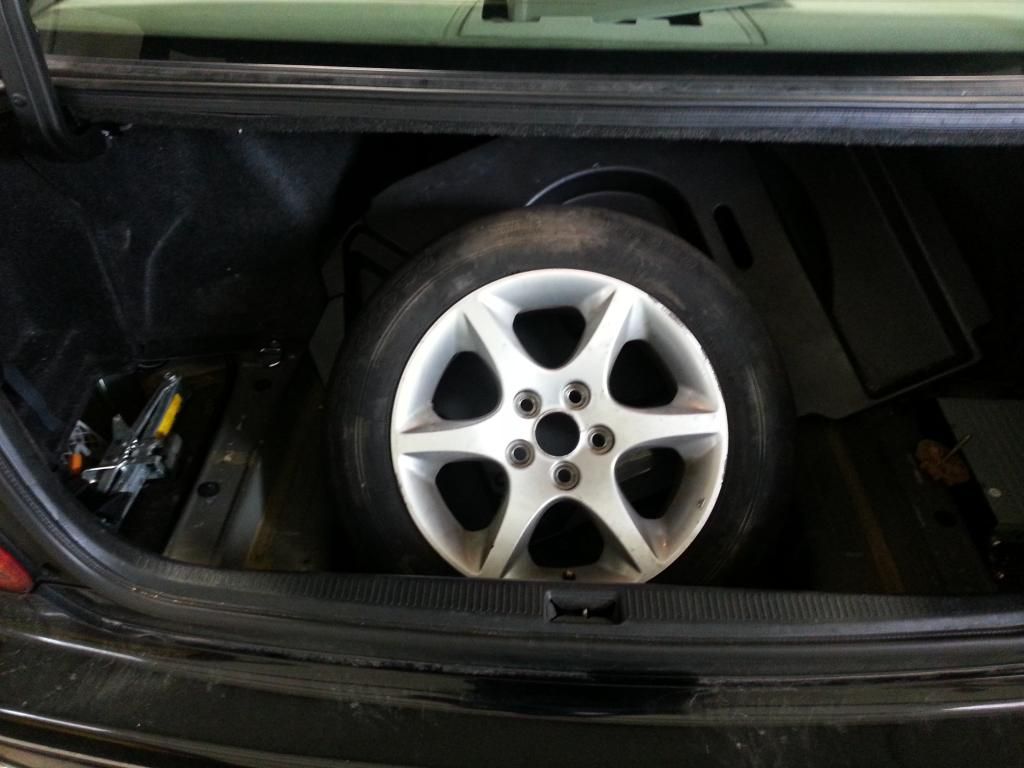
Holy crap it's a full size spare with a factory wheel! The tire was flat and off the bead, I as able to reseat it and it holds air, the tread is excellent too! That got me thinking that this is the reason the jack is loose in the trunk as well as the handle and lug wrench. I didn't get a picture of this but there's a really nice blow molded assembly that sits on top of the spare tire and the wrench, other tool bag, and jack handle snap nicely into place into this plastic cover and creates a flush fit in the trunk that the carpet assembly lays over. It appears nothing's missing except for the bolt that holds the jack into it's position. As soon as I figure out how this jack is supposed to sit, I'l find a bolt to fit it.
here is some pictures in the 36 degree temp while raining trying not to get my phone wet
Here's a picture of one of the front assemblies next to the L-tuned assembly. You can clearly see the difference int he springs. The struts are built heavier as well. According to the date stamp on the old assemblies, these struts are original to the car. That's over 250k on the original struts

This is the left front before drop, of course I didn't take a left front after drop for comparison. I'll try to do that yet.

Here was my biggest complaint with this conversion. I followed a "how-to" on one of the Lexus forums for the rear struts. Upon closer inspection it appears it was posted in the correct section but typed the wrong generation car in the heading, with no one correcting it. The How-To told me that to access the rear upper strut mount I needed to remove the back seat. The seat bottom was NBD as it's just like the ZX2, lift up on the snaps with a hard jerk (hehehehe, hard jerk). This is what I found under the seat:

There were 2 pens, like $1.12 in change, used sucker stick, other random trash, and probably a small McDonald's fry worth of french fries
The rear seat back took more effort than thought, following the directions (again, turned out they weren't the right ones), the seat back should just lift straight up and out once the lower securing bolts were removed. After a good amount of time trying to figure it out, I began looking for something that was holding the upper part of the seat on as the lower was completely loose. Behold, behind the headrests (didn't even know these were adjustable until now), I see this flap in the leather.

What's behind there? Oh noessss it's a nut! Once I removed the 2 nuts (one on each side) the seat came right out.

Upon digging, and digging and digging under the rear deck tray looking for the upper struts and making a huge mess, trying to remove the tray and undoing fasteners etc, I determined that its not possible the strut mounts are there and began to physically look at the struts with my eyes and determine where they come in. DOH! THEY HAVE TO BE IN THE TRUNK.
Oh what's this, just a few fasteners and removing the trunk carpet. Here it is:

Glad I wasted a good hour of my life looking for this. While in the trunk removing the carpet and other curiousness I found this:

That's a pile of pennies completely tucked in a corner and well happy with themselves, wth were they doing there?
I also found this:

Holy crap it's a full size spare with a factory wheel! The tire was flat and off the bead, I as able to reseat it and it holds air, the tread is excellent too! That got me thinking that this is the reason the jack is loose in the trunk as well as the handle and lug wrench. I didn't get a picture of this but there's a really nice blow molded assembly that sits on top of the spare tire and the wrench, other tool bag, and jack handle snap nicely into place into this plastic cover and creates a flush fit in the trunk that the carpet assembly lays over. It appears nothing's missing except for the bolt that holds the jack into it's position. As soon as I figure out how this jack is supposed to sit, I'l find a bolt to fit it.
here is some pictures in the 36 degree temp while raining trying not to get my phone wet


Last edited by gittert; May 1, 2013 at 06:48 PM.
Update: Part 1
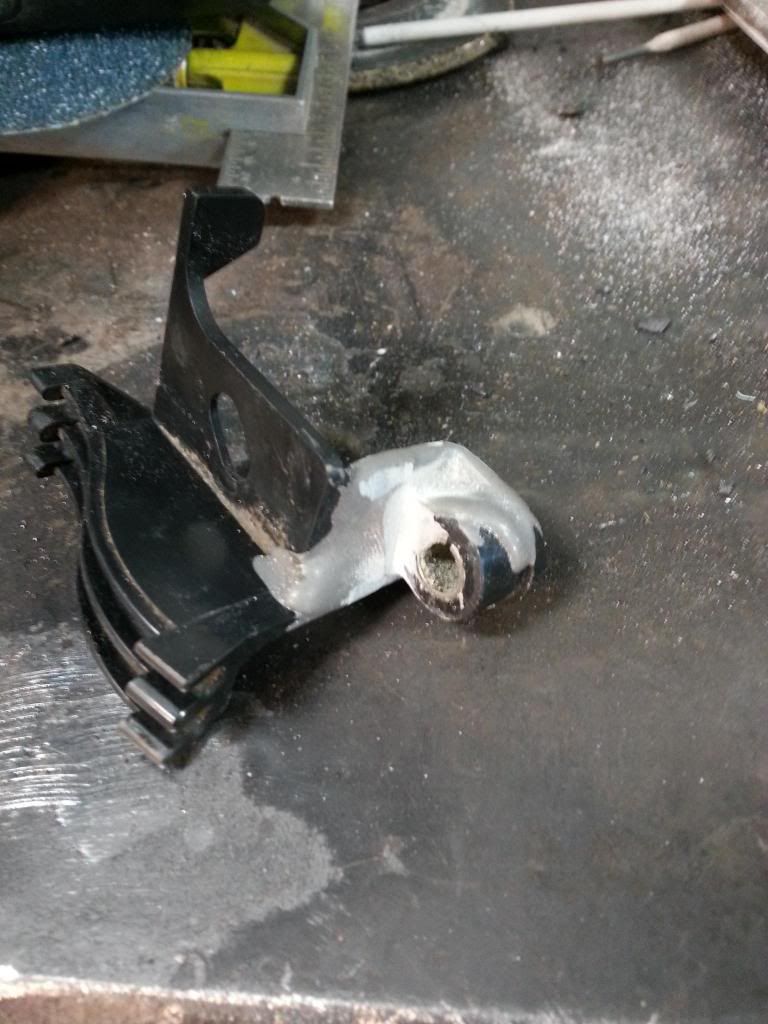
OK, So as mentioned above. I tackled the job of blacking out the headlights. As a general summary, I learned another really hard lesson as I've learned before and will learn again. Wear your freaking gloves and always cut away from you. I wound up with an ER visit...more on that later. First off, just to give some background, I had my wisdom teeth pulled Friday morning. I was sooooo bored sitting around Friday that Saturday morn I was going to start this project even though I should b resting and the Oxycontin was making me quite nauseous. First things first, must remove the bumper and headlights. This proved not too bad, except for the two nuts on each side that secure the bumper to fender, you have to reach in with an extension behind the fender liner, just like the zx2.
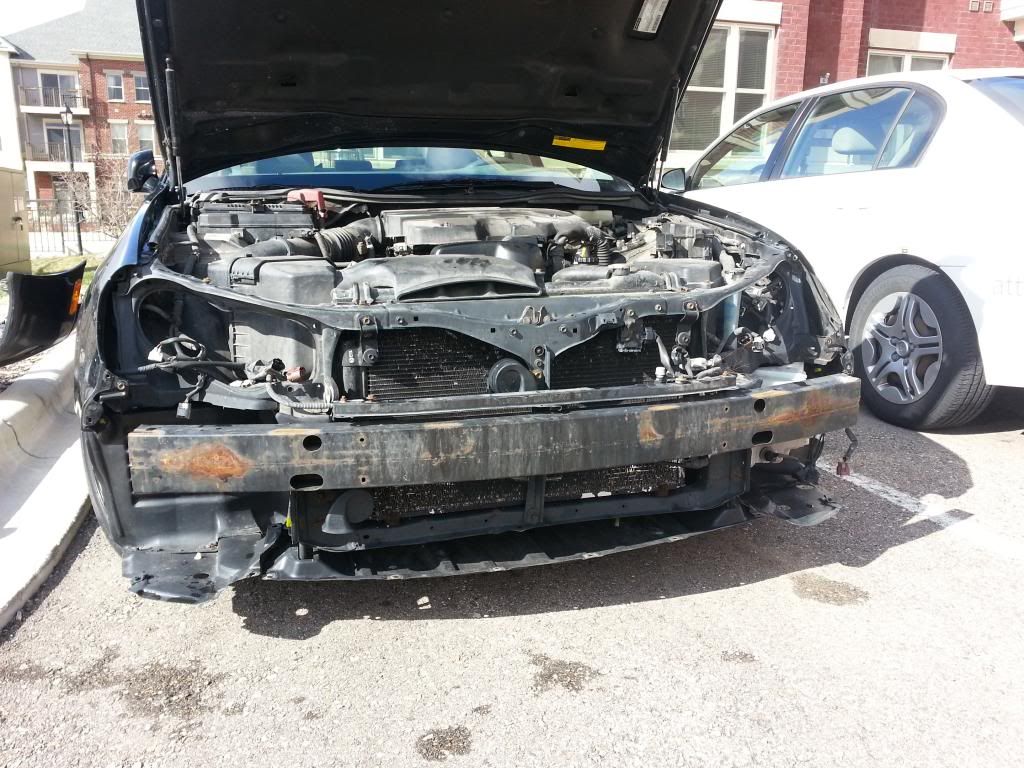
All bolts came out quite easy, except one of the nuts securing the bumper to fender snapped off FUUUUUUUUU
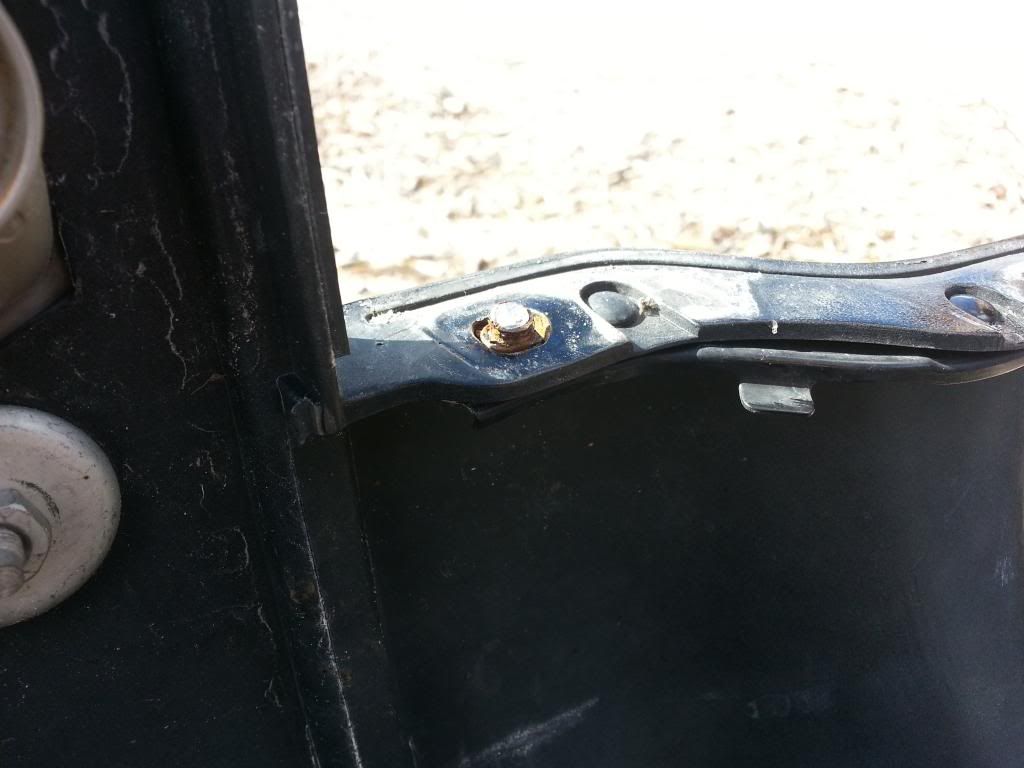
Looked up the part number online for this bracket since I didn't want to try and jimmy rig it, called the Lexus dealer and they surprisingly had a new one. Was sitting in an extra parts bin in the body shop. $9.75, I won't even argue for that price, plus he gave me two new nuts for it. win!
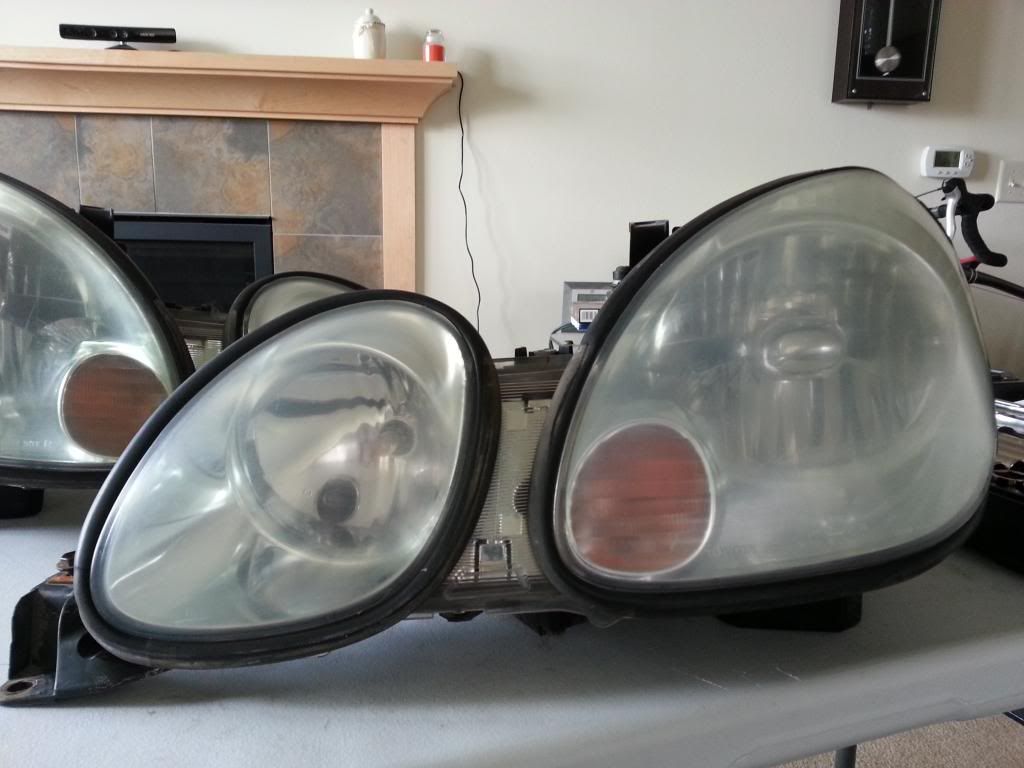
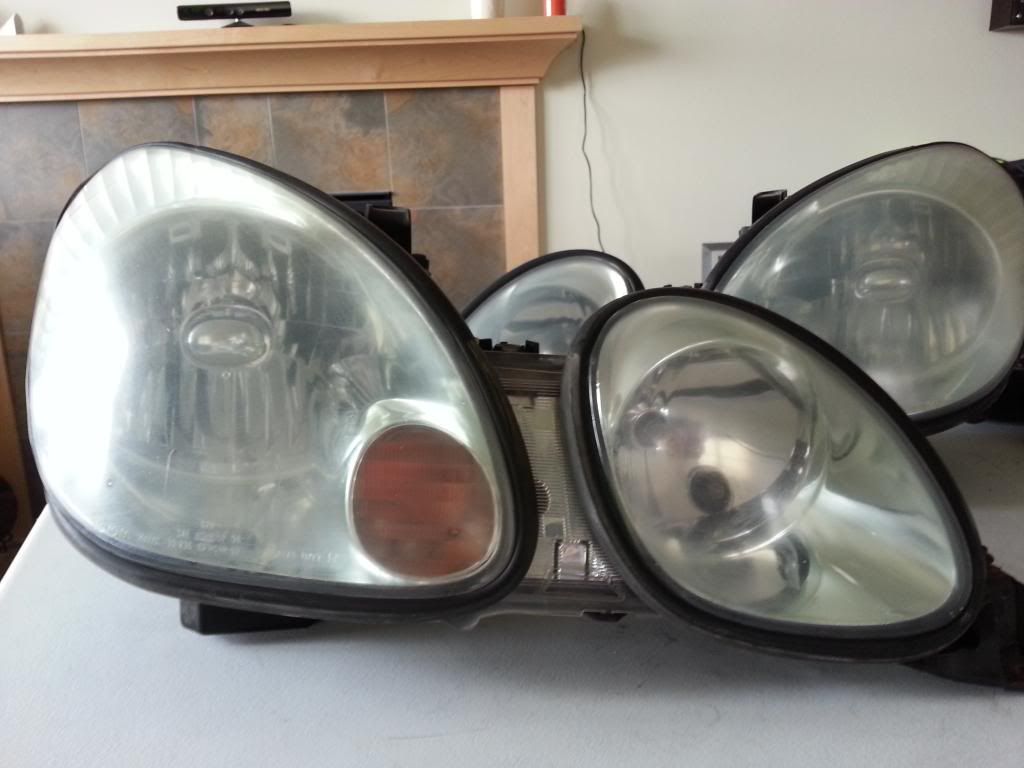
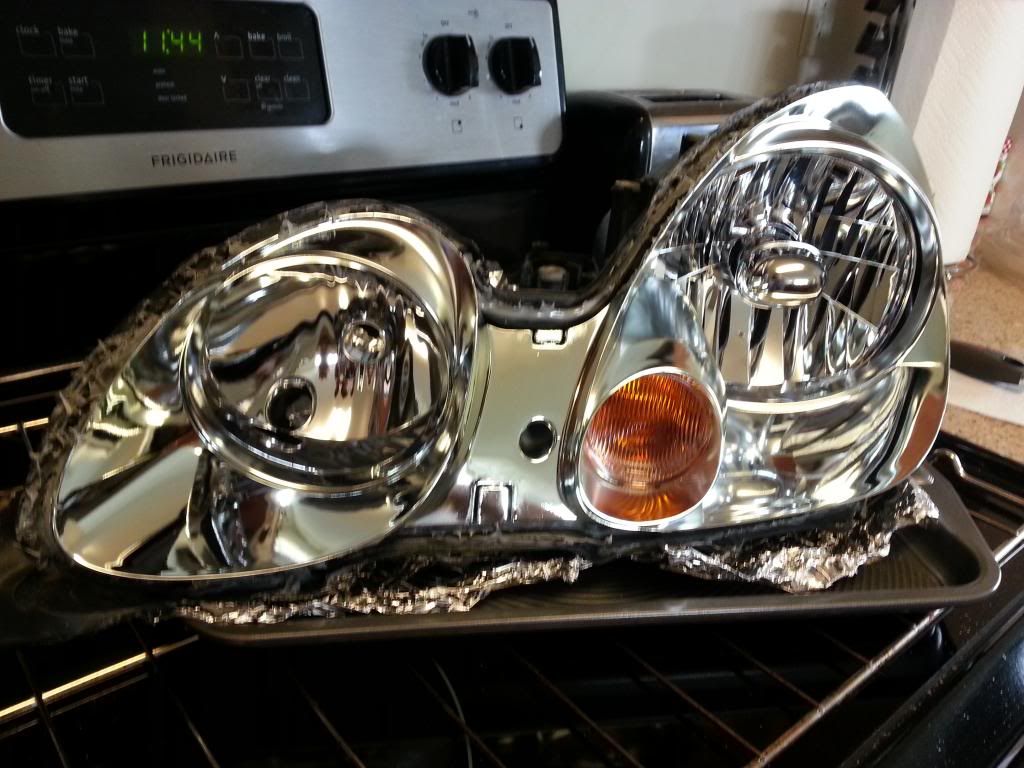
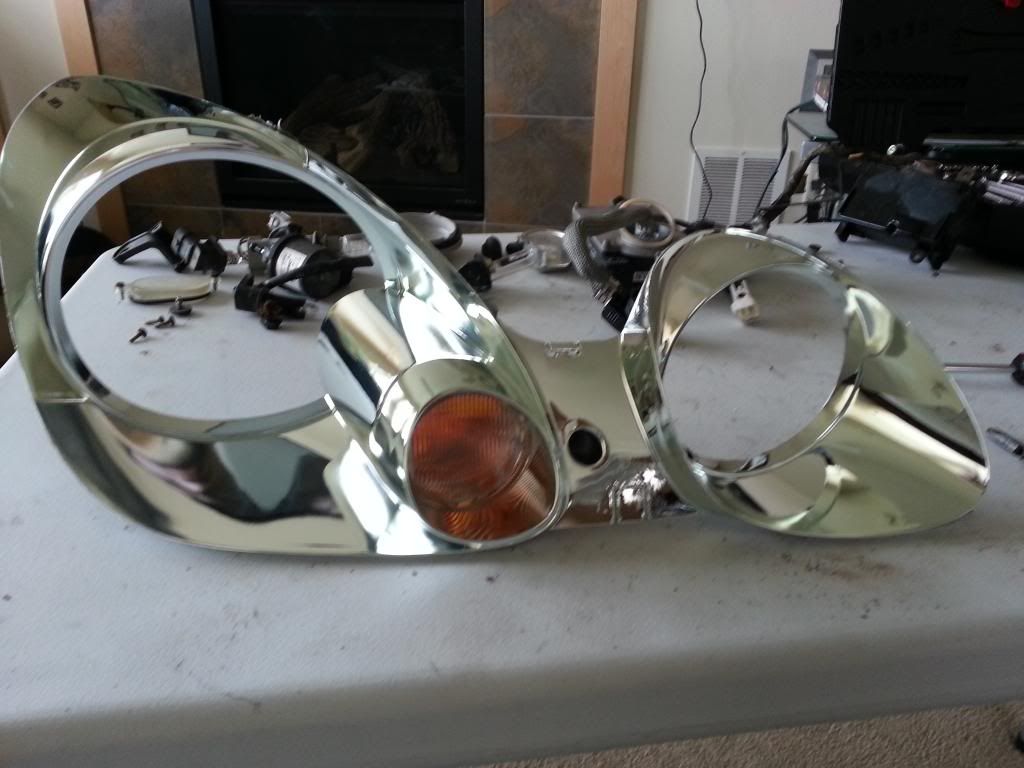
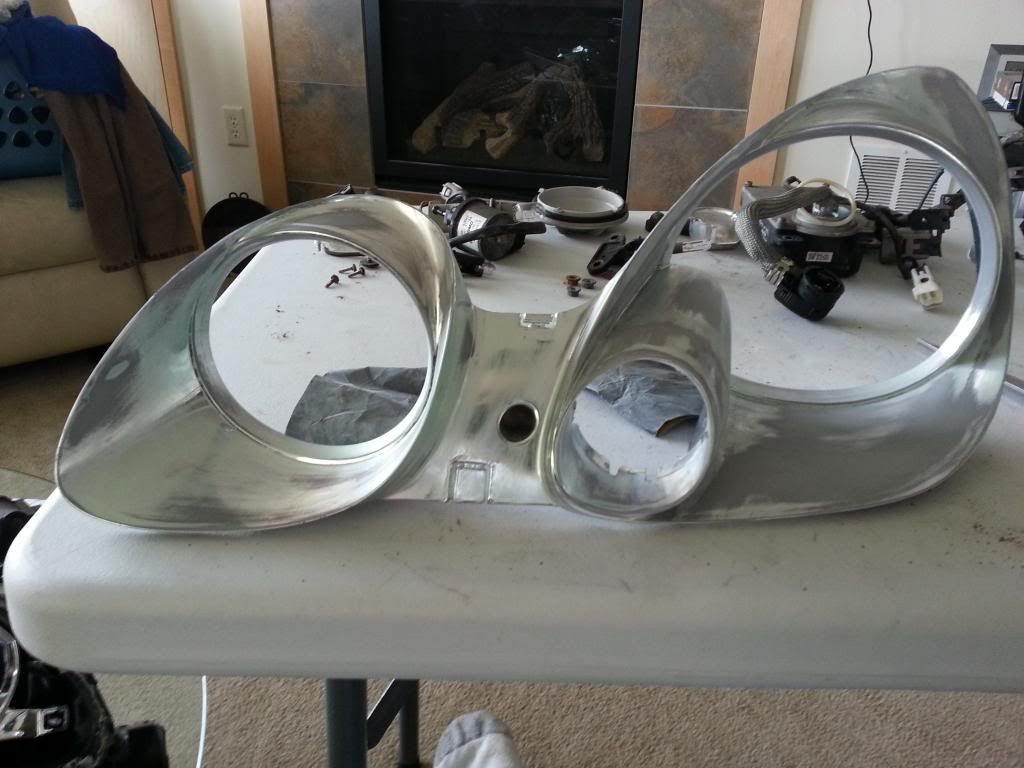
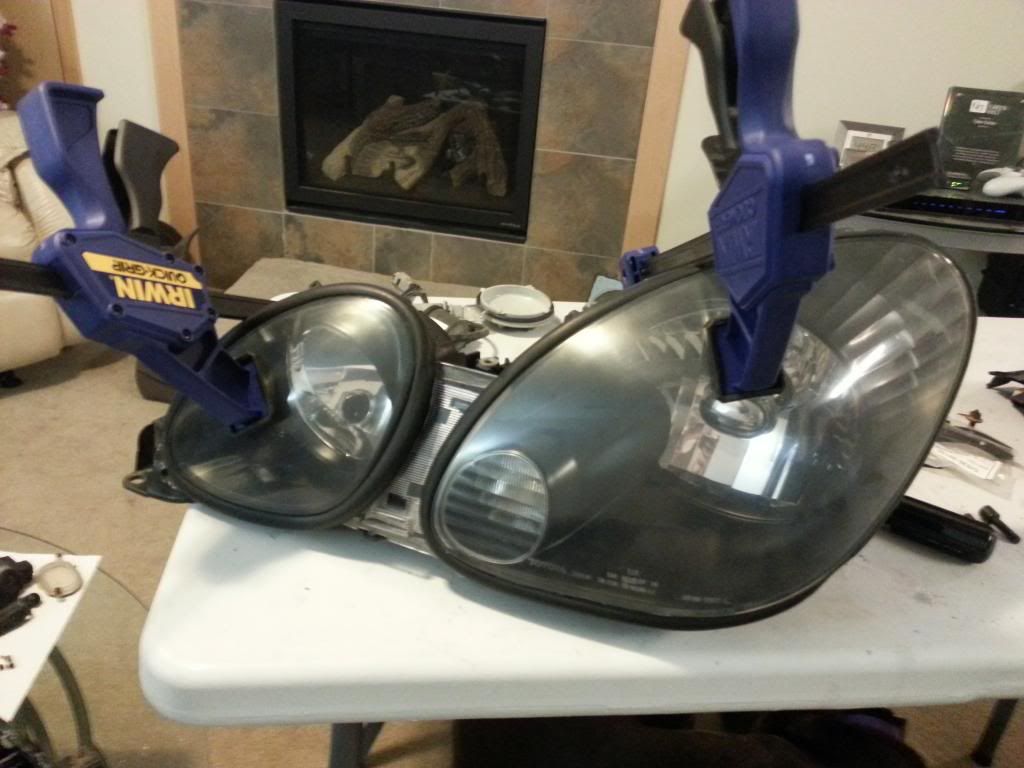
Here's both headlights removed and prior to baking
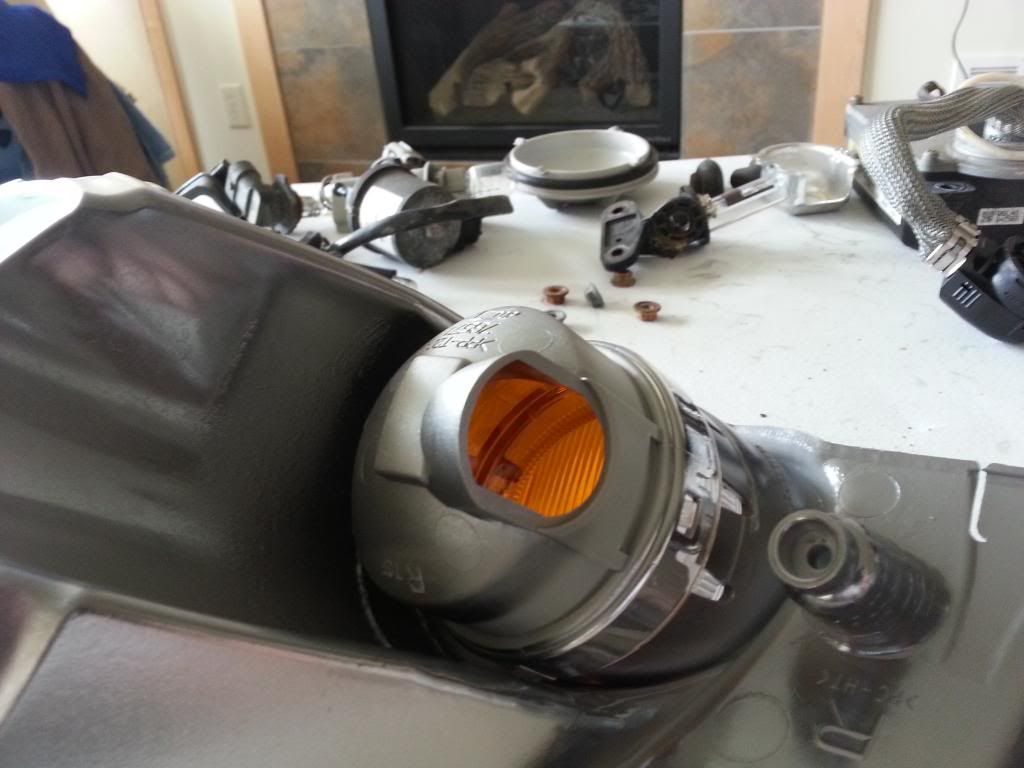
After removing the self-level motor, the wiring, and HID's, in the oven they go
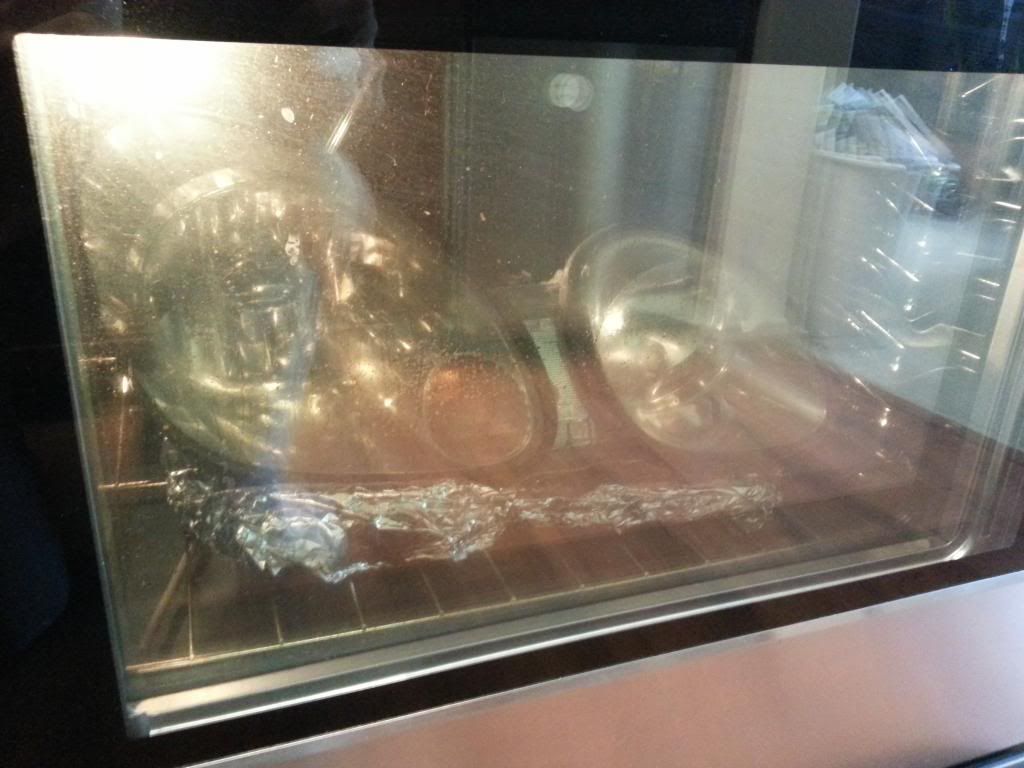
I baked them at 250 degrees for 10 minutes, which proved to be just about right, this was my first time doing this so it took me a little while to get the lens separated. I used a narrow metal putty knife to accomplish the separation. It worked really well.
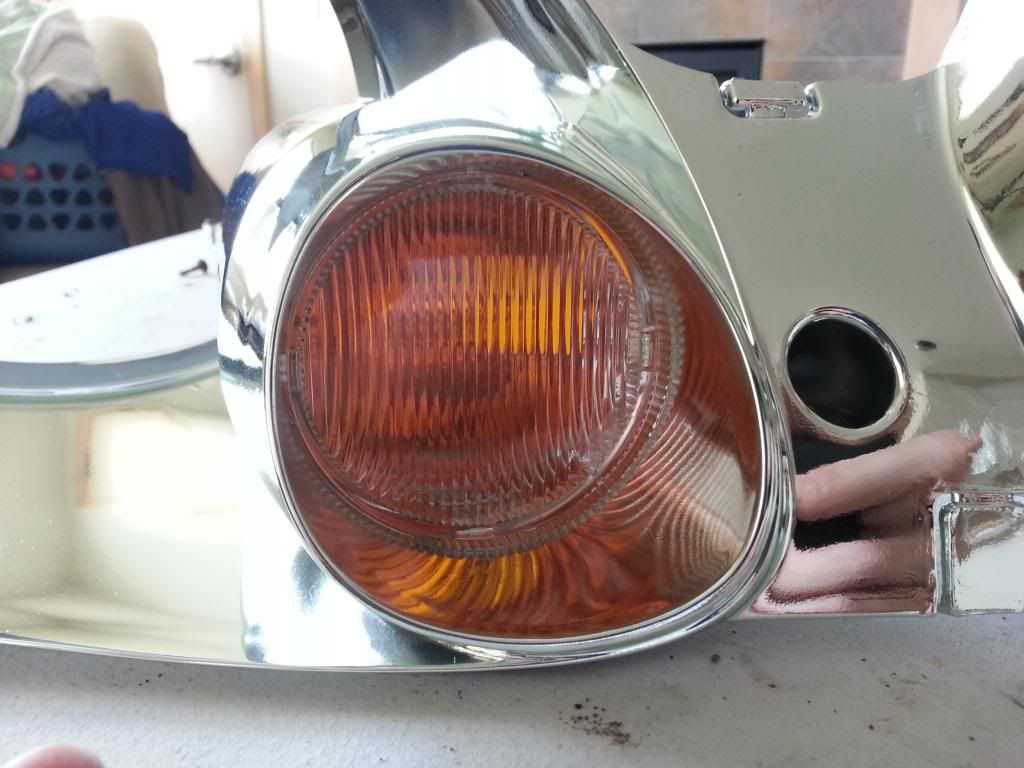
Lens off
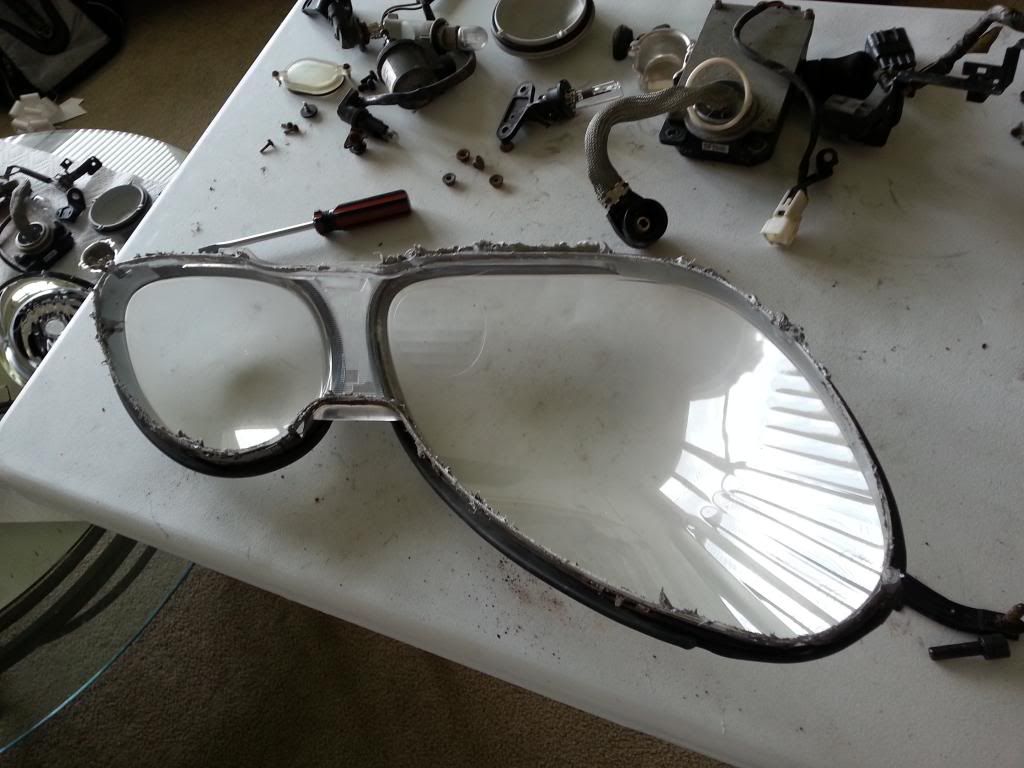
This is the housing with the inner reflector/style piece removed
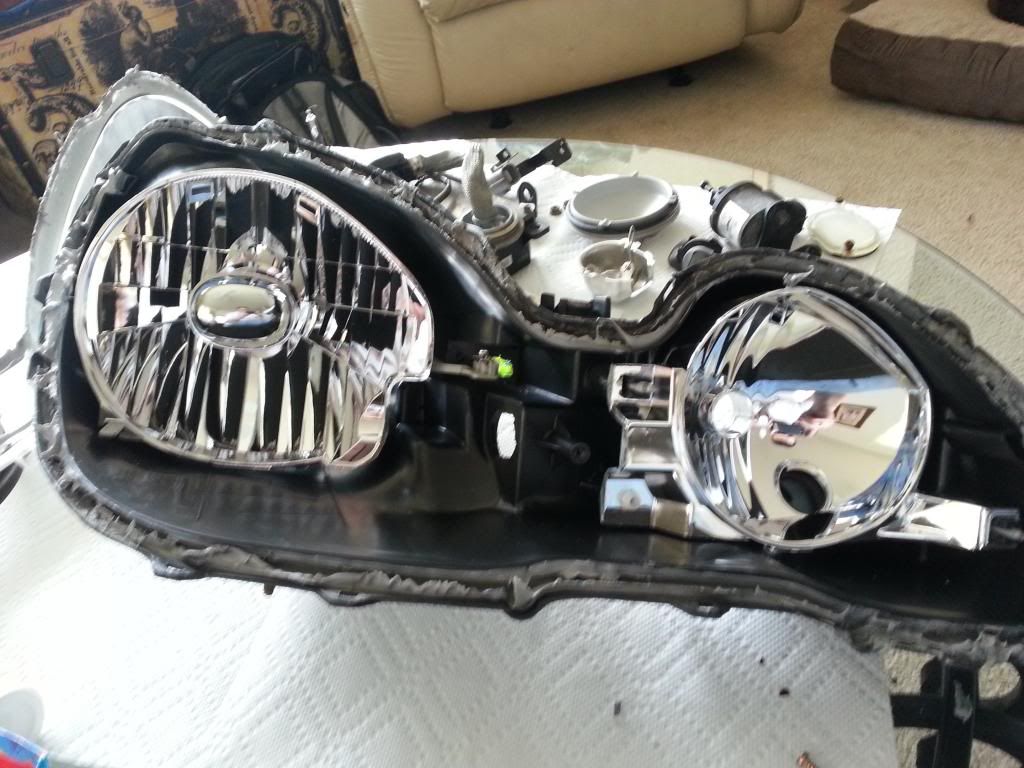
This is the piece I'm going to paint black
OK, So as mentioned above. I tackled the job of blacking out the headlights. As a general summary, I learned another really hard lesson as I've learned before and will learn again. Wear your freaking gloves and always cut away from you. I wound up with an ER visit...more on that later. First off, just to give some background, I had my wisdom teeth pulled Friday morning. I was sooooo bored sitting around Friday that Saturday morn I was going to start this project even though I should b resting and the Oxycontin was making me quite nauseous. First things first, must remove the bumper and headlights. This proved not too bad, except for the two nuts on each side that secure the bumper to fender, you have to reach in with an extension behind the fender liner, just like the zx2.

All bolts came out quite easy, except one of the nuts securing the bumper to fender snapped off FUUUUUUUUU

Looked up the part number online for this bracket since I didn't want to try and jimmy rig it, called the Lexus dealer and they surprisingly had a new one. Was sitting in an extra parts bin in the body shop. $9.75, I won't even argue for that price, plus he gave me two new nuts for it. win!

Here's both headlights removed and prior to baking


After removing the self-level motor, the wiring, and HID's, in the oven they go

I baked them at 250 degrees for 10 minutes, which proved to be just about right, this was my first time doing this so it took me a little while to get the lens separated. I used a narrow metal putty knife to accomplish the separation. It worked really well.
Lens off


This is the housing with the inner reflector/style piece removed

This is the piece I'm going to paint black

Last edited by gittert; May 1, 2013 at 06:55 PM.
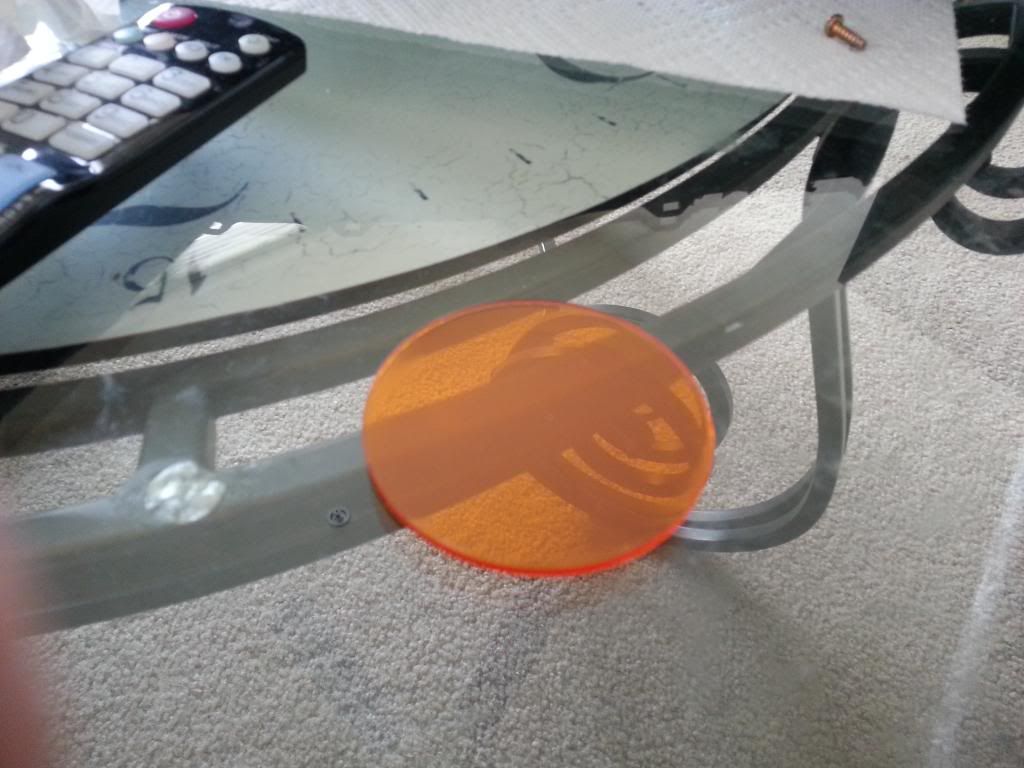
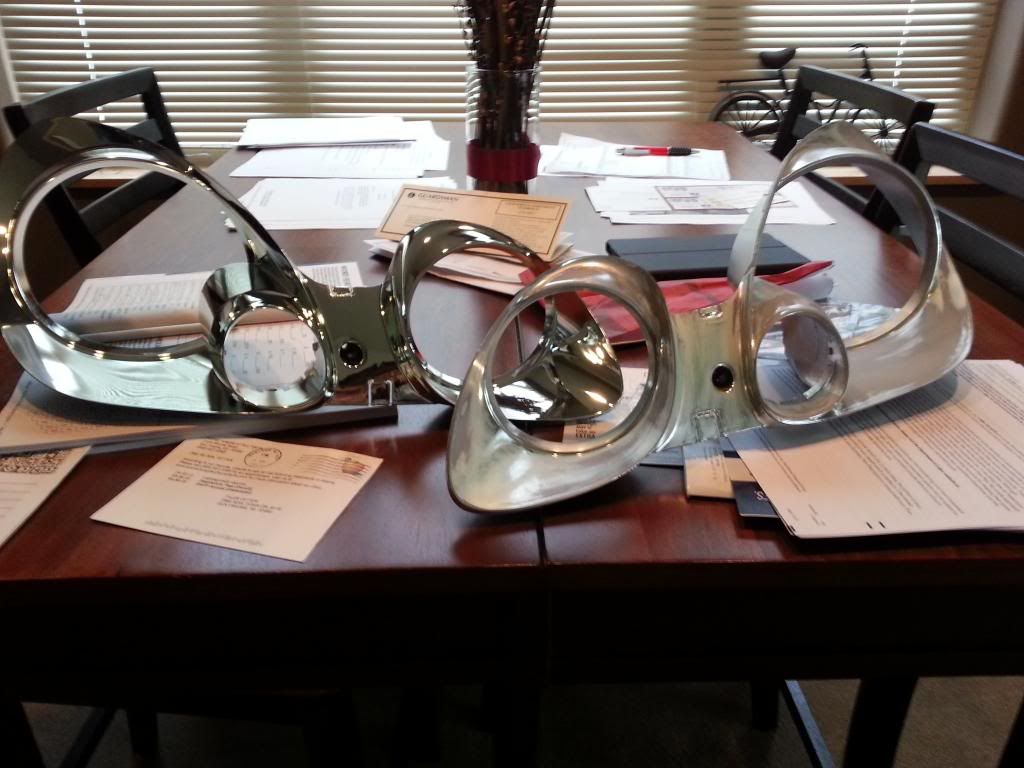
So here's this amber turn signal. It's just a disk that is easily removed. So, of course I'm going to remove it.
Removed...

Sanded with 400 grit, or maybe it was 800, I don't remember, comparison next to unsanded part
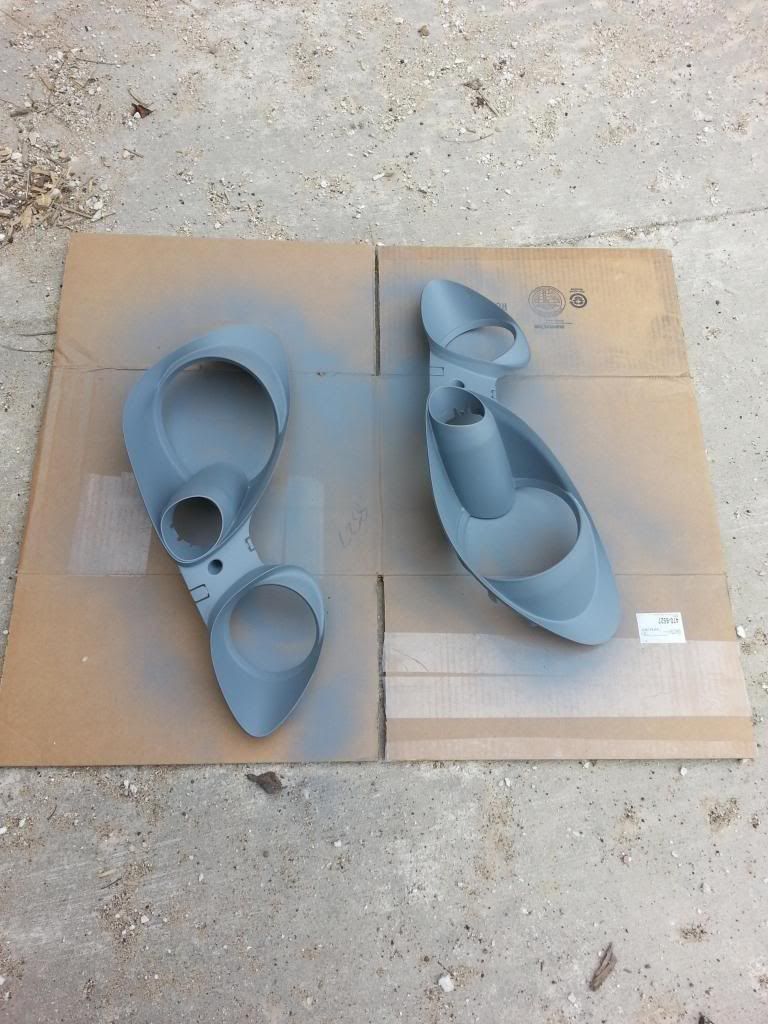
Primed, then painted. I used 3 really light coats of primer, and 4 light coats of satin black. I used Krylon rattle can for plastics.
Giggity!


Removed...


Sanded with 400 grit, or maybe it was 800, I don't remember, comparison next to unsanded part


Primed, then painted. I used 3 really light coats of primer, and 4 light coats of satin black. I used Krylon rattle can for plastics.


Giggity!

Last edited by gittert; May 1, 2013 at 07:00 PM.
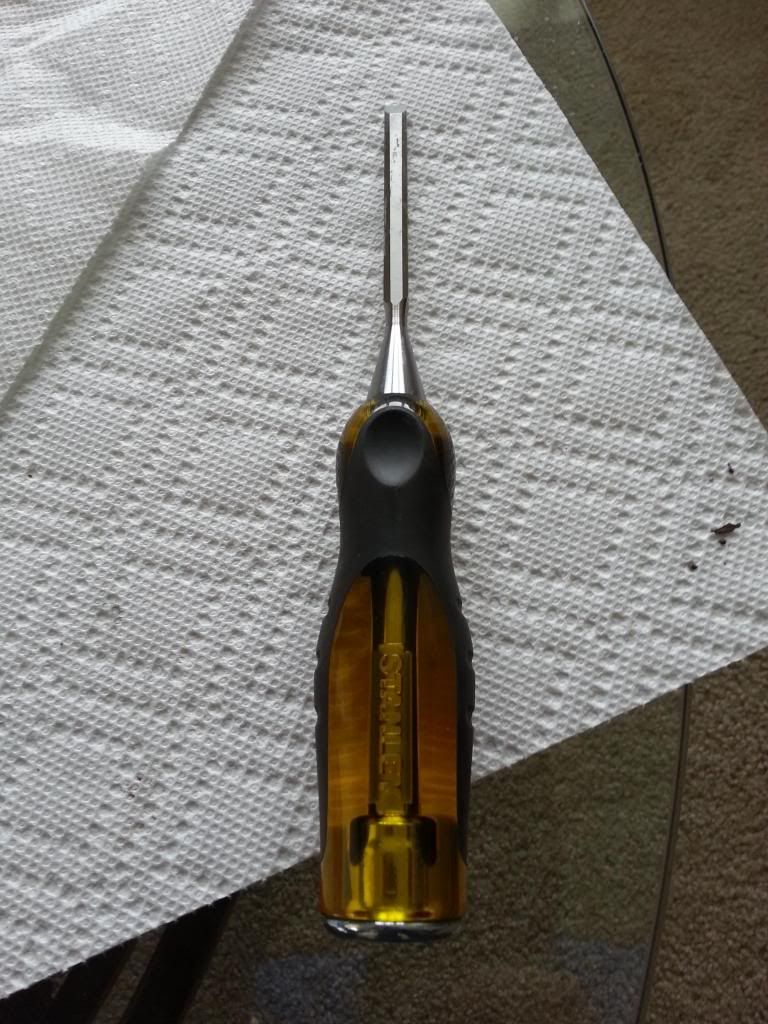
I had made the decision that I was going to remove as much of the factory adhesive on these lights and replace it with Black RTV silicone because these lights were known from the factory to get moisture inside. So I found a nice solid 1/4" wood chisel that had a nice sharp edge on it for cutting out the adhesive. This still was no easy task as it required force. It was inevitable that my left hand would be in the improper location eventually when the chisel would slip. It did, and I put a lengthy deep gash inside my left hand. FUUUUUUU. My wife was sleeping as she had also had her wisdom teeth removed. It wasn't until I noticed that I was going to faint/pass out that I had to call out to her. I've never fainted at the sight of blood or injury, I suspect the Oxy in my system combined with my overall pain already was just too much. I settled for puking blood from my teeth while my wife wrapped my hand. On our way to the Urgent Care we go...FUUUUUUUU all the Urgent Care's had closed a half hour earlier. Guess it'll be an ER visit.
Here is the tool I cut myself with.
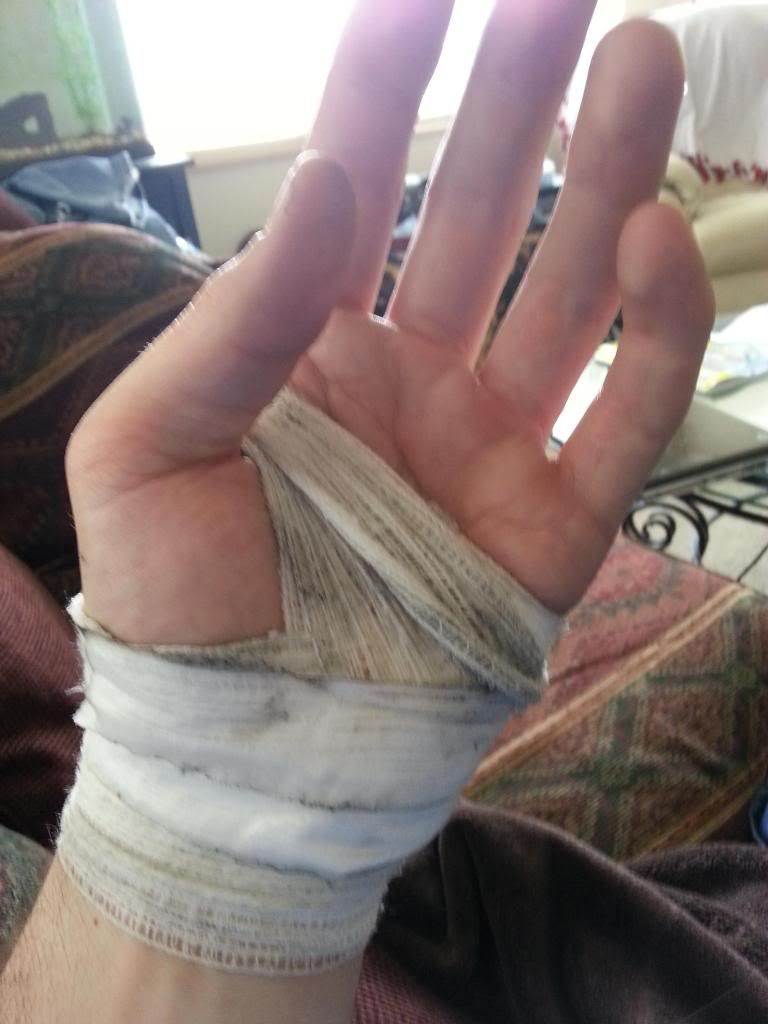
I had only removed a 1/4 of the glue that needed to be done on the 1 headlight with another headlight to go. So like I trooper I went back at it. Here's a picture of my bandaged hand after continuing the job. The bandage is dirty as fawk, I tried to wear a glove over it. I'm told to leave it on for a full 24hours before removing/replacing and cleaning the stitches.
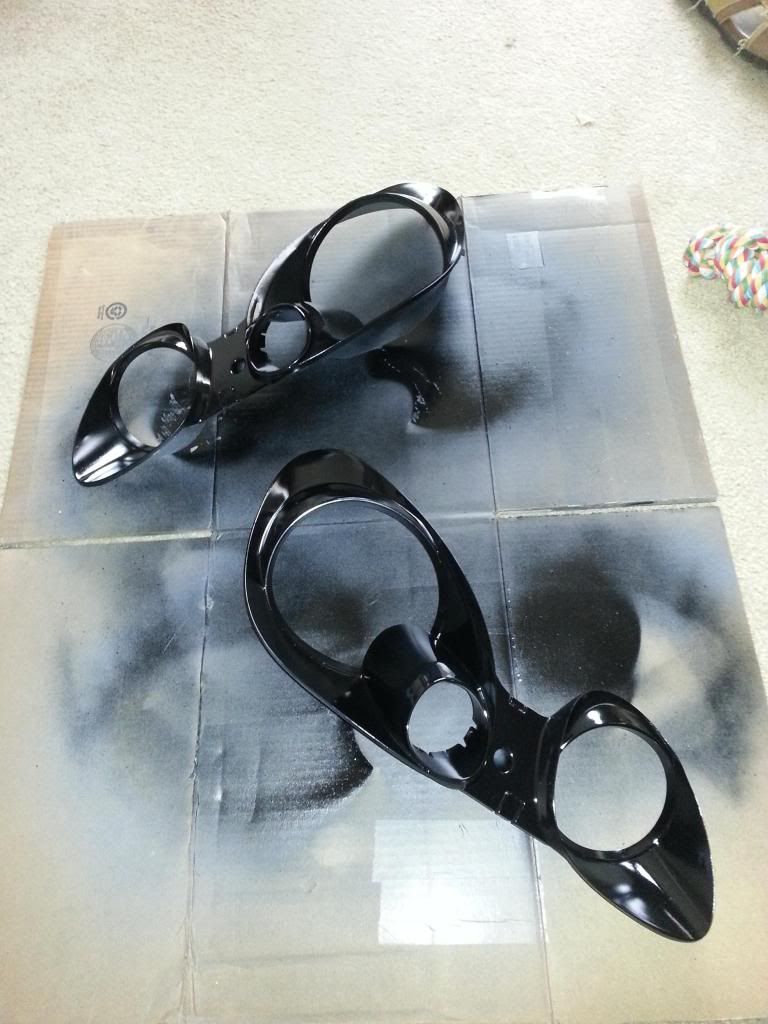
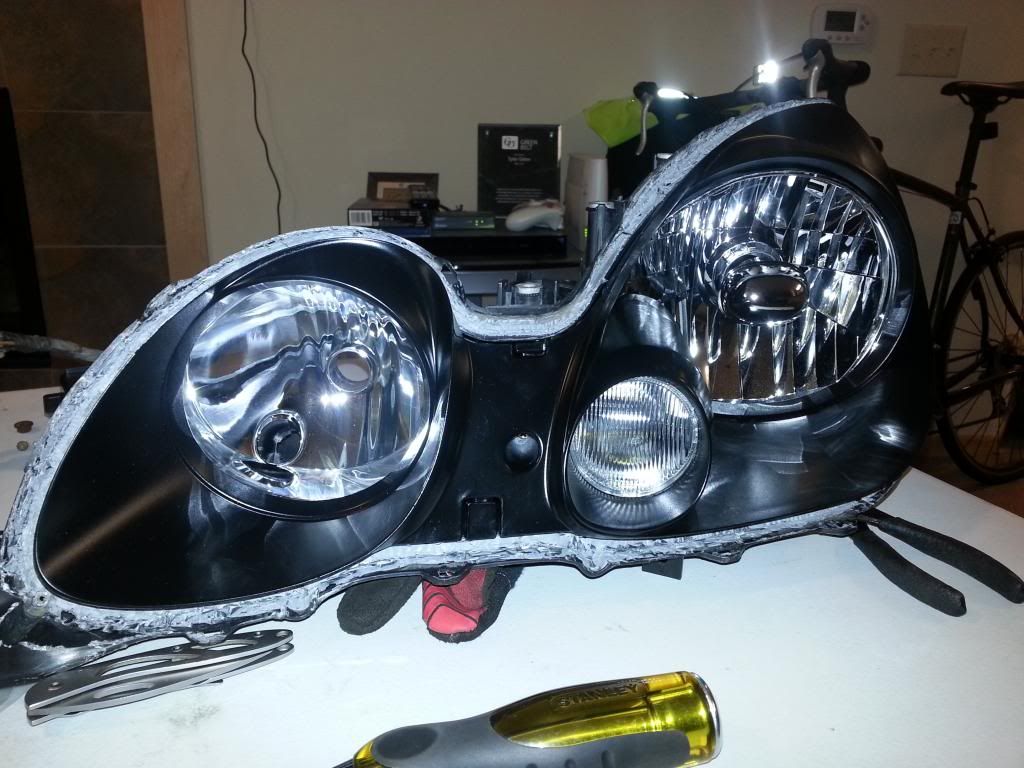
Here's one of the lights all gooed up and being pressed together with a few clamps. I should also note that before I put the lens on I had wetsanded them using a 800, 1000, 1500, and 2000 grit step process, then buff them with Ultimate Compound, then used lens restore on top of that.
Here's a pile of old adhesive I chopped out. This truly took forever.
And finally the end result.
Ironically, the cost of the ER visit, and general supplies (RTV, a few tools, paint), would have bought a damn nice set of aftermarket headlight. Also, the car wouldn't fire up right away after I put the bumper back on...freaked me out, turned over like it was low on compression. Going to have to check that out. I got it to spit sputter and then fire and it ran just fine, drove around no problem. Don't know what's up with that.
EDIT today for CL: Just got the FIRST of two bills today for the ER visit. $1400 for the first and found out there's a second one coming that's $1300....sooooooo I sure could have bought a really nice set of already done headlights, plus other goodies. *sigh* Not to mention I have moisture showing in the passenger side light, so I guess I'll have to redo them.
Here is the tool I cut myself with.

I had only removed a 1/4 of the glue that needed to be done on the 1 headlight with another headlight to go. So like I trooper I went back at it. Here's a picture of my bandaged hand after continuing the job. The bandage is dirty as fawk, I tried to wear a glove over it. I'm told to leave it on for a full 24hours before removing/replacing and cleaning the stitches.

Here's one of the lights all gooed up and being pressed together with a few clamps. I should also note that before I put the lens on I had wetsanded them using a 800, 1000, 1500, and 2000 grit step process, then buff them with Ultimate Compound, then used lens restore on top of that.

Here's a pile of old adhesive I chopped out. This truly took forever.

And finally the end result.


Ironically, the cost of the ER visit, and general supplies (RTV, a few tools, paint), would have bought a damn nice set of aftermarket headlight. Also, the car wouldn't fire up right away after I put the bumper back on...freaked me out, turned over like it was low on compression. Going to have to check that out. I got it to spit sputter and then fire and it ran just fine, drove around no problem. Don't know what's up with that.
EDIT today for CL: Just got the FIRST of two bills today for the ER visit. $1400 for the first and found out there's a second one coming that's $1300....sooooooo I sure could have bought a really nice set of already done headlights, plus other goodies. *sigh* Not to mention I have moisture showing in the passenger side light, so I guess I'll have to redo them.
Last edited by gittert; May 1, 2013 at 07:05 PM.

