
All my crazy Lexus issues SOLVED!! (ECU-leaking capacitor)


Rookie
Joined: Jun 2013
Posts: 55
Likes: 0
Well... Got the ODBII reader finally. Amazon sorta went screwball with shipping it.
So I plugged it up as instructed, and followed the letter of the instructions...
Told me NO CODES. Even though the Check light is still on.
And here is a youtube video of what is happening er Not happening.
So I plugged it up as instructed, and followed the letter of the instructions...
Told me NO CODES. Even though the Check light is still on.
And here is a youtube video of what is happening er Not happening.

Driver School Candidate
Joined: Jun 2013
Posts: 14
Likes: 0
From: Oh
Never being one to get the completely obvious... i'm having trouble removing the ecu from my 97 LS:
The bottom nut has been removed from the screw holding the bracket. The assembly rocks easily -- pivoting at the top. It doesn't seam like that last top nut is accessible because of that holding bracket. Even if I cold remove it, it still doesn't seem like the assembly will release -- how does that protruding screw escape the bracket? Does that holding bracket slide back?
befuddled (with sore neck).
ps: have everything from post #1 ready to go.

Thread Starter
Lexus Champion
Joined: Dec 2011
Posts: 4,078
Likes: 87
From: Birmingham, AL
make sure you disconnect negative battery cable before unplugging ECU connectors
you just pull the bracket off of the stud and then remove those two nuts above it, it's easy once you have done it once!
no codes being communicated from the ECU and yet check engine light is on is a sure sign of failed ECU caps!
do you have all of the caps in the list in your hand and the other tools/supplies from post #1 ?
Last edited by LScowboyLS; Jun 19, 2013 at 07:21 PM.

make sure you disconnect negative battery cable before unplugging ECU connectors
you just pull the bracket off of the stud and then remove those two nuts above it, it's easy once you have done it once!
no codes being communicated from the ECU and yet check engine light is on is a sure sign of failed ECU caps!
do you have all of the caps in the list in your hand and the other tools/supplies from post #1 ?
you just pull the bracket off of the stud and then remove those two nuts above it, it's easy once you have done it once!
no codes being communicated from the ECU and yet check engine light is on is a sure sign of failed ECU caps!
do you have all of the caps in the list in your hand and the other tools/supplies from post #1 ?
Driver School Candidate
Joined: Jun 2013
Posts: 14
Likes: 0
From: Oh
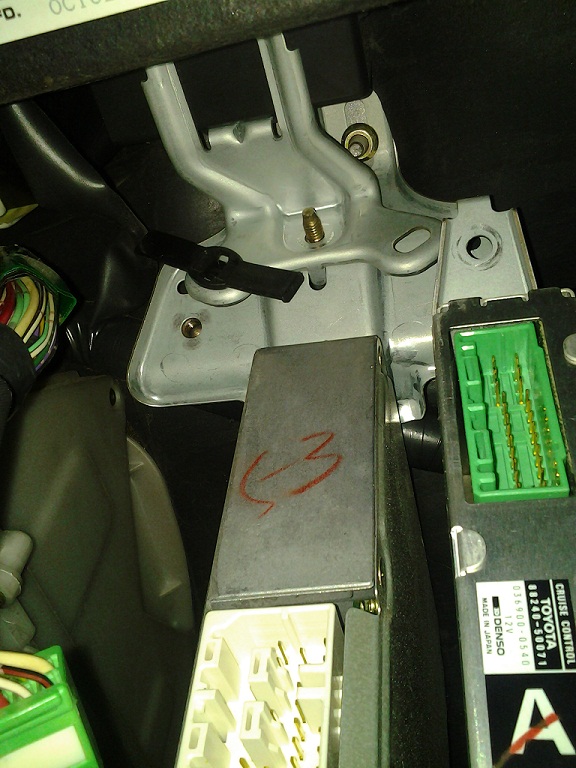
"...you just pull the bracket off of the stub and then remove those two nuts above it"
That bracket is incumbered by whatever that black box is. It wont move enough to pull off the stub. A little confused here. Is the bracket that the stub is coming through supposed to come all the way off? Doesn't seem like it wants to move much at all.

I purchased the caps from the suggested links. Purchased the suggested radio shack parts. Ready to go with that. Kind of surprised to be stuck at removal. Hope not for long.
***
Let me take this opportunity to thank you LScowboyLS for your fine work on this thread. Glad to be here instead of throwing money at strange problems. Thanks for the guidance.
That bracket is incumbered by whatever that black box is. It wont move enough to pull off the stub. A little confused here. Is the bracket that the stub is coming through supposed to come all the way off? Doesn't seem like it wants to move much at all.
I purchased the caps from the suggested links. Purchased the suggested radio shack parts. Ready to go with that. Kind of surprised to be stuck at removal. Hope not for long.
***
Let me take this opportunity to thank you LScowboyLS for your fine work on this thread. Glad to be here instead of throwing money at strange problems. Thanks for the guidance.
Thread Starter
Lexus Champion
Joined: Dec 2011
Posts: 4,078
Likes: 87
From: Birmingham, AL
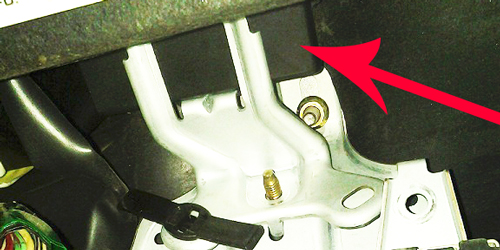
look up on the bracket going over the stud, there is something else holding it - it helps to get upside down and comfortable so you can study it - frustration is the enemy here!
and yes, once the bracket slips off the stud. there will be 2 nuts to remove (one is visible in your pic) and then the ECU will come out will a large bracket attached to it
and just to be my usual smarta$$ self, if you can't get the ECU out easily then you sure don't want to do the rest of this job, this is the easy part! - hehe
Attachment 498614
Last edited by LScowboyLS; Jun 20, 2013 at 01:23 AM.
Driver School Candidate
Joined: Jun 2013
Posts: 14
Likes: 0
From: Oh
The black box attached to bracket was "stuck" and felt like it was firmly affixed
to something, when it really wasn't. I applied upward force and it came loose.
Anyhow... here is what I found:
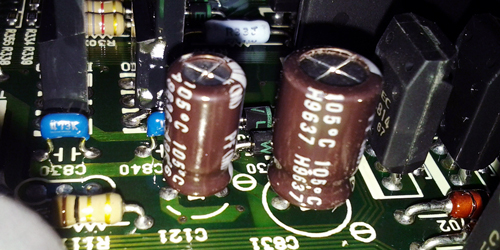
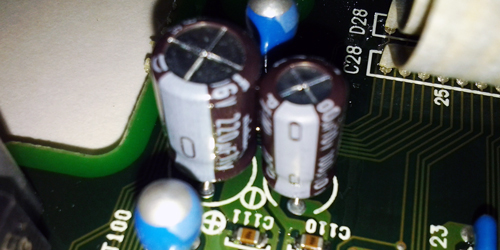
I was expecting to see some leakage, but it looks very clean. The car is 16 years old with 220k miles on it.
Could this still be the cause of the intermittent symptoms?
to something, when it really wasn't. I applied upward force and it came loose.
Anyhow... here is what I found:
I was expecting to see some leakage, but it looks very clean. The car is 16 years old with 220k miles on it.
Could this still be the cause of the intermittent symptoms?
Thread Starter
Lexus Champion
Joined: Dec 2011
Posts: 4,078
Likes: 87
From: Birmingham, AL
That is what made it so hard to discover this problem in the first place, I had to force myself to go back and reexamine the ECU a couple months later, after tearing my hair out trying to find the source of the intermittent problems, and what is crazy is, that between the first time I looked and the second time (maybe 2 months) the board had gone from perfect to almost completely ruined by the leakage!
have you found an expert at soldering?
make sure you triple check the polarity of the installed capacitors and their values after you are finished, it is very easy to put one in backwards or the wrong one in the wrong place!
it is also easy to get a clipped piece of a capacitor lead left on the board or a stray fleck of solder, keep reinspecting your work and also use gobs of flux on everything!
Thread Starter
Lexus Champion
Joined: Dec 2011
Posts: 4,078
Likes: 87
From: Birmingham, AL
1. all polarities are marked on the board with a minus sign
2. all polarities of the capacitors are marked on the capacitors with a minus sign
3. the most important thing to know: all polarities of all capacitors on a single board will be in the same direction i.e. all of the + sides will be on the left, for example
so if you come across a capacitor you removed and cannot see the polarity, look at the polarity of the other capacitors on that same board, it will be the same!
Driver School Candidate
Joined: Jun 2013
Posts: 14
Likes: 0
From: Oh
I purchased all of the soldering tools and supplies suggested by LscowboyLs in post #1. I found some old computer sound and graphics boards to practice on. I watched a couple of soldering videos. I decided to disregard this question from LS cowboyLS �have you found an expert at soldering?� and started practicing to get good enough to operate...
...after two hours of practice, and one hour of icing the horrible burn on my finger, I decided to revisit this question from LscowboyLS: �have you found an expert at soldering?� � Yes. Yes I did. I went to his shop Saturday morning with the new capacitors and the ecu boards. He wanted $120 for immediate service, which I was happy to give him when he finished the job and hour later. I thought I could do this myself � no way. He said that there was soldering on both sides � more complicated than the practice boards I butchered so badly (mostly desoldering)
I reinstalled the ecu and started the car. I thought it was going to shake apart. It had a horrible ticking sound and lurched while trying to stall. I barely got it out of the garage to let it run. Five minutes later, it's running like a Swiss watch. Unbelievable. What a horrible feeling when I first started it... then it all went away. Took it for an very spirited and satisfying test drive.
Just a couple of remaining issues:
- Although the cel is not on anymore, the trac-off light is still flashing.
- The glove compartment seemed to reinstall easily. Looks right, but it won't close � the latch won't catch.
Conclusion so far: the fix seems to work very well.
Driver School Candidate
Joined: Jun 2013
Posts: 14
Likes: 0
From: Oh
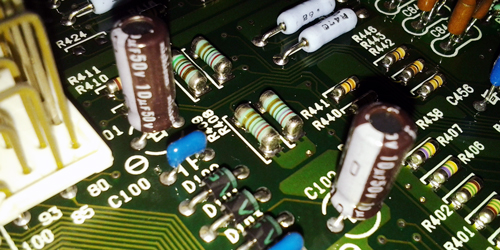
Forgot to share this:
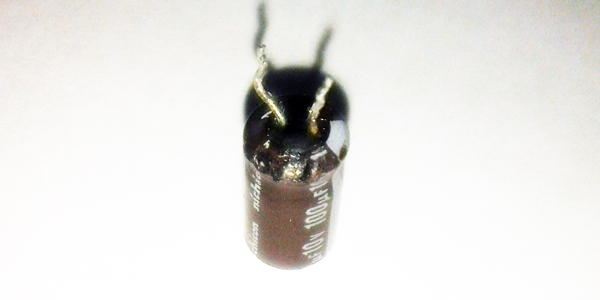
This is the only cap that showed any signs of distress -- couldn't see this until it was off.
ps: disregard glove compartment comment... I reinstalled it poorly.
This is the only cap that showed any signs of distress -- couldn't see this until it was off.
ps: disregard glove compartment comment... I reinstalled it poorly.
Thread Starter
Lexus Champion
Joined: Dec 2011
Posts: 4,078
Likes: 87
From: Birmingham, AL

I should tell folks that before first crank, put the ignition on RUN position for a minute or so, and let new caps get acquainted with the other components in the ECU - forgot that
")
Last edited by LScowboyLS; Jun 23, 2013 at 04:30 PM.
Thread Starter
Lexus Champion
Joined: Dec 2011
Posts: 4,078
Likes: 87
From: Birmingham, AL
I purchased all of the soldering tools and supplies suggested by LscowboyLs in post #1. I found some old computer sound and graphics boards to practice on. I watched a couple of soldering videos. I decided to disregard this question from LS cowboyLS �have you found an expert at soldering?� and started practicing to get good enough to operate...
...after two hours of practice, and one hour of icing the horrible burn on my finger, I decided to revisit this question from LscowboyLS: �have you found an expert at soldering?� � Yes. Yes I did. I went to his shop Saturday morning with the new capacitors and the ecu boards. He wanted $120 for immediate service, which I was happy to give him when he finished the job and hour later. I thought I could do this myself � no way. He said that there was soldering on both sides � more complicated than the practice boards I butchered so badly (mostly desoldering)
...after two hours of practice, and one hour of icing the horrible burn on my finger, I decided to revisit this question from LscowboyLS: �have you found an expert at soldering?� � Yes. Yes I did. I went to his shop Saturday morning with the new capacitors and the ecu boards. He wanted $120 for immediate service, which I was happy to give him when he finished the job and hour later. I thought I could do this myself � no way. He said that there was soldering on both sides � more complicated than the practice boards I butchered so badly (mostly desoldering)
 (although interestingly enough, the best solderers in the world are teenage Asian girls! - go figure)
one trick I use is slathering that Radio Shack (CAIG) rosin flux all over everything! - makes the soldering process behave! - just wish I could get my lead-free soldering skills up to the same level, I don't like all of this lead contamination in my house!......ugh!