

 Jan 7, 2015, 01:01 PM
Last edit by: IB Advertising
See related guides and technical advice from our community experts:
Browse all: Interior
- How to Install XM Satellite Radio
Step by step instructions for do-it-yourself repairs
Browse all: Interior

DIY: 2007 ISX50 OEM XM Satellite Radio Install
Thread Starter
Lexus Champion
Joined: Apr 2007
Posts: 3,121
Likes: 1
From: Sacramento, CA
Okay, I said I was going to do it and here it is. I didnt bother to search and see if there was already an XM install DIY for the 07s because I figured how could another from someone different hurt? The more the better on DIYs I think. First off let me just start by saying XM radio is awesome and if you are at all thinking about getting it DO NOT go through the dealer and pay their overpriced fees! The install was easy enough and the cost for the hardware is much cheaper! Here are some of the deails on costs:
Step 1 - Make sure you have all the parts

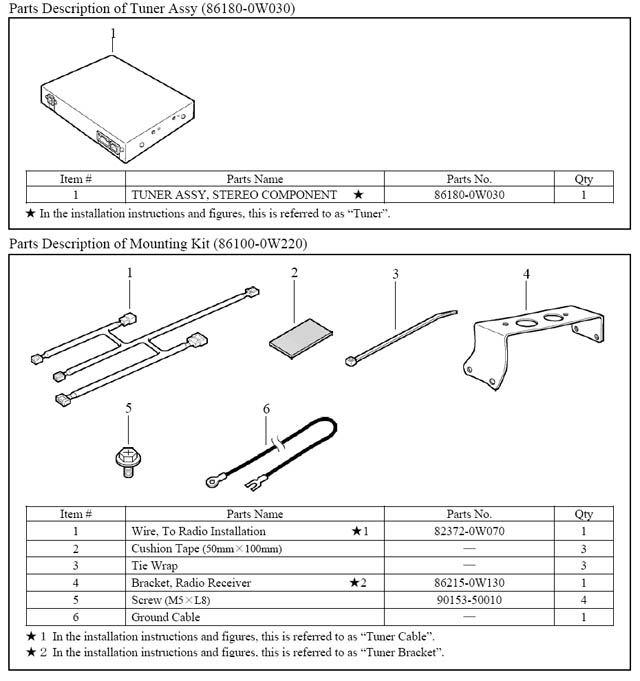
In person these look like this:


The only other things you will need to complete the install will be a 10mm socket wrench, small flat head and phillips head screw driver, and some wire cutters. There is also a Panel Clip Removal Tool that is recommended (part number 00002-06002-01) but I did not have one and I was okay. The small flat head screw driver takes the place of this, youll see how soon.
Step 2 - Disconnecting the battery
Yea sure this is probably a given for most, but personally I have never disconnected a car battery cable before and Im sure Im not the only one who hasnt here either! So I thought Id through this in with the steps.

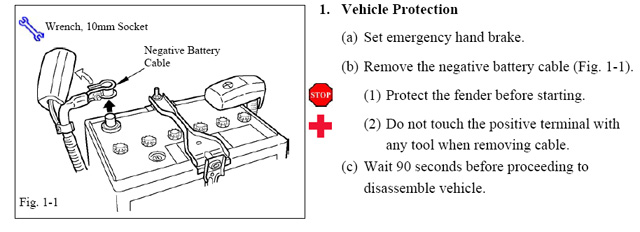
When you do this all you have to do it lift up the black plastic piece over the left battery terminal and using the 10mm socket undo the nut that holds the power cable onto the terminal. I wrapped it in towel so that there was no chance it might scratch my car and set if off to the side.


Step 3 - Removing all the floor board stuff
Most of the flooring (including the plastic trays on the left and right side) just come up and off when you pull on them. No trick there.


And once its all removed it should look like this:


At this point Id like to note that you can see our little mini amp chilling over there in the corner. I thought it was pretty funny looking.
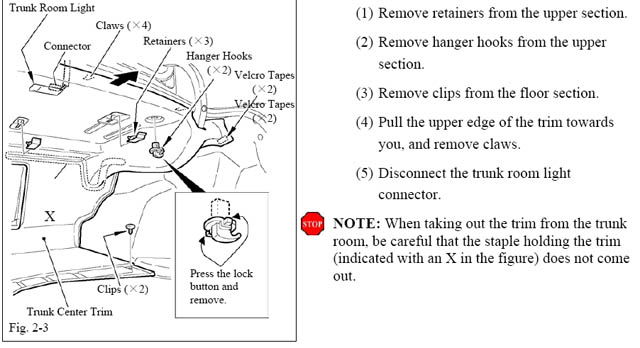
Step 4 - Removing the back trunk trim
Taking this out is a little frustrating because of one particular type of clip that is used that I absolutely hate! Youll see a close up of it later. There should be two 10mm bolts and three of those clips to remove to get this piece out, then underneath it is four different clips. You just have to pull up though and those will come out.


These are the two 10mm bolts. There is one on each side and in order to access the bolt you have to use a flat head screwdriver to lift up the little black plastic cover.


The three evil little clips are all like this and to get them out I used a small flat head screwdriver in the middle and pulled up to get them out. Be careful to catch them because they will go flying off if you remove them this way. I also had to wedge something (I used a long socket) under the screwdriver shaft to give me some more prying action on some of these clips (yes they are used all over the place in the trunk).


- Two kits: part numbers 86100-0W220-01 (07 mount kit) and 86180-0W030 (tuner kit) were $287 shipped from Sewell Lexus using the promo code "CL911M" for the extra 10% off. Apparently there is another code which will get you a bit more off. I haven't tested it myself, but am told it is "clublexus". Link
- Free activation and three free months of service from xmradio.com using promo code XMSCION03. More details on XM deals here and here (just read through the posts starting from the last page and youll learn all about it.
- One year of service after the three free months by calling customer service (again see the links in the previous bullet for details) for $77.
Step 1 - Make sure you have all the parts
In person these look like this:
The only other things you will need to complete the install will be a 10mm socket wrench, small flat head and phillips head screw driver, and some wire cutters. There is also a Panel Clip Removal Tool that is recommended (part number 00002-06002-01) but I did not have one and I was okay. The small flat head screw driver takes the place of this, youll see how soon.
Step 2 - Disconnecting the battery
Yea sure this is probably a given for most, but personally I have never disconnected a car battery cable before and Im sure Im not the only one who hasnt here either! So I thought Id through this in with the steps.
When you do this all you have to do it lift up the black plastic piece over the left battery terminal and using the 10mm socket undo the nut that holds the power cable onto the terminal. I wrapped it in towel so that there was no chance it might scratch my car and set if off to the side.
Step 3 - Removing all the floor board stuff
Most of the flooring (including the plastic trays on the left and right side) just come up and off when you pull on them. No trick there.
And once its all removed it should look like this:
At this point Id like to note that you can see our little mini amp chilling over there in the corner. I thought it was pretty funny looking.
Step 4 - Removing the back trunk trim
Taking this out is a little frustrating because of one particular type of clip that is used that I absolutely hate! Youll see a close up of it later. There should be two 10mm bolts and three of those clips to remove to get this piece out, then underneath it is four different clips. You just have to pull up though and those will come out.
These are the two 10mm bolts. There is one on each side and in order to access the bolt you have to use a flat head screwdriver to lift up the little black plastic cover.
The three evil little clips are all like this and to get them out I used a small flat head screwdriver in the middle and pulled up to get them out. Be careful to catch them because they will go flying off if you remove them this way. I also had to wedge something (I used a long socket) under the screwdriver shaft to give me some more prying action on some of these clips (yes they are used all over the place in the trunk).
Last edited by ben_r_; Jan 28, 2010 at 05:14 PM.
Thread Starter
Lexus Champion
Joined: Apr 2007
Posts: 3,121
Likes: 1
From: Sacramento, CA
Here is a close up of those evil clips so you can see what youre up against.

When you pull up on the piece to get it off these are the clips that you are removing:

They are the same ones that the scuff plates use, so if youve changed those youll know how to deal with those. I had the two on the ends stay stuck in the car and just used a set needle nose pliers to get them out and put them back in the piece.
Step 5 - Removing the upper and rear paneling
Taking this beast of a panel out is a little easier than the last, just more things to remove. For this there will be three slide "locks", two hanger hooks, and two more of those evil little clips. There is also 4 "claws" that hold the top edge closest to you in, but when you pull the whole thing toward you those just come off.
Here is a close up of the slide "locks". Just pull them toward you and they come off and out.

Here is what the "claws" look like. Like I said before when you pull the whole thing toward you they detach on their own

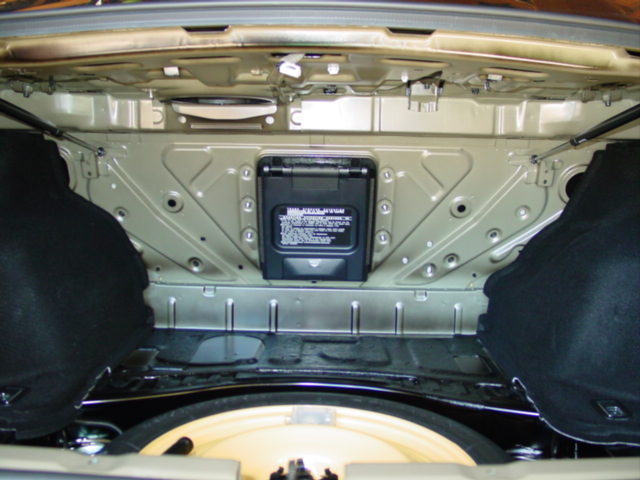
And when the whole thing is out it should look like this:
Step 6 - Removing the right side panel
Holding this piece in there are three evil clips, one philips head screw and one 10mm bolt.

Here is what the screw looks like half way out of the rope hook. Once the screw is out you can just pull on the hook and it comes off.

Use the same method (with the flat head screwdriver) to remove the two evil clips on the floor section. After you get all those clips out and pull the panel out it should look like this:

Step 7 - Un-mounting the Smart Key Unit
You will have to un-mount the Smart Key Unit because the XM tuner will use the included mounting bracket to piggyback onto the Smart Key Unit. Its pretty easy to remove the Smart Key Unit, just two 10mm bolts and disconnecting the cable.

When you pull up on the piece to get it off these are the clips that you are removing:
They are the same ones that the scuff plates use, so if youve changed those youll know how to deal with those. I had the two on the ends stay stuck in the car and just used a set needle nose pliers to get them out and put them back in the piece.
Step 5 - Removing the upper and rear paneling
Taking this beast of a panel out is a little easier than the last, just more things to remove. For this there will be three slide "locks", two hanger hooks, and two more of those evil little clips. There is also 4 "claws" that hold the top edge closest to you in, but when you pull the whole thing toward you those just come off.
Here is a close up of the slide "locks". Just pull them toward you and they come off and out.
Here is what the "claws" look like. Like I said before when you pull the whole thing toward you they detach on their own
And when the whole thing is out it should look like this:
Step 6 - Removing the right side panel
Holding this piece in there are three evil clips, one philips head screw and one 10mm bolt.
Here is what the screw looks like half way out of the rope hook. Once the screw is out you can just pull on the hook and it comes off.
Use the same method (with the flat head screwdriver) to remove the two evil clips on the floor section. After you get all those clips out and pull the panel out it should look like this:
Step 7 - Un-mounting the Smart Key Unit
You will have to un-mount the Smart Key Unit because the XM tuner will use the included mounting bracket to piggyback onto the Smart Key Unit. Its pretty easy to remove the Smart Key Unit, just two 10mm bolts and disconnecting the cable.
Thread Starter
Lexus Champion
Joined: Apr 2007
Posts: 3,121
Likes: 1
From: Sacramento, CA
Step 8 - Mounting the tuner
The tuner gets mounted using the bracket that comes with the 07 mount kit and with that bracket gets attached to the Smart Key unit. This part is fairly simple. Just four screws and some double sided tape (on the bottom of the metal bracket). Dont forget to pay attention to which direction all all the pieces are facing and match them up to the diagram. Also dont forget to attach the grounding cable.
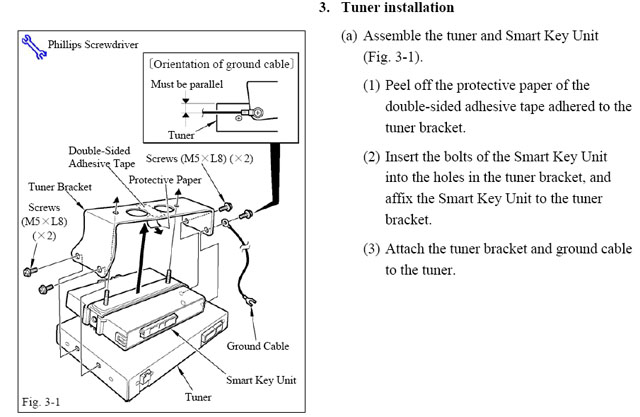
And once its all put together:

Step 9 - Re-mounting the units
Once the two units are one, place the whole package back in the same way it was when you took it out. Place the two 10mm bolts back and then attach the other end of the grounding cable to the bolt to the left that has two other things grounded to it.

At this point it should look like this:

Step 10 - Hooking up some wires
Okay, this part looks in the diagram like its going to be more confusing than it really is, but if you keep in mind that everything really only fits in one spot (the spot that its supposed to go into!) and that all you are doing with this part is putting the XM tuner inline with the amp and connecting it to your head unit at the same time its not so bad. Ill try and simplify it as much as possible.
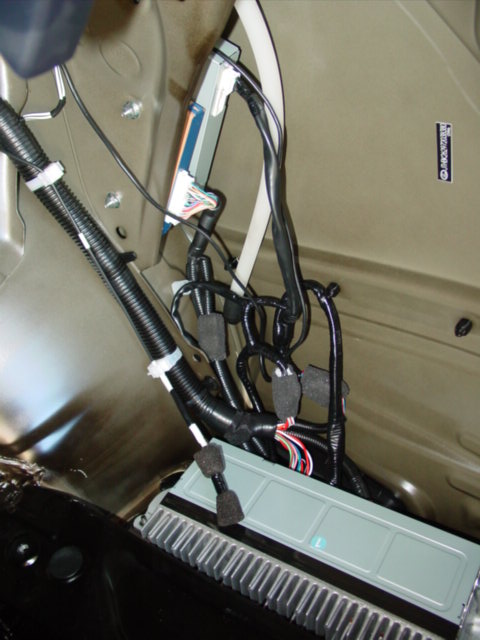
I found that removing the two 10mm bolts on either side of the amp and pulling up the amp made it easier to work with the stiff cables in the back. Its kinda tricky wiggling out the four connections that have to be removed with the amp giving no slack. Once you have those removed try to lay them out flat and in order and lay out the wiring harness that came with the mounting kit as shown below in the diagram. I found that helped me to get everything orientated better.

Cables removed and amp taken out:

Amp placed back on bolts but not tightened down (for wiggle room) and all the cables laid out like the diagram with only the two obvious ones connected.

Taped to the cable that goes in to the Smart Key Unit is a connector that is needed. Gently cut the electrical tape that holds it to the Smart Key Unit cable and connect it to the wiring harness. Also note that I have applied the cushion tape to the first two connections and an beginning to apply it to the connector we just connected.

Heres a close up of the taping process:

Then run the last "back pointing" wire off of the wiring harness up to the tuner (remember it only fits in one place).

The tuner gets mounted using the bracket that comes with the 07 mount kit and with that bracket gets attached to the Smart Key unit. This part is fairly simple. Just four screws and some double sided tape (on the bottom of the metal bracket). Dont forget to pay attention to which direction all all the pieces are facing and match them up to the diagram. Also dont forget to attach the grounding cable.
And once its all put together:
Step 9 - Re-mounting the units
Once the two units are one, place the whole package back in the same way it was when you took it out. Place the two 10mm bolts back and then attach the other end of the grounding cable to the bolt to the left that has two other things grounded to it.
At this point it should look like this:
Step 10 - Hooking up some wires
Okay, this part looks in the diagram like its going to be more confusing than it really is, but if you keep in mind that everything really only fits in one spot (the spot that its supposed to go into!) and that all you are doing with this part is putting the XM tuner inline with the amp and connecting it to your head unit at the same time its not so bad. Ill try and simplify it as much as possible.
I found that removing the two 10mm bolts on either side of the amp and pulling up the amp made it easier to work with the stiff cables in the back. Its kinda tricky wiggling out the four connections that have to be removed with the amp giving no slack. Once you have those removed try to lay them out flat and in order and lay out the wiring harness that came with the mounting kit as shown below in the diagram. I found that helped me to get everything orientated better.
Cables removed and amp taken out:
Amp placed back on bolts but not tightened down (for wiggle room) and all the cables laid out like the diagram with only the two obvious ones connected.
Taped to the cable that goes in to the Smart Key Unit is a connector that is needed. Gently cut the electrical tape that holds it to the Smart Key Unit cable and connect it to the wiring harness. Also note that I have applied the cushion tape to the first two connections and an beginning to apply it to the connector we just connected.
Heres a close up of the taping process:
Then run the last "back pointing" wire off of the wiring harness up to the tuner (remember it only fits in one place).
Thread Starter
Lexus Champion
Joined: Apr 2007
Posts: 3,121
Likes: 1
From: Sacramento, CA
Step 11 - More wiring
Lastly connect the two forward pointing wires from the wiring harness and connect them to the two empty ports in the back of the amp.

When the wiring harness is all hooked and and jammed back into the corner it might look like something like this:
Step 12 - Connecting the antenna
Tied in with the big black plastic tube to the left of all these cables we have been working with is the antenna cable. This is the connection to the shark fin up on the the roof.
Once separated and opened up it should look like this:

This connects to the now bottom of the XM tuner (again only fits in one port and only goes in one way so it cant be messed up).
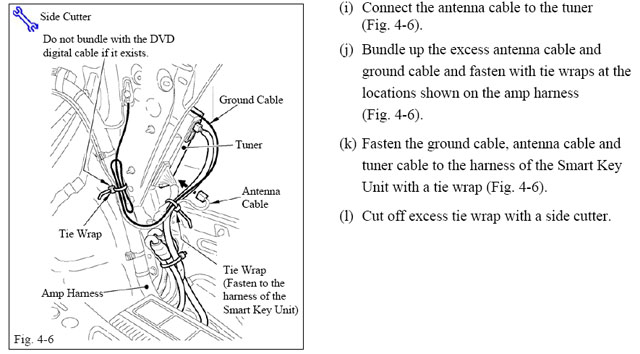
Here is a pic of it all hooked up:

Step 13 - Testing the XM
Once you have all this hooked up, reconnect the power to the battery and turn the car on (I wouldnt recommend starting it yet. Wait till you have all the trunk put back together. Just turn the radio on.). Once the radio is on press the AM/SAT button. You should see something that looks like this:

If it is all working properly you will hear the Emergency channel on 247, advertisements on channel 1, and when you tune to channel 0 you will get the Tuner ID in the upper right hand corner (for those with nav) that you need to activate the unit. Once you log in online, create your account and activate the radio itll be about an hour before itll start picking up all the stations.
Step 14 - Cleaning it all up
Once you have it all hooked up its just going back through and putting everything back the same way you took it out, cept in reverse. You can use the included zip ties anyway you see fit though they did not seem to help me much as my cables did not line up all pretty like the diagram shows. One thing I wanted to note though. The right side panel that was removed might not want to fit back into place again right away. This is due to all the cables added from the wiring harness and the disruption of the big fat bundle in the black plastic tube. You might have to take the panel out and move all the cabling around a bit. Dont be too afraid to smash the wirings harness a bit, its just the electrical tape that makes it feel so stiff, but it will bend. youll know the panel is in correctly when then right side plastic tray (from Step 3) drops in okay and lines up perfectly. Go over every step in reverse so you make sure you put everything back in place properly and dont forget anything. I know it sounds like common sense, but trust me, you dont want to have to go back and take all this crap out again just because you forgot to put in a clip and a new rattle has been created as a result. Lastly dont forget to reset all the power windows after reconnecting the battery otherwise you will not have control of them from the drivers window controls. Here is a great thread on how to do that.
Step 15 - Congratulations!!!!!
Get that tuner activated and jam to some real tunes!!!!
I hope some of you find this helpful and use it instead of dumping money into a stealership to have them do it! Trust me its very easy to do! Couple hours tops and youll save hundreds of dollars and at the same time once its done youll feel way proud of yourself and glad you didnt waste your money.
Lastly connect the two forward pointing wires from the wiring harness and connect them to the two empty ports in the back of the amp.
When the wiring harness is all hooked and and jammed back into the corner it might look like something like this:
Step 12 - Connecting the antenna
Tied in with the big black plastic tube to the left of all these cables we have been working with is the antenna cable. This is the connection to the shark fin up on the the roof.
Once separated and opened up it should look like this:
This connects to the now bottom of the XM tuner (again only fits in one port and only goes in one way so it cant be messed up).
Here is a pic of it all hooked up:
Step 13 - Testing the XM
Once you have all this hooked up, reconnect the power to the battery and turn the car on (I wouldnt recommend starting it yet. Wait till you have all the trunk put back together. Just turn the radio on.). Once the radio is on press the AM/SAT button. You should see something that looks like this:
If it is all working properly you will hear the Emergency channel on 247, advertisements on channel 1, and when you tune to channel 0 you will get the Tuner ID in the upper right hand corner (for those with nav) that you need to activate the unit. Once you log in online, create your account and activate the radio itll be about an hour before itll start picking up all the stations.
Step 14 - Cleaning it all up
Once you have it all hooked up its just going back through and putting everything back the same way you took it out, cept in reverse. You can use the included zip ties anyway you see fit though they did not seem to help me much as my cables did not line up all pretty like the diagram shows. One thing I wanted to note though. The right side panel that was removed might not want to fit back into place again right away. This is due to all the cables added from the wiring harness and the disruption of the big fat bundle in the black plastic tube. You might have to take the panel out and move all the cabling around a bit. Dont be too afraid to smash the wirings harness a bit, its just the electrical tape that makes it feel so stiff, but it will bend. youll know the panel is in correctly when then right side plastic tray (from Step 3) drops in okay and lines up perfectly. Go over every step in reverse so you make sure you put everything back in place properly and dont forget anything. I know it sounds like common sense, but trust me, you dont want to have to go back and take all this crap out again just because you forgot to put in a clip and a new rattle has been created as a result. Lastly dont forget to reset all the power windows after reconnecting the battery otherwise you will not have control of them from the drivers window controls. Here is a great thread on how to do that.
Step 15 - Congratulations!!!!!
Get that tuner activated and jam to some real tunes!!!!
I hope some of you find this helpful and use it instead of dumping money into a stealership to have them do it! Trust me its very easy to do! Couple hours tops and youll save hundreds of dollars and at the same time once its done youll feel way proud of yourself and glad you didnt waste your money.
Last edited by ben_r_; Jul 30, 2007 at 04:02 PM.


