
My Wheel Tire and Suspension Experience
 01-04-11, 10:07 AM
#1
Rookie
Thread Starter

Join Date: Nov 2010
Location: Houston, TX
Posts: 51
Likes: 0
Received 0 Likes
on
0 Posts
Many thanks to those that have gone before me and posted their experience. Your information was valuable helping my decisions and complete the work. I was looking for a quick solution, get it done now improvement; but as others have mentioned, this takes time and effort if you're changing anything from stock sizes. Since you're on this forum, you already know the SC430 is a beautiful luxurious car, my goal was to give it a little more "masculinity". I apologize for the length of this post, but wanted to help others with my experience.
I purchased my Silver 2002 about a month ago from a local broker here in Houston. He detailed the car, purchased new Bridgestone runflats, and did a four wheel alignment. I hated the runflats and knew before I bought the car I wanted to change them out. The broker contacted Discount Tire, where he purchased them, to arrange a trade-in. He offered a fair $800 (paid $1,200 tires, balance, mount, etc).
Most of you know the stock fitment is 18x8 5x114.3 +45 offset with 245/40R18 all around. I wanted a staggered look. My first wheel choice was Vossen VVS-CV2 Matte Black Machined w/Stainless Lip
Front 20x9 offset +32 with 245/30/20 (only .27% too slow from stock)
Rear 20x10.5 offset +45 with 285/25/20 (only .38% too fast from stock)
I was frightened by comments I received about the rough ride from the low profile 20 inchers and that's exactly what I was avoiding by trading in the runflats.
My second choice I decided to stay with 18 inch and get the TSW Cadwell Gunmetal w/Mirror Cut Face & Lip
Front 18x8 offset +20 with 245/40R18
Rear 18x9.5 offset +20 with 275/35R18
TSW did not have these wheels in stock. From the beginning I considered chrome, they had those in stock, so the decision was made for me, I switched to chrome.
The wheels and tires came in and were installed. The ride was a tremendous improvement over the runflats, which made me question whether I should have stuck with my original 20 inch Vossen first choice. Too late now, no time to look back. The rears rubbed on the inner fender lining when hitting a dip in the road. Upon removing the wheels to survey my options, I noticed the front struts were shot.
I then ordered Megan Racing EZ Coilovers to give me adjustable ride height. For the rear, the first thing to do is remove all the trunk liner to get to the strut towers. Do not under-estimate the time required to remove everything. Here is a pic showing all the pieces removed.

I installed the coilovers, I wanted it as low as possible without rubbing. It took many adjustments to get the height just right. Each adjustment involved jacking up the car, taking the wheels off, changing the height, putting wheels back on, boucing the car, measuring distance from floor to wheel well to ensure it's equal all around, and test driving. This takes patience and plenty of time.


I finally got it right, and got a good four wheel alignment. I'm still playing with the ride comfort adjustment. There are 16 settings, I started with 8 and it was too rough for my daily use. I changed it to 12 and it was too soft. So as of today, it's at 10. The nice thing is I can easliy change it whenever I want.


Things yet to do:
1. I ordered a G2 brake caliper red paint kit, hopefully shipped by this weekend.
2. TSW center caps are brushed metal, I'm looking for some chrome Lexus logo caps. All caps I've tried including anything available from Lexus do not fit TSW wheels. The diameter is correct, but the tabs are too deep and the cap just rattles around loose in the wheel.
If you're interested in more pictures check out these links that are in chronological order:
Stock Runflats and Pie Plate Wheels
New Wheels and Tires with the Stock Suspension (tires were rubbing on the wheel well when hitting a dip in the road)
Trunk Liner Removal and Custom Made Access Hole to Suspension Adjustment
New Wheels, Tires and Megan Racing Coilover Suspension
Completed Look
I purchased my Silver 2002 about a month ago from a local broker here in Houston. He detailed the car, purchased new Bridgestone runflats, and did a four wheel alignment. I hated the runflats and knew before I bought the car I wanted to change them out. The broker contacted Discount Tire, where he purchased them, to arrange a trade-in. He offered a fair $800 (paid $1,200 tires, balance, mount, etc).
Most of you know the stock fitment is 18x8 5x114.3 +45 offset with 245/40R18 all around. I wanted a staggered look. My first wheel choice was Vossen VVS-CV2 Matte Black Machined w/Stainless Lip
Front 20x9 offset +32 with 245/30/20 (only .27% too slow from stock)
Rear 20x10.5 offset +45 with 285/25/20 (only .38% too fast from stock)
I was frightened by comments I received about the rough ride from the low profile 20 inchers and that's exactly what I was avoiding by trading in the runflats.
My second choice I decided to stay with 18 inch and get the TSW Cadwell Gunmetal w/Mirror Cut Face & Lip
Front 18x8 offset +20 with 245/40R18
Rear 18x9.5 offset +20 with 275/35R18
TSW did not have these wheels in stock. From the beginning I considered chrome, they had those in stock, so the decision was made for me, I switched to chrome.
The wheels and tires came in and were installed. The ride was a tremendous improvement over the runflats, which made me question whether I should have stuck with my original 20 inch Vossen first choice. Too late now, no time to look back. The rears rubbed on the inner fender lining when hitting a dip in the road. Upon removing the wheels to survey my options, I noticed the front struts were shot.
I then ordered Megan Racing EZ Coilovers to give me adjustable ride height. For the rear, the first thing to do is remove all the trunk liner to get to the strut towers. Do not under-estimate the time required to remove everything. Here is a pic showing all the pieces removed.
I installed the coilovers, I wanted it as low as possible without rubbing. It took many adjustments to get the height just right. Each adjustment involved jacking up the car, taking the wheels off, changing the height, putting wheels back on, boucing the car, measuring distance from floor to wheel well to ensure it's equal all around, and test driving. This takes patience and plenty of time.
I finally got it right, and got a good four wheel alignment. I'm still playing with the ride comfort adjustment. There are 16 settings, I started with 8 and it was too rough for my daily use. I changed it to 12 and it was too soft. So as of today, it's at 10. The nice thing is I can easliy change it whenever I want.
Things yet to do:
1. I ordered a G2 brake caliper red paint kit, hopefully shipped by this weekend.
2. TSW center caps are brushed metal, I'm looking for some chrome Lexus logo caps. All caps I've tried including anything available from Lexus do not fit TSW wheels. The diameter is correct, but the tabs are too deep and the cap just rattles around loose in the wheel.
If you're interested in more pictures check out these links that are in chronological order:
Stock Runflats and Pie Plate Wheels
New Wheels and Tires with the Stock Suspension (tires were rubbing on the wheel well when hitting a dip in the road)
Trunk Liner Removal and Custom Made Access Hole to Suspension Adjustment
New Wheels, Tires and Megan Racing Coilover Suspension
Completed Look
Last edited by donsmith; 01-04-11 at 10:33 AM.
 01-04-11, 10:31 AM
#2

Awesome job. Thanks for sharing. Body of Knowledge right here.

 . How did you take out the jack? I know it's placed under a metal piece, but I couldn't move it.
01-04-11, 12:51 PM
. How did you take out the jack? I know it's placed under a metal piece, but I couldn't move it.
01-04-11, 12:51 PM
#5
Rookie
Thread Starter
Join Date: Nov 2010
Location: Houston, TX
Posts: 51
Likes: 0
Received 0 Likes
on
0 Posts
cyberlexus, you have to unscrew (counter-clockwise) the scissor action (circular end) and it will lift right out. Be sure to tighten when replacing or it will rattle.
 01-04-11, 02:51 PM
#7
Lead Lap

Nice job! I also installed the Megan EZ coilovers. I haven't drilled the hole yet in my trunk liner for adjusting the dampening. What diameter did you cut and have you found a decorative plug to conceal the hole?
Trending Topics
01-04-11, 03:37 PM
#8
Rookie
Thread Starter
Join Date: Nov 2010
Location: Houston, TX
Posts: 51
Likes: 0
Received 0 Likes
on
0 Posts
Poqman, I used computer desk cable hole covers I bought at Lowe's. It comes with a full cover for the center to conceal everything, so it would be all black. I intended to use the cover, however, after seeing how nice the whole thing looked, I really liked it without the cover on. It really looks classy, stock-like. I don't know the size of the hole because I found the center by leaving the adjustment **** on the coilovers, temporarily installing the liner and pressing firmly down on the **** area. This left an indentation on the board underneath the liner. I then used the cover as a template centered on this indentation to draw the circle. I cut the hole using the biggest hole saw I had for my drill and only had to file a small portion all around to get it slightly bigger. I was in no hurry, took my time and it worked out great.
01-05-11, 08:19 PM
#10
Looks good for 18's...I was pleasantly surprised when I scrolled down! Nice job! +1 to Talwang's comments-rubber bands would have been extremely rough...you could have easily done 30 and 35 series and been fine. Either way-all that matters is that you like the ride and the look! Very clean install. I like your touch on the cutouts for the coilovers too! Megans are great! I wish I would have added them to my 02 when I had it. I have the LP Street with the pillow ball technology. Lots of setttings!
I have a set of brand new, never installed lexus chrome center caps, but you need to get your measurements to perfection. I tried them on my aftermarket wheels and they did not fit---too small. I got them on eBay a while ago and are still in the bag. Very nice chrome with chrome logo. PM me if you are interested. Thanks!
I have a set of brand new, never installed lexus chrome center caps, but you need to get your measurements to perfection. I tried them on my aftermarket wheels and they did not fit---too small. I got them on eBay a while ago and are still in the bag. Very nice chrome with chrome logo. PM me if you are interested. Thanks!
01-09-11, 06:19 PM
#11
Rookie
Thread Starter
Join Date: Nov 2010
Location: Houston, TX
Posts: 51
Likes: 0
Received 0 Likes
on
0 Posts
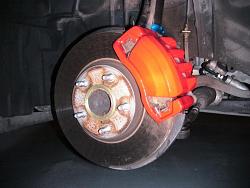
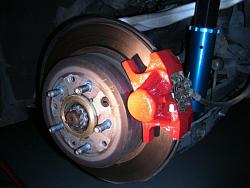
I completed painting the brake calipers using the G2 kit. I'm very impressed with the quality of the paint. Even though the paint is applied with a brush, the paint is self-leveling and shows no brush marks after it dries. The calipers now have a very glossy wet look. The pictures are after 24 hours drying, the ones without the wheels on look more orange than the actual red color.
Left front
Left rear
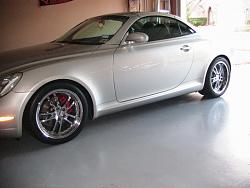
Wheels on close up

Wheels on
Left front

Left rear

Wheels on close up

Wheels on


Thread
Thread Starter
Forum
Replies
Last Post