
HOW TO: LS430 Brakes w/Pics
 06-08-11, 03:35 PM
#1
Lead Lap
Thread Starter
Hey guys,
A little while back some of you asked me about the brakes, but I never needed it done till now. Not too long ago, I had to do an emergency stop while it was very cold out and raining. This stop cause some brake pad deposits to be left on rotor. This makes the steering wheel shake slightly when you apply light to medium braking force at higher speeds. So here is the short and sweet write up on the front rotors. Front will take about an hour If you done it before. Rear rotors should be very similar and slightly easier to do than the front.
Recommendations:
*Lexus calls for new 19mm bolts to be used on the caliper
*If you feel unsure after reading this, Please take your car to dealer.
*I highly recommend OEM brake pads directly from Toyota/Lexus dealer.
*For new rotors, go with Duralast from Autozone (cheap and lifetime warrantee.)
*If you follow my guide, do not skip steps or jump around.
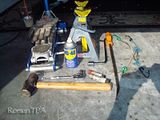
Tools needed: (picture #1)
*19mm ratchet 3/8 or 1/2
*Tire iron
*Jack
*Heavy hammer
Optional:
*Gloves (keep your hands clean)
*2 Jack stands (if you want to do botch sides at once)
*Pry bar (to pry the brake pads open if you dont have the proper tool)
*WD-40 (to brake the surface rust between rotor and hub)
*2 Budgies (to support calipers)
*Red or blue locktite (for caliper bolts)
*Silver locktite (for wheel studs)
*Grease that goes on the moving parts of the calipers (available from autoparts store in tiny packets for a $1 or so)
*Iced coffee (Large)
[click thumbs to get larger picture]
1. Slightly loosen lug nuts
**You need to understand how to properly raise and support your LS430**
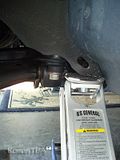
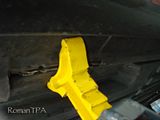
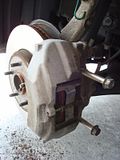
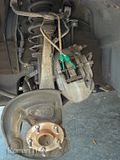
2. There are 2 points behind the front wheel. Use one to lift your car and the other one to support it. NOTE that there are 2 notches in the pinch weld, That is the only place where you should lift the car using the pinch weld (see picture #2 and #3)
3. Lift the car and support it with something incase jack fails
4. Remove all lugnuts and the wheel
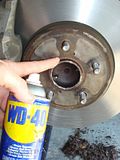
5. (optional) Spray some WD-40 on the hub, let it sit while you do next steps (see picture #4 where fingertip points to)
6. Remove 2 long 19mm bolts that hold the caliper (see picture #5)
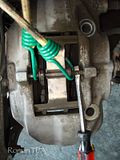
7. Use bungie to support the calipers and take the stress off brake lines and sensors (see picture #6, you might want to hook it to a different spot than me because you will need to remove that rod, i didnt change my pads so i hung it there)
8. Before removing the pads, you will need to pry the old pads as far apart as possible (this will let the new pads fit over the rotors)
9. To remove brake pads, you will need to take out safety pin and slide the rod out. (see picture #7 where screwdriver is)
10. Install new pads in reverse order
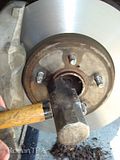
11. Now that WD-40 has done its job, you need to whack the hub couple of times (make sure you don't hit the shiny part of the rotor) in the middle and rotor should fall out on its own (see picture #8)
12. Now that rotor are off you can do one of the 2 things with it, 1) take it to any tire/brake/machine shop to have it re-surfaced or 2) install new rotors
13. Put everything back in reverse order. Install the caliper with the 2 new bolts.
Torque: Factory Service Manual states Front 81 ft/lbs, Rear 58 ft/lbs
14. Before letting the car down, spin the wheel make sure it does not wobble!! This is important if you hammered the crap out of the hub trying to get the rotor off.
15. Put the car down and finish torquing the lug nuts
*IMPORTANT* Start engine, then pump brakes a few times BEFORE driving it!
Just look at the hammer.
Don't mind that caliper is on.
Pictures taken backwards.
.
A little while back some of you asked me about the brakes, but I never needed it done till now. Not too long ago, I had to do an emergency stop while it was very cold out and raining. This stop cause some brake pad deposits to be left on rotor. This makes the steering wheel shake slightly when you apply light to medium braking force at higher speeds. So here is the short and sweet write up on the front rotors. Front will take about an hour If you done it before. Rear rotors should be very similar and slightly easier to do than the front.
Recommendations:
*Lexus calls for new 19mm bolts to be used on the caliper
*If you feel unsure after reading this, Please take your car to dealer.
*I highly recommend OEM brake pads directly from Toyota/Lexus dealer.
*For new rotors, go with Duralast from Autozone (cheap and lifetime warrantee.)
*If you follow my guide, do not skip steps or jump around.
Tools needed: (picture #1)
*19mm ratchet 3/8 or 1/2
*Tire iron
*Jack
*Heavy hammer
Optional:
*Gloves (keep your hands clean)
*2 Jack stands (if you want to do botch sides at once)
*Pry bar (to pry the brake pads open if you dont have the proper tool)
*WD-40 (to brake the surface rust between rotor and hub)
*2 Budgies (to support calipers)
*Red or blue locktite (for caliper bolts)
*Silver locktite (for wheel studs)
*Grease that goes on the moving parts of the calipers (available from autoparts store in tiny packets for a $1 or so)
*Iced coffee (Large)
[click thumbs to get larger picture]
1. Slightly loosen lug nuts
**You need to understand how to properly raise and support your LS430**
2. There are 2 points behind the front wheel. Use one to lift your car and the other one to support it. NOTE that there are 2 notches in the pinch weld, That is the only place where you should lift the car using the pinch weld (see picture #2 and #3)
3. Lift the car and support it with something incase jack fails
4. Remove all lugnuts and the wheel
5. (optional) Spray some WD-40 on the hub, let it sit while you do next steps (see picture #4 where fingertip points to)
6. Remove 2 long 19mm bolts that hold the caliper (see picture #5)
7. Use bungie to support the calipers and take the stress off brake lines and sensors (see picture #6, you might want to hook it to a different spot than me because you will need to remove that rod, i didnt change my pads so i hung it there)
8. Before removing the pads, you will need to pry the old pads as far apart as possible (this will let the new pads fit over the rotors)
9. To remove brake pads, you will need to take out safety pin and slide the rod out. (see picture #7 where screwdriver is)
10. Install new pads in reverse order
11. Now that WD-40 has done its job, you need to whack the hub couple of times (make sure you don't hit the shiny part of the rotor) in the middle and rotor should fall out on its own (see picture #8)
12. Now that rotor are off you can do one of the 2 things with it, 1) take it to any tire/brake/machine shop to have it re-surfaced or 2) install new rotors
13. Put everything back in reverse order. Install the caliper with the 2 new bolts.
Torque: Factory Service Manual states Front 81 ft/lbs, Rear 58 ft/lbs
14. Before letting the car down, spin the wheel make sure it does not wobble!! This is important if you hammered the crap out of the hub trying to get the rotor off.
15. Put the car down and finish torquing the lug nuts
*IMPORTANT* Start engine, then pump brakes a few times BEFORE driving it!


Just look at the hammer.
Don't mind that caliper is on.
Pictures taken backwards.
.
Last edited by RomanTPA; 06-10-11 at 08:17 PM.

The following users liked this post:
waqasnova (09-26-22)
06-08-11, 03:58 PM
#3
Lead Lap
Thread Starter
06-08-11, 11:15 PM
#4

Ahh perfect. I am in need of some new rotors within the next thousand KM or so.
Jealous you have a somewhat wide variety of rotors to choose from over in the States. My local parts shop had to make a few phone calls to see if they could actually get rotors for these cars. Even then, the cheapest were 160 each. I want slotted rotors though.
Jealous you have a somewhat wide variety of rotors to choose from over in the States. My local parts shop had to make a few phone calls to see if they could actually get rotors for these cars. Even then, the cheapest were 160 each. I want slotted rotors though.
06-08-11, 11:55 PM
#5
Lead Lap
Thread Starter
Ahh perfect. I am in need of some new rotors within the next thousand KM or so.
Jealous you have a somewhat wide variety of rotors to choose from over in the States. My local parts shop had to make a few phone calls to see if they could actually get rotors for these cars. Even then, the cheapest were 160 each. I want slotted rotors though.
Jealous you have a somewhat wide variety of rotors to choose from over in the States. My local parts shop had to make a few phone calls to see if they could actually get rotors for these cars. Even then, the cheapest were 160 each. I want slotted rotors though.
06-09-11, 11:43 AM
#6

nice writeup!
got some questions...
i don't see where those 19mm bolts attach to... i assume the connection's towards the side of that hub thingie?
so, the rotor isn't secured at all?
what's the process of using the loctite (red and silver)?
thanks!
got some questions...
i don't see where those 19mm bolts attach to... i assume the connection's towards the side of that hub thingie?
so, the rotor isn't secured at all?
what's the process of using the loctite (red and silver)?
thanks!
Last edited by danxp; 06-09-11 at 11:47 AM.
06-09-11, 12:10 PM
#7
Driver
Join Date: Sep 2010
Location: Va
Posts: 185
Likes: 0
Received 0 Likes
on
0 Posts
nice writeup!
got some questions...
i don't see where those 19mm bolts attach to... i assume the connection's towards the side of that hub thingie? Correct, it connects to the hub, upon removal of 19mm bolts and caliper, take notice of the location, it is almost impossible to miss.
so, the rotor isn't secured at all? No, the pressure from the wheel and lug nuts presses rotor tightly against hub.
what's the process of using the loctite (red and silver)? Open container and spread lightly over threads, no need for a lot, just a little.
thanks!
Trending Topics
06-09-11, 01:46 PM
#8
Lead Lap
Thread Starter
But you should use silver loctite on wheel studs. It is written in all the manuals I ever read.
06-09-11, 09:57 PM
#9
Driver
Join Date: Sep 2010
Location: Va
Posts: 185
Likes: 0
Received 0 Likes
on
0 Posts
interesting, never have used silver b4 on studs, no problems in years, BUT, perhaps I will start.
As far as torquing...that is if my memory serves me right, its 85 ft/lbs for the 19mm bolts.
Perhaps this can be the stickied Brake DIY in FAQ?

As far as torquing...that is if my memory serves me right, its 85 ft/lbs for the 19mm bolts.
Perhaps this can be the stickied Brake DIY in FAQ?
06-10-11, 07:58 AM
#10
Instructor

The front caliper bolts are 81 ft-lbs, and the rears are 58. Both sets of bolts are labelled as non-reusable parts. Also, when reinstalling, you are supposed tighten the bottom bolt first, and then the top one. Avoid overtightening because the bolted portion is an aluminum knuckle. Discussions on these forums said something about them being stretch bolts and that they shouldn't be reused.
I think you are supposed to bleed the master cylinder, brake lines, and ABS actuators after changing the rotors.
The ABS actuators can't be bled without using a Toyota/Lexus handheld scantool or the Techstream system, but I recall someone here with a Supra was able to do it by jumping some DLC3 pins.
06-10-11, 07:54 PM
#11
Lead Lap
Thread Starter
Im downloading a Factory Service Manual, I will update first post as soon as its done.
EDIT: Check out this discussion about the bolts. Also read #15 and #24
EDIT: Check out this discussion about the bolts. Also read #15 and #24
Last edited by RomanTPA; 06-10-11 at 08:18 PM.
09-26-11, 03:55 PM
#12
Driver School Candidate

Join Date: Jun 2001
Location: CA
Posts: 39
Likes: 0
Received 0 Likes
on
0 Posts
For new rotors, go with Duralast from Autozone (cheap and lifetime warrantee.)
I checked and they are covered only for two years, not a lifetime. So not sure they would be very good.
Manny
I checked and they are covered only for two years, not a lifetime. So not sure they would be very good.
Manny
01-08-12, 05:09 PM
#13
Driver School Candidate

Can't you just insert two 8mm bolts to pop the rotors loose?
I'm planning on using OEM rotors. Park Place Lexus has them cheap with free shipping.
I used after market rotors on my wife's car only to find that the caps are not treated resulting in ugly rust.
It's not pretty.
I'm planning on using OEM rotors. Park Place Lexus has them cheap with free shipping.
I used after market rotors on my wife's car only to find that the caps are not treated resulting in ugly rust.
It's not pretty.
01-08-12, 05:55 PM
#14
Driver School Candidate
Join Date: Jun 2001
Location: CA
Posts: 39
Likes: 0
Received 0 Likes
on
0 Posts
You should change out the bolts for new ones as I understand. They are stretched when torqued and it is recommended that you use new bolts. I guess the likelyhood that they would snap is remote. I purchased 8 thinking that it was 4 per side. Since I did not remove my rotors and calipers I decided not to change them out. I have two sets of 4 each for sale. $20.00 per set (enough for both front calipers) Send me a message.
Manny
Manny

Thread
Thread Starter
Forum
Replies
Last Post