When you click on links to various merchants on this site and make a purchase, this can result in this site earning a commission. Affiliate programs and affiliations include, but are not limited to, the eBay Partner Network.
Ok so first things first...if your at this point...you've already wired in your radio to the factory radio harness and have no sound. Also you have more than likely read the original write-up on how to install your cd player or wutever your using. So please if you have any question on abbreviations I use refer back to the wiring diagram picture in that write-up b/c I have no idea how to post it in here.
Now, we will be working with the 2 connectors going into the AMP. 1 is orange 1 is white. First cut them off and save enough just incase you ever decide to hook them back up. Now for the wires and there meanings and what goes where.
Connector A (white) Including pin numbers
Pin 1 FRL + Red
Pin 8 FRL - Green
Pin 3 FRR + Black
Pin 9 FRR - White
Pin 5 RRL + Light Blue
Pin 14 RRL - Purple
Pin 6 RRR + Blue
Pin 15 RRR - Green
Connector C (orange) Including pin numbers
Pin 1 Sub + LG/ Black stripe
Pin 7 sub - LG/ red stripe
You can splice those directly to your amp as that is what I did.
Pin 3 FRL + Pink
Pin 9 FRL - Violet
Pin 4 FRR + Light green
Pin 12 FRR - Light blue
Pin 6 RRR + Red
Pin 14 RRR - white
Now pins 2 and 5 are the rear left speakers but they werwent on my diagram and I forgot which is which so your on your own but its not hard to figure out.
So now im gonna give a few examples of how to wire in the wires. At this point your basically putting the wires together.
For Front left speaker
+ is Red wire to Pink
- is Green wire to violet
For Front right speaker
+ is black to light green
- is White to light blue
etc,etc and your done. This only took me roughly 15 mins. Very easy. Good luck And your welcome. Glad I could contribute here.
By: Harvey Paige
2/26/2010
Sorry for the late response. I meant the 2 wires that are for the subwoofer I ran them straight to my amplifier but the best thing to do is to run them with any of the other set of speaker wires.
Sorry for the late response. I meant the 2 wires that are for the subwoofer I ran them straight to my amplifier but the best thing to do is to run them with any of the other set of speaker wires.
okay so ive gotten my radio installed and power works wired the speakers to the radio and bypassed the amp all to your directions. I've gotten sound out of one tweeter my gs300 is pioneer installed wireing. With the amp and cd changer located in the trunk of the car
okay so ive gotten my radio installed and power works wired the speakers to the radio and bypassed the amp all to your directions. I've gotten sound out of one tweeter my gs300 is pioneer installed wireing. With the amp and cd changer located in the trunk of the car
okay I got almost everything working. I only had yellow and black left on my orange plug for the left rear speaker, pins 2 and 5. My original problem was a wire that came undone in the trunk from my speaker wire very odd thinking back because I only had one tweeter working amd I got everything but the rear left speaker now. Ive tried about all I can try as far as looking for correct wires for the speaker. About to give up and try to tie it in to the right rear speaker but I'm not sure how it will work. Being a lexus and getting 4 speakers powered from one dissconnected wire and all.
Because rear left speaker is used for stock cellular phone and probably is disconnected.
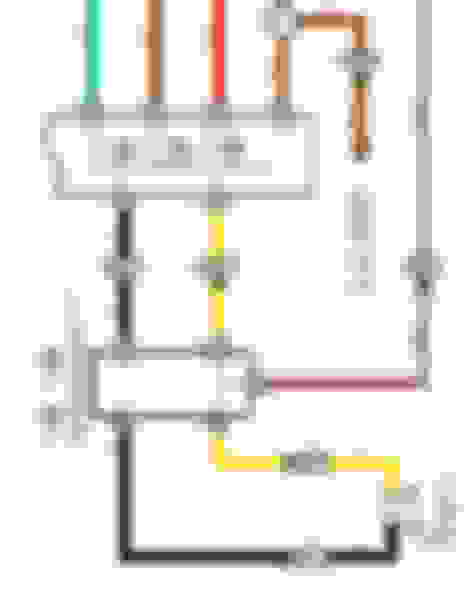
GS300 rear left speaker
When You are removing cellular phone transceiver, You need to connect plugs together. Now You have transceiver bypassed and rear left speaker connected. See picture below.
Because rear left speaker is used for stock cellular phone and probably is disconnected.
GS300 rear left speaker
When You are removing cellular phone transceiver, You need to connect plugs together. Now You have transceiver bypassed and rear left speaker connected. See picture below.
GS300 rear left speaker, transceiver disconnected
And this wiring is located in the center console?
Last edited by Gs300john; 04-27-20 at 07:13 PM.
Reason: Misspell and missing title

 02-26-10, 10:58 AM