Lexus IS: How to Replace Brake Fluid
Changing your brake fluid routinely ensures adequate performance and braking distance. Grab a friend and give it a try.
This article applies to the Lexus IS 250/IS 350(2005-2014).
Bad brakes? Changing your car's brake fluid helps to ensure your braking system's longevity and steady performance. Whether your brakes are feeling soft or mushy, or your car is due for a brake fluid change, doing it yourself can save time and money. This relatively simple task only requires a handful of supplies and is often easy enough for the novice Lexus IS owner.

Materials Needed
- 12-24 ounce bottle of Dot 3 brake fluid (Dot 4 if you frequently track or race the car)
- Cover for fender (optional)
- 10mm wrench
- 1/4" plastic tubing
- Turkey baster for suctioning
- Tall bucket or container
- Assistant to help bleed the brakes
Step 1 - Securely cover the fenders
Brake fluid can harm the car's paint, even if it is on for just a few seconds. Securely cover the fenders with old rags, towels, or even a tarp.
Step 2 - Carefully drain the old brake fluid
Suction out the dirty old brake fluid using the turkey baster or similar tool. Discard the dirty fluid in a tall container or bucket and set it aside.

Pro Tip
If you're using a turkey baster, either buy a new one for this purpose or use your household baster for this type of task only in the future. Returning a turkey baster to the kitchen after using it to suction out old brake fluid can be dangerous.
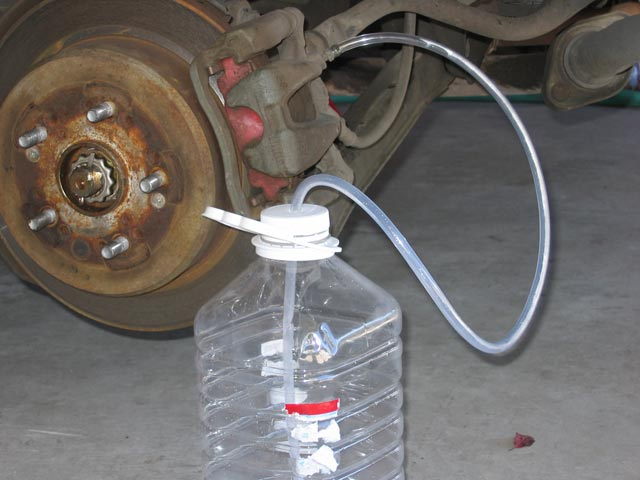
Step 3 - Bleed the brakes
The first step is to locate the small nozzle (often referred to as a brake bleeder screw), which is often situated behind each of the brakes. You will need to crawl underneath it to unscrew the components using your 10mm wrench. Use the clear plastic tubing to collect the brake fluid that drains out after undoing the screws, collecting it in a container or bucket if desired.
Now it's time to have your assistant carefully and slowly step on the brake pedal, then release it in the same manner. Be careful, as brake fluid tends to squirt quite a bit during this step. Ask your assistant to pump the brakes a few times to get all the fluid and air out. On the last pump, have the person hold the brake pedal down as you replace the screws to keep air from getting sucked back into the brake line.
Pro Tip
When tightening the screw, secure it in place but avoid over-tightening it. Once this step is complete, have your assistant pump the brake pedal three to four times until the pedal becomes firm.
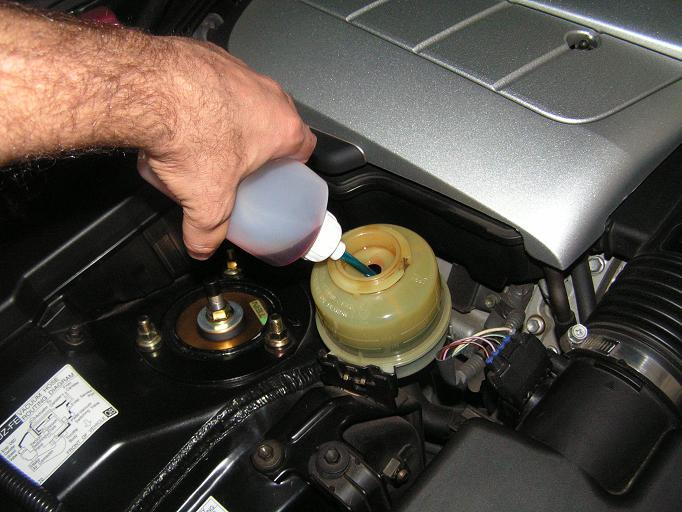
Step 4 - Refill the level of fluid in the master cylinder
Fill up the car's master cylinder to the designated "full" line. You will need to keep refilling the master cylinder for every brake bleed. Fill the container one last time after bleeding all the brakes, making sure not to dirty or contaminate the fresh fluid in the process.
Pro Tip
In some cases, you may accidentally overfill or dirty the fluid when refilling the master cylinder. In this case, simply bleed the brakes and retry. It's very important to refill the master cylinder to the designated level after each brake bleed, as failure to do so could result in air bubbles in the brake system, which means your brake pedal will go soft and your car won't slow down.
Step 5 - Top off and clean up
Check the fluid one last time, ensuring it's at the appropriate level and that it is not contaminated. Then secure the lid to the master cylinder. Wipe away any excess fluid from the container. Carefully dispose of any cloths or rags if they are contaminated with brake fluid.

Featured Video: How to Change Brake Fluid
Related Discussions and Site
- Brake Fluid Change - ClubLexus.com
- Brake Fluid, Dot 3? - ClubLexus.com
- How to Change Your Brake Fluid - Dummies.com