Suspension Springs, shocks, coilovers, sways, braces, etc.

DIY: Lowering your GS

Thread Tools
 
Search this Thread
 
Old 12-24-11, 08:57 PM
  #16  
Whitena
Pole Position
iTrader: (2)
 
Whitena's Avatar
 
Join Date: Sep 2011
Location: Ca
Posts: 358
Likes: 0
Received 2 Likes on 2 Posts
Default

passnu2, wonder if you have factory torque specs for all bolts and nuts when putting everything back together?
Thanks
Old 12-24-11, 09:06 PM
  #17  
Whitena
Pole Position
iTrader: (2)
 
Whitena's Avatar
 
Join Date: Sep 2011
Location: Ca
Posts: 358
Likes: 0
Received 2 Likes on 2 Posts
Default

I think they're stiffness adjuster(factory option or maybe standard on awd)
Old 12-24-11, 10:24 PM
  #18  
passnu2
Lexus Fanatic
Thread Starter
iTrader: (33)
 
passnu2's Avatar
 
Join Date: Feb 2007
Location: .....
Posts: 13,958
Received 8 Likes on 8 Posts
Default

Here are the specs requested


Originally Posted by lobuxracer
This diagram has everything you need for the front:


This diagram has everything for the rear:

Old 12-24-11, 10:27 PM
  #19  
passnu2
Lexus Fanatic
Thread Starter
iTrader: (33)
 
passnu2's Avatar
 
Join Date: Feb 2007
Location: .....
Posts: 13,958
Received 8 Likes on 8 Posts
Default

Originally Posted by m32
Thanks Passnu! I've been talking to FIGS and he said his prototype adj front arm should be avail in Jan. The one you have is only to increase neg camber right not to correct it?

Edwin
Yes this is correct
Old 12-25-11, 11:54 PM
  #20  
Whitena
Pole Position
iTrader: (2)
 
Whitena's Avatar
 
Join Date: Sep 2011
Location: Ca
Posts: 358
Likes: 0
Received 2 Likes on 2 Posts
Default

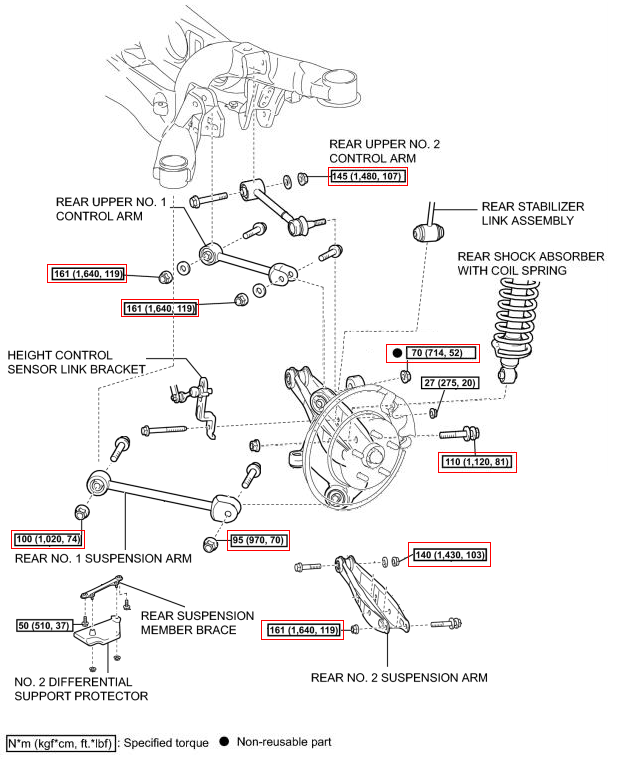
Really appreciate for the diagram but really don't know which number to look for, I mean for a torque specs and all the red squared out are all the components that needed to be taken out and torque to spec for replacing coilovers?

Last edited by Whitena; 12-25-11 at 11:58 PM. Reason: mo info
Old 12-26-11, 12:00 AM
  #21  
Whitena
Pole Position
iTrader: (2)
 
Whitena's Avatar
 
Join Date: Sep 2011
Location: Ca
Posts: 358
Likes: 0
Received 2 Likes on 2 Posts
Default

I'm sorry for my newb questions! but they're really important to my up coming installation.
Thanks

Last edited by Whitena; 12-26-11 at 12:02 AM. Reason: minmfo
Old 12-26-11, 06:12 AM
  #22  
passnu2
Lexus Fanatic
Thread Starter
iTrader: (33)
 
passnu2's Avatar
 
Join Date: Feb 2007
Location: .....
Posts: 13,958
Received 8 Likes on 8 Posts
Default

Its okay! The last number is what you would torque the bolts to. (ft*lbf)
Old 12-26-11, 08:35 AM
  #23  
m32
Intermediate
iTrader: (4)
 
m32's Avatar
 
Join Date: Nov 2006
Location: Texas
Posts: 497
Received 3 Likes on 3 Posts
Default

Couple of follow up points on Mike's DIY thread as I just finished doing this.

1) You MUST disconnect the upper control arm b/c there is not enough room to move the bottom of the shock out of the way. The tapping method does work and it did pop out just fine after a few love taps

2) You either need to disconnect the sway bar or do both sides of the front (or rear) at the same time. I did the driver side first and when I tried to do the passenger side, the new "position" of the coilovers put a lot of tension on the sways that didn't give me any play at all when I disconnected the passenger side shock. I had to unbolt the bottom of the coils on the driver side and then there was enough play.

Edwin

Last edited by m32; 12-26-11 at 06:03 PM.
Old 12-26-11, 12:37 PM
  #24  
passnu2
Lexus Fanatic
Thread Starter
iTrader: (33)
 
passnu2's Avatar
 
Join Date: Feb 2007
Location: .....
Posts: 13,958
Received 8 Likes on 8 Posts
Default

Excellent please add as anyone does this. Pictures, suggestions, things that helped you during the install.
Old 12-26-11, 12:47 PM
  #25  
clarkpark
Driver School Candidate
 
clarkpark's Avatar
 
Join Date: Dec 2011
Location: ont
Posts: 29
Likes: 0
Received 0 Likes on 0 Posts
Default

very informative
Old 12-26-11, 12:47 PM
  #26  
clarkpark
Driver School Candidate
 
clarkpark's Avatar
 
Join Date: Dec 2011
Location: ont
Posts: 29
Likes: 0
Received 0 Likes on 0 Posts
Default

make one of these for the ls!
Old 12-27-11, 02:45 PM
  #27  
XxGoKoUxX
Moderator
 
XxGoKoUxX's Avatar
 
Join Date: Jul 2009
Location: FL
Posts: 3,387
Received 59 Likes on 56 Posts
Default

Passnu, you're a G, even after you've left the lexus scene. Thanks for all your help as i'll probably be using this write-up
Old 12-27-11, 07:29 PM
  #28  
passnu2
Lexus Fanatic
Thread Starter
iTrader: (33)
 
passnu2's Avatar
 
Join Date: Feb 2007
Location: .....
Posts: 13,958
Received 8 Likes on 8 Posts
Default

Thanks
Old 02-15-12, 01:33 PM
  #29  
Todd Edge
Driver
iTrader: (2)
 
Todd Edge's Avatar
 
Join Date: Dec 2007
Location: TN
Posts: 129
Received 2 Likes on 2 Posts
Default

Originally Posted by passnu2
On the 3rd gen you will need to remove. Even when at the dealer when I first installed springs we had to reeve it. Save yourself the headache and just remove. It's rather easy. No special tool and tap it on both sides with a mallet. You can remove the upper A arm if you want, I tried both ways, and this is much easier.

Alright... I'm installing the coil overs and the ball joint won't seperate from the spindle. I've used a mallet and a sizeable hammer hitting up on the upper arm and it won't budge. I used WD-40 to attempt to free it up but, no luck. I'm guessing my only other option is to use a ball joint seperator to push the ball joint bolt up through the upper arm.

Any other suggestions?

Todd
Old 02-15-12, 01:34 PM
  #30  
Todd Edge
Driver
iTrader: (2)
 
Todd Edge's Avatar
 
Join Date: Dec 2007
Location: TN
Posts: 129
Received 2 Likes on 2 Posts
Default

I went as far as compressing the suspension some to take some of the angle/tension off the ball joint but, still no movement.


Quick Reply: DIY: Lowering your GS


All times are GMT -7. The time now is 08:05 AM.