
AVS Reinstallation
 03-28-17, 07:46 AM
#1
Driver School Candidate
Thread Starter

Hi, I have found many excellent posts with information about springs installation and some really good guides about them. What I can't find on those guides is how to reinstall the AVS module after the springs are reinstalled. I see that you need to unplug the connector and rotate the module counterclockwise to remove it, but is there anything specific that needs to be done when you are installing the module back? My question comes because the dealer told me that there are some specific steps to reinstall the module and "recalibrate" it, and they want to charge me around $700 to install the F-Sport springs.
 05-09-17, 01:42 PM
#3
Lexus Test Driver
Join Date: Feb 2017
Location: Richmond Hill, Ontario, Canada
Posts: 6,260
Received 1,738 Likes
on
1,371 Posts
Here is the reinstallation procedure for the AVS actuator:
NOTICE:
If the control rod is not in the position shown in the illustration, turn the control rod to adjust the position before installing the absorber control actuator.
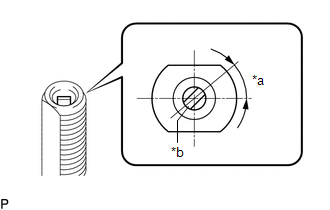 *a
*a
40�
*b
Control Rod
(b) Install the absorber control actuator to the front actuator support bracket.
NOTICE:
Make sure to check that the absorber control actuator output shaft and control rod are securely connected.
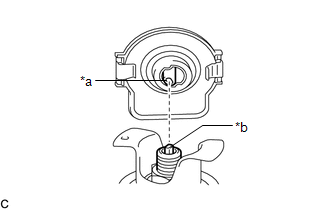 *a
*a
Absorber Control Actuator Output Shaft
*b
Control Rod
(c) Turn the absorber control actuator clockwise 40� until a click is felt.
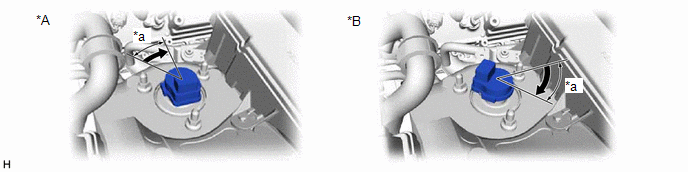 *A
*A
for 2WD
*B
for AWD
*a
40�
-
-
(a) Install the wire harness to the upper shock absorber cap.
(b) Connect the connector.
(c) Install the upper shock absorber cap with the 3 nuts.
Torque:
19.6 N�m {200 kgf�cm, 14 ft�lbf}
INSTALLATION
CAUTION / NOTICE / HINT
HINT:
- Use the same procedure for the RH side and LH side.
- The procedure listed below is for the LH side.
PROCEDURE
1. INSTALL ABSORBER CONTROL ACTUATOR(a) Check that the control rod of the front shock absorber assembly is in the position shown in the illustration.NOTICE:
If the control rod is not in the position shown in the illustration, turn the control rod to adjust the position before installing the absorber control actuator.
*a40�
*b
Control Rod
(b) Install the absorber control actuator to the front actuator support bracket.
NOTICE:
Make sure to check that the absorber control actuator output shaft and control rod are securely connected.
*aAbsorber Control Actuator Output Shaft
*b
Control Rod
(c) Turn the absorber control actuator clockwise 40� until a click is felt.
*Afor 2WD
*B
for AWD
*a
40�
-
-
NOTICE:
2. INSTALL UPPER SHOCK ABSORBER CAP- Before turning the absorber control actuator, make sure to check that the absorber control actuator output shaft and control rod are securely connected.
- Do not turn the absorber control actuator more than 40�.
- Do not drop the absorber control actuator. If it is dropped, replace it with a new one.
(a) Install the wire harness to the upper shock absorber cap.
(b) Connect the connector.
(c) Install the upper shock absorber cap with the 3 nuts.
Torque:
19.6 N�m {200 kgf�cm, 14 ft�lbf}
The following users liked this post:
LuisRo (05-09-17)
05-09-17, 02:30 PM
#4
Driver School Candidate
Thread Starter
Sasnuke thanks for the guide, its perfect. So it seems like there is no special stuff you need to do with the computer to "recalibrate" it. I will use this to finally install the springs 
05-09-17, 03:51 PM
#5
Lexus Test Driver
Join Date: Feb 2017
Location: Richmond Hill, Ontario, Canada
Posts: 6,260
Received 1,738 Likes
on
1,371 Posts
No calibration needed.
Good luck! Took me 5 hours start to finish...probably lost a few hairs on my head and half my sanity...lol!! Of course in Canada a have corrosion to deal with on the nuts and bolts...you'll probably be ok.
Good luck! Took me 5 hours start to finish...probably lost a few hairs on my head and half my sanity...lol!! Of course in Canada a have corrosion to deal with on the nuts and bolts...you'll probably be ok.

Thread
Thread Starter
Forum
Replies
Last Post