
Timing belt - preparation for surprises
 02-13-19, 11:00 AM
#1
Driver School Candidate
Thread Starter

Join Date: Feb 2019
Location: OK
Posts: 14
Likes: 0
Received 0 Likes
on
0 Posts
2002 IS300
My son and I will be changing the timing belt and seals when we get everything ready.
This will be our first go at it and we think we will be prepared. We know about TDC and the marks on the belts, etc...
One question... Say we put the belt on and pull the pin on the tensioner. When the tensioner pops into place, and somehow we notice that the mark is 1 tooth off.
How can we remove the belt and correct the alignment on the belt?
 02-14-19, 07:30 AM
#2
Driver School Candidate

When you pull the pin fomr the tensioner do not throw it away. If you just so happen to be off a tooth or 2 when you pull the pin, you can recompress it (it isn't the easiest thing in the world to do) then slide the pin back into its original location. And gently let pressure off to make sure its in the correct spot. And that is it.
Some guys will unbolt the tensioner and use a vise to compress it again, I do not do it that way.
Some guys will unbolt the tensioner and use a vise to compress it again, I do not do it that way.
02-20-19, 10:48 AM
#3
Driver School Candidate

If the crank pulley has never been off, it's going to be very, very difficult to get the crank bolt out.
I've recently done this job twice (I have two IS300s). The first had been apart previously and the bolt was no big deal - the "belt cinch" method worked fine. Belt cinch is where you cut an old serpentine belt and route it around the pulleys so the loose end gets fed up underneath itself on the crank pulley. Thus, attempting to rotate the crank counterclockwise will tighten the belt on itself, and the engine will be "seized" in place.(reverse the belt arrangement so you can torque the bolt back in place when you're done)
On the second car, this was NOT enough. In fact I split open an impact socket trying it with a breaker bar and a cheater pipe. Next, I tried the "starter bump" method where you put a breaker bar on the bolt, and support the handle of the breaker on a jackstand, then bump the starter. This also failed.
Next, I pulled my A/C condensor out of the way and put my Milwaukee 18V "Fuel" impact on it. Fail
Next, I aired up my compressor and tried my Snap On impact. Fail. So I upped the pressure to 160psi and tried again. Fail.
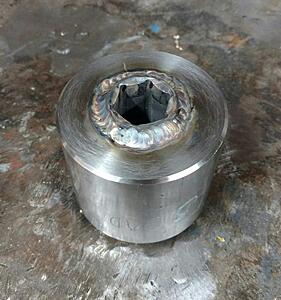
What ended up working was making a special weighted socket. I took a hunk of steel, bored a hole through it so that a Harbor Freight 22mm Deep impact socket would fit through, and then welded it together.
This took that bolt out in 3-4 hits with my Milwaukee.
I've recently done this job twice (I have two IS300s). The first had been apart previously and the bolt was no big deal - the "belt cinch" method worked fine. Belt cinch is where you cut an old serpentine belt and route it around the pulleys so the loose end gets fed up underneath itself on the crank pulley. Thus, attempting to rotate the crank counterclockwise will tighten the belt on itself, and the engine will be "seized" in place.(reverse the belt arrangement so you can torque the bolt back in place when you're done)
On the second car, this was NOT enough. In fact I split open an impact socket trying it with a breaker bar and a cheater pipe. Next, I tried the "starter bump" method where you put a breaker bar on the bolt, and support the handle of the breaker on a jackstand, then bump the starter. This also failed.
Next, I pulled my A/C condensor out of the way and put my Milwaukee 18V "Fuel" impact on it. Fail
Next, I aired up my compressor and tried my Snap On impact. Fail. So I upped the pressure to 160psi and tried again. Fail.
What ended up working was making a special weighted socket. I took a hunk of steel, bored a hole through it so that a Harbor Freight 22mm Deep impact socket would fit through, and then welded it together.
This took that bolt out in 3-4 hits with my Milwaukee.
 02-20-19, 11:19 AM
#4
Driver School Candidate
Also, I strongly advise you to replace the o-ring in your VVTi pulley. They get really brittle and fail. I think the act of messing with the cam pulley bolt (to remove the pulley to get access to the cam seal) disrupts the o-ring and will cause it to start leaking. Mine was fine until I did my timing belt and cam seal service, and only then started leaking... Had to take it all back apart.
Anyway, Toyota doesn't make a replacement pulley o ring, but it is easy enough to disassemble the pulley and put a new one in. I used this o ring: Toyota part # 96711-31080
It's not the "correct" o ring for the pulley, but other people on the interwebz said it worked so I used it as well. It is slightly too big for the application, but with a bit of care you can get it in there. I've done it on both my cars, and no leaks.
A google/youtube search for "vvti pulley rebuild" or "vvti pulley o ring" will find you forum posts and videos on how to take the pulley apart. A bunch of people make it out to be a big deal, but it's really not.
02-20-19, 12:06 PM
#5
Driver School Candidate
Thread Starter
Join Date: Feb 2019
Location: OK
Posts: 14
Likes: 0
Received 0 Likes
on
0 Posts
That's the plan. Pull the crankshaft pulley and the 2 pulleys at the top of the engine and replace the seals.
I am a bit concerned about the bolt on the crankshaft pulley. Car has about 200,000 miles, so I am sure it has been pulled of once. but how long ago, I have no idea.
Thanks for all the suggestions. The way it looks, we may try to go at it this weekend...
I am a bit concerned about the bolt on the crankshaft pulley. Car has about 200,000 miles, so I am sure it has been pulled of once. but how long ago, I have no idea.
Thanks for all the suggestions. The way it looks, we may try to go at it this weekend...
02-20-19, 12:58 PM
#6
Driver School Candidate

Join Date: Apr 2016
Location: Nevada
Posts: 6
Likes: 0
Received 0 Likes
on
0 Posts
I was going to say something about the crank pulley. I will be very hard to get it off. Otherwise make sure you have cam and crank seals ready and be prepared to possibly reseal the oil pump.
02-21-19, 07:49 AM
#7
Driver School Candidate
Thread Starter
Join Date: Feb 2019
Location: OK
Posts: 14
Likes: 0
Received 0 Likes
on
0 Posts
Trying to be prepared for any surprises. Likely to start pulling the pulley off this weekend. Just waiting for the Pulley Holding Tool to arrive.
About using the starter to break loose the crankshaft pulley nut - That sounds risky... might doing that damage the teeth on the flywheel?
I might do this as a LAST option, but I'd rather try using a 6 foot bar, impact wrench, etc... first.
Last night I sprayed a bit of penetrating oil on the nut, and will put it in the garage tonight and spray a bit more on the nut.
Then hope the tool comes in by Saturday.
Trending Topics
02-21-19, 08:25 AM
#8
Driver School Candidate
Trying to be prepared for any surprises. Likely to start pulling the pulley off this weekend. Just waiting for the Pulley Holding Tool to arrive.
About using the starter to break loose the crankshaft pulley nut - That sounds risky... might doing that damage the teeth on the flywheel?
I might do this as a LAST option, but I'd rather try using a 6 foot bar, impact wrench, etc... first.
Last night I sprayed a bit of penetrating oil on the nut, and will put it in the garage tonight and spray a bit more on the nut.
Then hope the tool comes in by Saturday.
About using the starter to break loose the crankshaft pulley nut - That sounds risky... might doing that damage the teeth on the flywheel?
I might do this as a LAST option, but I'd rather try using a 6 foot bar, impact wrench, etc... first.
Last night I sprayed a bit of penetrating oil on the nut, and will put it in the garage tonight and spray a bit more on the nut.
Then hope the tool comes in by Saturday.
Honestly, I think the belt-cinch method is worse, because it puts a ton of stress into the accessories - their bearings,and their brackets, none of which was designed to carries thousands of pounds of belt tension.
The best technique is probably the impact, but it's pretty inconvenient to get an impact on the bolthead on account of vertical hoodlatch support and the AC condenser. I believe Lisle tools sells weighted crank bolt impact sockets. That's where I got the idea to make my own. You'll need 22mm.
02-22-19, 12:36 PM
#9
1. Toyota Schley tool 64300(you can find it on Amazon etc)
2. 2x breaker bars, one as long as you can find (Harbor Freight sells a 24inch I think).
3. Home Depot or Lowes- get a long piece of metal square tubing(as long as you can find) that will slide just over breaker bar handle like an extension.
Attach one breaker bar to the schley tool on the pulley and brace it against something(floor, subframe of vehicle) so it won't move. Use the long breaker with the square tube extension and break the bolt loose. Works every time, doesn't damage anything.
The following users liked this post:
Blwnhemi (04-14-22)
02-22-19, 03:11 PM
#10
Driver
iTrader: (2)

Join Date: Dec 2009
Location: CA
Posts: 103
Likes: 0
Received 0 Likes
on
0 Posts
I recommend you spend the $150 and get a new VVTI pulley. Your alignment of the VTTI pulley will never be as good as the laser alignment that was done at the factory. Up to you though. If saving $150 is worth the hassle of VTTI working correctly. It will also suck if whatever seal you use ends up leaking and you have to do the job over again.
I'm at 150k and the pulley didn't leak yet. I will end up replacing the entire pulley during the next timing belt service @ 180k miles.
https://www.ebay.com/itm/GENUINE-TOY...LRf~:rk:1:pf:0
Genuine parts. Part number 13050-46010.
I'm at 150k and the pulley didn't leak yet. I will end up replacing the entire pulley during the next timing belt service @ 180k miles.
https://www.ebay.com/itm/GENUINE-TOY...LRf~:rk:1:pf:0
Genuine parts. Part number 13050-46010.
02-23-19, 02:15 PM
#11
Driver School Candidate
I recommend you spend the $150 and get a new VVTI pulley. Your alignment of the VTTI pulley will never be as good as the laser alignment that was done at the factory. Up to you though. If saving $150 is worth the hassle of VTTI working correctly. It will also suck if whatever seal you use ends up leaking and you have to do the job over again.
What difference do you think � 1� of cam timing makes, anyway?? Essentially zero. Your cam timing will vary by (much) more than 1� from theoretical just based on manufacturing tolerances of the cams, pulleys, belts, deck height of block etc, etc - to say nothing of belt stretch while being operated.
Regarding the seal leaking: it's just an o ring. It's not a complicated or challenging joint to properly seal. It's certainly not a 2-piece rear seal on an old small block V8.
All that said, by all means buy a new pulley if that's what you feel comfortable with. I was very comfortable "rebuilding" my pulley, and both I've done are working happily and are leak free.
02-23-19, 07:59 PM
#12
Driver School Candidate
Thread Starter
Join Date: Feb 2019
Location: OK
Posts: 14
Likes: 0
Received 0 Likes
on
0 Posts
OK everything was removed- NOT FUN trying to break some of the pulley bolts lose~! ( to replace the oil seals).
Anyway, we are stopping for the night. but I have 1 question...
We put all the pulleys back on (but didn't tighten the bolts/nuts yet). We want to double check everything tomorrow before tightening the bolts and nuts, then put the timing belt on.
Here is the question. Everything is Top Dead Center, but I noticed you can turn the driver side camshaft pulley about 20 degrees- as in free play. Is this normal?
What happens if I accidentally turned the camshaft about 10 degrees, but then turned the driver side pulley to "compensate" for it? I didn't do this, but was just wondering- because you can easily turn the camshaft, then turn the pulley to TDC anyway.
Before we took the timing belt off, we marked TDC on the belt (to match TDC on each pulley) and made sure the marks on the pulleys were TDC.
02-23-19, 08:07 PM
#13
Driver School Candidate
Thread Starter
Join Date: Feb 2019
Location: OK
Posts: 14
Likes: 0
Received 0 Likes
on
0 Posts
One other question. My son and I disagreed on something when putting the new oil seal on.
Do we rub a little bit of oil on the inside of the seal or not (that comes into contact with the crankshaft and Camshaft)?
Do we rub a little bit of oil on the inside of the seal or not (that comes into contact with the crankshaft and Camshaft)?
02-23-19, 11:11 PM
#14
Driver School Candidate
You can disregard the free-play between the intake cam pulley -and camshaft itself. The oil control valve atop the head will position them in the correct place relative to one another.
When installing the belt, I like to have the pulley rotated clockwise all the way, so it's up against the cam, but it doesn't honestly matter.
Regarding lubricating the sealing lip of the seal: in my opinion, you absolutely should. I use a Qtip to apply grease to the inner diameter of seals like that.
02-24-19, 09:40 AM
#15
Driver School Candidate
Thread Starter
Join Date: Feb 2019
Location: OK
Posts: 14
Likes: 0
Received 0 Likes
on
0 Posts
All good so far, but now we are getting mixed messages about the torque for the 2 top camshafts.
We had a HELL of a time on the variable pulley breaking the allen nut loose (driver side). My guess is it took 200 Ft Lbs.
Now we want to put it back and my son is getting 11-16 ft lbs on the allen nut ( from youtube and other forums). I said no way- it has to be more like 50 lb lbs.
Can anyone verify the torque? Also there is a cover plat the screws on after the allen nut is tight. This is around 30 ft lbs?