When you click on links to various merchants on this site and make a purchase, this can result in this site earning a commission. Affiliate programs and affiliations include, but are not limited to, the eBay Partner Network.
I've been meaning to do this for the past thousand posts, and now that most of the car's projects are completed and the weather has taken a turn for the less pleasant -- no cover for outdoor work and no room in the garage, it's time to just enjoy driving it for the winter and compile the things I've done to the car that make it somewhat unique. And then I can thin out my signature line and not overwhelm every post with the details.
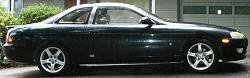
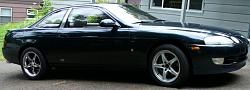
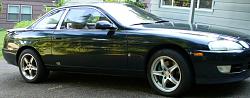
First of all, why "Goodkat?" Well, the car has the refinement and presence of a Jaguar, IMO, so I often think of it as the big cat. And the Royal Jade Pearl might as well be British Racing Green. So, naturally, name association led me to one cool, menacing dude of a character in one of the most under-appreciated movies of recent years. And, well, yeah, read the sig... The Kansas City Shuffle fits too perfect!
A glimpse of Goodkat's journey, previewing what you'll find at the various links below. Top row, L-R: 1) on the dealer lot, in all it's cheesy multi-pin striped, skin cancered clear coat, chrome wheeled, and purple, bubbled tint glory, 2) various interior improvements -- no, I didn't install the steering wheel upside down! that's just the curvature of the driveway, 3) '95 Cobra R wheels in back, '98 Cobra wheels in front, 4) driver's seat re-leathered. Bottom row: 1) GS400/430 wheels (pre-Cobras), 2) M2 mufflers, 3) upgraded subwoofer and rear speakers with stock mounts.
There seems to be a marked increase in the amount of advertisement keyword linking lately, which makes it tough to differentiate ads from intentionally linked text for my various mods and fixes, so I have gone through and underlined all of my links.
Creature Comforts:
$1 Driver's Seat Reupholstering - Not for the faint of heart, but instantly transforms the car from a semi-beater into a true luxury ride. I pulled the materials from a super nice donor couch. Your price may vary, but your butt will thank you either way.
Permanent Fix for the Window Trim Cracks - Just gluing the breaks won't do anything long-term. It's not a weak seam, as some have suggested. There is no seam. The issue is a lack of bracing along the full length of the trim piece -- the cracks develop between the thin braces every couple of inches -- easily solved with expanding foam to support the entire backside evenly.
6.5" Rear Deck Speaker Upgrade w/ No Modifications - Pretty self-explanatory, but defies conventional wisdom that the deck openings must be modified to accept a speaker that large. The stock 4" speakers are undersized and surprisingly heavy. I can't imagine why Lexus: a) left so much space unused, and b) thought a huge magnet would make up for a tiny cone. Two wrongs definitely do not make a right. And why you would put paper cones in a "premium sound system" is beyond me.
Aftermarket Subwoofer in Rear Deck - Following the lead of others, upgraded the system without compromising trunk space. I couldn't get the stock sub amp working, so I mounted a small mono amp to its location, using a block of wood below the parcel shelf to adapt the mounting holes.
Single DIN Stereo Mount + Cubby using Stock Brackets - Still brainstorming ways to use that bottom 1" piece for a popout cupholder, coin tray, extra pocket, amp gain/EQ, expanded switch panel, GPS holder, etc.
A/T Shifter Vibration - temporary and initially very effective fix, but started vibrating again after 10-11 months; much less work than a true fix of replacing the little worn bushings. I bought 'em, but I don't want to tear everything apart to install 'em. I eventually caved and replaced the bushings, supplemented by the padding "fix."
Steering Wheel Telescoping Motor Fix - Mine turned out to be the Tilt/Telescoping Motor ECU, not the motor itself. The Memory Seat functions were also restored as a result of the fix. Well, at least I thought that's what it was. Tilt/tele functionality was still sporadic, so there were multiple problems.
Cabin Heat - A solution of sorts to the insane cabin heat buildup when sitting in the sun.
Simple Solution to Tired Trunk Struts - Trunk struts getting too weak to hold the lid up? Remove the liner! Those few ounces make a world of difference.
Wood Trim Restoration, Center Vent Repair - will need to search for the links...
Part of my goal for the car has been to incorporate as many non-SC factory parts and non-'94 parts into it as possible, aka a Factory Frankenstein. Not for any particular reason other than it appealed to me. Well, maybe there is one reason... Along with fixing things like the HVAC screen bleed, window trim cracks, and grossly inferior leather, my vision is a stock SC the way it should have come from the factory, rather than something that looks obviously modified. So far, that endeavor includes: '02 ES300 steering wheel, '93-96 GS300 speedo/tach needles, MKIV Supra front & 22mm rear sway bars, Supra front LCAs, '95 front seat garnish (contoured corner, non-vinyl wrapped), '97 auto-dimming rearview, '97+ 2002 re-release headlights (?), '95 tail lights & lamp failure module, LS400 inner door handles ... '95+ LS400 front brake calipers initially denied wheel clearance for take-off but reacquired a set for wheels with sufficient backspace. '98-02 GS400/430 wheels and Prius lug nuts (eco friendly!) recently removed in favor of Mustang Cobra R wheels. Along those same lines, I've stuck to factory upgrades of worn suspension components, preferring factory comfort/performance over aftermarket looks.
Feb '15: '97+ side skirts pending acquisition. I had a chance to pick up a Supra TT LSD but couldn't make up my mind, so that Supra item will remain a wish list item for now.
Performance and Wishful Thinking Performance:
The performance list isn't huge, but part of what I love about the car is how well it performs while being buttery smooth and reliable for the long-haul, so there's not a pressing need to upgrade performance and sacrifice those inherent comforts. I'll admit, though, the thoughts of a manual transmission swap and a turbo/supercharger or ITBs are rather tantalizing... Mostly the M/T. The 1UZ deserves it. At present, my performance list looks like:
Alternative BFI Air Intake - or BeeFI, as I like to call it. I truly believe this is an improvement over the traditional BFI design and has the advantage of being all but invisible for Cali modders. All of the benefits (and more), with none of the drawbacks. You can still access the headlight as normal, and there's no danger of a "normally open" design suddenly becoming "normally closed" in the event of broken plastic bits like with the traditional BFI.
A/T Solenoid Bypass - If you haven't tried this on your SC400, then you're seriously missing out on the car's potential. I had planned on a high stall torque converter, but after the solenoid bypass it seemed pointless. KC95SC400 gets the credit for this surprisingly under-utilized mod. It's a big part of why I feel keeping the engine stock is for the best. There's plenty of power there once you remove some of the factory shackles.
M2 Performance / Manzo axleback exhaust - Dropped nearly 9.5 lbs, sounds better, looks marginally better, and possibly performs better. Deleting the center resonator and two rear resonators and adding an improved downstream y-pipe (along with bigger 2.5" in and 2.25" dual out tubing) dropped another 5.5 lbs -- a bit shy of the additional 10-15 lbs I was hoping for. But boy does it sound mean now!
EGR Delete and Throttle Body Coolant Bypass - maybe worth 1-2 HP between them, but the latter will save a good 2 hours of work any time I need to remove the throttle body and/or intake manifold. I hope they fired the engineer that proposed that hose routing! It stands to reason that any measurable performance effect of burnt gases (EGR) offsetting combustible air volume (i.e., less fuel to keep A/F ratio in check), or warmed air intake (TB coolant), is going to be negative. Eliminating them can only help. The EGR Delete cuts 1 lb 13 oz, more if removing the impossible to access pipe.
'95+ LS400 Front Brakes with Modified Dust Shields - Improved braking but not nearly the 13+ lb alleged weight savings, coming in at less than half that. Techna-Fit stainless steel brake lines awaiting installation.
DIY Hood Vent and Hood Lightening - Should aid significantly in engine bay cooling and possibly overall aerodynamics (high/low pressure), while offering a big bump in aesthetics and a side bonus of nearly 4.5 lbs weight reduction. After driving, you can feel the heat pouring out of the vent. I can practically see the engine smiling.
Intake Manifold Shaving & Porting - Throttle response seems a bit better and a modest amount of weight was removed in the process. Would have been nice to get the AEM Wideband installed first to see if AFR is affected by improved airflow, but didn't want to wait on that.
AEM Wideband + Apexi Neo awaiting installation. Hoping for some power and efficiency gains through leaning out the rich factory tune, and doubly hoping that the OBDI learning ECU doesn't fight the Apexi's overrides. TBD...
Lance Alignment specs along with the Supra rear sway bar and front LCAs.
Outside the Box Troubleshooting:
If the car's modifications have made it unique, then my ability to possess the full spectrum of unusual problems is freakishly singular! Here are the resulting solutions, most of which have been so far out of left field that getting answers has proven difficult.
Heater Control Valve Diagnosis - If your cold air is being warmed well above that of outside temps, the HCV's actuator may be to blame. Get a camera or mirror down alongside the pivot arm so you can see if the marks are lining up properly. It's too low relative to the fender to see clearly on your own.
Passenger Seat Tilt/Recline Motor - It's a lot easier to check your control switch than to remove the motor from the seat back, so start there if your tilt/recline doesn't work.
Unlocking Driver's Door Trips Alarm - Kudos to O.L.T. for solving this one 3 years ago. Hopefully, I added enough additional information to the sparse topic to greatly help anyone else having to deal with this nightmare of a project. Having been placed in the A/V-Security-Electronics sub-forum, it's all but invisible to SC troubleshooting on-site searches, unfortunately.
IAC Valve Servicing - tips for making your IACV function like new. No more herky jerky no/low-throttle nonsense! If you've been frustrated by an inability to solve the problems commonly attributed to the TPS or ignition system, give this a try.
Additionally, a problem arose within my first week of ownership with Knock Sensor (CEL 55) trips. The shop quoted $700 to replace them both, with much of that being the labor involved to get in there. I went through a variety of suggestions that never quite panned out, before finally discovering that it was my ECU. One of the capacitors down at the bottom had leaked and corroded the input terminals to the point that the KS (and O2) inputs were barely hanging on by a thread, resulting in sporadic losses of signal that I couldn't find a pattern to. It tripped more frequently with the A/C on, which presented an uncomfortable dilemma between limp home mode and 113� vent air during the summer when the HCV was still an issue.
The last remaining, and most elusive, issue is the long-cranking start-up. I've tried pretty much everything (new fuel pressure regulator, injectors, and fuel filter, used fuel pump, new soft hoses to the fuel pump, new spark plugs/wires, new caps & rotors, checked coils, fuel pulsation damper, and fuel pressure VSV, new coolant temp sensor, new vacuum lines, repaired ECU, cleaned and swapped charcoal canisters, new upstream O2 sensors) and have more or less given up for the time being on figuring out why fuel pressure drops after shutting the engine off, instead just using the fuel pump ecu bypass or double tap of the starter to build pressure. So un-Lexus like. However, after 15 months, it may be resolved!!!
Unfortunately, I'm well aware that these suggestions will be ignored by most. Like the Kansas City Shuffle reference, it falls on deaf ears mostly... Case in point, the BeeFI mod, where everyone just buries their head in the sand. People don't appreciate having conventional wisdom questioned, so this post, and the overall thread to a lesser extent, is mostly for those willing to step back and take an objective look. But what are the odds that anyone else will even read this far? On the other hand, if you have read this far, then you've earned the t2d2 stamp of approval and the right to call me an arrogant a**! In all sincerity, I do appreciate the help, guidance, and inspiration I've received from many people here. It just gets annoying having anything that doesn't deal with slammed & cambered suspension, pulled fenders, tinted windows, HID headlights, black interior conversions, and Double DIN head units be consistently overlooked.
Adding Lightness:
As mentioned in the Performance section, my preference is to fight the lure of the Dark Side and keep it stock. So, in the interest of maximizing the car's performance potential while retaining all the comfort and reliability, I am cutting weight wherever possible in hopes of getting the car under 3500 lbs soaking wet (an Oregon joke). Edmunds and other sources list it at 3616 lbs, meaning the initial weight reduction goal was 120 lbs. I say was because I blew by that and changed the goal to 220 lbs (sub-3400).
In descending order of weight, to help you prioritize your tummy tuck strategy:
- Group 24F battery = 9 lb 8 oz (estimate of weight specs compared to stock 27F = 50 lb est; tried a lithium battery but not enough reserve capacity)
- LS400 front calipers & rotors = 5 lb 12 oz (calcs given here)
- front tie-downs = 5 lb 6 oz (2 lb 11 oz ea; DIY tow strap substitute adds back 6 oz)
- hood lightening + vent = 4 lb 6 oz
- main engine splash shield = 3 lb 10 oz (estimated @ 1.5x wheel well liners or 2x side splash shields (within 0.6 oz of same calc))
- hood blanket/liner & plastic clips = 2 lb 2 oz
- EGR delete = 1 lb 13 oz (more if removing pipe)
- shaved / ported intake manifold = 1 lb 11 oz
- throttle / cruise control plastic covers & mounting tabs = 13 oz
- air intake resonator (bottom box) = 12 oz
- fender lip liners = 9 oz
- spark plug wire tray/cover = 9 oz (annoying to remove all the covers every time to get underneath it, so ... buh-bye!)
- vented plastic trim pieces over fuel rails = 6 oz (looks silly extending out from distributor covers without the spark plug wire covers)
- fuel pressure VSV = 5 oz
+ '98 Cobra 17x8 wheels = 13 oz
----------------------------------------------
- pass. seat removed = 61 lb 8 oz (59.0 lb according to others ... may try a lightweight alternative w/ spare factory rails)
- pass. airbag gutted = 7 lb 11 oz (calcs given here)
- removal of 3 exhaust resonators = 5 lb 8 oz (new center & rear piping + downstream y-pipe)
- pass. door card = 5 lb 0 oz (10.0 lb total, 0.5 lb retaining just inner handle & wood trim, 5.0 lb without plastic portion & armrest)
- 3-spoke ES300 steering wheel w/ gutted airbag = 3 lb 6 oz
- pass. seatbelt = 3 lb 5 oz (more if removing the lower bracket/rod's bolt & trim cover)
- pass floor mat = 3 lb 0 oz
- 5.25" door speaker enclosures = 2 lb 11 oz
- 2.5 DIN -> single DIN head unit = 2 lb 9 oz (estimated @ 50% of stock 5 lb 2 oz)
- glove box crash plate = 2 lb 1 oz
- ECU kickpanel cover = 1 lb 14 oz
- steering column crash plate / panel brace = 1 lb 7 oz
- door control receiver = 12 oz (for remote unlock, which I never had the key fob for)
- fuel pump ecu = 10 oz
- "oh s***!" handles = 9 oz
- '95 ECU = 3 oz (on again, off again experiment; more reduction if removing the cold start injector & fuel line)
- 2x pass. seat bolts = 2 oz
----------------------------------------------
- alloy donut spare (Nissan T145/80D17 Enkei N05A-740) = 25 lb 1 oz (*)
- CD changer = 10 lb (?)
- axleback exhaust = 9 lb 6 oz
- trunk top carpet = 6.5 lb (?)
- rear tie-down hooks = 4 lb 4 oz (4 bolts left in for muffler mounts = 7 oz; cut 3 oz with much shorter bolts now that the strength requirement is gone?)
- Supra 20mm rear sway bar & subframe mounts = 2 lb 5 oz (vs. 24mm SC bar; switched to 22mm Supra bar which is 1 lb 2 oz heavier)
- trunk lid liner = 1 lb 12 oz
- spare tire tool tray = 1 lb 3 oz
- fender lip liners = 1 lb 1 oz
- trimmed trunk floor cover & foam (@ level of donut spare) = 14 oz
- '95-96 tail lights = 10 oz
+ amps/speakers = 10 oz (stock amps = 3 lb 13 oz, MTX sub amp = 5 lb 11 oz; stock speakers w/ pods = 4 lb 5 oz; 6.5" Pioneers = 3.1 lb?)
+ '95 Cobra R 17x9 wheels = 6 lb 14 oz (* full size steel spare = 48 lb 6 oz w/ low tread; Supra site says +/- 5 lb for a bald tire, so we'll split the difference (2.5 lb) and call it 50 lb 14 oz stock. Nissan / Enkei = 25 lb 13 oz)
----------------------------------------------
227 lb 14 oz total (73 lb 6 oz front, 99 lb 15 oz cabin/mid, 54 lb 9 oz rear) ... current vehicle weight = 3388 lb (6.3% reduction).
Front / Rear reduction = 72.9% / 27.1% of the total, using the back of the front seats as an approximate and convenient midpoint, improving the overall weight distribution from 54.5/45.5% to 53.3/46.7%. (I built a handy little spreadsheet to determine all that for me! The above front/mid/rear lists aren't quite up to date...)
Items marked by (?) indicate I don't have a measurement of my own yet, such as for stuff I never had with the car, so using estimates or numbers reported by others. I assume the widely varying numbers for things like wheels (+/- 15 lbs for a spare tire!) and very questionable ones are the result of using bathroom scales, so I take anything I couldn't weigh myself with a very big grain of salt.
I briefly had the weight down to 3392 lbs with a 5 lb lithium battery, but it lacked the reserve capacity to start strong after sitting for a day or two ... too much parasitic draw with the vehicle's various electronics. So, I put the smaller-than-stock Group 24F lead-acid back in for the time being and am revisiting the idea of a relocation to the trunk for better front:rear balance.
The 17" GS4xx wheels were 42 lb 14 oz with fairly worn tires, a couple pounds more than the beefier looking SC's 16" stockers @ 41 lbs (?). The GS4xx wheels were in turn replaced by '95 Mustang Cobra R (17x9 +24) wheels in back, which are ~24.5 lbs for the rims and ~23 lbs for the wider 245mm tires with lots of tread. The aftermarket wheels that came with the car were temporarily back on up front after the LS caliper upgrade, and they weigh a hair under 23 lbs each. I considered splurging on some Enkei RPF1s or PF01s to replace them, dropping 6-7 lbs per corner up front to offset the 6+ lbs of weight gain each corner in back, and further balancing the weight loss efforts front-to-back. However, I couldn't get over the uneasy feeling from the many reviews cautioning against using a lightweight racing wheel on a moderately heavy car for street driving. Instead, I finally picked up some '98 Mustang Cobra (17x8 +30) wheels for the front. At 21 lb 7 oz each, they should be pretty close to the stock SC 16" weight.
Admittedly, it's a pipe dream, but my absolute, ultimate goal is a 2500-3000 lb SC. Going by the "100 lbs = 1-2% mpg increase" rule of thumb, such a car should be capable of 24-28 mpg on the highway, meaning a 15 ga tank would be sufficient. Phase II of the lunacy would then be to relocate the tank (as a fuel cell?) to the rear seat / footwell area somehow, opening up the stock location to be a useful pass-through for vastly increased trunk space.
Last edited by t2d2; 07-02-16 at 08:20 AM.
Reason: continued crafting of the perfect post; the one post to rule them all
I remember being somewhat fond of the SC when it was first introduced, but I never paid it much attention because it was in a price range that didn't register as anything I would consider purchasing.
Fast forward to this spring and my trusty 19 year old car was totaled by a young driver. Nineteen years of never having to carry a tool set or a spare quart of oil. You can't put a price tag on low mileage, one-owner reliability, but that's exactly what insurance adjusters do... I had $3100 of insurance money to put toward a replacement car and had to choose between paying a lot more for an equally dependable new car or seeing how much DIY value I could get out of something older. I was leaning toward the latter, searching local used car listings, getting increasingly annoyed with all the cross-listed nonsense on craigslist, when one day a SC popped up under a Mazda search. I hadn't thought about the SC for years, and there are very few of them in the area to have reminded me along the way. Out of sight, out of mind.
So, I took a look at SC offerings and found a 1996 jade green SC300 nearby for $1000 with a blown engine. In terms of interior and exterior, it appeared to be in very good shape with no dents, clean paint, good front seats, good steering wheel and shift **** leather, and good stock wheels and stereo. The only area it was lacking in was ripped back seats. The seller was going to trade it to his mechanic for labor if no one made an offer. He stated a strong preference for cash. I set about doing some research on the cost of an engine swap. My mechanic of old quoted an astronomic figure that was basically the value of the whole car, so I cooled off to the idea...
About a week later, I found my '94 jade green SC400 at a used car dealership for $1950. It ran strong, but cosmetically it needed a lot of attention. Awful paint/clear, rearview mirror hanging by its dimmer wire, purple bubbled tint, icky aftermarket wheels, ratty front seats / steering wheel / shift ****... The one area it excelled in was near-perfect back seats. Go figure. I kind of felt bad for it, being so poorly kept up. These cars deserve better! A couple days passed in being able to test drive it because they were too cheap to put a working battery in and their attempts to charge it up for a test drive failed the first time...
Once that hurdle was cleared and I had a mechanic do a pre-purchase inspection, I hatched a plan to buy both SCs and use the SC300 as the perfect complimentary parts car. $1600 out the door for the SC400, and I headed to the bank to get money out to make an $800 cash offer for the SC300. (As I leave the bank, the alarm goes off when unlocking the door ... and I have no tools on-hand, having just left the dealer lot. They conveniently forgot to mention that problem, and who thinks to check something like that when a door is already unlocked?) I called the guy up and he said he had traded it to his mechanic for $800 worth of labor a week earlier and never took the ad down. So, I ended up paying more than planned for all the small parts acquisitions instead of the one donor car.
If I had known then what I know now, and had the mechanic that I now have who can do engine swaps for cheap, I would have just bought the SC300 first as an ideal 2JZGTE swap candidate and come out smelling like roses.
There were additional complications early on, such as the dealer sitting on the title for seven weeks until I finally threatened police and/or legal action. Having learned a lot more about how sketchy that outfit is -- I had no familiarity with them beforehand, but several people warned me after the fact -- I suspect the reason I only got one key with the car is they hold onto one so they could repo it once enough time had passed. I couldn't do the inexpensive VIN-based eBay key cuts without the title in my name yet, and I didn't trust the one busted up key to hold together much longer, so I had to pay $40 per key to be cut by a local locksmith.
In addition to all the "unique" stuff in the first post, I've also done the typical, boring maintenance: NGK platinum spark plugs and wires, oil/tranny/coolant flush, all new vacuum hoses, lower mileage MAF and TPS, air intake hose, fuel injectors, rack & pinion, battery, IAC and engine grounds cleaning, coolant temp sensor, coolant level sensor, distributor caps and rotors, PCV valve, fuel pressure regulator, upstream O2 sensors, ECU capacitor repair, KYB OEM replacement struts, transmission mount, headlight restoration, fuel filter, HVAC screen (Tanin), less worn A/T shift ****, leather conditioning, antenna mast... To no one's great surprise, I imagine, I also had some very sketchy alignment settings realigned.
Overall, Goodkat has had a fairly rough childhood, but we're on good terms now and all will be forgiven with a fresh coat of paint next year.
Might as well reserve post #3 for the all-important pictures, to be updated with various projects. My preferences run counter to the thread bump trends.
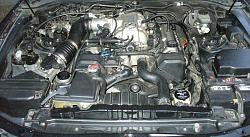
Recently, I wanted to do a quick IAC Valve swap but couldn't do so without removing most of the plastic trim pieces. As a result of that annoyance, I decided most had to go, so this is what I came up with in place of the spark plug tray/cover, to keep things from looking sloppy with the plug wires hanging out uncovered. (There's not quite enough room to pass the wire loom under the coil connector.) I had already ditched the throttle and cruise control covers, which I see absolutely no point in. Also, note that my version of the BFI is completely concealed from above.
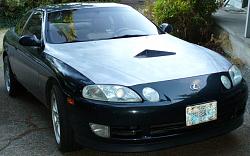
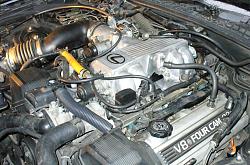
The ubiquitous engine bay pic.
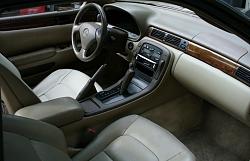
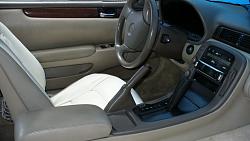
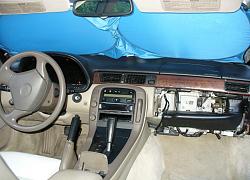
And the equally ubiquitous interior pic, showing a variety of touches: three spoke steering wheel, subtle 2-tone action with black ignition ring and black buttoned window switch, painstakingly restored dash wood trim and center vent, 2-tone driver's seat, modified stereo mount, new HVAC LCD, added dash cup holder, nicer but still not perfect shift ****. The glove box cover has since been replaced with one not pulling away at the latch.
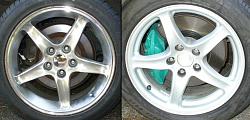
As mentioned here, I picked up a set of '95 Mustang Cobra R 17x9 +24 wheels in December. I don't think there's a better looking wheel on the SC than the GS400/430 ones I've been rolling with, but they lack caliper clearance up front and like most people, I prefer lower than the stock +50 offset for a less tucked in look. I considered spacers, but didn't really want to go that route.
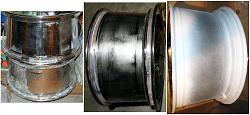
The guy I bought the Mustang wheels from had picked them up for a big trailer project over the summer, only to learn he needed trailer-specific wheels. So, they sat unused for 6+ months and were in unknown condition. One had chrome peeling on the face and liquid sloshing around -- I assumed it was water, but it turned out to be a dozen cans worth of fix-a-flat. I figured they were worth it for the two nearly new 245/45-17 tires (the other two were completely shot) even if the wheels turned out to be unsalvageable, so it was a low risk but labor intensive project. No dickering needed, the price was too good to pass up. (Not quite as good as initially thought, however...) I absolutely despise chrome, though, and sure enough, three of the four wheels were corroding too much on the inner lips to hold air. Apparently, the fourth had also gotten to that point earlier on and had already had the chrome shaved down somewhat.
From this ... to this ... to this. Whew, that was a lot of work! Have I mentioned how much I hate chrome? Lots of grinding and sanding, followed by JB Weld to fill some pitting and rust-resistant automotive primer and enamel paint.
I got the 245/45 tires re-mounted and received a gold star from the tire guy for my refinishing handiwork. I did a test fit on the front just to see if the 245's have any chance of fitting in there without fender rolling, as I've read will be required. I haven't started in yet on cleaning up the front wheels, other than peeling the loose chrome off, but I was hoping they could go up front once ready. Nope! Oh, and after quite a bit of research, I learned that the wheels are replicas. It didn't occur to me that they were such a popular wheel, they would be frequently copied... There's apparently quite a range of replica quality levels on these, so I may end up just using the other two as spares in case they don't hold up well. Reported weights are anywhere from 22 to 26 lbs, and mine are right about in the middle. If I can find a pair of the nearly identically styled '98 Cobra 17x8 wheels, they would be a much better fit up front, I imagine.
245 tire on 17x9 +24 rim doesn't come close to fitting up front without major fender modification.
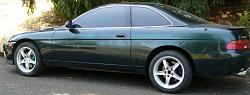
But boy does it look good in back! Mustang Cobra wheel on the left, GS400/430 wheel on the right.
Worth it? Tough to say, as I've since learned that the wheels can be bought new for $110 each, although again, quality level would be an unknown. You can get them in a silver finish and not have to deal with PITA chrome in a couple years... Only 250 sets of the originals were produced, so they're likely pretty hard to come by. I look at it as bonding time with the car, so it's all good.
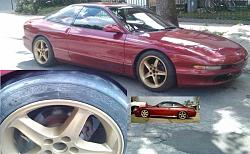
The chrome on the faces is in pretty good shape still, but I've been jonesin' for some bronze wheels on the SC... I'll tackle that later, as I've had enough of chrome grinding for the time being! One odd thing about these wheels in chrome is the concave spokes catch light in all sorts of crazy ways and make the wheels look smaller than other 17" styles. I think a less reflective finish will help a bunch. I was able to find pictures of two cars with the '95 Cobra wheels in bronze:
Phase 2 goal. I need a moment to wipe up that drool. At least, I hope that was drool. Unless a better, slightly lighter option surfaces, I'll be using Duplicolor HWP105.
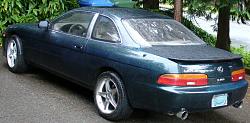
See what I mean about the crazy way the chrome Cobra wheels catch the light? I wasn't fond of the wheels that came with the car at first, but they're actually growing on me as fronts to complement the Cobra rears. Surprisingly, the split spokes fool people into thinking they're supposed to go with the concave spoke rears, and the unknown offset makes for a very flush fit with the front fenders.
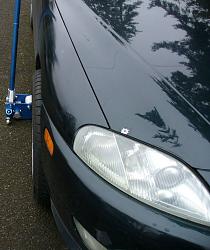
With the 17x9 Cobra wheels mounted, I was surprised to see the tires rub in back, even with stock suspension. So, I set about doing some impromptu DIY fender rolling on the driver's side sitting up higher, as it provides 2-3" more clearance than the downhill side. I later moved the car to a level surface and found there was sufficient room to work on the other side without jacking it up to let the suspension drop. In other words, you can easily roll your own fenders with nothing more than a pair of pliers (and an angled screw driver to get the plastic trim piece off), if you're at stock ride height.
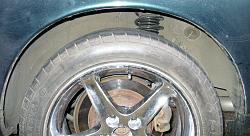
Fender rolling the primitive way, with hammer and pliers! I don't really have THAT much gap, the car is just leaning to the other side because of the driveway angle. The paint was already rough and cracked around the wheel wells from P.O. bodywork, so I had nothing to lose by "rolling" it myself. To my pleasant surprise, no additional paint damage ensued. It looks like I'll have to paint the rusty rotor hats soon, now that they're so exposed by thin spokes and low offset.
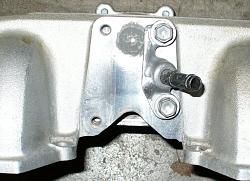
Next, I was left wondering if the stock wheel studs are too short to be safely used with the Cobra wheels... Seven full turns of the lug nut isn't terrible, as it "turns" out, but I hate being borderline, especially when one of the studs was totally stripped on the first 3-4 threads and awaiting replacement. When one snaps, the others take on undue stress... Fortunately, I was able to find some 35mm extended studs that give a reassuring amount of thread bite, but not being so long as the ARP 50mm ones as to require cutting down or open ended lug nuts. The best part was finally discovering the trick to rear wheel stud removal that had delayed the replacement of the stripped one for many months.
Can't beat the look of the GS400/430 wheels, but stock offset lets them down.
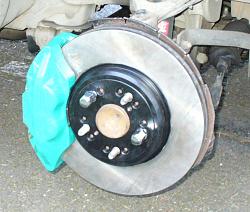
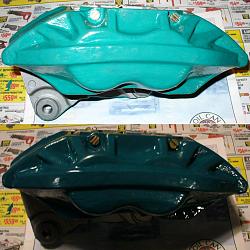
Yep, that just happened! LS400 front brakes, painted funky green epoxy. Twas the catalyst for letting go of the GS400/430 wheels.
Post #3 must have exceeded the maximum post size or number of images, as it won't let me add more. Too much of a good thing!
Exhaust work completed. Center resonator replaced by 2.5" pipe to new y-pipe to dual 2.25" pipes replacing the two downstream resonators. Also visible is the Supra rear sway bar, tucked in behind the diff and subframe. You can never have too many jack stands when doing heavy torquing of subframe mounts! Even if the front two are just there for moral support, placed by hand after the fact should the back two tip or collapse. And you can see the new fuel line that had to be patched in downstream of the ***** factory fused filter.
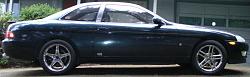
It took 6 months, but I finally found some OEM '98 Mustang Cobra 17x8 +30 wheels for up front to match the replica '95 Cobra R 17x9 +24 rears. Perfectly flush fit front and back, like they were designed for the car. Now to refinish the chrome rears...
L: 17x9 rears after some chrome sanding; not sure yet if I'll paint them silver to match the fronts or paint both bronze. (They were as shiny as the center cap.) More sanding needed still, ideally down to bare metal. R: 17x8 fronts with center caps. As luck would have it, I had exactly two Ford 2.5" caps in my miscellaneous stash. The '95s take a 2.25" cap.
With the annoying shine taken out of the chrome rears, the color match is actually somewhat close...
May '15, time to inch ahead with re-paint ideas. While contemplating a few paint schemes, another door ding mysteriously appeared... That sort of made up my mind that an expensive, properly cooked paint job is not worthwhile on an older car. I've always questioned why it's taken as gospel that cars must be shiny. Chrome is the extreme outcome of that thinking, and I would be happy if I never see a piece of the stuff again! A good matte paint job can look fantastic.
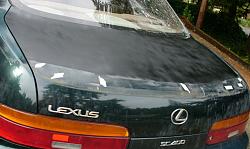
So, I decided to try out a two-tone paint scheme, with the trunk/spoiler and raised center section of the hood in charcoal gray or black. Both sections flow nicely in between the A- and C-pillars, allowing the rest of the body to be a seamless single color. And since I had some BBQ Black paint on hand, I figured that would be a perfect test bed. Go big or go home. Now, keep in mind, my level of expectation for car painting is always somewhere been presentable and dismal, and I still manage to fall short....
I decided to leave the good paint alone on the rear of the trunk and just two-tone the top, so no point sanding down the part that will be covered up by the spoiler. In hindsight, I should have sanded the primer smoother. I figured the pebbly BBQ Black would cover the blotchiness, but it actually just highlighted it.
The finished product looks okay from some angles and like rubbish from others. This is one of the good angles, sadly. Of course, I had to shoot an angle rocking the new stationary aero foil.
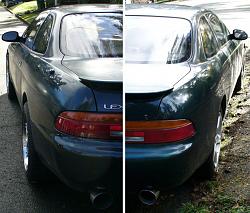
It does look quite good when wet, however, and that accounts for much of the weather conditions here. Consider that what it would look like if painted by someone with skills. This angle also gives a better indication of how the two-tone paint job flows with the C-pillar and window trim, while not interrupting the lines of the side and tail.
I'm happy with the look, and despite the prep flaws, it's a much better paint job than my initial attempt a year ago at blending the trunk and spoiler in with the bad clear coat peeling and paint fading. I'll be curious to see how long it holds up. (At the very least, it was an opportunity to replace the heavily decayed weatherstrip lip on the spoiler with a fresh silicon bead -- no more picking pine needles out of the back edge -- and replace the bolt hole rubber washers/gaskets with new 3/16" I.D. ones from Lowes.) But part of the goal in going this direction is to have easy re-spray capabilities when blemishes occur. Nothing beats the ease of a common spray color with no clear coat and no need to blend!
And the B-pillar freshened up with matching BBQ Black (and self-etching primer), along with new belt line moulding. My first ever automotive paint job that came out perfect!!! (I even managed to capture the blink of the upgraded alarm LED.) Now the quarter window trim piece needs some touch-up work...
I noticed something interesting in comparing the freshly painted B-pillar to the bare stainless steel one on the pass. side: The pillar appears much shorter when blacked out, giving that side of the car almost a chopped look.
Note: I used Ace Hardware brand BBQ paint, which is a nice, deep black. I ran out of that while doing trunk touch-up and used Rustoleum's BBQ black on the other B-pillar. It's more of a charcoal gray, which doesn't look particularly good. I'll probably have to redo that side.
June/July '15: I've decided the car is best suited as a 3-seater. No more passenger seat! I've had the SC for 15 months now and can only think of two occasions where I've had 2-3 passengers. Even with the mile-long doors and clever automated passenger seat, it's still not the easiest back seat to get in and out of, especially behind the driver. So, the stock configuration is really a 2-seater, for all intents and purposes.
1) The 3-seater makes the back seats much more accessible, so it's arguably got more seating space and much more luggage space than before. The right rear seat is nearly as easy to get in and out of as the normal pass. seat would be, and the left rear seat is easier to access than before.
2) The rear bucket seat with loads of leg room is crazy comfortable.
3) 85.5 lbs of weight savings between the pass. seat, seat belt, airbag, "oh s***!" handles, glove box crash plate, ECU kickpanel cover, and door card. Most of that weight is from the front half of the car, making it extra significant. A few pounds got added back in with a streamlined door card (arm rest and controls not needed).
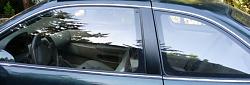
July '15: Side and rear windows tinted to 35% (Oregon legal limit).
35% window tint, taken in similar lighting conditions to the previous B-pillar pic above. The Llumar film is quite good, hardly seeming tinted at all from inside despite looking that dark from outside. I held off for a while because I was concerned about visibility.
August '15: Finally tackled painting of the de-chromed rear wheels; went with silver to match the fronts rather than painting them all bronze. I used VHT polyurethane wheel paint (SP188 Ford Argent Silver) and VHT clear coat. The paint went on real nice but the clear reacted horribly with it, cracking the paint like a desert floor. I've never seen anything turn out so poorly, especially matched products. So, I sanded most of the damage down and re-sprayed just paint, eff the worthless VHT clear coat.
I painted the rotor hats while I was at it, but decided to leave the calipers unpainted.
August '15: I upgraded the pass. door 4" speaker to a 5.25" setup w/ semi-custom enclosure. Like with the rear speakers (also 4") previously upgraded to 6.5", sound quality was massively improved and weight was surprisingly reduced. The stock speakers have very heavy magnets and enclosures for how anemic such a small driver is. The upgraded driver's side enclosure is ready to go in next time I have the door card off.
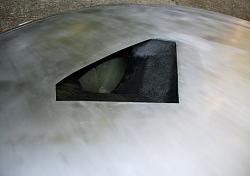
September '15: The Hood Vent and Hood Lightening project finally progressed from mock-ups to implementation... Love it or hate it, it's about as unique as they come.
The clear coat over brushed metal turned out only so-so (hey, it's technically paint, what do you expect?!), but some angles and lighting conditions look really, really good. This is one of them.
Looking forward at the radiator fan, showing the vent opening and water drainage route. Some clear coat touch-up still present. The cutouts in the under-hood bracing hold the vent in place pretty well, but I bonded it to the bottom side of the hood with construction-grade adhesive, then siliconed the visible gap from above to be a more aerodynamic transition. Hopefully, it never needs revising, because it may not be reversible as assembled...
My car used to rub alot before.....get yourself a nice set of coilovers and it will eliminate the problem.....the stock suspension is so soft and extends and compresses a significant amount....
I would bottom out getting in and out of my driveway on stock suspension...
After coilover install and even with lowering car around 1.5-2 in I barely scrape at all
That's an interesting point about the stock suspension compressing, but it's a theory I can't really risk exploring...
1) I make the approach very slow to avoid that compression as much as possible. The length of the car leaves extremely little to work with.
2) Even trucks with lots of ground clearance bottom out on my driveway if they don't take the right angle.
3) I just installed new stock struts over the summer. It would suck to double dip on that only to find that coilovers lack the necessary ground clearance.
Stiffer springs could be worth experimenting with, I suppose, especially if my original ones are wearing out. I imagine there's some sort of tool to measure a spring's tensile (?) strength relative to specs?
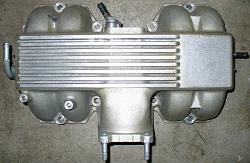
A bit more could be shaved from the remains of the exterior EGR tube, but I decided to leave some behind as bracing on that half of the plenum.
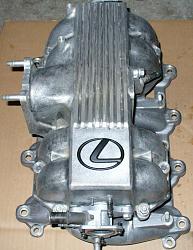
Undecided if I'll put the Lexus badge back on or leave it streamlined. You can see I sloped the longitudinal raised lines to meet the badge location for that reason. I'll probably paint or powder coat the upper and lower and then decide. Although, a few rounds of wire wheeling cleaned it up nicely, so I may keep it stock looking, after all.
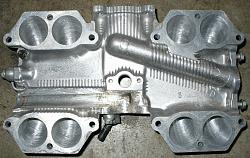
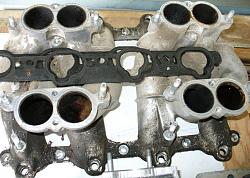
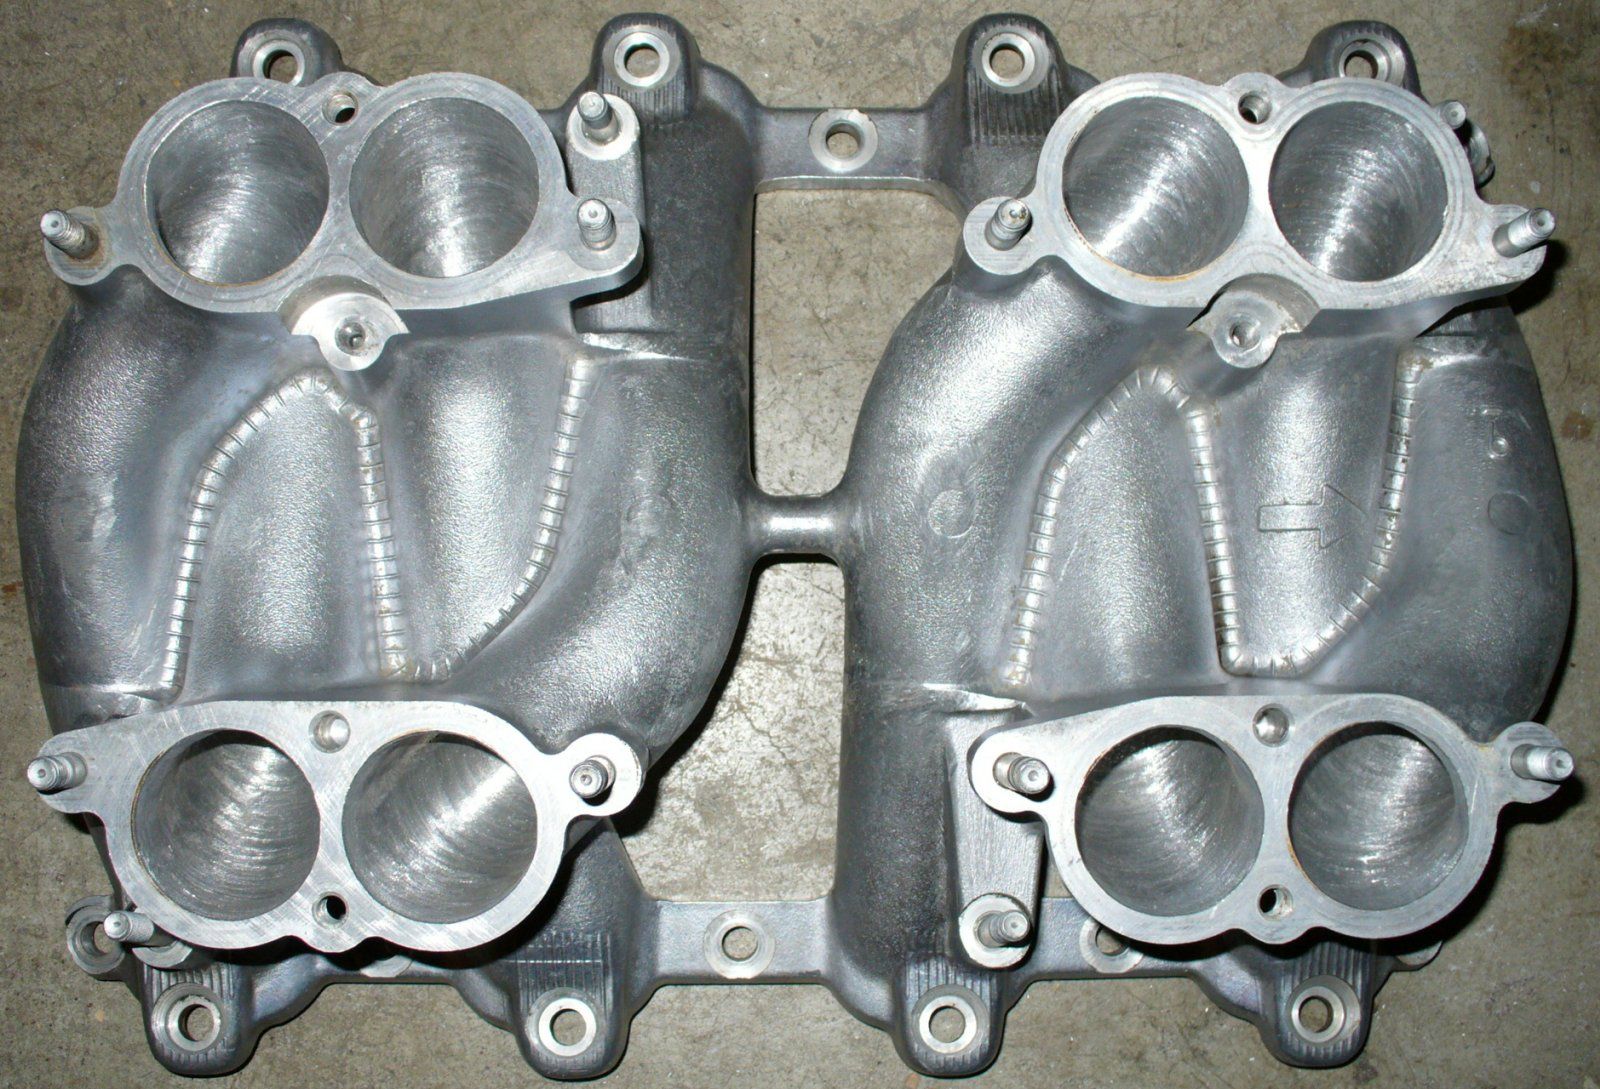
Compare to dawhorl21's post #14, or a few pics further down in this post, to get a sense of how much material was shaved from the lower manifold. It'll be a shame to bury those clean, sexy curves under the plenum. Hmm custom ITBs mounted to the lower manifold and a transparent air box...?
Much of the space between the runners was filled in with bracing of questionable value. I'm not sure what the little support wedges are on the bottom of three of the runners; they don't appear to sit on anything down below. I ended up leaving them alone. Those round casting marks on the bottom actually protrude into some of the runners. (Others are flush with the interior surface.) And some of the runners have numbers stamped on the inside. Without the benefit of flow testing, I can only assume that minimizing all that nonsense will help immensely. Toyota did a great job of designing a manifold that looks very refined on the outside, but they tucked all the rough stuff away on the inside ... right where it affects performance.
Here you can see the inaccessible middle section of the long lower runners, cleaned but not ported.
My reasons for shaving in addition to porting:
1) If I'm going to spend that much time porting, I might as well go the distance and eliminate everything "unnecessary"! Less weight and more room for the engine to breathe -- yes, I semi-seriously subscribe to the holistic belief of car health -- fewer protrusions to collect dirt and grime, plus it bothers me knowing there is fairly extensive casting slop tucked away out of sight. I just wish I had the tools to follow the interior weld lines the full length of the lower runners.
2) I didn't realize until taking the plenum off and looking it over that the 4" x 3/4" EGR tube juts out right in the path of the throttle body air flow. That certainly isn't ideal. I had assumed it just dumped in the side of the plenum. So, I carefully cut the inner tube out and then figured, I might as well remove all the tubing that leads up to it externally... Taking the plenum off sucks in part because of the EGR pipe bolted to the back -- one of the bolts is very inaccessible because of the curve of the pipe -- so eliminating all that metal will allow me to bolt the block-off plate directly to the pipe and not fasten the pipe to the plenum. I used a 1/2" (I.D.?) copper plumbing cap to plug the EGR hole into the plenum.
Sure, some bracing / casting slop was removed, especially from the lower manifold where it's conveniently hidden from view in stock form, but so was 10+ percent of the upper plenum's weight that the bracing would be supporting. (1 lb 9 oz overall was removed between the two pieces.) On the other hand, the gasket holes are very similar if not identical circumferences for the round upper and oval lower runners (based on measurement by string), but the oval lowers flatten out 2-3" before the gasket and reduce the runner's inner area significantly. I don't know if that was done for space constraints on some other vehicle using the 1UZ, is supposed to somehow direct and/or speed up the air to the injectors, or was just poor design, but it's an annoying limitation. To take full advantage of the upper porting, there's little choice but to remove more of the oval lowers and risk reducing the wall thickness where it attaches to the gasket plate, i.e., right where I removed much of the goofy bracing... I split the difference and focused the extra removal on the flat lower side of the runners, opening up the inside a bit extra there to keep the wall from protruding in.
I feared I would have to do likewise on the heads to match the opened up lower ovals, but I checked the gasket against the parts car and fortunately, it's only the manifold ovals that were crazy reduced. The heads' openings are actually very similar to what I ended up porting to, including which side of the oval is opened up more relative to the gasket shape. Phew. No need to risk getting a bunch of metal shavings down in there.
One potential negative to removing the external EGR tube is reduced air volume within the overall plenum chamber. However, a) those EGR tubes get so clogged with gunk, not much air is likely to move through freely, and b) I largely offset any such losses by porting the upper and lower runners and removing the volume of the mostly clogged internal EGR tube.
I also replaced the IAC studs with bolts while I had it all apart. That should make it possible to remove the plenum in the future without draining the coolant and wrestling with the short, inflexible hose run to get the IAC off the studs.
My solution to the PCV Valve and old EGR port. My first thought was to attach a hose barb directly to the PCV's opening in the plenum, but I didn't want to risk damaging the aluminum wall by threading something in or opening up the diameter and bonding it in. The PCV hose can be a very tight fit and could potentially put too much force on a barb bonded to the wall. The JB Weld on the EGR copper cap was sanded down better after this pic. The EGR setup consists of: a) the pipe from the exhaust to the back of the plenum, b) the external tube to the EGR/PCV plate, c) a loop through the plate to the EGR Valve and back into the plate, d) the hole into the plenum. Normal EGR delete just blocks off the hole to and from the valve, leaving all that extra stuff hanging off there.
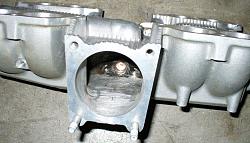
Couldn't leave the throttle body opening alone... It has a surprisingly non-smooth transition. Make that "had." In the back, you can see the inside of the copper EGR plug. The EGR tube would extend 4" from there into the path of the TB opening.
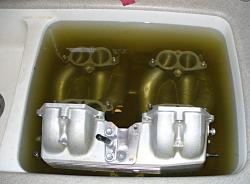
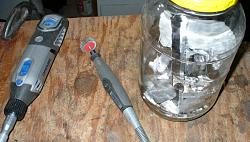
Almost a perfect fit in the "parts washer." I hadn't planned on this step, and I really should have done it first thing, but the carbon buildup on the walls is super sticky and ended up being a magnet for the metal shavings, which I really didn't want getting in the engine.
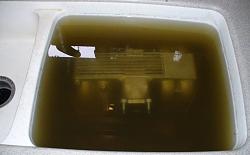
Er, I need a parts washer for my parts washer... And that's after removing most of the gunk already through wire brushing and grinding.
Kinda hard to see with the glare, but that's the aluminum scrap cut away from the upper plenum. Well, I did it twice as practice, so that's two plenum's worth. The first time, I shaved a bit too much in the area around the cold start injector and EGR opening... The second time went way faster, having finally realized that carbide tungsten cutting bits are far superior to grinding bits for metal work! Still, it took a lot of Dremel'ing and hacksaw'ing -- much of it holding the blade by hand -- to get to the finished product.
Before and after shot of two upper plenum runners. You can see on the right how deep those casting marks are. Conventional wisdom says that's turrible, turrible for airflow.
Semi-clogged EGR tube on my '94 upper plenum. The two that I used for porting were quite a bit more clogged, so your mileage may vary... The '94 plenum walls were also quite a bit cleaner and oilier, supporting Ali SC3's hunch that my long-crank cold start-ups could be from the cold start injector over-fueling rather than under.
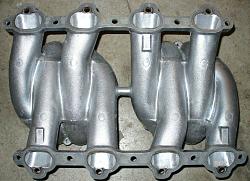
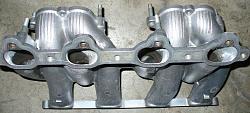
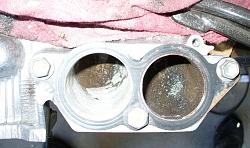
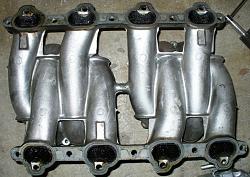
Lower manifold before shaving.
In the bottom, second to left runner, you can see one of the weld lines that run down both sides, how they sometimes result in non-circular walls at the junctions, and one of the round protrusions as shown on the outside of the tubes. (That's after a fair bit of wire brush scrubbing w/ degreaser and carb cleaner.) You can also see the funky casting notch on several of them. I was able to smooth most of that out, but some is out of reach of any tools at my disposal.
My original '94 lower manifold, better showing the ugly casting protrusions all over the bottom. I'm not sure, but I think the '95 that I ported actually had more casting crud. The '94 weighed in 6 oz lighter, but it had ~two-thirds the mileage and perhaps less carbon build-up. Final post-porting cleaning of the upper and lower pieces removed exactly 5 oz from each, so wall gunk could explain much of that 6 oz discrepancy.
Cleaned up with a wire wheel and looking pretty sharp with a plasti-dipped emblem. I might just have to hit it with some aluminum polish and leave it that way instead of painting.
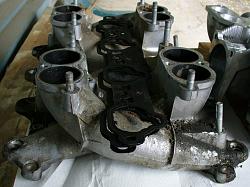
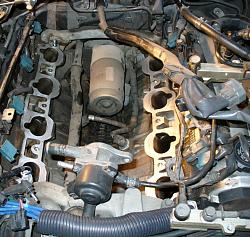
Swapping out the manifolds ended up being a lot more involved than I had anticipated. I think I blocked it out of my memory just how many steps it took to replace the injectors last year... Wish I had done this at the same time. :/ At the very least, I cleaned a lot of sludge out of the cylinder head runners!
I was able to wrestle the IAC off the plenum studs once the throttle body was removed, which was infinitely easier this time having bypassed the insanely difficult coolant barbs last time, and hoped I wouldn't have to drain the coolant or mess with fuel lines. Unfortunately, the coolant line was in the way of the fuel rail and I eventually had to give in and drain it. Then I had to disconnect the FPR because I still didn't have enough wiggle room to get the fuel rails out of the way of the lower manifold, which in turn meant going on the hunt for a store that carries crush washers. And then the short coolant line from the water neck to the IAC was leaking from the use-once-and-die pinch clamp being disturbed while maneuvering the IAC out of the way of everything, and of course I only had 5/16" hose lying around, no 3/8", so had to make a run to the store for a few inches of that...
In the end, it fired right up, albeit a bit weak on the initial try, and has no fuel leaks. I was hoping the cold start injector was indeed problematic and that the supposedly low mileage one I used makes a lasting difference. However, after a few more cold starts, I think the "new" CSI is DOA. Everything works great when warm, but cold starts are much worse off. So, I'll be putting the old CSI back in or using the '95 ECU again... Upon further reflection, having become deeply familiar with the inside of the manifolds, it seems impossible that the '92-94 SC400 wouldn't have a cold start hesitation. The CSI is in the upper plenum, and the regular injectors are at the base of the lower manifold. So, cold starts are going to be delayed (longer cranking) by however long it takes for that air volume to be sucked through the upper and lower runners to reach where regular injection takes place. I've probably been chasing my tail in trying to eliminate the last of the start-up delay.
On a positive note, driving impressions are good. Throttle response feels a bit better, but it could also be that the power band has shifted or expanded. The difference isn't mind-blowing, but the engine feels very healthy and happy.
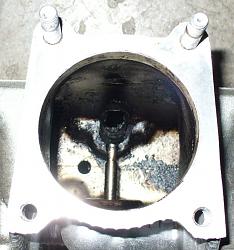
Cleaned out the V-alley and lots of cylinder head sludge, but no metal work down there! I don't know what the story is with those huge notches on the middle cylinders. Sort of makes me question whether improved airflow in the manifold pieces is actually worthwhile...
Done! The JB Weld'ed EGR plug blends in pretty well now. You can see the capped EGR pipe behind the plenum. I bent it back a bit for extra clearance, so I didn't have to shave down the back of the plenum around the bolt holes after all. It's possible to peer underneath now and see the fuel line to the cold start injector, making more engine bay fuel connections visible without removing stuff.
I ran across this pic in a JDM Soarer eBay listing after the fact. It looks like non-EGR models got a PCV plate that fills that entire space, but doesn't extend down below the portion I trimmed off for the EGR passageways. I wouldn't mind getting my hands on one of those plenums/plates to compare up close to my hack job. Also interesting that there's no Fuel Pressure VSV alongside the Diagnostics box. (That might be it to the right of the PCV hose, though. There's that extra vacuum line running over the PCV plate and down toward it. Also, it's hard to tell, is the coolant line to the IAC capped?) I've had my Fuel Pressure VSV off and on a few times and can never tell a difference one way or the other, so it wouldn't surprise me if JDM models didn't use it.
That moment you realize you built a clown car...
May '16: Backup camera and new head unit arriving this week... I went with the Nakamichi NA135 Single DIN:
Who would think to look for a Single DIN unit with backup camera inputs? Certainly not me. (As it turns out, there are several others that are similar, mostly called Digital Media Receivers, but generally under the lesser brand names for some reason.) It checks all the boxes of what I was looking for, though, without all the negatives of pretty much every Double DIN I looked at. The one negative I see is the red illumination. Blue or green options would make it much better. (But, while waiting for it to arrive, I was informed that Nakamichi was sold to a Chinese company a few years ago and may not be the same quality of old.) The camera I ordered is the Esky EC180-19.
The camera had to be sent back and ended up being a refund instead of an exchange for some reason, so I'm back to shopping for a camera to go with the Nakamichi. Early impressions of the Nak are:
- CD player is slow loading and noisy, but microSD (HC, up to 32 GB) is nearly instantaneous.
- Shuffle play is very quick, but turns off (default) every time powered down.
- No headlights input for auto dimmer, just a high/low setting.
- Good sound quality, but I need more testing time to decide if it's comparable to my old top of the line unit (triple the price point).
- Great LCD and simple, intuitive controls, but the lesser used buttons have pretty small labels.
- Build quality feels budget, but what do you expect for $100?
- Very tight squeeze in back with the factory wiring bundle.
- Face is non-motorized and technically not detachable despite shipping detached and having a carry case. USB and AUX are on the face, with CD and SDHC behind it when flipped down.
In short, more good than bad. However, on day 2 of more extensive testing, it's unable to make it through a song on the SD card without read errors which kick it back to the tuner. It'll usually play through that spot just fine on the next try, then have a read error on the next song... This could be the end of the Nakamichi experiment. And, after a couple days, the volume **** abruptly stopped working. It briefly adjusted itself a few minutes later, then stopped responding again.
In looking around at other options, I've noticed that several other brands, including some formerly very good ones that have since gone Chinese, look like carbon copies: Blaupunkt, Clarion, Power Acoustik, Soundstream, etc. Unfortunately, they comprise almost the entire market on Single DINs with backup camera capability.
Here are a few pictures of the short-lived Nak in action:
The red illumination isn't bothersome during the day, and surprisingly not at all bad at night. The red is very similar to the '94-95 gauge needles in color and intensity.
CD and SDHC slots.
I'll have to do a bit more work on the mount, as things didn't quite fit together like before with the cubby and 1/2 DIN trim plate.
I had a random thought that a stock head unit could prove useful as a cubby system and trim piece if disassembled. I've had one in the garage in unknown condition, being part of a parts stash I purchased and having none of the stock connections to hook it up. With the funky shaped 2.5 DIN opening and only the cheap Metra kit available, I'll keep the shell on hand to test out different ideas as they come along.
Hmm... Single DIN mount + cubby? Multi-level cubby w/ iPod stereo? GPS / backup camera mount?
April '16: Doing a black & tan 2-tone conversion...
I found a nearly flawless black shift **** and had to switch over to it to add to the partial 2-tone look. Then was inspired to go back for the black dash... Also visible is the recently added LS400 inner door handle(s). I could do without the shiny, but it does feel good and stout.
The old dash is out now, the ducts are cleaned and drying (might as well have a fresh start after two decades of grime), and the new dash is going in. If I never see another piece of purple tape, it'll be too soon! They couldn't have made the harness any tougher to remove from the underside of the dash unless they riveted the damn thing on.
It sucks, I've pulled the dash (and gauge cluster) from three different cars, and on two of them the cluster disconnects easily, while on mine all of the connectors require dropping the steering column (wire harness is too short to pull it out far enough, otherwise) and prying like crazy to get them free. That turns a 10 minute job into one which can take several hours.
Day 2 of the black dash swap, everything is back together except for the glove box which presented a problem. The shift **** and e-brake handle (shaved) are in, as well as the auto-dimming mirror. I've got the A-pillars and one back seat window trim ready to go in next. I still need to get a black e-brake boot and steering wheel shroud, although both fit the look fairly well as-is. Maybe the stereo/shifter surround, but we'll see. Definitely the door window trim.
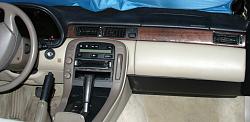
The wood trim was busted in two at the edge of the passenger side vent, by someone who couldn't figure out how to remove it properly, so I glued it up with Titebond and it feels like a surprisingly strong bond. I was only optimistically hoping for something strong enough to temporarily mount the passenger vent. That minimizes the need to source an immediate replacement, since they're not easy to find.
I couldn't handle that gaping hole in the dash while searching for a tan '97+ glove box. Sometimes you have to improvise and...it turns out better than expected!
Black glove box to match the newer dash's modified upper left mounting point, but with the tan door/cover swapped over.
I have the black lower dash portions for the driver's side, although I'm having trouble locating the bottom piece (which you can only see if you lay upside down in the footwell), so I may try those out to carry the line across. It also makes me wonder what a black center console would look like, leaving the rest as-is. The lower part of the glove box extends beyond the edge of the ignition ring wraparound trim piece, creating a bit of a broken line with the black vs tan, but tying into a black center console would hide that.
Tomorrow, the A-pillars will go in, as well as the driver's side back window trim. That may look funny not having the matching pass. side back window trim, but oh well. One step at a time.
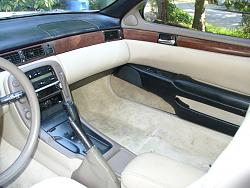
Yesterday's improv led to today's inspiration! No pressing need to carry the black lower portion over to the driver's side now that the partial door card completes it on the passenger side.
The 2-tone door contrast seems a bit harsh from this angle, but it'll obviously look much better once I source, or SEM paint, black window trim.
My shaved Oh S***! handle mounting clips look awesome now that they're against black A-pillars instead of beige ones. Not so awesome is that I ditched some of the door wiring when I went with a minimal passenger door card, so putting a full one back in, I don't have the hookups for the lock controls or light.
I had planned on getting a black e-brake boot at some point to go with the black handle, but I couldn't decide between the vinyl replacements for $20 and the RedlineGoods leather one for $49, so I figured I would try dying the beige one black as a test of the Dupli-Color Vinyl and Fabric product before tackling the interior trim pieces I don't have black ones of. I scrubbed it down with Simple Green and...it pretty much dissolved. Apparently, the stock e-brake boot is a thin rubbery membrane loosely bonded to a mesh backing. Experiment failed. Oh well, on to the next experiment, using the same white leather as the seat reupholstering to create a much nicer boot.
White leather e-brake boot to match the seat, plus black & tan passenger window controls to match the driver's side and soften the contrast of the half-black door card.
Finished product. It fits pretty well but didn't come out quite like I wanted. I copied the original as an exact template, which was problematic because the leather was too thick to make the same folds as the thin vinyl. So, I had to trim some stuff I had already sewn and make modifications after the fact, which never turns out well... I've got some ideas now how to make the hole for the handle a bit cleaner looking, if I decide to do a second version.
Painted the door window trims with DupliColor Vinyl/Fabric Gloss Black to match the A-pillar and quarter window trims.
After swapping in the shiny metal LS400 door handles, it struck me that the black surrounds don't blend well with the stock beige window trim. I was hopeful that switching to black trim would not only address that, but make the shininess of the handles look less out of place. It does seem to have accomplished that.
The Gloss Black is a bit shinier than the factory black, but it's close enough that the camera doesn't really capture it.
Different view of the new e-brake boot.
Also painted a spare center console to see if I like the look. I've got a factory black console lid to go along with it, if going that route.
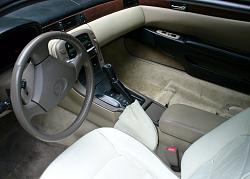
Painted center console installed, along with a fresher wood trim (damaged in shipping, was able to mostly salvage with a fair bit of elbow grease) and re-repaired right vent.
That ties the lower glove box in nicely! I think that's enough black now. Except for maybe the seat... I'm still contemplating that.
June '16:'05 Mazda RX8 Shinka driver's seat added. Benefits include: a full 30 lbs of weight savings (41 lbs vs 71 lbs; ~8 lbs less than the Supra seat with half the power adjustability), retains all the SC's power functions, is a bit less plush but a lot more supportive fit with much better bolsters, and adds the seat heater which my car didn't come with. The special edition "parchment leather" is a remarkably close color match to the SC's tan, although not quite as close as it was before I thoroughly cleaned it. And as an added bonus, the black lower garnish ties it in to the new 2-tone color scheme!
The patch harness I created. I went back and soldered/wrapped the wires after testing that I had them all hooked up right. The dangling blue wire on the right is for the RX8 seat heater, which I later added in with the seat swapped to the '98. (Hint: The RX8 seats have a bad design, where the lower element's wire crosses under one of the rods that pulls the seat cover tight into the cushion. That commonly results in a severed wire, which also keeps the upper element from working.)
Bottom view of the seat, with RX8 feet, locating pegs, and mid-rail brackets removed, and SC feet welded on. Even after adding the SC feet, the final weight was nearly 4 lbs less than the RX8 seat began with airbag and everything. I removed nearly as much metal as I added.
Installed! I removed the airbag wiring and carefully separated the bag from the cover. I also removed the unneeded magnetic weight sensor and associated wiring, which I believe is only to tell the airbag there's someone in the seat. I guess the white e-brake boot has to go now...
And in "I never saw that coming" news, I realized after the installation that the rotary symbol on the RX8 seat closely resembles the shape and orientation of my custom hood vent!
June '16: Trying out a wood/leather ES300 steering wheel. Now that I've gone two-tone with the interior, the all-beige wheel seems to lack spunk.
The wood obviously doesn't match, but I figured I'd go ahead and install it while deciding what to do about that. With the "Frankenbag" airbag gutted and the side controls removed, it's 3 lb 6 oz lighter than the stock SC wheel.
Also sneaking into the above picture is version 2 of my DIY ebrake boot. I got a bit cocky this time, attempting contrasting double-stitched leather, and discovered the limits of my sewing ability... Between the machine snagging constantly and the lines wandering way more than I realized while working from the back side, I definitely should have gone with black thread.
Next, maybe I'll hack up a tattered SC wheel and use its mount to adapt a MOMO hub while retaining the clock spring and CC stalk... I don't know if anyone has tried that before.
I enjoyed the in-depth look of the 1uz intake manifold, it reminds me of all of those things I would do that no one else would even bother with. came out looking good!! also like the shape of the hood vent but I would paint it once its got the final tweaks.
Trust me, no one would ever question your affinity for detail.
I don't think I ever posted a final picture of the hood/vent... The clear coat didn't hold up to rust, as feared. I ended up painting the raised middle section aluminum silver for a similar look to the brushed metal that I liked so much, and black on the edges. Just the opposite of the original plan to paint the middle section black to tie into the trunk. :/ Sounds weird and looks sorta weird, TBH, but it makes sense in person. The whole car's paint scheme is still evolving, or devolving depending on your perspective...
Tomorrow looks like it might have a brief break in the weather to get the manifold swapped over. I'll be able to fill in a couple more "before" pics at that point of stuff I didn't shoot before modifying the spare.
really appreciate the information on the seat change. SC seats are heavy and getting to hard to find. You offer a sporty looking and do-able alternative that also keeps the power switches, not to mention the added benefit of weight reduction.
 10-24-14, 09:37 AM


 So, I ended up paying more than planned for all the small parts acquisitions instead of the one donor car.