
My Drift/Fun Build


Thread Starter
Rookie
Joined: Oct 2010
Posts: 50
Likes: 0
From: WI
I started a build thread a couple of years ago now but things are finally changing for my little red SC so I figured I would start a new one. A group of close friends and I have been wanting to get into drift for quite some time now so we all decided to dive in and get our builds done for the 2016 season.  I'm going to start with the basics, no power adders less exhaust/intake, a few suspension mods, aftermarket inner tie rods, brake upgrades, abs/trac delete, 6 speed swap, welded diff. so onto a few pics to get started...
My 96 SC400 as of last summer

Early last September i decided to go ahead and pursue my dream to have as much fun with my car and my friends as possible. So being as infatuated with the Lexus badge as I am I picked up a new daily driver. Basically I had to have another RWD 1UZ car that was comfortable and I could easily use all year for every occasion. I found a one owner, completely rust free, low mileage, clean 2000 LS400 in Wisconsin. Yes, in Wisconsin. I hate tan interiors but I couldn't pass it up.

My fleet. Also a 1979 Celica Coupe.

Started with the interior

In the garage ready for disassembly

Newly rebuilt transmission with Precision Industries converter now useless

Engine out (Yes I'm a huge Grimmspeed fan)

Cutting weight wherever I can

Done

My 06 350Z CD009 This was a long process to find the correct transmission. There are a bunch of CD00 variations and the first 2 I ordered from LKQ were wrong even though I specifically told them it had to be an 06 model year car. But finally after jumping through some hoops I finally got the correct model and now I can collect all of the parts to connect it to the 1UZ. They even sent me one with everything attached, which is super weird.

Pulling this harness is the single most difficult thing to do on an SC400

started pulling the dash to remove the HVAC unit. Another huge pain to pull out but thanks to ClubLexus and a little search it was an easy endeavor.

Gone

All back together

So many modules in these cars!

So a couple weeks ago an older gentleman traded in a 99 LS to the dealership I work at. 150k, rust free, pretty clean. Needed a power steering pump. Head Lamps needed to be buffed. Key was broken. But I got it at wholesale for extremely cheap and I love the color so I couldn't pass it up. Fixed the pump and cleaned everything. Probably will sell it in a couple months but I didn;t want to see it go to auction.

I've got some more but I will update this weekend. Enjoy my fellow enthusiasts. Also sorry for the giant pictures. Still learning photobucket.
I'm going to start with the basics, no power adders less exhaust/intake, a few suspension mods, aftermarket inner tie rods, brake upgrades, abs/trac delete, 6 speed swap, welded diff. so onto a few pics to get started...My 96 SC400 as of last summer
Early last September i decided to go ahead and pursue my dream to have as much fun with my car and my friends as possible. So being as infatuated with the Lexus badge as I am I picked up a new daily driver. Basically I had to have another RWD 1UZ car that was comfortable and I could easily use all year for every occasion. I found a one owner, completely rust free, low mileage, clean 2000 LS400 in Wisconsin. Yes, in Wisconsin. I hate tan interiors but I couldn't pass it up.
My fleet. Also a 1979 Celica Coupe.
Started with the interior
In the garage ready for disassembly
Newly rebuilt transmission with Precision Industries converter now useless
Engine out (Yes I'm a huge Grimmspeed fan)
Cutting weight wherever I can
Done
My 06 350Z CD009
This was a long process to find the correct transmission. There are a bunch of CD00 variations and the first 2 I ordered from LKQ were wrong even though I specifically told them it had to be an 06 model year car. But finally after jumping through some hoops I finally got the correct model and now I can collect all of the parts to connect it to the 1UZ. They even sent me one with everything attached, which is super weird.Pulling this harness is the single most difficult thing to do on an SC400
started pulling the dash to remove the HVAC unit. Another huge pain to pull out but thanks to ClubLexus and a little search it was an easy endeavor.
Gone
All back together
So many modules in these cars!
So a couple weeks ago an older gentleman traded in a 99 LS to the dealership I work at. 150k, rust free, pretty clean. Needed a power steering pump. Head Lamps needed to be buffed. Key was broken. But I got it at wholesale for extremely cheap and I love the color so I couldn't pass it up. Fixed the pump and cleaned everything. Probably will sell it in a couple months but I didn;t want to see it go to auction.
I've got some more but I will update this weekend. Enjoy my fellow enthusiasts. Also sorry for the giant pictures. Still learning photobucket.


Thread Starter
Rookie
Joined: Oct 2010
Posts: 50
Likes: 0
From: WI
Thanks everyone! I'm excited to drive this again this summer. Regarding the 2 LS's I wasn't planning or looking for 2 it just kind of happened. I will probably end up selling it this spring once it's all cleaned up.
Thread Starter
Rookie
Joined: Oct 2010
Posts: 50
Likes: 0
From: WI
Time for e few more updates.
The HVAC unit, no longer needed

Found out the old rack was leaking after removing the inner tie rod boots so I grabbed a new one and some Sikky solid bushings.

ABS and TRAC are out to start making new lines. This is actually a very easy mod, all the extra lines make it a bit confusing but it's really very simple.

Rear lines have been made

Front lines are in as well

It's a little messy but they will work and it is a very budget friendly setup. Next time I will probably do stainless pre-made lines to clean it up a bit more.

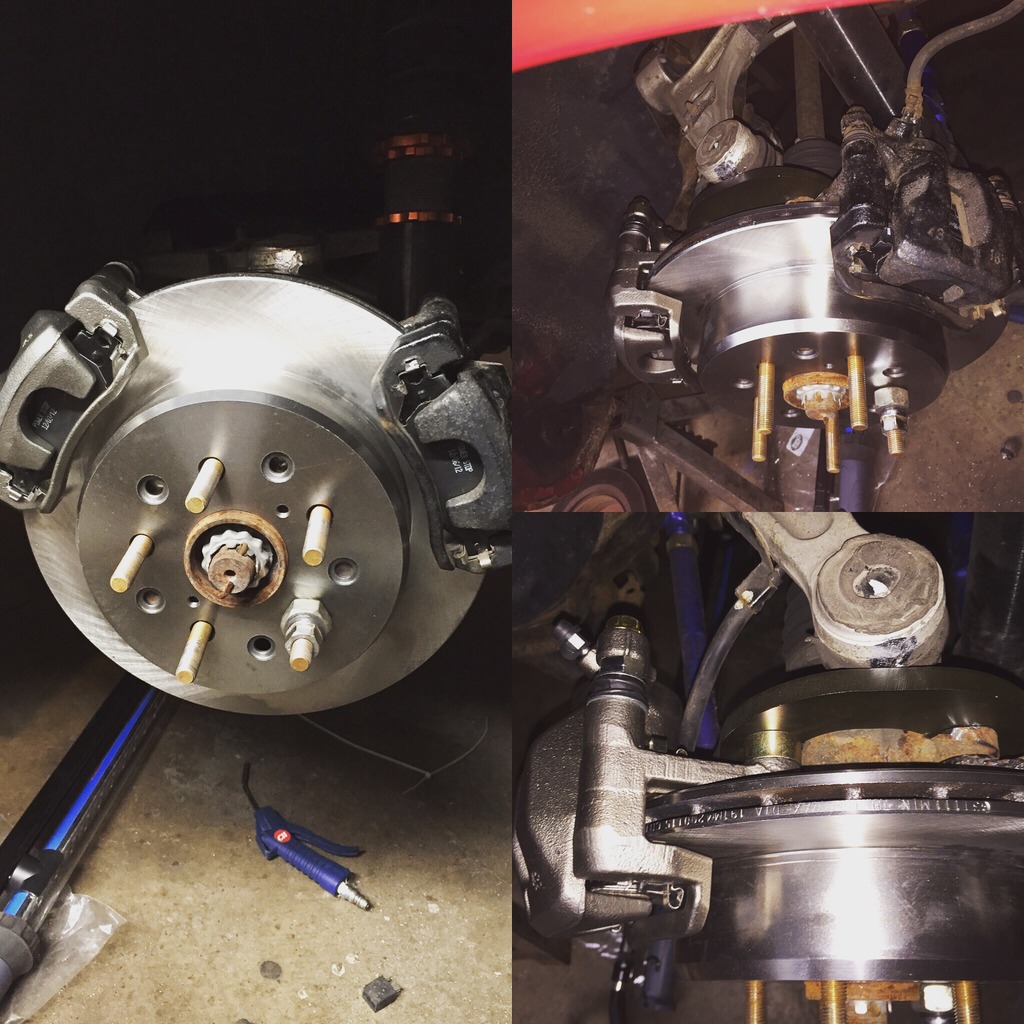
Here is my brake setup. LS front caliper upgrade, no name rotors and pads, ASD handbrake, BattleVersion dual caliper bracket, Stainless lines, second set of rear calipers.

Also for a little flavor this is my buddy's FXT.

The HVAC unit, no longer needed
Found out the old rack was leaking after removing the inner tie rod boots so I grabbed a new one and some Sikky solid bushings.
ABS and TRAC are out to start making new lines. This is actually a very easy mod, all the extra lines make it a bit confusing but it's really very simple.
Rear lines have been made
Front lines are in as well
It's a little messy but they will work and it is a very budget friendly setup. Next time I will probably do stainless pre-made lines to clean it up a bit more.
Here is my brake setup. LS front caliper upgrade, no name rotors and pads, ASD handbrake, BattleVersion dual caliper bracket, Stainless lines, second set of rear calipers.
Also for a little flavor this is my buddy's FXT.


Trending Topics


Thread Starter
Rookie
Joined: Oct 2010
Posts: 50
Likes: 0
From: WI
Thread Starter
Rookie
Joined: Oct 2010
Posts: 50
Likes: 0
From: WI
Been a little while since I've had an update but things are still progressing on this build. Took weeks to find a front steel subframe that wasn't too overpriced. I finally snagged one to replace the rusty unit I pulled off mine. Front end is now back together with LS brakes, supra ss lines, Battle Version inner tie rods, ARP wheel studs, new lower control arms, new wheel bearings. Also pulled the diff this weekend to have it welded and started on the new rear brake setup. Next month I will be ordering all the transmission goodies.


XXR 527 18x9.75 +20 clears LS brakes with miles of room

Diff out and has been cleaned/drained
XXR 527 18x9.75 +20 clears LS brakes with miles of room
Diff out and has been cleaned/drained

Thread Starter
Rookie
Joined: Oct 2010
Posts: 50
Likes: 0
From: WI
Well got the diff welded and back in last weekend. Turned out pretty good, don't have any pics but we burned the spiders at all 4 corners then laid down a 1/4 flat stock square over the gears and burned that in all around. Should be plenty strong to handle my heavy foot. Also got the Battle Version dual rear caliper brackets in and all the brakes sorted and bled. Only thing left for the brake setup is plumbing/mounting the handbrake.
As far as the BV caliper bracket install is a breeze. Yes you can keep your stock handbrake, there is no interference at all. A little shave on the knuckle with the carbide and everything fits together nicely. The bolts they provide I feel are a touch long, they don't hit the rotor but I still put in a washer to give a bit more space. Also if you keep your ABS it does hit the wheel speed sensor so you will have to shave a bit off the bracket. I don't have ABS anymore so it wasn't an issue for me.
Got everything bled today as well. Found one leak in a fitting that wasn't quite flared enough. Took about 5 min to sort that out and now the brakes feel fantastic. I'm excited to feel the difference with the larger LS calipers.
First bath of the season!

Tucked away for the night. Finally back on all fours.

As far as the BV caliper bracket install is a breeze. Yes you can keep your stock handbrake, there is no interference at all. A little shave on the knuckle with the carbide and everything fits together nicely. The bolts they provide I feel are a touch long, they don't hit the rotor but I still put in a washer to give a bit more space. Also if you keep your ABS it does hit the wheel speed sensor so you will have to shave a bit off the bracket. I don't have ABS anymore so it wasn't an issue for me.
Got everything bled today as well. Found one leak in a fitting that wasn't quite flared enough. Took about 5 min to sort that out and now the brakes feel fantastic. I'm excited to feel the difference with the larger LS calipers.
First bath of the season!
Tucked away for the night. Finally back on all fours.


