Notices
RX - 3rd Gen (2010-2015) Discussion topics related to the 2010 - 2015 RX350 and RX450H models

How do you replace parking light bulb right above the high beam?

Thread Tools
 
Search this Thread
 
Old Apr 20, 2022 | 09:57 AM
  #1  
DallasLex's Avatar
DallasLex
Thread Starter
Advanced
20 Year Member
Photogenic
Photoriffic
Liked
iTrader: (1)
 
Joined: Dec 2004
Posts: 562
Likes: 19
From: TEXAS
Default How do you replace parking light bulb right above the high beam?

I didn’t want to try this without asking:


Reply
Old Apr 20, 2022 | 10:46 AM
  #2  
zmel's Avatar
zmel
Rookie
10 Year Member
Liked
Loved
 
Joined: Jun 2013
Posts: 32
Likes: 12
From: OR
Default

https://www.carcarekiosk.com/video/2.../parking_light
Reply
Old Apr 22, 2022 | 03:17 PM
  #3  
ellocovg's Avatar
ellocovg
Advanced
15 Year Member
Liked
Loved
Community Favorite
iTrader: (1)
 
Joined: Oct 2009
Posts: 739
Likes: 207
From: NJ
Default

I replaced these with fairly decent looking, overpriced leds from the retrofitsource and they did not last long before they started flickering and burnt out. They looked great while they lasted but I’ll be going back to stock yellowish dependable incandescent bulbs.
Reply
Old Apr 23, 2022 | 07:36 AM
  #4  
Roscol's Avatar
Roscol
Pit Crew
5 Year Member
Photogenic
Photoriffic
 
Joined: Jun 2018
Posts: 215
Likes: 61
From: Ont
Default

There are quite a few configurations of lights on these models, there are are “side marker” lights which I think a lot of instructions are based on, as opposed to the parking lights as indicated on the included picture.


Reply
Old Apr 23, 2022 | 07:39 AM
  #5  
Roscol's Avatar
Roscol
Pit Crew
5 Year Member
Photogenic
Photoriffic
 
Joined: Jun 2018
Posts: 215
Likes: 61
From: Ont
Default

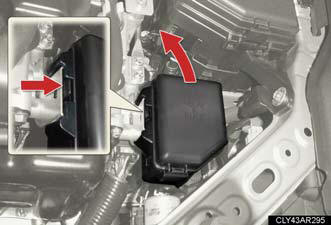
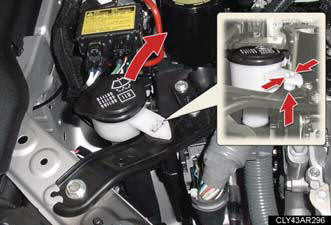
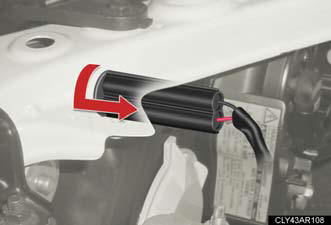
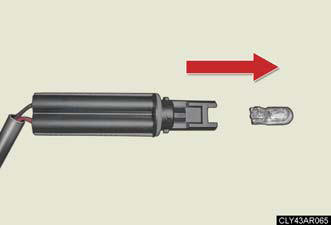
I found this to replace those ones.Parking lights (halogen headlights and discharge headlights)


1. Before replacing the bulbs: - Left side.


Move the fuse box.

- Right side.


Move the washer fluid filter opening.


2. Turn the bulb base counterclockwise.


3. Unplug the connector while depressing the lock release
Reply
Old Apr 23, 2022 | 07:22 PM
  #6  
ellocovg's Avatar
ellocovg
Advanced
15 Year Member
Liked
Loved
Community Favorite
iTrader: (1)
 
Joined: Oct 2009
Posts: 739
Likes: 207
From: NJ
Default

I just swapped mine back to the stock bulbs, it’s pretty simple. My Morimoto led 194 bulbs were actually melting! Not cool but that explains why one went out and the other was flickering.

My 2010 is a little different from the picture above. On the drivers side the fuse block is closer to the windshield and didn’t need to be removed. The filler neck for the washer fluid was bolted to the metal with a bolt not clipped in to a bracket as shown in the illustration.

1. Remove the black plastic covers over the engine. You just need to remove the outers, but I took off all three so I could inspect everything.

2. I removed the number 10 bolt holding the filler neck for the windshield washer fluid. This isn’t necessary but I have big hands.

3. The two outer yellow 194 bulbs are easy just track the wire and twist the connector. The two on the top middle are just as easy but it isn’t the typical socket that we are used to. They have that 4” extender that’s pictured above. Same principal just trace the wire look for the black piece and twist it like a bulb. I like to use a tiny dab of electrical grease to avoid condensation in there.


Last edited by ellocovg; Apr 23, 2022 at 07:27 PM.

Reply
Old Apr 26, 2022 | 08:51 PM
  #7  
DallasLex's Avatar
DallasLex
Thread Starter
Advanced
20 Year Member
Photogenic
Photoriffic
Liked
iTrader: (1)
 
Joined: Dec 2004
Posts: 562
Likes: 19
From: TEXAS
Default

Thanks everyone for the prompt responses. Special thanks to @Roscol and @ellocovg
Reply
Related Topics
Thread
Thread Starter
Forum
Replies
Last Post
bud13
LS - 3rd Gen (2001-2006)
2
Sep 25, 2019 11:08 PM
johnnunez2
GS - 3rd Gen (2006-2011)
16
Nov 2, 2010 07:14 AM
TomLee
GS - 2nd Gen (1998-2005)
9
Aug 1, 2007 12:08 PM
kevs
GS - 2nd Gen (1998-2005)
1
Aug 3, 2002 03:18 PM


All times are GMT -7. The time now is 01:37 PM.