
DIY Brakes RX350 (2008)


Thread Starter
Pit Crew
Joined: Aug 2008
Posts: 152
Likes: 1
From: IL
I thought I had previously seen a good DIY guide with photos for basic pad replacement but now I can't find it after a lot of searching.
Maybe I had been looking at a 330 or even a different model entirely? Is there a 2nd gen RX brake thread out there that I can't find? Or maybe they're all similar. (Front brakes for now.)
I did my own brake work on my Jeep GC for a dozen years so it's not entirely new but it'll be the first time on the RX and I really don't want any surprises when the time comes so I figured I should get my ducks in a row and do a little research. Thanks.
Steve

Pole Position
Joined: Oct 2009
Posts: 268
Likes: 0
From: il
I thought I had previously seen a good DIY guide with photos for basic pad replacement but now I can't find it after a lot of searching.
Maybe I had been looking at a 330 or even a different model entirely? Is there a 2nd gen RX brake thread out there that I can't find? Or maybe they're all similar. (Front brakes for now.)
I did my own brake work on my Jeep GC for a dozen years so it's not entirely new but it'll be the first time on the RX and I really don't want any surprises when the time comes so I figured I should get my ducks in a row and do a little research. Thanks.
Steve
Maybe I had been looking at a 330 or even a different model entirely? Is there a 2nd gen RX brake thread out there that I can't find? Or maybe they're all similar. (Front brakes for now.)
I did my own brake work on my Jeep GC for a dozen years so it's not entirely new but it'll be the first time on the RX and I really don't want any surprises when the time comes so I figured I should get my ducks in a row and do a little research. Thanks.
Steve

Rookie
Joined: Jun 2009
Posts: 65
Likes: 0
From: DC
I just did the front brakes on the RX-330 (I know, yours is a 350) - what I forgot were the 2 bolts needed to drive the rotor off of the hub.
Another comment - if hairline cracks are visible on the braking surface of the rotors, I would replace them.
My 2 cents.
Tom
Another comment - if hairline cracks are visible on the braking surface of the rotors, I would replace them.
My 2 cents.
Tom

Lexus Test Driver
Joined: Aug 2007
Posts: 1,254
Likes: 22
From: Western Australia (Australia)
This is the article for the RX330 front pads (which will most likely be exactly the same for the 350 unless something was changed). Did a search on google that brought me straight back here https://www.clublexus.com/forums/rx-...placement.html
Pole Position
Joined: Oct 2009
Posts: 268
Likes: 0
From: il
This is the article for the RX330 front pads (which will most likely be exactly the same for the 350 unless something was changed). Did a search on google that brought me straight back here https://www.clublexus.com/forums/rx-...placement.html


Lead Lap
Joined: May 2006
Posts: 3,999
Likes: 37
From: FL
For anyone who has done any brake work in the past you will not find anything here to trip you up. Assuming you do not need to turn or replace the rotors it is straightforward. Replaced the rear pads not long ago and it took me about 45 minutes from the time I rolled out the floor jack until I was finished cleaning up. That included a quick scuff of the rotors with the cordless drill to prep the surface. Only thing I have had to do with the rotors after 85K miles as there is still no pulse in the pedal at any speed. YMMV.
Trending Topics
Thread Starter
Pit Crew
Joined: Aug 2008
Posts: 152
Likes: 1
From: IL
Thanks; that's a big help. Parts from Sewell just arrived. So all 4 pads (L & R, inboard/outboard) are all the same?
I went ahead and bought the shim kit though the old ones can probably be reused. Maybe I will do that next time. It includes a small packet of grease. Does that go between the shim and the pad or where the caliper piston hits the shim?
I also bought the "fitting kit" which I almost certainly won't need but figured better to be safe then find out I need it mid job. Not sure exactly how they would get used but seem to be folded sheet metal stampings that might be used to better hold the pads into the brackets that hold them.
Steve

Driver School Candidate
Joined: Feb 2010
Posts: 12
Likes: 0
From: BC
Thanks; that's a big help. Parts from Sewell just arrived. So all 4 pads (L & R, inboard/outboard) are all the same?
I went ahead and bought the shim kit though the old ones can probably be reused. Maybe I will do that next time. It includes a small packet of grease. Does that go between the shim and the pad or where the caliper piston hits the shim?
I also bought the "fitting kit" which I almost certainly won't need but figured better to be safe then find out I need it mid job. Not sure exactly how they would get used but seem to be folded sheet metal stampings that might be used to better hold the pads into the brackets that hold them.
Steve
I went ahead and bought the shim kit though the old ones can probably be reused. Maybe I will do that next time. It includes a small packet of grease. Does that go between the shim and the pad or where the caliper piston hits the shim?
I also bought the "fitting kit" which I almost certainly won't need but figured better to be safe then find out I need it mid job. Not sure exactly how they would get used but seem to be folded sheet metal stampings that might be used to better hold the pads into the brackets that hold them.
Steve
http://www.youtube.com/watch?v=M1LTjoQjLKY
http://www.youtube.com/watch?v=SEf1w...eature=related
Just did my front rotors a couple days ago, everything was pretty much the same as in those videos (for the RX300). Remove the top 14mm bolt, flip caliper up and remove pads (they pop out after some effort), remove the two 17mm bolts and take off the caliper. The rotors required a bit of effort to pull off (probably some rust on the hub), but they came off evenutally without the use of the two bolt holes.
Thread Starter
Pit Crew
Joined: Aug 2008
Posts: 152
Likes: 1
From: IL
I just did one which went pretty easy. I'm going to drive around a bit and make sure all is well before doing the other.
In the video since he's reusing pads he's not dealing with the shim business. My old pads showed signs of some substance between the rubbery inboard layer of the shim and the pad, presumably the stuff that comes in the little packet. No sign of any on the outside though that could have long washed away. Unsure, I did put some on the outside as well as under the shim but I bet that wasn't necessary.
The "fitting kit" which I bought just in case I didn't use and not entirely sure where it would go if I did. Seems like between the pad (with regular shim) and the caliper as an extra spacer though why I don't know. I'd say it seems likely the old shims stuff could be reused.
I started intending only to inspect to see if the brake job was needed right away or could wait. The initial inspection showed about 3 or 4 mm left on the outboard pad which meant there was plenty of time. But when I swung the caliper up out of the way and got a good look at the inboard pad there was only about 1 mm or less at the top. And it was uneven...there is probably a good 2 or 2.5 mm left at the bottom of the inboard pad. So it was time to proceed.
I do like this design with the swing-away caliper. About the only thing that took any time was my hesitation to back down the caliper too much (on account of new thick pads). I backed it down, then untied the wire that was holding for a trial fitting only to see it needed to go back more. So a couple unnecessary rounds of that. Otherwise pretty simple. Fingers crossed but so far so good. Initial road test was fine.
Steve
Thread Starter
Pit Crew
Joined: Aug 2008
Posts: 152
Likes: 1
From: IL
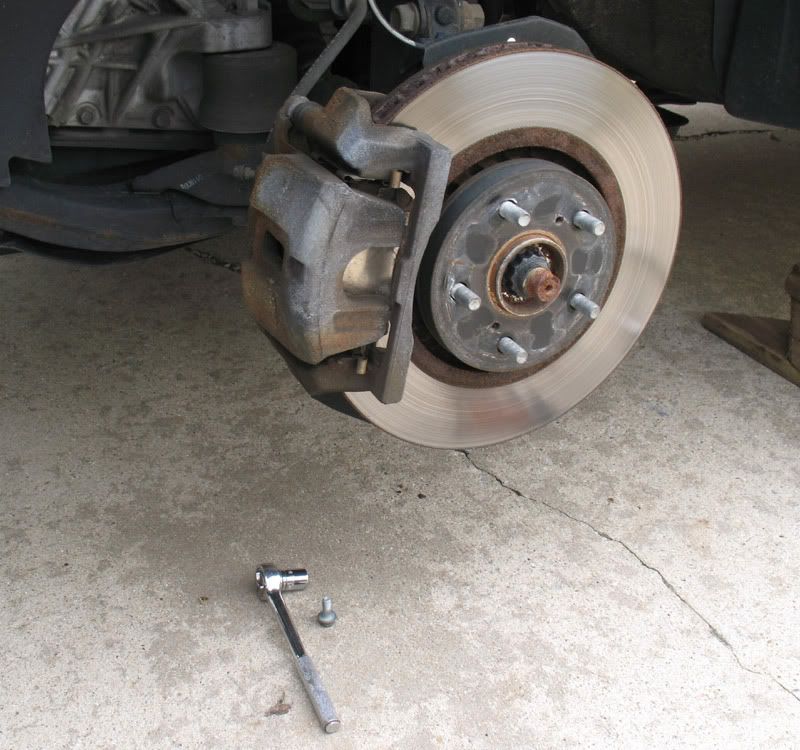
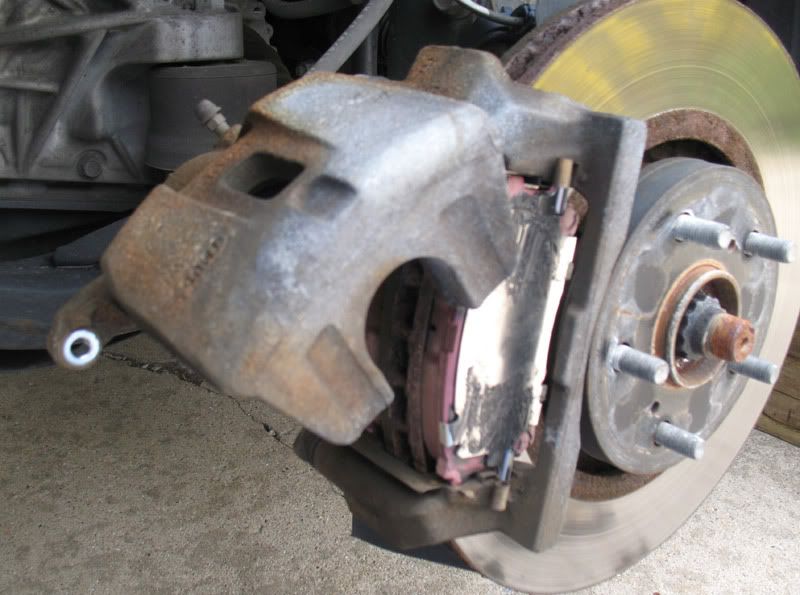
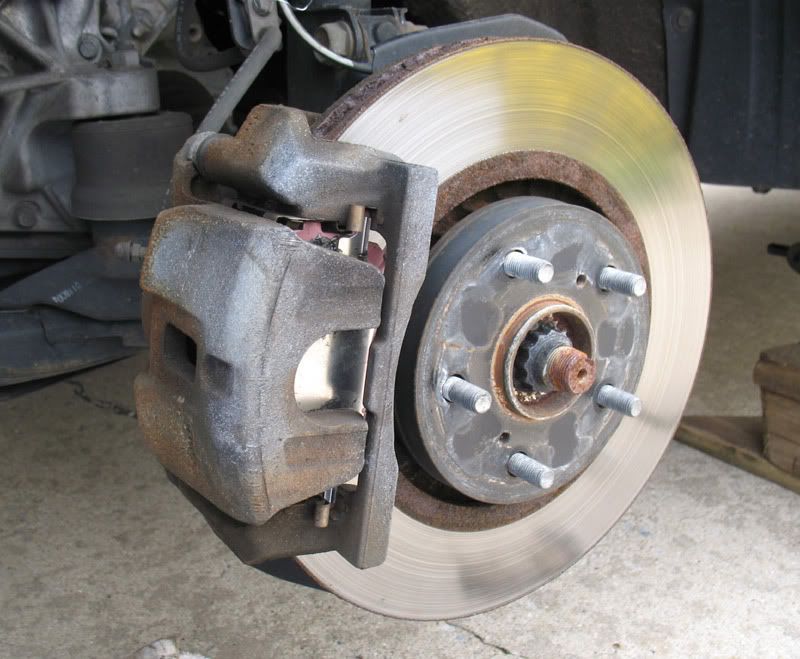
Here we go...parking brake on, other wheels chocked, vehicle jacked and wheel removed. I've removed the lower 14mm caliper bolt. The upper bolt will not be removed.
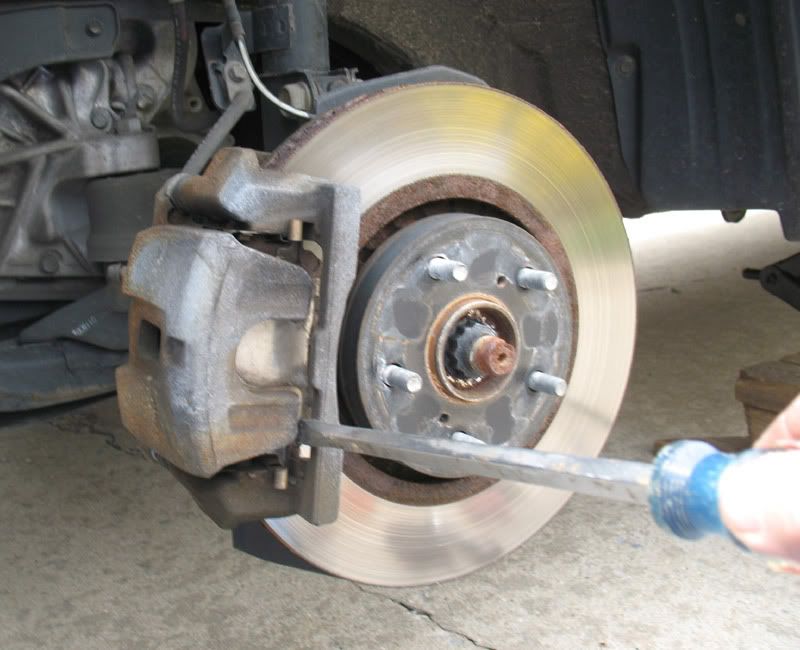
A little prying to get the caliper free to swing away.
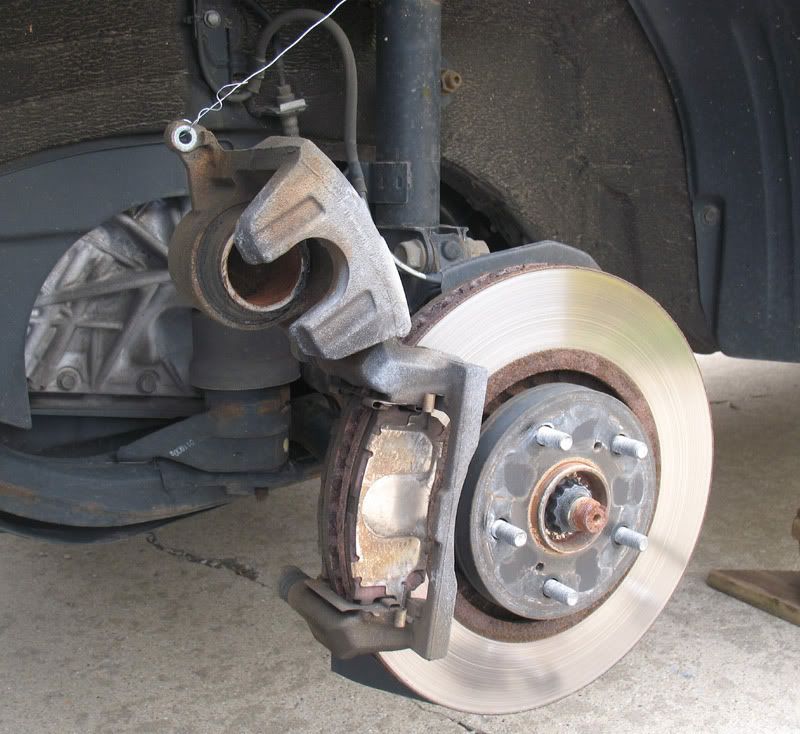
I've swung the caliper up out of the way. As you see the pads stay where they are in the bracket on both sides of the disk. I think this is a great system.
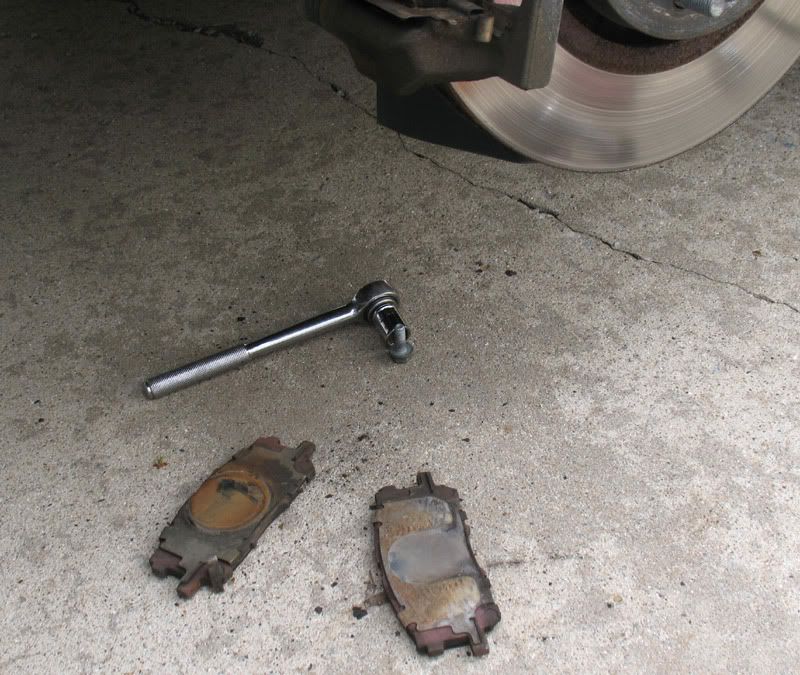
Old pads removed. A little nudging with a screwdriver helped but basically they just come right off.
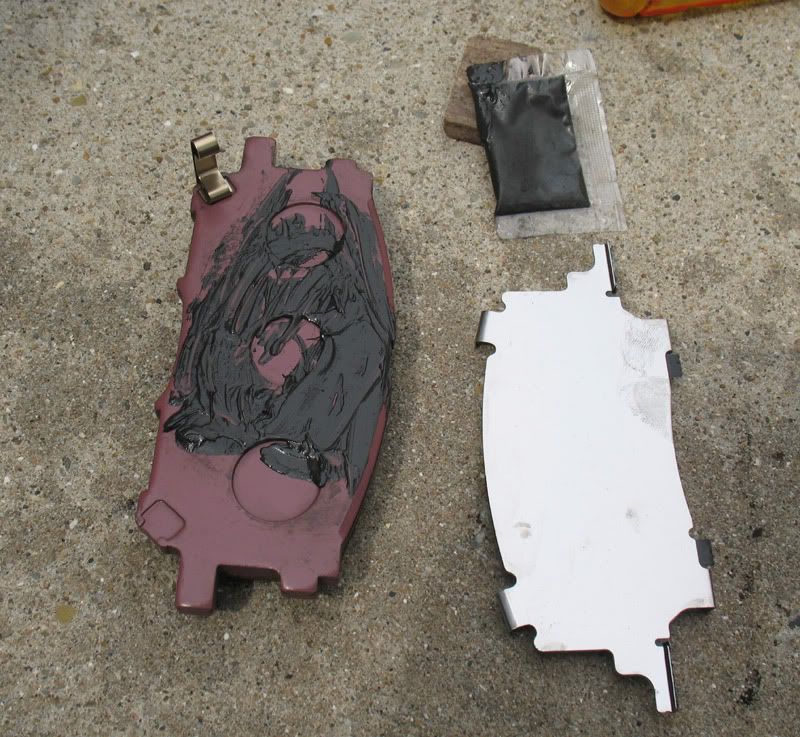
Preparing a new pad for the shim which is the silver thing. I slathered small amount of what I am calling anti-squeal over the whole area that will have the shim go over it. A tiny packet came with the shims. The old shims could have been reused and goop purchased separately.
Also, you can see that the clip thing is already on the new pad. That's the thing that will make noise when the pad wears thin. They come with the shim kit and again, the old one could have been reused.
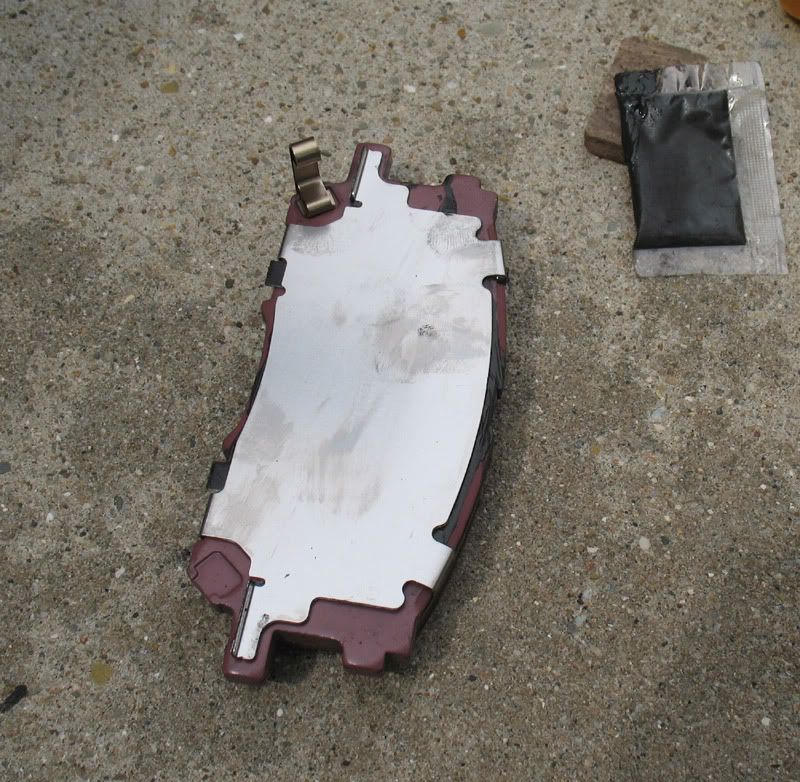
Pad ready for installation. All four pads are the same...inboard, outboard, left, right. Only inboards get the noise maker clip thing though.
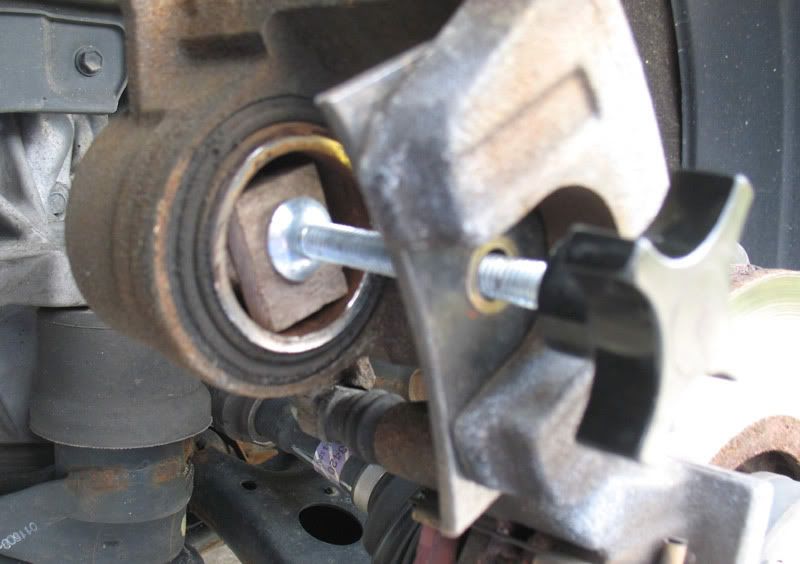
Backing off the caliper piston to make room for the new, thicker pad. I am using a tool I got when I was doing brakes on my Grand Cherokee but a C clamp is what most people use. I put several tiny pieces of wood in the piston so I would not have to crank it down as far. I don't think I ever added brake fluid but if you have you may need to monitor the reservoir and remove some so it doesn't overflow.
Trial fitting. New pads are in place. They just get put in position with a little bit of force to get the small tab parts of the pad to jam down the channels of the carrier bracket which has some sheet metal spring things that must be gotten past. If you do this it will be pretty obvious.
In the photo I've let down the caliper and trying to get both sides around the new pads. Oops...gonna need swing it back up and do a little more of what I was doing in the prior photo. After that it was fine.
I wasn't entirely sure whether goop was needed between the caliper and the pad shims I went ahead and put a little there...in the circular area contacted by the piston on the inboard pad shim and in the two contact areas on the outboard as you see here. I'm pretty sure this is unnecessary as I saw no evidence of anything there before on the old pads. I did see evidence of it between the shim and pad, though.
Here we have the caliper back in place and the lower bolt reinstalled. Now ready for the wheel.
It really is pretty simple. If you've never done it before it's probably prudent to do one and go drive a few blocks before doing the other just to be sure there are no issues.
BTW, at nearly 55K both left side pads still had maybe 3 mm left while right side was as described in the prior post. So 3 out of 4 pads had life left in them.
Last edited by filmteknik; Apr 24, 2011 at 09:32 PM.


