RX300: DIY Liftgate Lift support replacement write-up
 06-15-18, 02:26 AM
#1
Rookie
Thread Starter

FIRST GEN RX300 (1999-2003) Liftgate Lift Support replacement!!!
These instructions will probably be applicable to most RX's with just a few differences, but specific for the FIRST GEN RX300's.
All these Liftgate shocks wear out eventually, so here is a simple write-up:
Mechanical difficulty: 1|5 (5 being the hardest).
Time: 1/2 hour!!!
Total Cost: $40.40
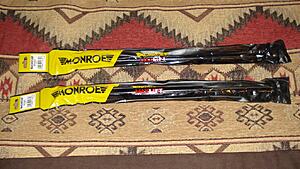
I've been hesitant over the years to purchase some off brand lifts, so I was pleased a year ago when I found Monroe offers these.
Cheapest I found was CarID: CarID 901662
Here are the simple install instructions:
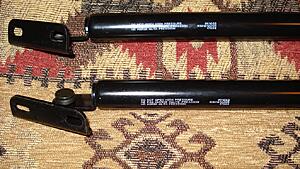
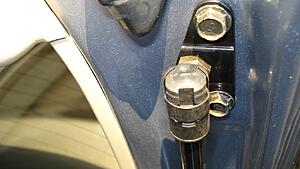
Don't disconnect any clips on the shocks, leave intact.
Step 1: Buy the lift supports
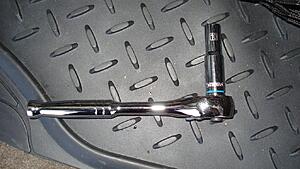
Step 2: Get a socket wrench with 10MM socket
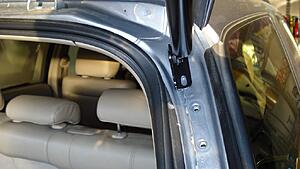
Step 3: Open the Liftgate and support it with something (ladder)
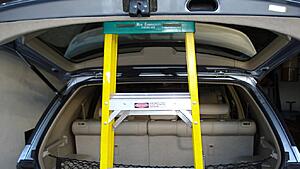
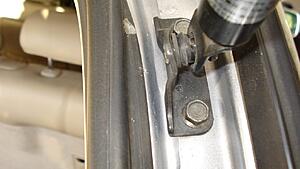
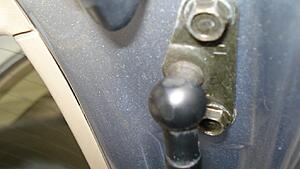
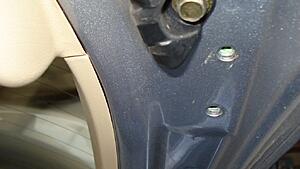
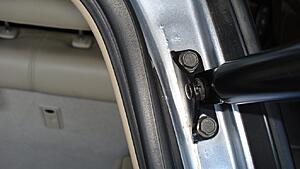
Step 4: Remove four bolts from the cars body (first)
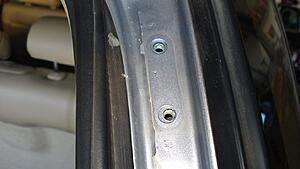
Step 5: Remove four bolts from the lift on the gate/hatch
Step 6: Reverse said steps for install (will have to push up on the gate/hatch to line up holes)
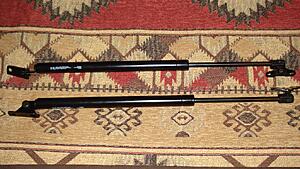
Been installed for a year now with great results, work just like when the car was new!
These instructions will probably be applicable to most RX's with just a few differences, but specific for the FIRST GEN RX300's.
All these Liftgate shocks wear out eventually, so here is a simple write-up:
Mechanical difficulty: 1|5 (5 being the hardest).
Time: 1/2 hour!!!
Total Cost: $40.40
I've been hesitant over the years to purchase some off brand lifts, so I was pleased a year ago when I found Monroe offers these.
Cheapest I found was CarID: CarID 901662
Here are the simple install instructions:
Don't disconnect any clips on the shocks, leave intact.
Step 1: Buy the lift supports


Step 2: Get a socket wrench with 10MM socket

Step 3: Open the Liftgate and support it with something (ladder)

Step 4: Remove four bolts from the cars body (first)


Step 5: Remove four bolts from the lift on the gate/hatch


Step 6: Reverse said steps for install (will have to push up on the gate/hatch to line up holes)


Been installed for a year now with great results, work just like when the car was new!
Last edited by 2002RX300; 06-15-18 at 02:30 AM.
 06-15-18, 07:54 AM
#2
Moderator

I would put a rolled up towel on the op of the ladder.
Please add torque specs [OP or any member] and dont forget to add a link in the DIY index thread.
Thank you for your contribution
Salim
Please add torque specs [OP or any member] and dont forget to add a link in the DIY index thread.
Thank you for your contribution
Salim
 06-15-18, 08:11 AM
#3

Just to add, not all replacements come with a brackets on each end like your Monroe's. Many replacements you have to press fit the socket end of the damper onto the factory ball stud bracket and release a clip that secures the damper to the ball stud bracket for removal.
06-15-18, 09:37 AM
#4

I also replaced my lift gate shocks and the front hood shocks and do they work great.
Some times I forget that I replaced them and when I open the back lift gate it comes up fast and almost knocks me over.
I used a small pole to hold up both parts the lift shocks are Gabriel 6102 paid $50.00 at One Stop Santa Ana CA..
I put a Flow master muffler on the beast and got 2 miles to the gallon better performance on the open road.
Running all synthetic fluid and plan to get 300,000 miles ,I got over 500k on 86 Cressida and 400k on 1991 LS 400 no tranny problems no engine problems on both cars.


Thread
Thread Starter
Forum
Replies
Last Post