
Cruise control troubles


Thread Starter
Driver School Candidate
Joined: Jan 2011
Posts: 9
Likes: 0
From: State
Hi all!
I have a european RX300 (since I live there ) and the car is perfect except for the cruise control. Everything seems to work but no speed can be set.
I checked the following thus far:
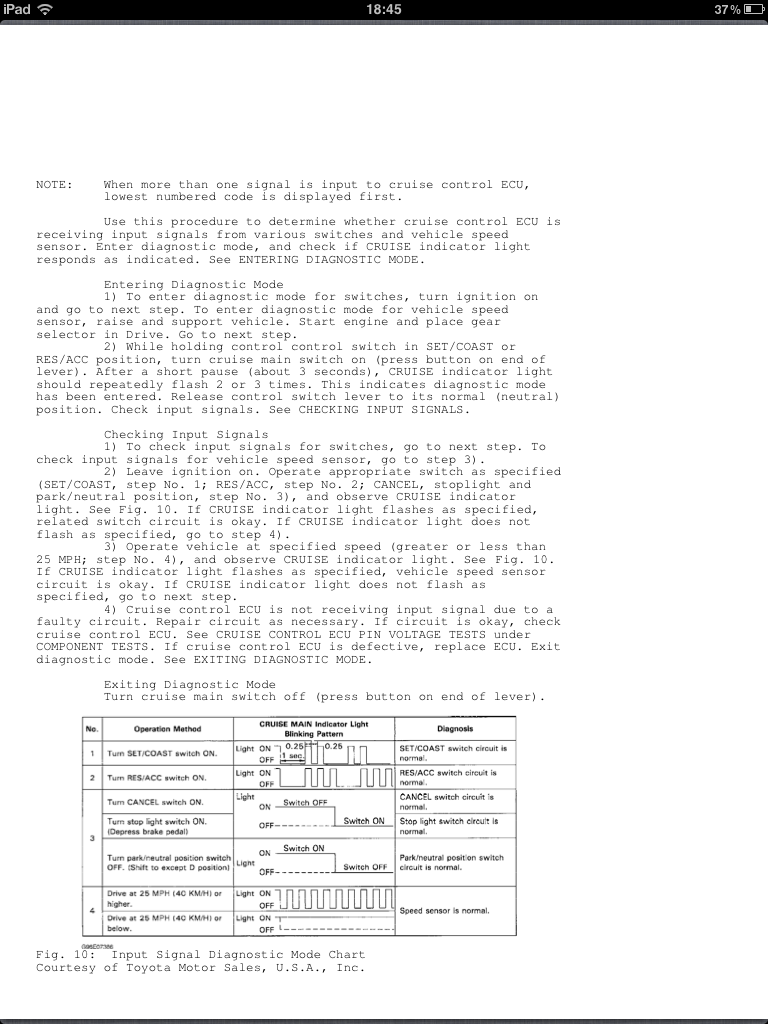
self diag: cc switch turned off, ignition turn on, hold cc lever in set or res and switch cc on still holding the lever in set, after approx 3 sec the cruise control light will start flashing
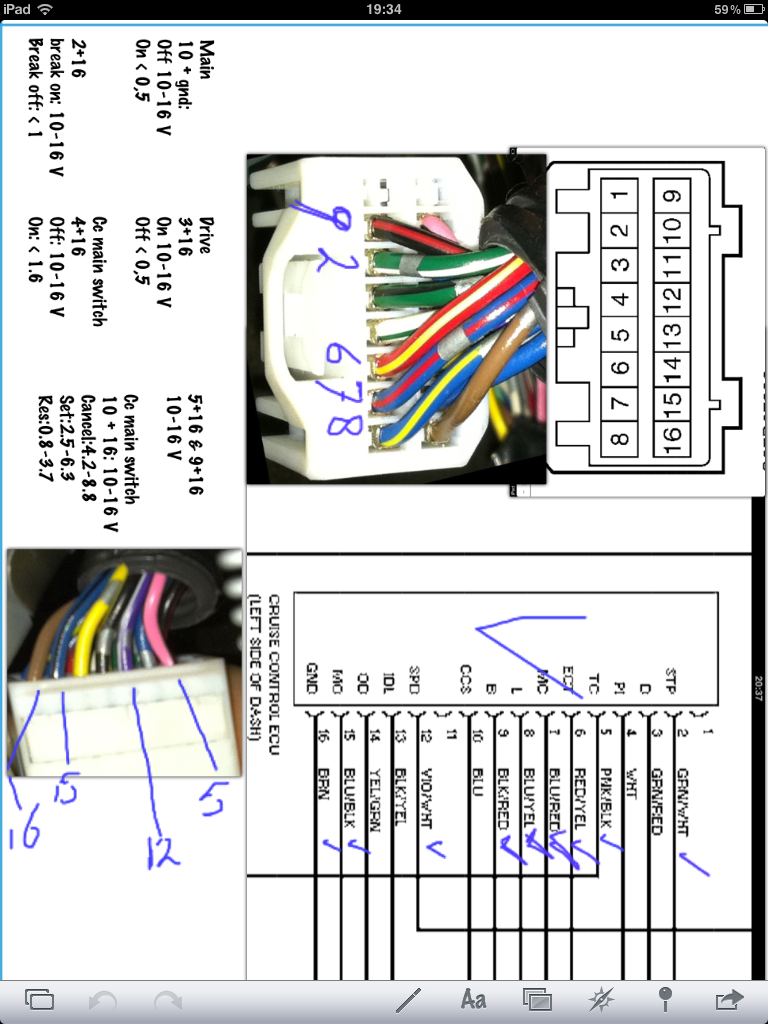
What makes debugging the issue hard, is that I'm not able to get a correct wire diagram or info for the european model. What I was able the find seems to be for the Canedian model. See also the attached image.
Any help will be greatly appriciated!
I have a european RX300 (since I live there
) and the car is perfect except for the cruise control. Everything seems to work but no speed can be set.I checked the following thus far:
- cruise control light is glowing constanly when cc is switched on
- No blown fuses
- Resistance of the actuator is according to specs
- Self diagnoses checks ok as well
self diag: cc switch turned off, ignition turn on, hold cc lever in set or res and switch cc on still holding the lever in set, after approx 3 sec the cruise control light will start flashing
What makes debugging the issue hard, is that I'm not able to get a correct wire diagram or info for the european model. What I was able the find seems to be for the Canedian model. See also the attached image.
Any help will be greatly appriciated!
Last edited by Boger; Mar 13, 2011 at 08:31 AM.


Pole Position


Joined: Sep 2006
Posts: 3,054
Likes: 103
From: Sacramento, California
Maybe the brake switch is bad by the pedal...
Sometimes there is a two part switch, one for the brake lights and one for the cruise control...If the switch were to fail closed it would constantly reset the cruise to off.
Sometimes there is a two part switch, one for the brake lights and one for the cruise control...If the switch were to fail closed it would constantly reset the cruise to off.
Last edited by thomas1; Mar 15, 2011 at 09:37 AM.
Lexus Champion
Joined: Oct 2006
Posts: 1,717
Likes: 11
From: Dallas, Texas
Are you trying to over complicate the problem? There are only a few parts, start replacing with the cheapest thing and keep going until you fix it. Is it really worth your time to trace every wire down?
Thread Starter
Driver School Candidate
Joined: Jan 2011
Posts: 9
Likes: 0
From: State
Thanks for the answers guys.
Actually I tried to keep it as simple as posslbe (tried but failed apparently ), that's why I checked fuses first, "mechanic parts" (actuator) and then used the self diagnostic option to check the other parts.
To be clear I include the self diag page from the manual. Since all checks for this where ok, I have no clue on how to continue.
Actually I tried to keep it as simple as posslbe (tried but failed apparently
), that's why I checked fuses first, "mechanic parts" (actuator) and then used the self diagnostic option to check the other parts. To be clear I include the self diag page from the manual. Since all checks for this where ok, I have no clue on how to continue.
Last edited by Boger; Mar 15, 2011 at 11:02 AM.
Trending Topics
Lexus Test Driver


Joined: Aug 2009
Posts: 5,724
Likes: 114
From: NJ
 )
)
Thread Starter
Driver School Candidate
Joined: Jan 2011
Posts: 9
Likes: 0
From: State
Just 2 update y'll on the solution:
The actuator was the issue, it didn't actuate ....
I tested it using the method described in the workshop manual (attaching the battery to the 4 connection of the actuator), but nothing happend.
So I took the actuator out of the car to have a closer look.
The dealer told me a new one would set me back �1600
Some research on ebay and it was down to $175 bu excluding shipping to Europe.
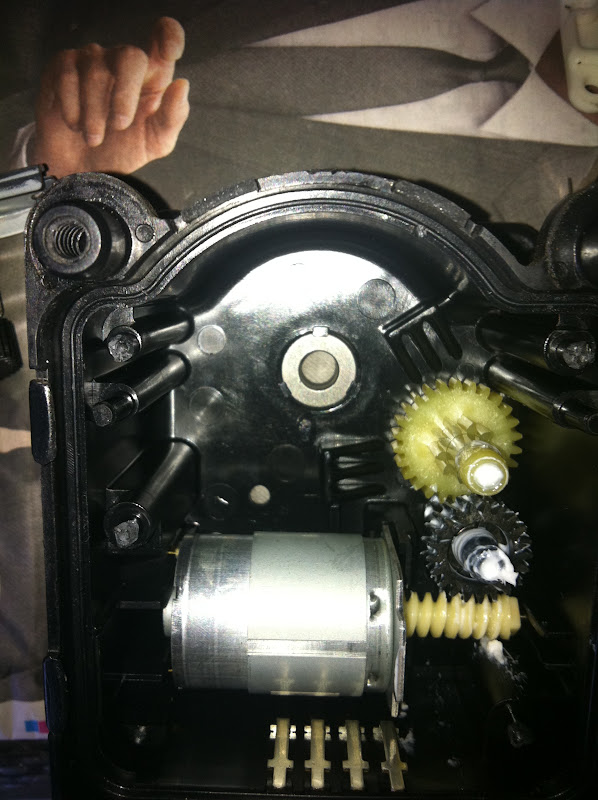
So I reconned it was worth a change to take it appart. In the attached images you can see it consist of the connector a motor and a electro magnet, together with some plastic apparently worth approx $2000!!
After taking the actuator appart I tested the motor, coz the test for the magnet was succesful. And the motor did zip, only buz, but no turning. After some googling the bill went down to $1.95 for a new motor!!
While surfing the net I was playing with the motor in my hand, turning the wormgear which is attached to it. After a while I noticed it became easier to turn it, and deside to help it get smoother by attaching the electric drill to it as where the wormgear a bur. Just run the drill for some seconds and afterward the motor run smooth!
Retested it by putting some juse on it and it spun like new! The bill went down to $ 0.00 !!!
To disassemble:
(some images taking from ebay, perhaps will become unavailable in the future)

1. Take of the steel bracket which mounts the actuator to the car.

2. Carefully lift the bottom lid of the actuator, try not to distroy to many snap fingers in the progress.
3. now you see the white base plate with the the 2 micro switches and resistors, to be able to remove this you have to remove the 4 plastic revits. I used a 2 mm drill to get a center point and after that an 8 mm to remove the head from the revit

4. now remove the clips from the electrical connectors, 4 at the side of the connector to the harnas
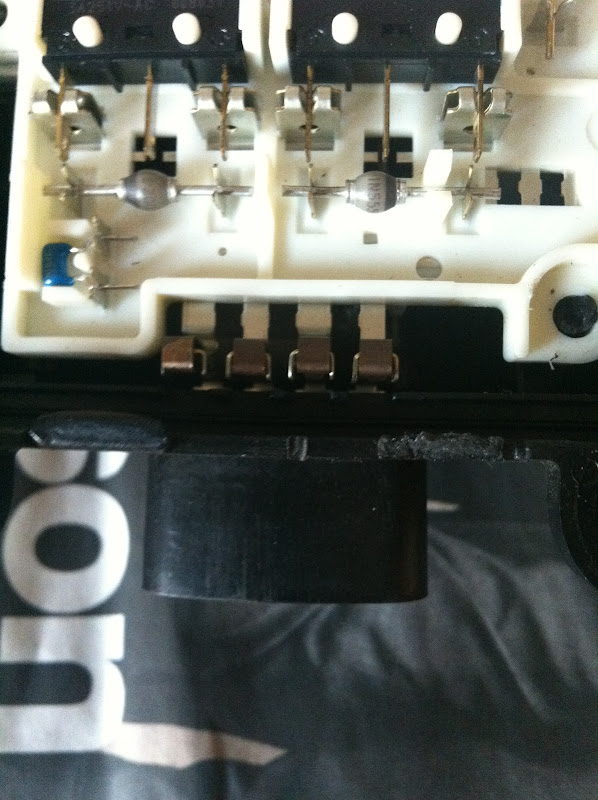
and 2 on top of the magnet
5. you should now be able to lift the white plate out of the housing, some gentle force is needed here
6. After removing the white base plate you have access to the motor and gears.
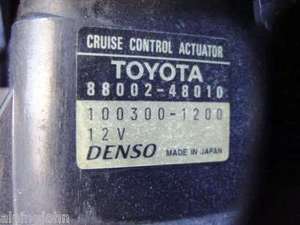
Just for reference the part number of the actuator:
Toyota 88002-48010
Denso 100300-1200
The actuator was the issue, it didn't actuate ....
I tested it using the method described in the workshop manual (attaching the battery to the 4 connection of the actuator), but nothing happend.
So I took the actuator out of the car to have a closer look.
The dealer told me a new one would set me back �1600
Some research on ebay and it was down to $175 bu excluding shipping to Europe.
So I reconned it was worth a change to take it appart. In the attached images you can see it consist of the connector a motor and a electro magnet, together with some plastic apparently worth approx $2000!!
After taking the actuator appart I tested the motor, coz the test for the magnet was succesful. And the motor did zip, only buz, but no turning. After some googling the bill went down to $1.95 for a new motor!!
While surfing the net I was playing with the motor in my hand, turning the wormgear which is attached to it. After a while I noticed it became easier to turn it, and deside to help it get smoother by attaching the electric drill to it as where the wormgear a bur. Just run the drill for some seconds and afterward the motor run smooth!
Retested it by putting some juse on it and it spun like new! The bill went down to $ 0.00 !!!
To disassemble:
(some images taking from ebay, perhaps will become unavailable in the future)
1. Take of the steel bracket which mounts the actuator to the car.
2. Carefully lift the bottom lid of the actuator, try not to distroy to many snap fingers in the progress.
3. now you see the white base plate with the the 2 micro switches and resistors, to be able to remove this you have to remove the 4 plastic revits. I used a 2 mm drill to get a center point and after that an 8 mm to remove the head from the revit
4. now remove the clips from the electrical connectors, 4 at the side of the connector to the harnas
and 2 on top of the magnet
5. you should now be able to lift the white plate out of the housing, some gentle force is needed here
6. After removing the white base plate you have access to the motor and gears.
Just for reference the part number of the actuator:
Toyota 88002-48010
Denso 100300-1200


Thread Starter
Driver School Candidate
Joined: Jan 2011
Posts: 9
Likes: 0
From: State
It would be nice and helpful to others if you would post what you found about the motor.
The link in the DIY: How can I add it?