When you click on links to various merchants on this site and make a purchase, this can result in this site earning a commission. Affiliate programs and affiliations include, but are not limited to, the eBay Partner Network.
Yeah thanks everybody for all the information, maybe in the future I will just find some bolt or something for the ground next to the positive terminal in a fuse box, so I do not have to makeshift something to get to the ground on thother side of a vehicle, and just use the original cable clamps.
There is some controversy on where you connect the negative clamp ....if you place it on the wrong bolt, the jump process can fry the computer. Some say its ok to use one of the strut bolts in the engine compartment. I have used one of the strut bolts for a battery tender, however I dont think I would use the strut bolt for a jump.
It would really be safer if you were to properly add/solder/appropriately crimp an extra few feed to the existing negative terminal of the booster. There is a thread on the topic in the Rav4 forum. Edited for clarification. This applies to our Hybrid vehicle when jumping in engine compartment which is what the post above is referring to which references jumping at fuse box
Last edited by Lexicon1; Mar 31, 2024 at 10:41 AM.
Reason: clarification
Yesterday I killed the battery, again! Not sure how, pulled the car from the garage into the driveway to wash it. 1.5 hours later it would not start. I must have left it in a mode that turned everything on but didn't notice. Called CAA for a boost. When the guy came, he connected his booster and away we went.
In speaking with him briefly, he says he owns a rustproofing shop and is hyper leary of hybrids. Here is the point of this post. He stated that I should be able to boost the car with a simple 9V battery, ya know the square ones. Suggests attaching a couple of wires long enough to contact the boost point +ve terminal in the fuse box and a ground. I'm not about to kill the battery to try it. His point was that all the car needs its a bit more juice and it should start. No starter motor, not much current draw so in his opinion it should work. I didn't ask if he actually did that (should have). So, over to the experts here; whaddaya think?
Had the NX in today for the seasonal service, swapped the winter for summer tires and do the Service 2.No charge for me as I have the extended warranty. Asked them to check the 12V battery. Was told if no fault found, would cost me 1/2 hour ($81 and change). Wasn't impressed so I spoke with the service manager. He reluctantly agreed to do the work. Well, as it turns out the battery was "bad" and is being replaced. So hopefully I won't experience this issue so frequently in the future. They (Lexus) know the batteries are weak hence the charge to us owners to check likely because so many of us are complaining.
Also had them look at the fuel filler door as it stuck on me 2X over winter. Parts are now on order, but back ordered.
The newby service advisor asked if I wanted the air and cabin filter checked. I asked, is that not part of this service? Answer was if you don't want it, it wont be done. So now they are scrimping on service work. Not sure if this is dealer specific or a Lexus thing. Certainly a first for me. Anyone else experience this?
Hi, thanks for all the information.
Please read the answer I sent to Lexicon 1
@BobMillar thanks for your details in responses. The users on this forum have a lot of different levels of experience and understanding and I have always found it best to assume that a person asking a question might need a more complete answer that includes baseline information.
There is some controversy on where you connect the negative clamp ....if you place it on the wrong bolt, the jump process can fry the computer. Some say its ok to use one of the strut bolts in the engine compartment. I have used one of the strut bolts for a battery tender, however I dont think I would use the strut bolt for a jump.
It would really be safer if you were to properly add/solder/appropriately crimp an extra few feed to the existing negative terminal of the booster. There is a thread on the topic in the Rav4 forum.
Ground is ground, There is no wrong ground point; that is not what fry's a computer. However, it is very, very important that you connect positive and negative cables in the CORRECT ORDER.In order to do this successfully the cables should be connected in this exact order:
Connect one end of the red(positive) jumper cable to the red (+) positive post of the dead car battery.
Connect the other end of thered (positive) jumper cable to the red (+) positive post of the fully charged car battery.,
Connect one end of the black (negative) jumper cable to the black (-) negative post of the fully charged car battery.
Connect the other end of the black (negative) jumper cable to a metal part of the dead car that is unpainted, as far from the battery as the cable will reach. This will ground the circuit and help prevent sparking. Connecting it to the dead battery carries a risk of the battery exploding.
Verify that none of the cables are touching any engine parts that will move when the engine is started.
YMMV,
MidCow3
Check the Rav4 forum, there are a few bolts close to the ECU in the Rav4 hybrid and NX350h which should NOT be used to connect to ground.
While your info above applies to cars w a 12v battery up front, it does not apply to our hybrids when you jump in the engine compartment.
Your post is wrong for our Hybrid vehicles.
see link below and also the pdf which warns hybrid owners directly warning of the fried ECU potential from a Toyota warning.
You, @Lexicon1 and the RAV4 seem to think there are different ground points. That just isn't true. As I said there are different level of understanding on this forum.
Very simple rule for almost all 12 volt circuit use in a vehicle. You provide a wire to the item in order to connect to the + 12 volt source from the positive post of the battery. In Toyota hybrids with 12 volt battery located in trunk they provide a positive connection point under hood within a fuse panel see owners manual. Once the item 'sees' or 'uses' the 12 volts it returns to the - negative terminal of the 12 volt battery thru the metal body or 'ground' to complete the circuit. The 12 volt negative post on your battery simply connects to your metal body structure of the vehicle. Anything metal that directly connects the body can serve as a ground. Yes providing paint, rubber or plastic washers, rust, other insulators etc., don't inhibit metal to metal connection you're good to go!! This last point would be the one reason to possibly not use a strut bolt but to confirm you simply use a voltmeter and put positive lead to 12 volts and negative to strut bolt head. If it measures 12-13 volts (providing you have a healthy battery) you have a circuit going to battery. Using caution I would definitely stay away from bolt or screw heads that clearly are being use to hold a lid or closure / shielding purpose as the voltage may harm that specific component as in a circuit panel or electronic device etc. So yes use common sense.
Excellent info MidCow3!! This is very informative and especially important to note about bad grounds and poor connections. They are the 'plague' of an automobile's electrical system. Of course salt on winter roads and resulting rust and corrosion also wreak havoc on a vehicle and our most often the root cause too.
I often giggle at the cautionary notes about open flames and smoking and wearing safety glasses etc. I see people smoking while filling their car with gas and watch shade tree mechanics show total disregard for their own life with some of things they do on their cars in their own driveways.
You, @Lexicon1 and the RAV4 seem to think there are different ground points. That just isn't true. As I said there are different level of understanding on this forum.
YMMV,
MidCow3
@midcow3
it appears you know more than Toyota's pdf warning.... you may wanna try hitting that not so sweet spot they said to avoid with another vehicle's battery jump , let us know your findings (please dont take this personally)
Peace on an Easter Sunday
Last edited by Lexicon1; Mar 31, 2024 at 08:28 PM.
Reason: clarification
I was recently contacted by a fellow Clublexus member who asked for clarification on what to believe or not to believe.
Not all info posted our forums is correct and in the same light,, " a ground is a ground" is not really true when trying to jump a NX350h or a Rav4 Hybrid.
If you attempt to jump a NX350h hybrid from the Wrong bolt, in the engine compartment, you WILL fry your ECU
see link from Toyota on this potential hazard.
for clarification I am enclosing a picture from the Rav4 site which has quite a few knowledgeable posters
As is always the case, not all folks posting on forums know everything , Some admit it, some dont. I am not an expert, but use this info entered here for your discretion, I am alerting you to be careful if not jumping your vehicle directly to your 12v battery.
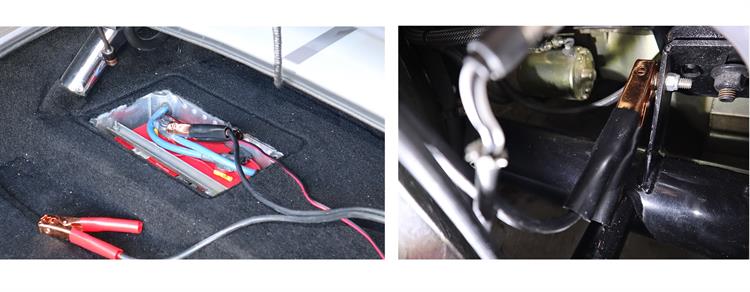
Note that, if you have an electric cargo back door, you will not be able to easily access your battery if the 12v battery is dead and thus, you may only be able to jump your battery from the front compartment.
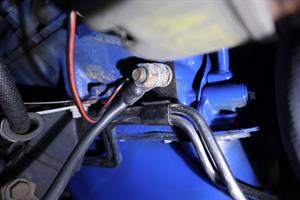
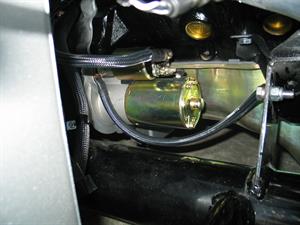
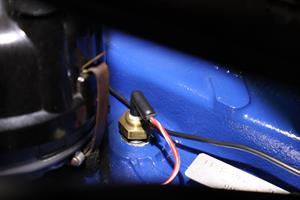
Do not use the bolts specified in the pix below where there is a white arrow.
I was recently contacted by a fellow Clublexus member who asked for clarification on what to believe or not to believe.
Not all info posted our forums is correct and in the same light,, " a ground is a ground" is not really true when trying to jump a NX350h or a Rav4 Hybrid.
If you attempt to jump a NX350h hybrid from the Wrong bolt, in the engine compartment, you WILL fry your ECU
see link from Toyota on this potential hazard.
for clarification I am enclosing a picture from the Rav4 site which has quite a few knowledgeable posters
As is always the case, not all folks posting on forums know everything , Some admit it, some dont. I am not an expert, but use this info entered here for your discretion, I am alerting you to be careful if not jumping your vehicle directly to your 12v battery.
Note that, if you have an electric cargo back door, you will not be able to easily access it if the 12v battery is dead and thus, you may only be able to jump your battery from the front compartment.
Do not use the bolts specified in the pix below where there is a white arrow.
Did you actually read the PDF ? If you connect to the ECU as if it were ground you could potentially cause a short. Not connecting to a bracket next to ECU is only a precaution for clumsy amateur people that might on rare occasional actually touch the ECU next to it which, yes, is not ground.
As much as you want to try Mr. @Lexicon1 you cannot change physics. All grounds are ground, If you have a ground that is connected by a very thin metallic path you may potentially add resistance to the circuit, but it is still a ground. All metallic surfaces that are not insulated are ground points.
I was recently contacted by a fellow Clublexus member who asked for clarification on what to believe or not to believe.
Not all info posted our forums is correct and in the same light,, " a ground is a ground" is not really true when trying to jump a NX350h or a Rav4 Hybrid.
If you attempt to jump a NX350h hybrid from the Wrong bolt, in the engine compartment, you WILL fry your ECU
see link from Toyota on this potential hazard.
for clarification I am enclosing a picture from the Rav4 site which has quite a few knowledgeable posters
As is always the case, not all folks posting on forums know everything , Some admit it, some dont. I am not an expert, but use this info entered here for your discretion, I am alerting you to be careful if not jumping your vehicle directly to your 12v battery.
Note that, if you have an electric cargo back door, you will not be able to easily access your battery if the 12v battery is dead and thus, you may only be able to jump your battery from the front compartment.
Do not use the bolts specified in the pix below where there is a white arrow.
You�re all set for a great day at a car show, or perhaps you�re about to head out with a group of friends for a day trip in your rides. The cooler is packed, you�ve got your favorite car-themed T-shirt on, and a full tank of gas. There�s nothing to stop you from having a blast with your classic truck, muscle car, or hot rod. That is until you reach for the ignition key, give it a twist, and nothing happens. Well, maybe something happens, like the starter chattering or even slowly cranking the car, but not fast enough for it to start. Your classic car won�t start. You think it is your battery, but chances are you have a poor ground connection somewhere in your starting/charging system circuit. No amount of jump starting is going to get you going and now your day is ruined as you troubleshoot car not starting steps. You can prevent all this by ensuring that your ride is properly grounded and has enough grounds for everything electrical on the car.
Bad Ground Wire Symptoms
A poor ground circuit can happen for many reasons. Corrosion of the vehicle ground wire reducing the ground wire�s effectiveness, physical damage from road debris, loosening of the attaching hardware, or even absent minded repairs where the ground wire is not reinstalled after removing it for access are some of the bad ground symptoms you might come across. Not to mention that there is multiple, if not dozens of grounds on the typical vehicle, it can be a nightmare to determine just where the issue may lie, which is why your ground wire is important.
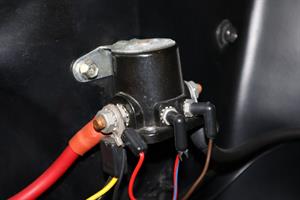
For vehicles with remote mounted starter solenoids be certain the solenoid mounting screws are clean and tight, as a poor or loose ground here will prevent the solenoid from engaging, acting like a bad chassis ground, bad starter or dead battery.Obviously, the big/main ground circuit for starting and charging the car is what everyone thinks of first, but there are individual grounds all over a car for things like gauges, lighting, and more. Don�t automatically assume it is the main chassis ground that is causing bad ground symptoms like your instrument lights to be dim (or not work at all), when in fact it could be the dash ground from your instrument cluster. Typical bad vehicle ground wire symptoms that can come up due to lack of a solid ground include flickering/dim lighting, ignition/radio noise through the speakers, intermittent electrical functions (heater blower working then not working), hard starting, low charging system output, and much more. Will a bad ground cause slow cranking, or can a bad ground cause a car not to start? Most definitely, but these bad ground symptoms are relevant to the main chassis ground for the most part. However, a bad starter solenoid ground (for those that use remote solenoids like classic Ford vehicles) can be a culprit of these issues as well. For these situations it is easy to see�bad ground, car won�t start.
How to Check for Bad Ground on a Car
As we mentioned above, there are multiple ways for a ground to become an issue with grounding the electrical system. Before you grab a single tool out of your toolbox, however, it is best to start with a good visual inspection of all major grounds. Inspect your battery, chassis, and engine ground straps to ensure that they are indeed still there/connected, and the connections are clean and tight. It wouldn�t be the first time someone installed a set of aluminum heads and forgot to reinstall the ground strap from the back of the head to the firewall.
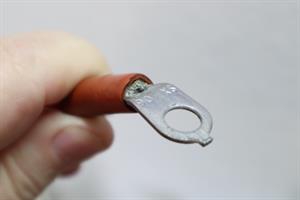
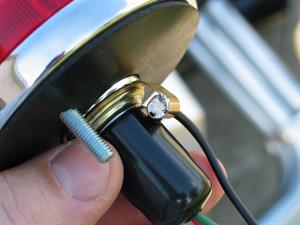
This battery positive cable showed signs of internal corrosion of the copper wire strands at the back side of the ring terminal. It was hard to spot installed on the car.If all your main ground connections are solid, then it is time to dig further into your electrical system to determine if a more specific ground connection is the issue (this is where a wiring diagram of your vehicle really helps!), or if there is a voltage drop issue with your main battery ground. Voltage drop is caused by resistance in the ground cable itself, usually from age or failure of the ground cable�s insulation, exposing the copper strands to air and moisture. As copper wire ages and is exposed to air it will become brittle, turn green from oxidation, and will often have visible signs of corrosion affecting it. You could have a ground cable that passes a visual inspection, but still has excessive resistance deep within the wire somewhere. But how to test a ground wire on a car for this voltage drop? The only way to know for sure is by testing for voltage drop with a digital multimeter on the main ground wires of your vehicle.
To perform a voltage drop test on your main battery cables (both positive and negative) for your starter you will need the digital multimeter mentioned previously. With the meter set for DC voltage checks you will start by disabling your car�s fuel injection or ignition system to prevent the vehicle from starting (we only want the starter to crank, not the car to start). Once you have confirmed the engine will crank, but not start, place one lead on the battery�s positive terminal and the other on the large stud of the starter itself (not the stud of the starter mounted solenoid). Have a helper crank the engine over for five seconds and monitor the meter�s display. The voltage reading should be no more than .5-volts and realistically .2- to .3-volts. Repeat these same test steps, but with the meter leads now on the battery�s negative post and the starter body, or in a pinch one of the starter mounting bolts. Again, the ground side should be no more than .5-volts as well.
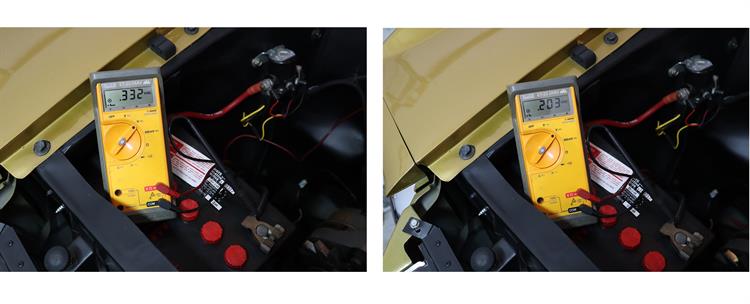
Shown here is our voltage drop test on the ground circuit between the battery negative terminal and the starter mounting bolt (left image). Moving the meter lead to the main ground stud (right image) shows less voltage drop.You can continue to test the ground side circuit (which passes through the engine/transmission to the engine ground strap to the body or frame and then back to through the negative battery cable) by repeating this voltage drop test at each �checkpoint� in the ground loop. For example, move the test lead from the starter body to your frame and crank the starter. If you now have a favorable result of .5-volts or less, the issue will be somewhere between your starter and the frame (loose starter, poor engine to chassis ground, etc.). Ultimately, this is how to check car ground with multimeter for most accurate results.
For smaller circuits throughout your car, such as grounds for your headlights, stereo, or electric fuel pump, you can perform the same voltage drop test by using the digital multimeter as described in the tests above and applying power to the circuit. Alternatively for these smaller circuits you can also measure resistance of the ground wire back to the battery�s negative terminal. You should see little resistance here on your meter (set to ohm scale). Often just a few ohms of resistance are fine. Anything more than that and you probably have an issue in the wiring harness itself, or the area the wire is grounded to, such as the steel dash structure/body, isn�t seeing proper grounding. This could be due to a missing or damaged body ground strap, which is why it is so important to inspect and test �the big 3� wires under hood�starter/alternator positive cable, negative cable from the battery to ground, and ground between the engine block and frame/body. Often the battery negative cable or the engine to frame/body ground is the culprit for these other electrical issues as well.
How to Fix a Bad Ground in a Car
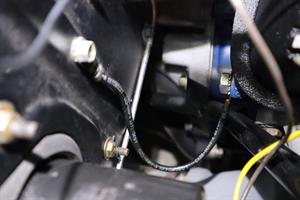
It wouldn�t be the first time someone forgot to reattach the firewall ground after installing a set of heads or a new crate engine. This is why visual inspections are important.Once you�ve found the ground issue in your electrical system the next step is to properly repair it to eliminate those bad ground symptoms. The repair could be as simple as tightening the loose ground wire�s attachment bolt or even reattaching the ground wire you forgot to reinstall (hey, it happens). However, more often you�ll find a ground wire that has failed the voltage drop test and requires cleaning or outright replacement. When it comes to how to clean ground wires in a car electrical system, the ground wire�s end terminal needs to be clean of all dirt, corrosion, and paint�literally bare metal. A wire brush or battery terminal cleaning tool should suffice to clean back to bare metal on the terminal. This goes for the attaching area as well. That freshly painted small block Chevy looks great but be sure to clean the area of the block where the ground wire attaches to bare metal for best connectivity to minimize that voltage drop.
That said, if the ring terminal on the end of the ground wire is severely corroded and there is visual indication that the wire crimped into the terminal is also corroded, then there is possible corrosion deeper into the wire under the insulation. In this case it is much better to buy or build a new ground cable/strap for your vehicle. Testing the ground cable for resistance will also provide confirmation if the cable should be replaced. A quality ground connection will usually show zero to less than one ohm on a digital multimeter. Using external star washers with the ground wire end terminal fastener will help give the contact �bite� and prevent the ground from loosening as well. Once you have learned how to fix bad ground in a car you�ll know if it happens again and can fix it more quickly.
How to Ground a Car
You may be dealing with a factory wiring harness and grounds, but what if you�re building something custom? How do you properly ground your project vehicle? Wiring a complete car or truck from front bumper to rear bumper is no easy feat, even for those who are experienced and comfortable with wiring but having the proper battery grounding so that new wiring (or add on circuits) work properly is critical to your project car�s wiring success. Below we�ll address several of the most common, and important, battery grounding aspects of a project car�s electrical system so you understand how to ground a car.
Most battery ground cables will attach to the engine block in some manner, such as this stud-head bolt on this small block Ford.What is a Chassis Ground?
When we are discussing �chassis ground� we are referring to the main grounding point in a vehicle. This could be the frame itself (be it a full frame car or just a front subframe like many classic Chevy models) or the metal body structure in a unibody type car, such as a Mustang. This main grounding point is where the negative battery cable will attach to. But where to ground negative battery cable? Where does the ground wire go on a car battery? It could be the engine block itself, a welded stud on the frame, or even one of the starter�s mounting bolts. The preferred location is the engine block or starter mounting area to provide the shortest and cleanest ground path for the starter back to the battery.
In the case of this trunk mounted battery application, a secondary ground from engine to frame is made with the same size battery cable.If the main chassis ground is the frame or front subframe then it is imperative that there is a secondary ground cable of the same size from the engine to the frame. Meaning, if you are using standard 4-gauge battery cables (both positive and negative) then your engine block to frame ground cable should be a 4-gauge cable as well. Obviously, all these chassis grounding points need to be clean and free of any paint, powder coat, or other contaminants that may affect voltage drop in the ground loop. Now you understand what is a chassis ground.
A ground strap kit such as this is the perfect answer to ensure body, frame, and engine are all properly grounded.Lastly, a body to chassis ground, either from the body to the frame, or the body to the engine block (with the engine block properly grounded of course) is necessary for all body mounted electrical items (lights, horn, wiper, radio, etc.) to function properly. This body ground is normally a braided ground strap of some form when connected to the engine to absorb engine vibrations, but standard battery ground cable can be used if grounding the body directly to the frame/subframe. Remember, full frame bodies sit on rubber body bushings, thus properly grounding the body to the frame is important.
Traditional gauges primarily use a single wire sensor, with the sensor body grounding through the engine, which is why your engine ground strap is so important.Bad Engine Block Ground Symptoms
As mentioned above, the engine requires its own ground to the main chassis ground. This dedicated ground not only ensures the starter has a solid ground path back to the battery, but that any engine sensors or other engine mounted electronics have the necessary grounding needed to function properly. If you examine most engine wiring you will see a single wire for your dash gauge sending units for oil pressure and water temperature for example. This is because the sensor body screwed into the engine is the ground for that instrument sending unit, and thus grounds through the engine block and finally to the engine block ground to the chassis.
Without the proper engine block ground, you can induce all manner of electrical gremlins to your gauges, ignition system, and more. Though the most common symptom of a bad engine block ground will often be an engine that cranks slowly or not at all with just a chattering/clicking starter solenoid (especially when at operating temperature). But what if you suspect a bad engine ground? How can you tell if you are experiencing a bad engine ground vs a bad chassis ground? Well, all you have to do is follow the steps we outlined earlier to perform a voltage drop test for each segment of the ground loop.
You can also do a �quick and dirty� test we�ve been doing for decades when diagnosing ground issues. Grab yourself a good set of jumper cables and connect one end of the jumper cable to a clean bare metal part of your engine. Connect the opposite end of the cable (ensuring you�re connecting the same color clamp) to the chassis ground point and see if this fixes the issue you are having. You can also move the chassis ground clamp to the battery negative terminal as well to further test the ground loop. Why does this work? The path of least resistance. If you have a bad ground cable that is full of corrosion, the jumper cable offers an alternative path with lower resistance and will allow the ground path to continue back to the battery.
The jumper cable test provides a strong ground from a remote mounted battery to the engine and/or chassis ground up front. If connecting the jumper cables as shown helps you have a bad chassis or engine ground.
On fiberglass bodies any electrical item mounted to the body (lights, gauges, etc.) will require a dedicated ground wire. Either use lights with built in ground wires or solder a ground wire to the light�s body as we have here.How to Ground a Fiberglass Car
Fiberglass cars bring their own challenges, as fiberglass is not conductive. While they are often mounted to a full steel frame chassis, the body cannot be used as a ground path for anything mounted to the body itself. This includes lighting, power accessories, gauges, and more. Thus, fiberglass bodies cars require extra attention to the various ground circuits to ensure that they are tied into the main chassis ground properly. Some builders use bus bars for this, or they create specific grounding stud points at the front, middle, and rear of the car that are either tied together by properly sized battery ground cable or are bolted or welded directly to the frame.
What are bus bars you might ask? A bus bar or bus block is used to gang all wire terminals (in our case ground wires) together into one �bus� which is then connected to the chassis ground. You are taking several ground circuits and making them into one ground circuit that feeds back to the chassis ground. The terminal block, on the other hand is usually used as a connection point between two wires. For example, a pre-wired gauge panel and the vehicle�s body/engine harness. Terminal blocks are not normally used as a ground bus, but by adding additional wire loops or terminal jumpers they could be used in a pinch. Though our vote is for bus bars, grounding studs, or even remote ground terminals when it comes to fiberglass cars.
On the left is a bus bar (all screws on the same bus) and on the right is a terminal strip where each circuit (pair of screws) is separate.
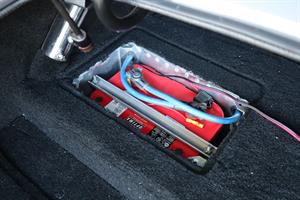
A trunk mounted battery will work just fine with a short ground cable at the rear of the car if installed correctly. However, running the ground cable all the way to the front is preferred by many.How to Ground a Relocated Battery
Relocating your battery to the trunk or even inside the passenger compartment of a race car with a battery relocation kit is a popular option. It helps position �dead weight� in the vehicle for better handling and cleans up the engine bay. With a relocated battery comes the need for special attention to grounding. There are two schools of thought on where is the ground wire located on a car with a relocated battery. Some prefer to install the ground at/near the battery to the frame or unibody structure, while others prefer to run the ground cable all the way to the front of the car to the main/original chassis grounding point. There are other things to consider too, including battery cable size and how to route the cables, which we�ve covered in how to relocate your battery elsewhere in our Toolbox.
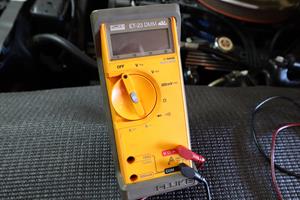
Auto Electrical System Tester
Our Fluke meter has served us well for 30 plus years. You�ll want a DMM with DC voltage, ohm reading, and continuity check/tester at a minimum.We mentioned using a digital multimeter (or DMM) earlier to test for voltage drop in your electrical system and ground paths. There are many electrical testers and multimeters available to help you test and confirm your electrical system has solid grounds (or to check for shorts, system draws, and other electrical issues). We also feature a full line of electrical tools and equipment to aid in ground wire repairs, building custom ground wire circuits, or performing repairs on ignition and charging system wiring. Every tool box should have some sort of auto electrical system tester, including a DMM, powered circuit tester, test light, and jumper leads at least.
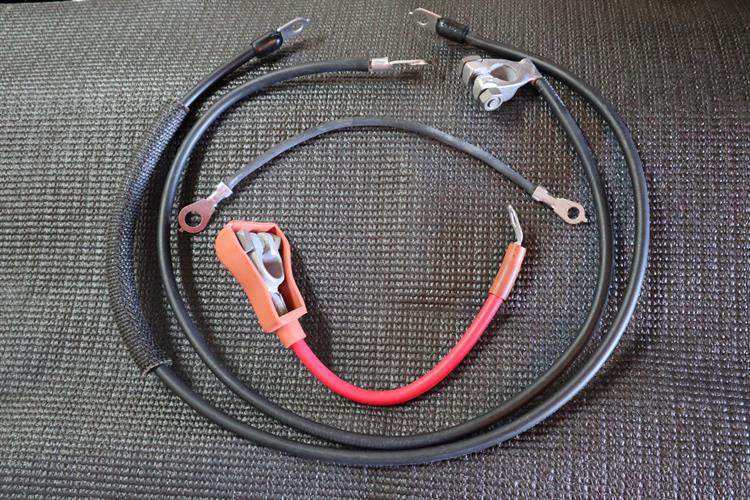
Ground Cable for Car Battery
Battery cables can be pre-made or can be user assembled. A pre-made ground cable for car battery can work great for batteries mounted in stock locations, while user assembled ground cables are perfect for relocated batteries or custom needs like engine swaps. User-assembled cables also provide you with the opportunity to increase the cable size for more capacity for your starting and charging systems. Lastly, don�t forget those engine block and chassis ground cables, which we offer in pre-made braided strap material, or can be built using lengths of bulk battery cable with compression, crimp, or solder on end lugs.
If any of your cables are suspect or fail a voltage drop test it is best to replace everything as a set, including battery and starter cables and your engine/firewall ground strap.


 maybe in the future I will just find some bolt or something for the ground next to the positive terminal in a fuse box, so I do not have to makeshift something to get to the ground on thother side of a vehicle, and just use the original cable clamps.

 Not sure how, pulled the car from the garage into the driveway to wash it. 1.5 hours later it would not start. I must have left it in a mode that turned everything on but didn't notice. Called CAA for a boost. When the guy came, he connected his booster and away we went.