
LS430 Oxygen O2 Sensor Location and Part Numbers

Thread Starter
Driver
Joined: Sep 2008
Posts: 136
Likes: 18
From: CA
I think I finally have the oxygen sensor location and and part numbers sorted out. If anyone sees a mistake in this info, please let me know so I can correct it. There are posts dealing with the replacement such as the one from speedemon. Remember you also need an O2 socket which is about $12 on line.
There are four O2 sensors in the LS430. They are as follows:
Bank 1 Sensor 1 - Driver's side (left front) on exhaust header. Lexus # 89465-50120 / Denso OEM # 234-4138 / Denso Universal # 234-4209 / Bosch OEM # 13441 / Bosch Universal # 15733
Bank 1 Sensor 2 - Driver's side (rear) near catalytic converter. Lexus # 89465-50140 / Denso OEM # 234-4167 / Denso Universal # 234-4209 / Bosch OEM # 15272 / Bosch Universal # 15733
Bank 2 Sensor 1 - Passenger side (right front) on exhaust header. Lexus # 89465-50130 / Denso OEM # 234-4630 / Denso Universal # 234-4209 / Bosch OEM # 13632 / Bosch Universal # 15733
Bank 2 Sensor 2 - Passenger side (rear) near catalytic converter. Lexus # 89465-50140 / Denso OEM # 234-4167 / Denso Universal # 234-4209 / Bosch OEM # 15272 / Bosch Universal # 15733
Cost for Lexus sensors are about $180 at dealer. Bosh and Denso OEM about $95 at Amazon. Cost for universal fit where you have to solder the wires to make your connector is about $45 per sensor.
Location of sensors with torque setttings:
Last edited by PilotSmith; Aug 24, 2009 at 10:20 AM.
Thread Starter
Driver
Joined: Sep 2008
Posts: 136
Likes: 18
From: CA
If someone who has used the universal fit sensors could comment on if it was a pain or not to wire it please let me know. Do you have to replace the connector on the car or do you just need to hook up the wires on the new sensor to a connector that comes with it to match the connector that is on the car?
If someone who has used the universal fit sensors could comment on if it was a pain or not to wire it please let me know. Do you have to replace the connector on the car or do you just need to hook up the wires on the new sensor to a connector that comes with it to match the connector that is on the car?
Thread Starter
Driver
Joined: Sep 2008
Posts: 136
Likes: 18
From: CA
I decided to buy the Bosch OEM fit units becuase I figured I would be pissed enough after stuggling to get the sensors out from the cramped area. Didn't want to mess with wires and worry about screwing up a connection or shorting something out. Bosch makes good stuff so I figure I'm safe and save some $$$ over Denso. My total cost for the two sensors came out to $154.04 at Amazon. One was $62.52 and the other $91.52. (B1 S1 and B2 S1.) That is about $65 extra compared to buying the universal fit units. But at least I don't have to worry about messing with the wires now. The dealer wanted $183 for each one! $700 job for them to replace the two. I'm counting on 2 hours of my time to do the job. Wish me luck!
Thread Starter
Driver
Joined: Sep 2008
Posts: 136
Likes: 18
From: CA
Here are some photos for those considering doing the job. I replaced sensor 1 on both bank 1 and bank 2. Sensor 1 are the forward sensors near the exhaust manifolds. Bank 1 is driver's side and bank 2 is passenger side. I sprayed the base of both sensors with penetrant and let it sit a few minutes. Both came off without much effort. Torque setting is 32 pounds so if they are not rusted on they should come off without too much of a fight.
I didn't find the driver's side one to be that hard to do. I bent and ground a long pegboard wire to make a right angled pick to reach the tab. (Was faster than driving to the hardware store to buy one.) I highly recommend that you first do the passenger side if you are doing both O2 sensors up front. It is easier to get to the connector so you can see the tab that needs to be pressed to release the connector. This will help you to know where to aim for on the driver's side as you can't see the tab on that side. On the passenger side I removed the entire connector off the metal bracket to give me room to pull it down and get a better position to press the tab. You just need to pry a little on the plastic tab that holds the socket assembly on the braket. Don't pry too far or you may break the tab off.
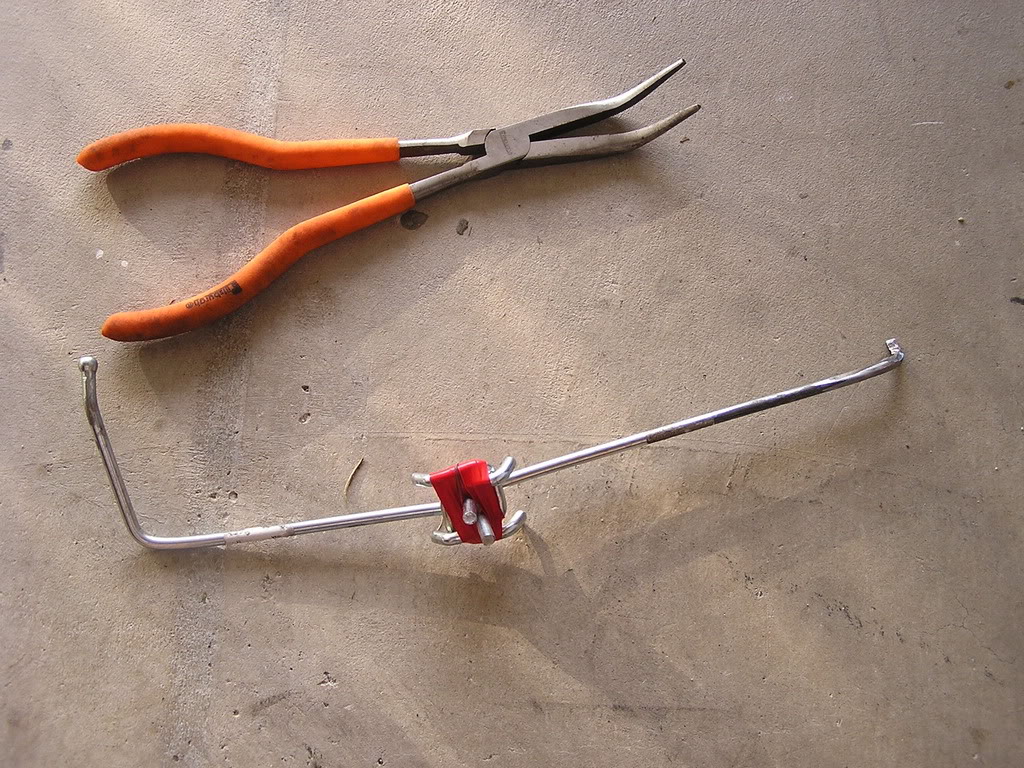
I attached some photos for those who are considering doing this to know what to look for. I found that a very long pair of curved needle nose pliers I got from Harbor Freight for something like 3 cents was very handy to grip the connector on the driver's side, while with my other hand I rotated the pick to press on the tab to release the connector. You also need an O2 slotted socket. Space it tight so a bulky ratchet wrench may not fit. The click spacing on one of my wrenches was too far apart to ratchet on the driver's side. Fortunately my smaller torque wrench has finer teeth and allowed me to ratchet in the small space to loosen and tighten the sensors.
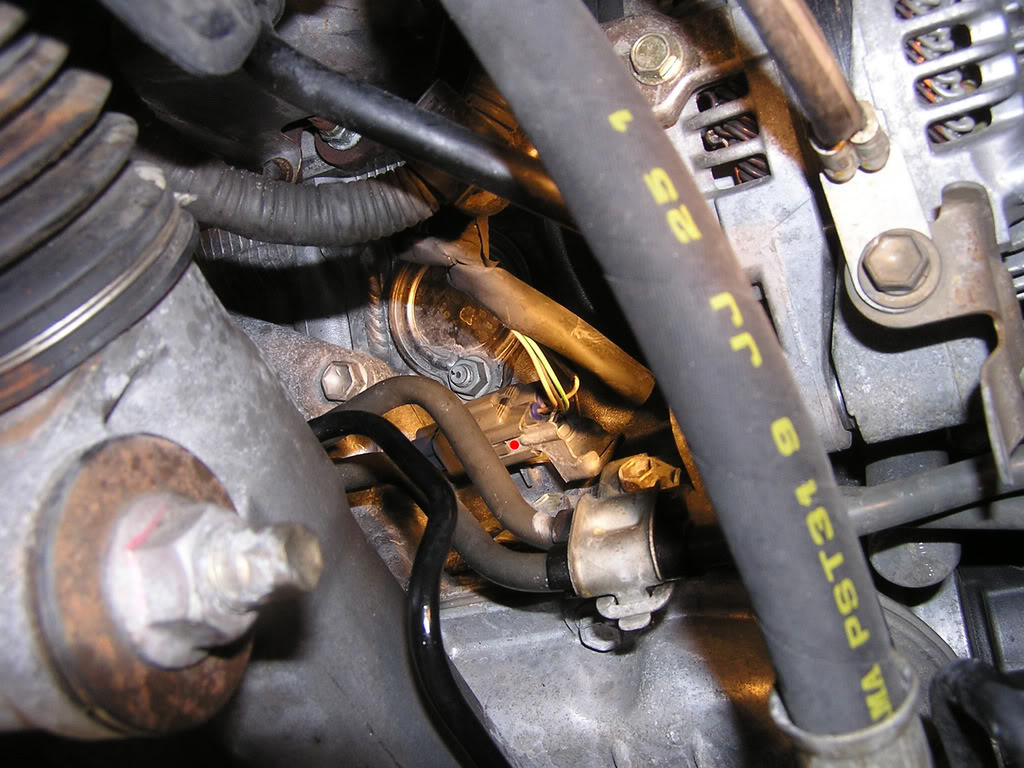
This is the driver's side O2 sensor (bank 1 sensor 1). You may need to pry the heat shield at the red dot location toward the O2 sensor to give you room to get the pick between the connector and the shield. The tab you have to press is on the spot between the connector and the heat shield marked by the red dot. (All photos below are taken from under the car with the plastic splash shield removed.)
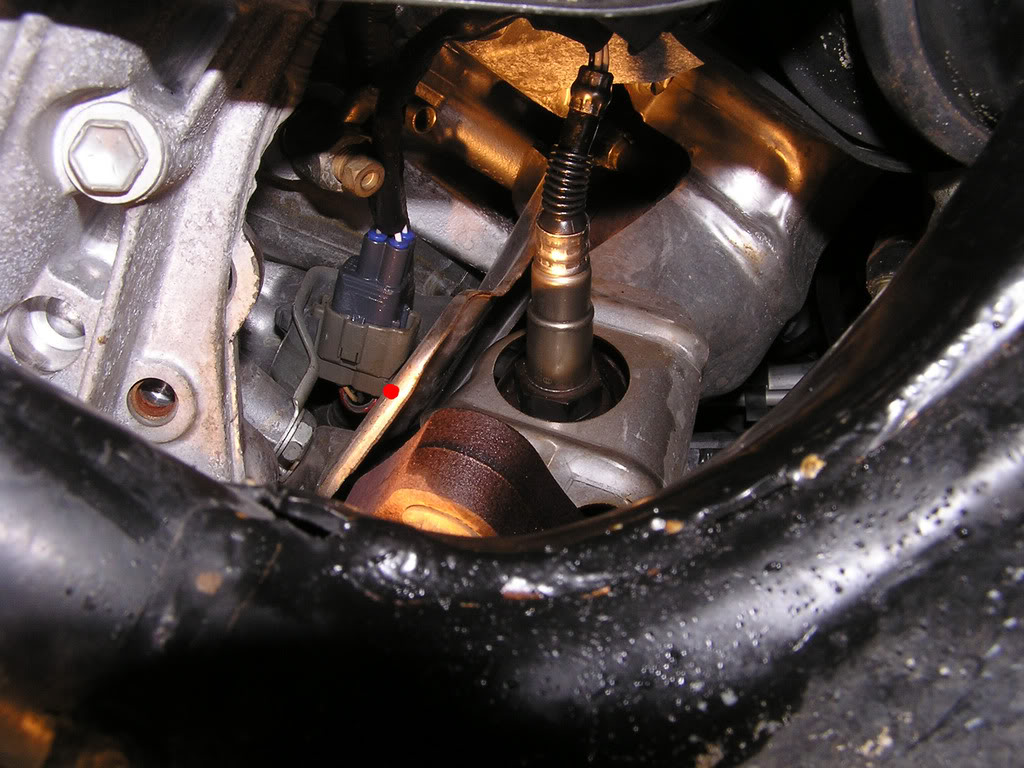
Here is pick inserted between connector and shield:
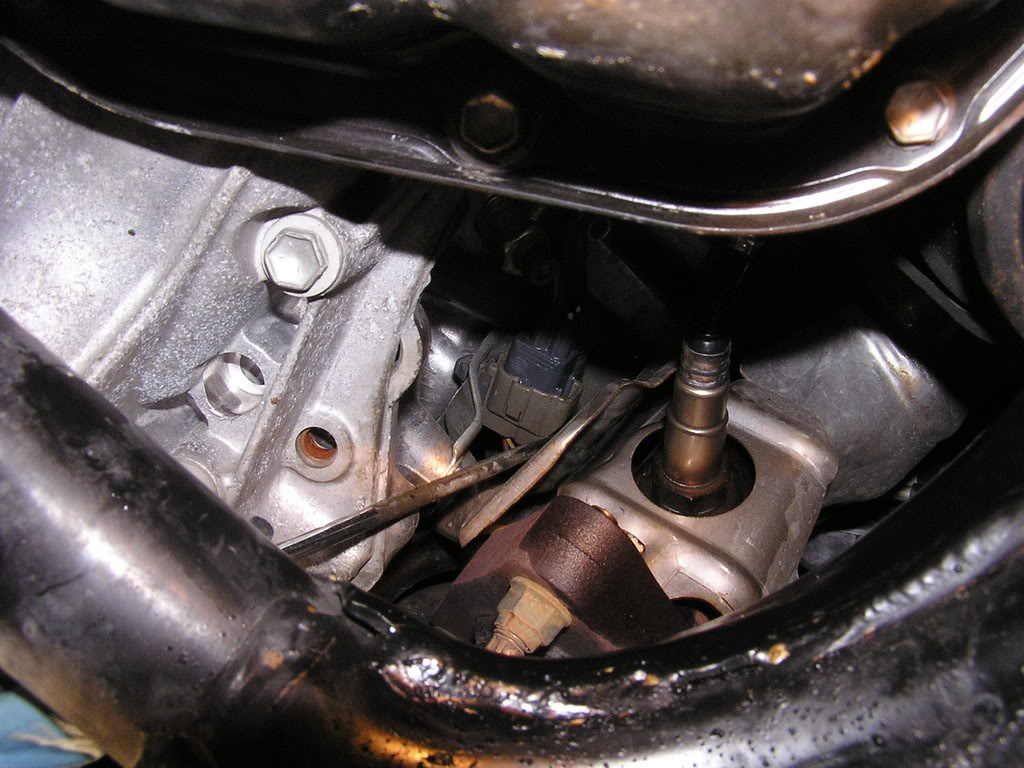
O2 sensor on passenger side.
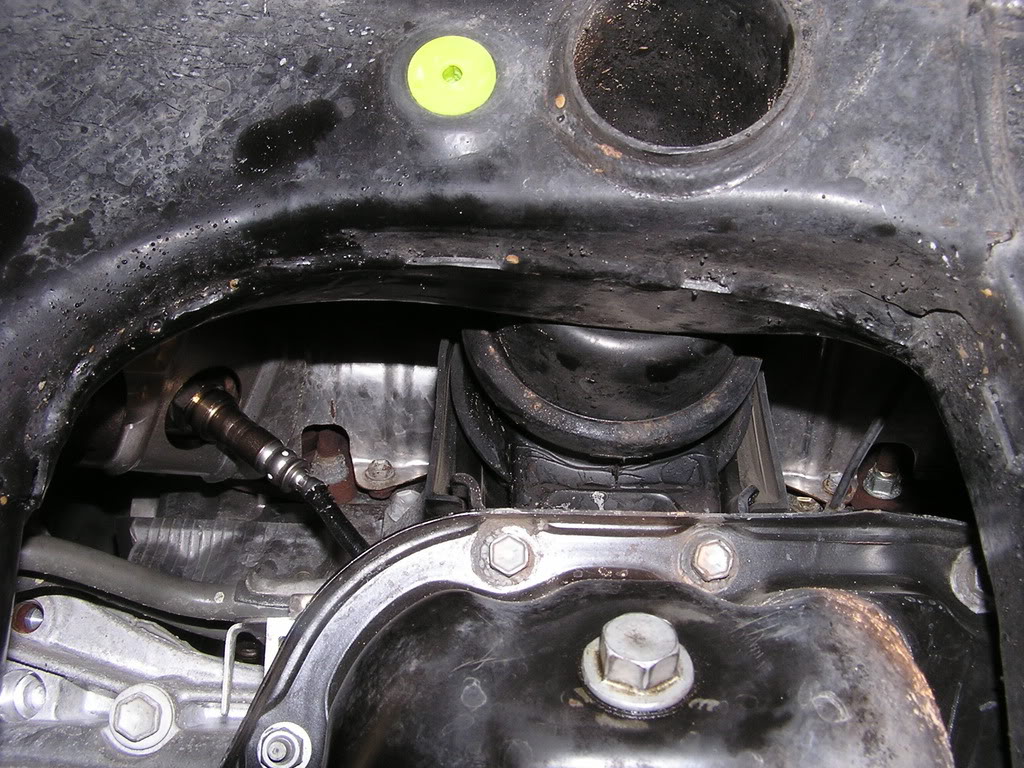
Here is the clip holding the passenger side O2 cable to the car. If you have an OEM connector there will be a clip on the replacement. Just pry back the plastic tabs marked with the red dots on the old one and pull it out of the bracket.
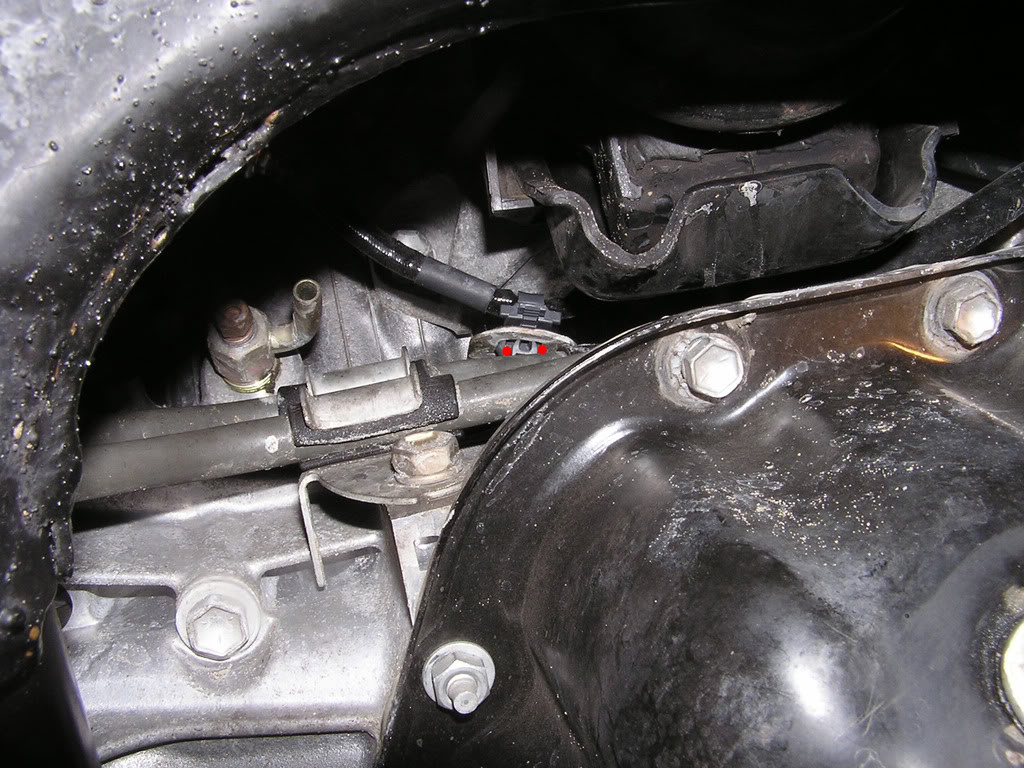
Here is the O2 connector on the passenger side just behind the alternator. I found it easier to unlatch the entire connector from the bracket by lifting up the tab near the red dot and sliding the assembly off the bracket. If you have already broken off the clip holding the wire in the earlier photo, you now should have enough slack to pull the connector down a bit, and rotate it around to see the tab you need to press to release the O2 connector from the socket.
My long pliers and home made right angle pick made from some pegboard parts.
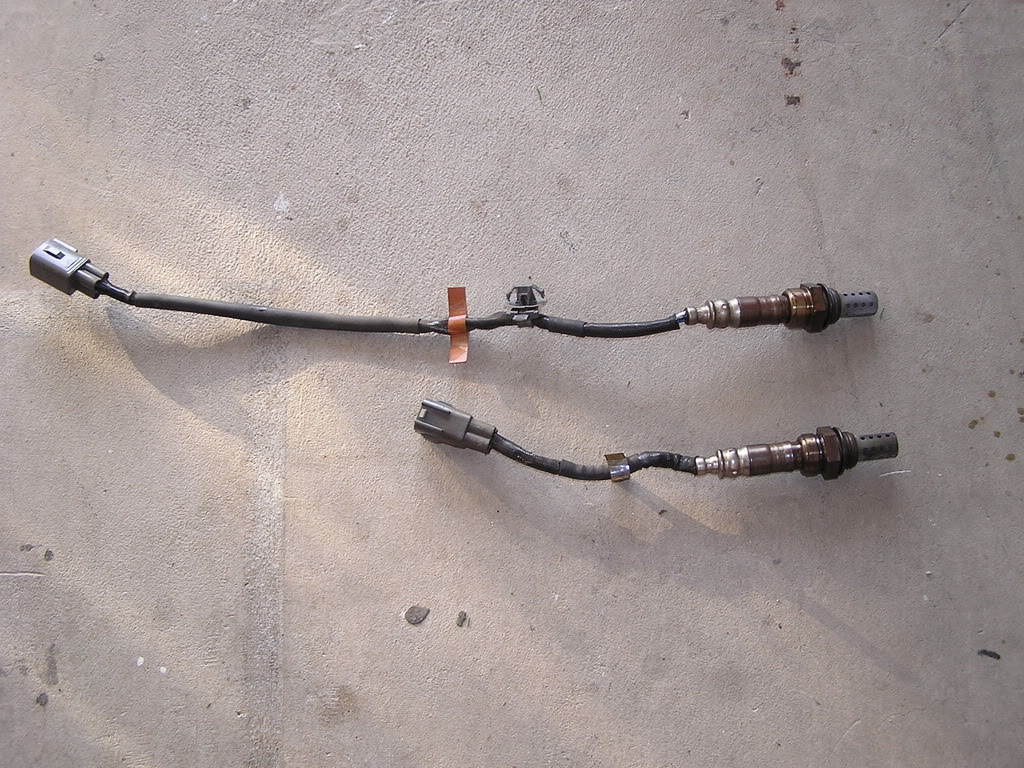
Here are the old sensors from our LS430. Note tab lock notch on the lower sensor. That is what the latch on the O2 sockets locks against. At first it looks like you have to lift up on the socket tab, but you must press down on the tab for it to disengage from the notch.
I didn't find the driver's side one to be that hard to do. I bent and ground a long pegboard wire to make a right angled pick to reach the tab. (Was faster than driving to the hardware store to buy one.) I highly recommend that you first do the passenger side if you are doing both O2 sensors up front. It is easier to get to the connector so you can see the tab that needs to be pressed to release the connector. This will help you to know where to aim for on the driver's side as you can't see the tab on that side. On the passenger side I removed the entire connector off the metal bracket to give me room to pull it down and get a better position to press the tab. You just need to pry a little on the plastic tab that holds the socket assembly on the braket. Don't pry too far or you may break the tab off.
I attached some photos for those who are considering doing this to know what to look for. I found that a very long pair of curved needle nose pliers I got from Harbor Freight for something like 3 cents was very handy to grip the connector on the driver's side, while with my other hand I rotated the pick to press on the tab to release the connector. You also need an O2 slotted socket. Space it tight so a bulky ratchet wrench may not fit. The click spacing on one of my wrenches was too far apart to ratchet on the driver's side. Fortunately my smaller torque wrench has finer teeth and allowed me to ratchet in the small space to loosen and tighten the sensors.
This is the driver's side O2 sensor (bank 1 sensor 1). You may need to pry the heat shield at the red dot location toward the O2 sensor to give you room to get the pick between the connector and the shield. The tab you have to press is on the spot between the connector and the heat shield marked by the red dot. (All photos below are taken from under the car with the plastic splash shield removed.)
Here is pick inserted between connector and shield:
O2 sensor on passenger side.
Here is the clip holding the passenger side O2 cable to the car. If you have an OEM connector there will be a clip on the replacement. Just pry back the plastic tabs marked with the red dots on the old one and pull it out of the bracket.
Here is the O2 connector on the passenger side just behind the alternator. I found it easier to unlatch the entire connector from the bracket by lifting up the tab near the red dot and sliding the assembly off the bracket. If you have already broken off the clip holding the wire in the earlier photo, you now should have enough slack to pull the connector down a bit, and rotate it around to see the tab you need to press to release the O2 connector from the socket.
My long pliers and home made right angle pick made from some pegboard parts.
Here are the old sensors from our LS430. Note tab lock notch on the lower sensor. That is what the latch on the O2 sockets locks against. At first it looks like you have to lift up on the socket tab, but you must press down on the tab for it to disengage from the notch.
Last edited by PilotSmith; Aug 26, 2009 at 09:16 PM.
Thread Starter
Driver
Joined: Sep 2008
Posts: 136
Likes: 18
From: CA
Here is a good O2 info page that clearly explains the operation of the O2 sensors.
http://www.aa1car.com/library/o2sensor.htm
Who would have thought I would end up knowing all this 02 trivia just from changing my sensors...
http://www.aa1car.com/library/o2sensor.htm
Who would have thought I would end up knowing all this 02 trivia just from changing my sensors...

Driver School Candidate
Joined: Aug 2006
Posts: 6
Likes: 1
From: ca
thanks for the write up on the o2 sensors.
i have an 02 LS430. i opened the hood and try to locate the o2 sensor on the driver side ( front ) and was not able to locate it.
is the sensor accessible from under the car, removing the splash guards?
also, can you confirm, the shorter wired sensor is the one that's for the driver side?
thanks!!
i have an 02 LS430. i opened the hood and try to locate the o2 sensor on the driver side ( front ) and was not able to locate it.
is the sensor accessible from under the car, removing the splash guards?
also, can you confirm, the shorter wired sensor is the one that's for the driver side?
thanks!!
Trending Topics
Thread Starter
Driver
Joined: Sep 2008
Posts: 136
Likes: 18
From: CA
Yes, you have to remove the plastic panels from under the car to gain access to the upstream sensors. I don't think you can see the driver's side sensor from above. Only takes a minute to remove the panels with a cordless screwdriver. There is a large plastic panel / splash shield under the engine and a smaller plastic panel just behind the larger one. I removed both but now I don't remember if it was really necessary to also have removed the smaller plastic panel.
The O2 sensor with the short cable is on the driver's side. The O2 sensor and the connector are very close to each other on the driver's side.
The O2 sensor with the short cable is on the driver's side. The O2 sensor and the connector are very close to each other on the driver's side.

Driver School Candidate
Joined: Mar 2010
Posts: 10
Likes: 1
From: NJ
I think I finally have the oxygen sensor location and and part numbers sorted out. If anyone sees a mistake in this info, please let me know so I can correct it. There are posts dealing with the replacement such as the one from speedemon. Remember you also need an O2 socket which is about $12 on line.
There are four O2 sensors in the LS430. They are as follows:
Bank 1 Sensor 1 - Driver's side (left front) on exhaust header. Lexus # 89465-50120 / Denso OEM # 234-4138 / Denso Universal # 234-4209 / Bosch OEM # 13441 / Bosch Universal # 15733
Bank 1 Sensor 2 - Driver's side (rear) near catalytic converter. Lexus # 89465-50140 / Denso OEM # 234-4167 / Denso Universal # 234-4209 / Bosch OEM # 15272 / Bosch Universal # 15733
Bank 2 Sensor 1 - Passenger side (right front) on exhaust header. Lexus # 89465-50130 / Denso OEM # 234-4630 / Denso Universal # 234-4209 / Bosch OEM # 13632 / Bosch Universal # 15733
Bank 2 Sensor 2 - Passenger side (rear) near catalytic converter. Lexus # 89465-50140 / Denso OEM # 234-4167 / Denso Universal # 234-4209 / Bosch OEM # 15272 / Bosch Universal # 15733
Cost for Lexus sensors are about $180 at dealer. Bosh and Denso OEM about $95 at Amazon. Cost for universal fit where you have to solder the wires to make your connector is about $45 per sensor.
Location of sensors with torque setttings:
There are four O2 sensors in the LS430. They are as follows:
Bank 1 Sensor 1 - Driver's side (left front) on exhaust header. Lexus # 89465-50120 / Denso OEM # 234-4138 / Denso Universal # 234-4209 / Bosch OEM # 13441 / Bosch Universal # 15733
Bank 1 Sensor 2 - Driver's side (rear) near catalytic converter. Lexus # 89465-50140 / Denso OEM # 234-4167 / Denso Universal # 234-4209 / Bosch OEM # 15272 / Bosch Universal # 15733
Bank 2 Sensor 1 - Passenger side (right front) on exhaust header. Lexus # 89465-50130 / Denso OEM # 234-4630 / Denso Universal # 234-4209 / Bosch OEM # 13632 / Bosch Universal # 15733
Bank 2 Sensor 2 - Passenger side (rear) near catalytic converter. Lexus # 89465-50140 / Denso OEM # 234-4167 / Denso Universal # 234-4209 / Bosch OEM # 15272 / Bosch Universal # 15733
Cost for Lexus sensors are about $180 at dealer. Bosh and Denso OEM about $95 at Amazon. Cost for universal fit where you have to solder the wires to make your connector is about $45 per sensor.
Location of sensors with torque setttings:
PilotSmith. Forgive me for a long post. Maybe my experience may help someone else. Anyway I got my oxygen sensors delivered today ( was expecting them on 4/3/10 ).
I removed both small and large splash guards. I started with the passenger side upstream sensor 1st. That was a good suggestion from you too. It's a lot easier to see how the wire harness connects/disconnects on the passenger side sensor. And the most important part is what you said above.......to make sure the tab on the connector is pushed in , in order to separate the connectors, INSTEAD OF TRYING TO PRY THE TAB APART.
For the driver side sensor I used a short pry bar to move the heat shield away from the connector. I used a wire clothes hanger , stretched it, and then bent the tip so it could be used to press the tab on the connector next to the heat shield.
Both sensors came out and installed easily using a oxygen sensor socket with a 1/2 inch insert on the side of it, to help with leverage.
Since I had the splash guards out of the way, I changed the oil too!!!

I used my friends OBD ll scanner to clear the P0031 code. The scanner is made by Actron model#CP9135. What I found interesting is that the Check VSC/Trac Off message was erased along with the CEL code erase.
Here's a tally on replacing my 2 upstream sensors and oil change.
Ordered 2 Denso perfect fit upstream 02 sensors off of Amazon for $189 ( includes shipping )
One Oxygen sensor socket for $14
Synthetic Oil/Filter change = Had oil and filter already
Labor 2 1/2 hours of my own = $0
Grand total = $203

Called Lexus to get a price quote on purchasing and installing 2 upstream 02 sensors. Check this : $192 for each sensor, $450 for labor. And that labor price is only if there is no problem removing the old sensors. That leaves the door open for the potential for them to tack on more $$$

Grand Total for Lexus $834??? I saved over $600 doing it myself. My thanks again to you and others in this forum for sharing the information and your experiences. I hope this post gives someone else the incentive to consider doing it themselves.

Last edited by mrsincere; Mar 31, 2010 at 02:09 PM.


Driver School Candidate
Joined: Sep 2007
Posts: 22
Likes: 7
From: MI
I went a step further and replaced the rear passenger sensor in my 2001 LS430. I couldn't find any pictures of the installation, so I figured I'd take some and post them here since this thread was so helpful in replacing the front passenger for me. The only thing I had to add to the instructions on removing the front passenger oxygen sensor was that removing the giant front plastic pan that covers the entire engine area from the bottom allowed for the right angle to unplug the sensor. After spending an hour (or two) trying to get it undone AFTER already figuring out the clip part, I just couldn't get it to slide out. Once I removed that panel, it slid right out for me!
The rear passenger sensor is attached right to the exhaust pipe and doesn't require the oxygen sensor socket to remove so you can use just an open wrench. I did have to apply penetrating oil as it was quite stuck and I didn't want to pry too hard on the exhaust system for fear of creating leaks. I gave it a good hour (or two) while I worked on the front passenger sensor which is detailed above.
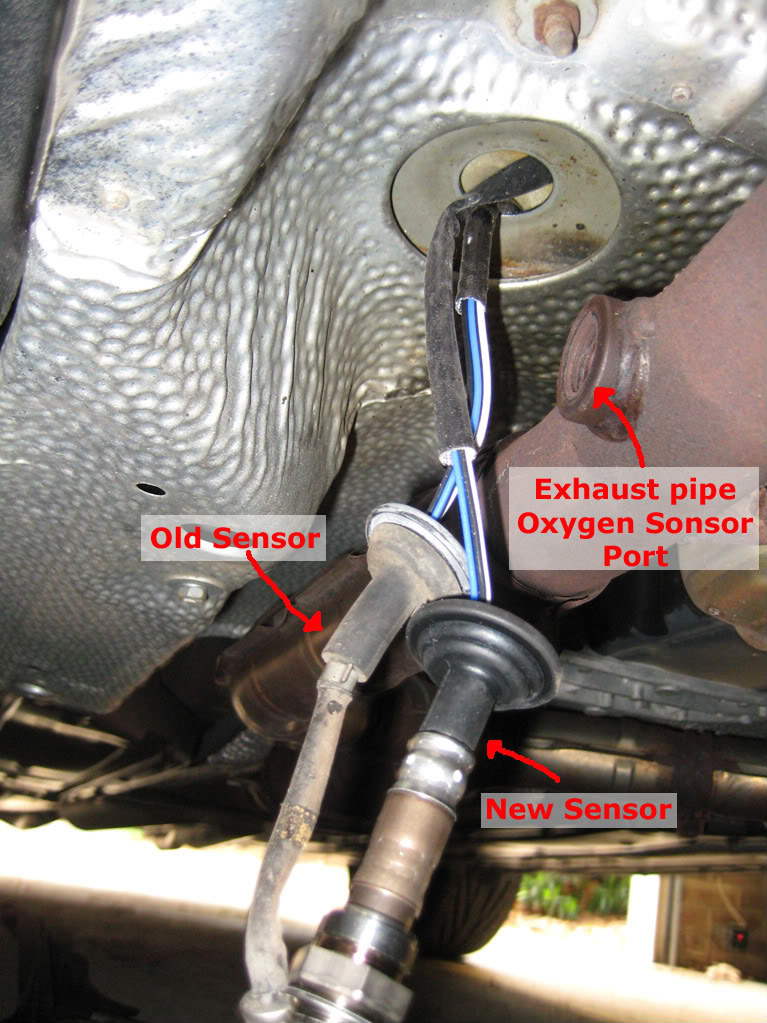
So now that the penetrating oil has done its work, I removed the sensor from the exhaust with the open ended wrench. The photo below shows where the sensor came out along with the new sensor as I took this photo closer to the end.
Now we move inside the car into the passenger foot well. To find where the wire came through the floor I poked my finger up in the hole while under the car. My wife, who was in the passenger seat area watched for where the floor was coming up. It basically comes through in the left front corner of the foot well.
We determined that based on the drawings in the original post from the Lexus manual, the intention was to remove the air vent to gain access to where the connection is. To remove this vent, pull out from the side that is towards the rear of the car, this will release the build-in clip, and then slide the cover towards the rear of the car to pull the tab out of the slot.
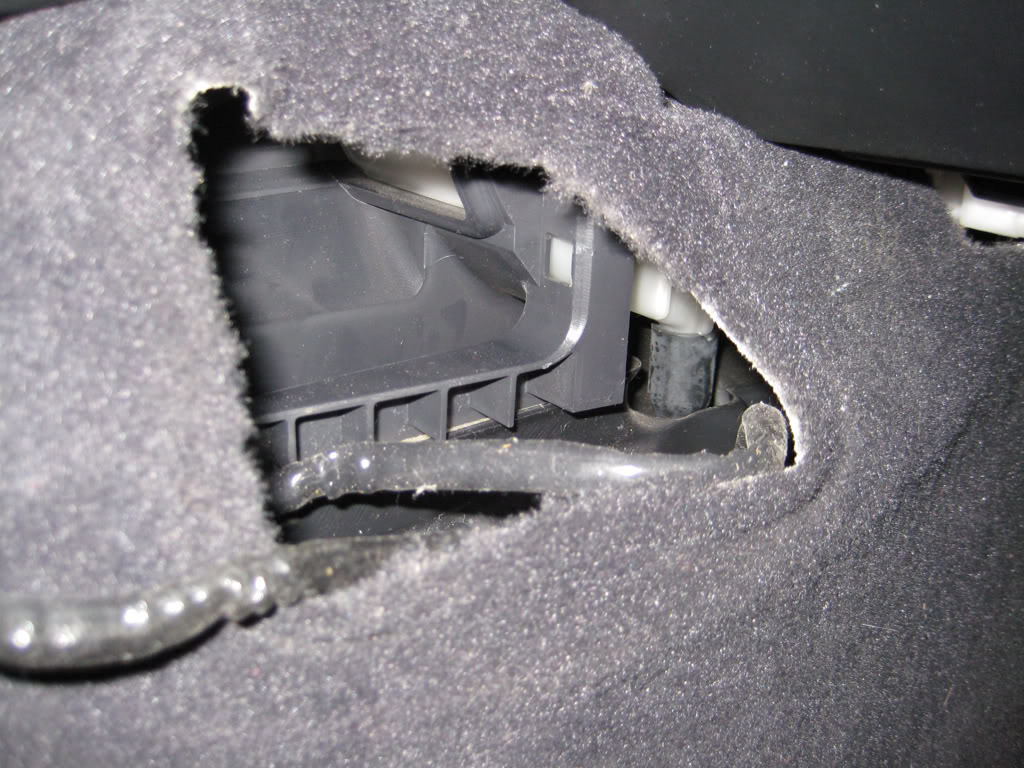
Now you can pull the carpet out to the left and the right of the vent as you can see in the photo below. The wire travels from the front left corner of the passenger foot well until it reaches the vent height, and then takes a 90 degree turn towards the back of the car. When you first reach your finger in you�ll find it just below the vent. Towards the rear of the car, to the left of the vent is where it clips into the wire harness.
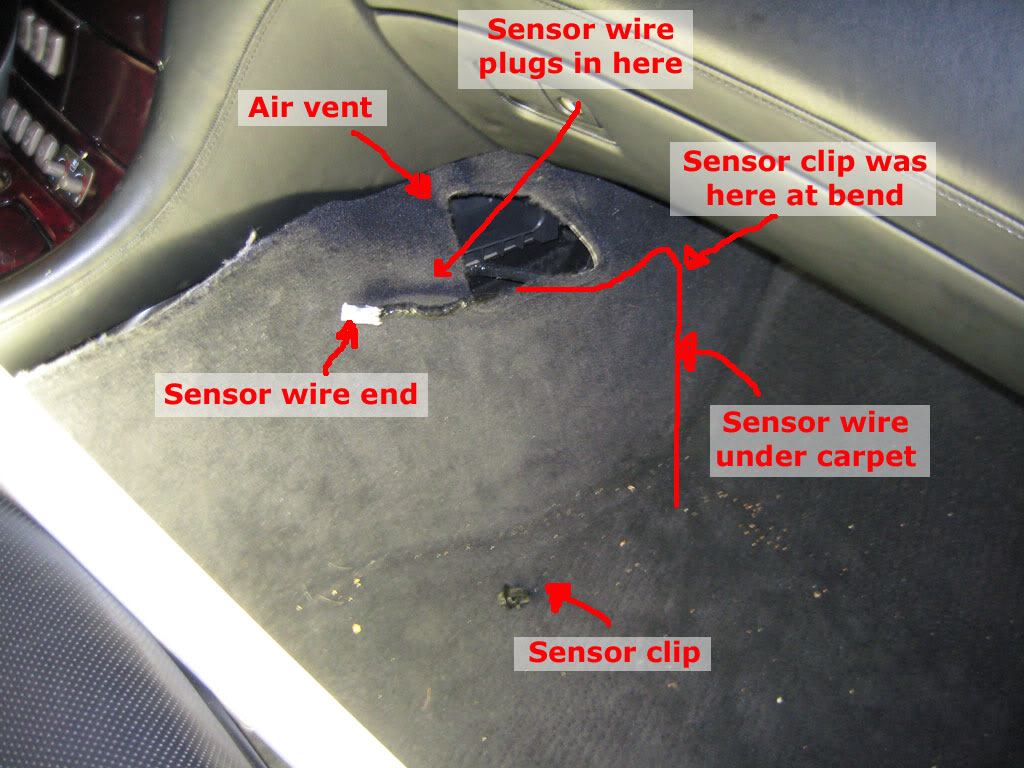
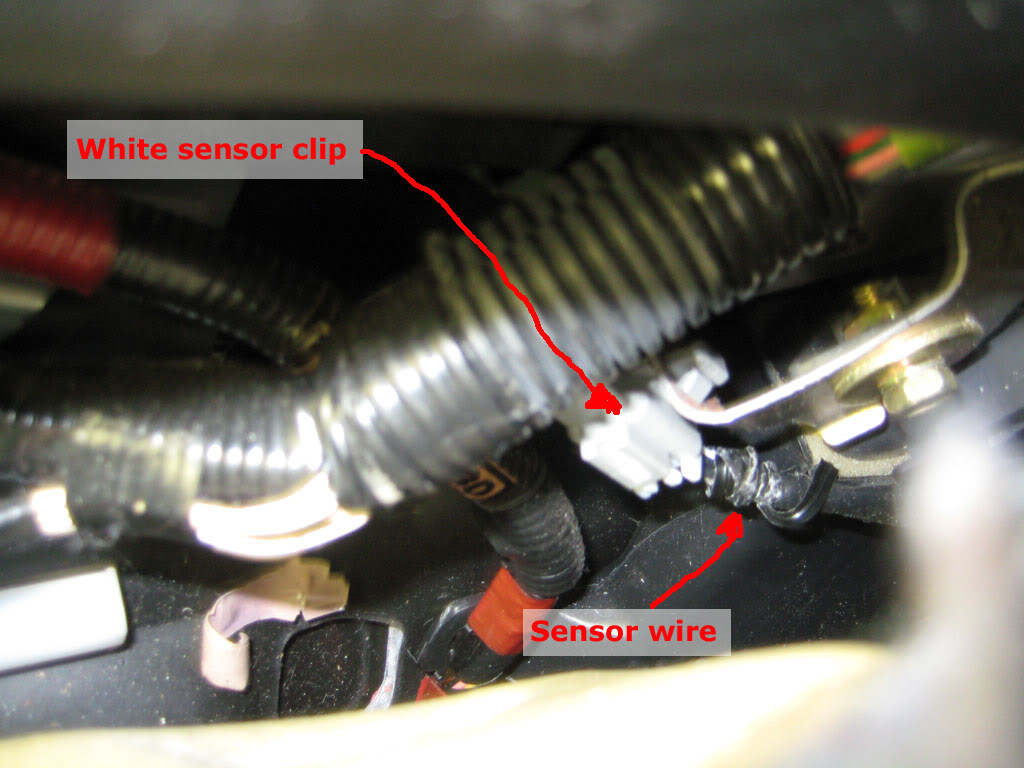
Unclick the white clip here with the top toggle and it should come out easy. The white clip is pictured below:
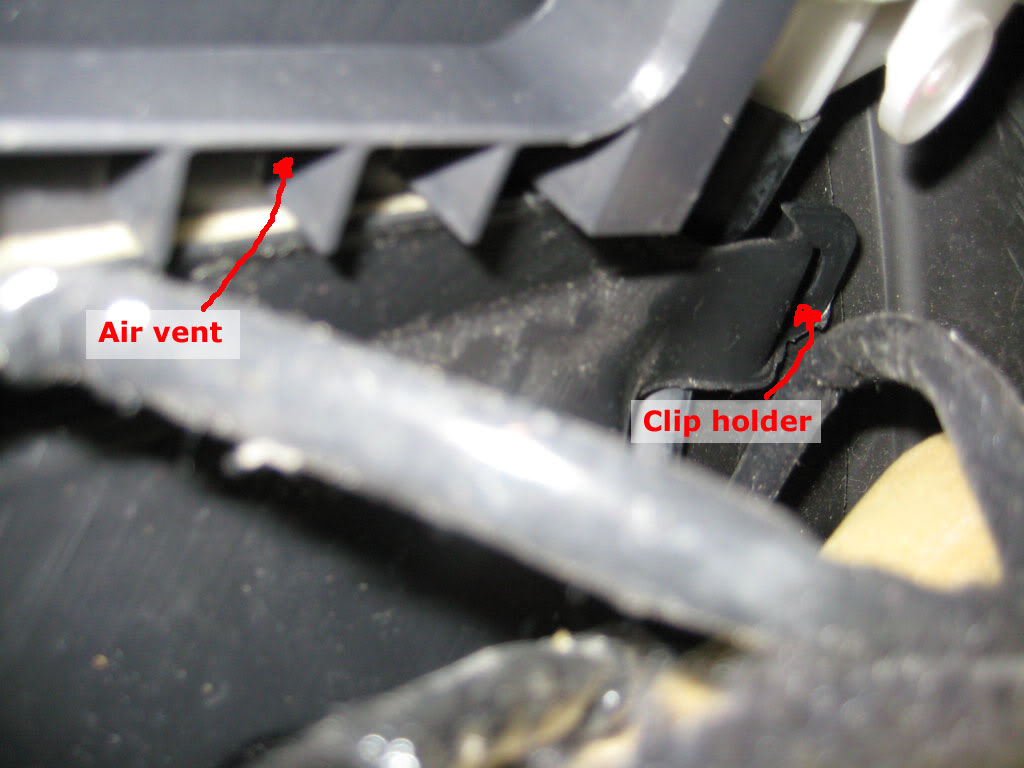
Towards the front of the car, to the right of the vent, there is a clip that holds the wire to the plastic frame which you will need to remove. Squeeze the tabs on the back and then pull it through the hole, should be easy to remove. I�ve included a photo below which shows the oval hole after the clip was removed.
Now that I had the whole thing disconnected, I decided that I would put the new wire in before removing the old. I figured that if I couldn't get the new one in for some reason, it would be bad to take the old one out. So I took the new wire and used the wire tie that came with it to tie the rubber outer layer of the wires to the clip on the end of the wire. This prevented the outer rubber casing from getting bunched up while I slid it through hole and under the floor. From under the car I fed it through the hole while my wife put her hand down behind the carpet around the air vent from top side. She managed to grab the end of the wire and pull it through and plug it in.
Now secure that we had everything through set as far as wire fishing, we wrapped the clip on the end of the old wire with electrical tape to prevent it from getting snagged and I pulled it through the hole under the car while my wife guided it through the carpet. At the end it got stuck, but I gave it a good tug and it came through. With the old oxygen sensor now entirely out, we applied the anti-seize compound to the threads and screwed it in. I then pulled the rubber casing down the wires to cover the wires that were exposed under the car.
I haven't reset the codes yet because the last time I did I had to reset the vehicle stability control entirely.
The rear passenger sensor is attached right to the exhaust pipe and doesn't require the oxygen sensor socket to remove so you can use just an open wrench. I did have to apply penetrating oil as it was quite stuck and I didn't want to pry too hard on the exhaust system for fear of creating leaks. I gave it a good hour (or two) while I worked on the front passenger sensor which is detailed above.
So now that the penetrating oil has done its work, I removed the sensor from the exhaust with the open ended wrench. The photo below shows where the sensor came out along with the new sensor as I took this photo closer to the end.
Now we move inside the car into the passenger foot well. To find where the wire came through the floor I poked my finger up in the hole while under the car. My wife, who was in the passenger seat area watched for where the floor was coming up. It basically comes through in the left front corner of the foot well.
We determined that based on the drawings in the original post from the Lexus manual, the intention was to remove the air vent to gain access to where the connection is. To remove this vent, pull out from the side that is towards the rear of the car, this will release the build-in clip, and then slide the cover towards the rear of the car to pull the tab out of the slot.
Now you can pull the carpet out to the left and the right of the vent as you can see in the photo below. The wire travels from the front left corner of the passenger foot well until it reaches the vent height, and then takes a 90 degree turn towards the back of the car. When you first reach your finger in you�ll find it just below the vent. Towards the rear of the car, to the left of the vent is where it clips into the wire harness.
Unclick the white clip here with the top toggle and it should come out easy. The white clip is pictured below:
Towards the front of the car, to the right of the vent, there is a clip that holds the wire to the plastic frame which you will need to remove. Squeeze the tabs on the back and then pull it through the hole, should be easy to remove. I�ve included a photo below which shows the oval hole after the clip was removed.
Now that I had the whole thing disconnected, I decided that I would put the new wire in before removing the old. I figured that if I couldn't get the new one in for some reason, it would be bad to take the old one out. So I took the new wire and used the wire tie that came with it to tie the rubber outer layer of the wires to the clip on the end of the wire. This prevented the outer rubber casing from getting bunched up while I slid it through hole and under the floor. From under the car I fed it through the hole while my wife put her hand down behind the carpet around the air vent from top side. She managed to grab the end of the wire and pull it through and plug it in.
Now secure that we had everything through set as far as wire fishing, we wrapped the clip on the end of the old wire with electrical tape to prevent it from getting snagged and I pulled it through the hole under the car while my wife guided it through the carpet. At the end it got stuck, but I gave it a good tug and it came through. With the old oxygen sensor now entirely out, we applied the anti-seize compound to the threads and screwed it in. I then pulled the rubber casing down the wires to cover the wires that were exposed under the car.
I haven't reset the codes yet because the last time I did I had to reset the vehicle stability control entirely.
My car is a LS430 year 2001.
I would like if a mechanic can verify the Denso part numbers as my mechanic has gave me these part numbers for the Denso Brand 02 Sensors. It seems different from the Denso part numbers above.
Bank 1 Sensor 1 - Denso 234-4630
Bank 2 Sensor 1 - Denso 234-4138
Both Rears are the Denso same part numbers
Bank 1 Sensor 2 - Denso 234-4167
Bank 2 Sensor 2- Denso 234-4167
Please let me know who is correct as my mechanic gave me these part numbers and I verified with him twice. I need to change out Bank 2 Sensor 1 and want to make sure I buy the correct Desor 02 Sensor.
Thanks, DanozLS430...
Last edited by ChocosLS430; May 5, 2010 at 11:07 AM.