When you click on links to various merchants on this site and make a purchase, this can result in this site earning a commission. Affiliate programs and affiliations include, but are not limited to, the eBay Partner Network.
Interesting idea putting two of them together. I believe they would fit, but as cjitty said, modding the edge of the lights to sit flush would be required. I will have a look later and take measurements.
This looks like an easy, inexpensive, great looking mod. Right up my alley! These stay on at night, correct? You have any pictures of the lights at night? I may have to order these lights today. Thanks roadfrog for a great mod thread with great pictures.
I don't have any pics of them at night, but cjitty does. I think tee does as well.
Yes they stay on all the time, as long as the car's ignition is on. I'm going to disable my regular DRL's so that these will be my only ones on all the time. Sorta like what you see with Audis and the new Dodges
I have youtube videos out there, just search on CJITTY. And I did not run these at night all the time. In the city yes, but open dark roads no. They may not be bright on the road, but they are bright. They are long gone though so i have no idea if the new owner of the car is using them. I think he smashed up my 460 actually iirc lol.
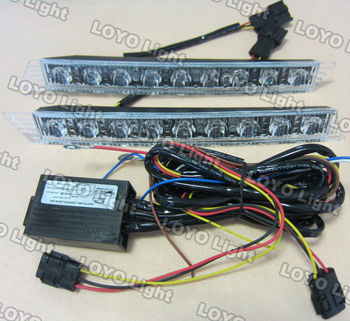
There are countless sellers with this item and they are all the same except for the price. They sell as low as 9 dollars and as high as 50+. But they all come from the same Chinese supplier.
As for how I wired mine, I went with the "always on when ignition on". I did not want to go with relays and switches. The next time I go to a dealer, I'll have them disable my factory DRL's as these will now replace their function. For power, I wired into the passenger side under-hood fuse panel for a switched power source. Mounting the lights was facilitated with outdoor 3M Mounting tape as seen in pics.
NOTE: the supplied wire connections that came with the lamps ARE NOT long enough between the two lights, nor are they long enough to reach a power source. It's about 3 inches too short between the lamps. My pics will show how I easily tackled the minor glitch. All connections and splices are soldered and sealed with heat shrink tubing.
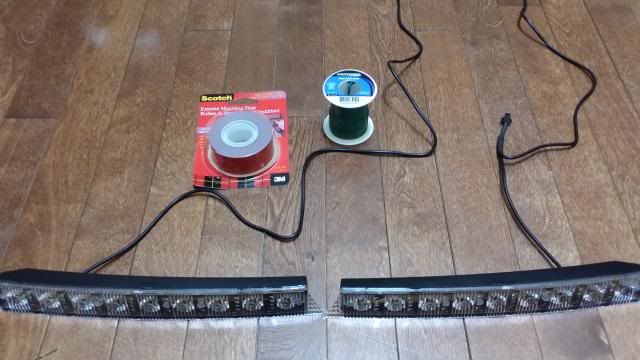
Here's the gear: I used 18 ga wire, but to be honest even THAT is awfully thick. To do it again, I would go with no larger than 22 ga. The wire that came with the bulbs is maybe a 24 ga or less.
[IMG][/IMG]
I used a fish tape to run the wire between the lamps behind the valance. It was at this point that I realized the wires were too short, so it was back to the drawing board:
[IMG][/IMG]
This is where I cut the wire connection of one side of the lamps so as to splice in a 12" length of 24ga wire
[IMG][/IMG]
[IMG][/IMG]
[IMG][/IMG]
[IMG][/IMG]
Added the mounting tape to the lamp assemblies next. This stuff is quality as expected of 3m. Once mounted, they aren't going anywhere:
[IMG][/IMG]
[IMG][/IMG]
As you can see from the pic above, it's amazing how closely the lights follow the angles of the valance and factory fog light, as though made for our cars. I considered removing the angled tab seen on the left side of the light, but I feared breaking a waterproof seal, so I left it alone.
Here is where the fuse panel is located. As mentioned earlier, it's on the passenger side if the engine compartment. I tapped into the wiper fuse, as it was the first power source I found that was a switched source. Many of the others were hot at all times. When looking at the fuse panel, it is the second one down from the top on the far right side row of fuses. For ground, I used an existing lug that secured the fuse panel to the fender well.
[IMG][/IMG]
Here's the outcome:
[IMG][/IMG]
[IMG][/IMG]
It really looks factory. It's uncanny how the lines of the lights align perfectly with the lines of the valance. All angles are exactly matched as you can see from the pics. It's as thought they were made for our cars.
As always, if you have any questions with my DIY, fire away.
Hi - Quick question do you have a picture of how you 'tapped' in to the fuse - thanks in advance
I can try and get a pic. Basically, I took the "hot" wire and ran it to the underhood fuse box on the passenger side. I simply placed the wire in the windshield wiper fuse terminal with a "piggyback fuse terminal" . You can get them at any auto parts store.
Thanks. If you can send pic that would help me out a lot. I just bought the car and want to make sure I follow everything you wrote accurately. My lights are on order so have couple of weeks before I need the pics.
Thanks in advance.
if you dont mind can you show where did you tap for the power, exact fuse and the wires going in? i can DIY mechanical stuff but electrical i have really no idea about?
Appreciate the help!
Originally Posted by roadfrog
With all the good advice, tips and info from members like cjitty and tee, I went ahead and tackled the Audi style LED lights in the lower valance.
There are countless sellers with this item and they are all the same except for the price. They sell as low as 9 dollars and as high as 50+. But they all come from the same Chinese supplier.
As for how I wired mine, I went with the "always on when ignition on". I did not want to go with relays and switches. The next time I go to a dealer, I'll have them disable my factory DRL's as these will now replace their function. For power, I wired into the passenger side under-hood fuse panel for a switched power source. Mounting the lights was facilitated with outdoor 3M Mounting tape as seen in pics.
NOTE: the supplied wire connections that came with the lamps ARE NOT long enough between the two lights, nor are they long enough to reach a power source. It's about 3 inches too short between the lamps. My pics will show how I easily tackled the minor glitch. All connections and splices are soldered and sealed with heat shrink tubing.
Here's the gear: I used 18 ga wire, but to be honest even THAT is awfully thick. To do it again, I would go with no larger than 22 ga. The wire that came with the bulbs is maybe a 24 ga or less.
[IMG][/IMG]
I used a fish tape to run the wire between the lamps behind the valance. It was at this point that I realized the wires were too short, so it was back to the drawing board:
[IMG][/IMG]
This is where I cut the wire connection of one side of the lamps so as to splice in a 12" length of 24ga wire
[IMG][/IMG]
[IMG][/IMG]
[IMG][/IMG]
[IMG][/IMG]
Added the mounting tape to the lamp assemblies next. This stuff is quality as expected of 3m. Once mounted, they aren't going anywhere:
[IMG][/IMG]
[IMG][/IMG]
As you can see from the pic above, it's amazing how closely the lights follow the angles of the valance and factory fog light, as though made for our cars. I considered removing the angled tab seen on the left side of the light, but I feared breaking a waterproof seal, so I left it alone.
Here is where the fuse panel is located. As mentioned earlier, it's on the passenger side if the engine compartment. I tapped into the wiper fuse, as it was the first power source I found that was a switched source. Many of the others were hot at all times. When looking at the fuse panel, it is the second one down from the top on the far right side row of fuses. For ground, I used an existing lug that secured the fuse panel to the fender well.
[IMG][/IMG]
Here's the outcome:
[IMG][/IMG]
[IMG][/IMG]
It really looks factory. It's uncanny how the lines of the lights align perfectly with the lines of the valance. All angles are exactly matched as you can see from the pics. It's as thought they were made for our cars.
As always, if you have any questions with my DIY, fire away.
Hi
So sorry to bring this up again.
I looked at my fuse panel under the hood - and i saw the 30amp fuse for the wipers.
However i do not see any wires that i can 'tap' in to - if you can send me a pic or let me know exactly how you tapped in to that fuse for power for the DRL Leds that would be appreciated.
Thank you again.
Hi..I got hyper when I saw this thread ..got in the garage and found the same lights as these I had bought a few years ago and found out that I could do this ...
The ones I have has a few more functions.... They run at full power at daytime, dims 50-70% when the auto headlights comes on, and can also double up as yellow front turn signals ...I have not tried them to work as turnsignals... and a super fit ...even my son likes them
....finally I can run with the light settings in auto ... and since they have a E4 marking on the back they are legal ...even here in Norway.. ..the way they are now wired..
Sorry ..but I can't remember where I bought them...either aliexpress or e-bay ...did a search for them but could not find them at all..... anyways..here is a few pictures:
No lights on...
Also fits good ... this is full power with headlights off
from a distance ...still full power and how they light at daylight
and here with headlights on...and dimmed
Sorry for the crappy pic's ...need a new mobile :-(
Regards
Arvid
Last edited by Arvid; Sep 20, 2016 at 04:41 AM.
Reason: misspelling...again :-) ...and a few photos
Hi
Do you have detailed instructions or pics on how you wired these lights please?
if so can you share pics or detailed instructions on the wiring of these lights?
Thanks in advance.
Hi Sibby1979, I have wired to 2 fuses in the RHS fuse box ..right aft for Your right headlight...I connected the live wire to the DRL to the winsdscreen wiper fuse, the wire for dimming to the main running light fuse ..You will find the numbers and placing in Your Owners manual under FUSES ...I have a 2008 LS600hL, European version, so I don't know if your model is the same ...but You will at least have these fuses....for me they where very simple to find...
I have made a new search for the set of lamps/wiring online but only found a seller on Alibaba that have the ones I have got....but sells minimum 10 sets at a price US$ 10-20 according to quantity (as they say on their site: 10 Set/Sets Sample Order Welcome). Maybe a sample order could be one set ??
.... these are the ones I bought (plug and play...find the fuses and connect) ......this is also exactly the same box as mine came in :
pics of the actual wiring please? I also realize the fenders of the 2011s are different than the older LSs they have a vent to the brakes so these lights wont be so far apart.
Here ya go. First pic is a piggy back fuse you can get anywhere. However you could just insert the wire into the fuse slot and then insert the fuse, trapping the wire.
Here ya go. First pic is a piggy back fuse you can get anywhere. However you could just insert the wire into the fuse slot and then insert the fuse, trapping the wire.
Im sorry Roadfrog, these pictures aren't very clear...
To small and I cant tell what your pointing at...
Could you take a few more for better clarification.....??


 [/IMG]
 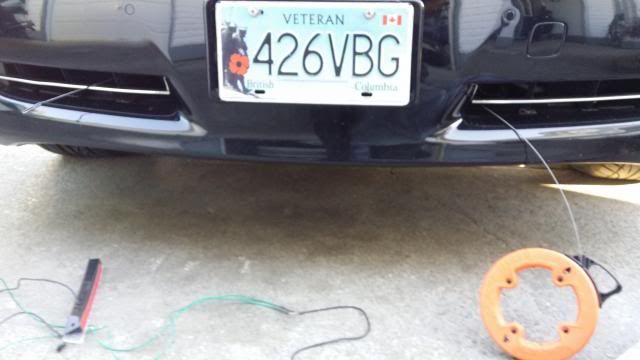 [/IMG]
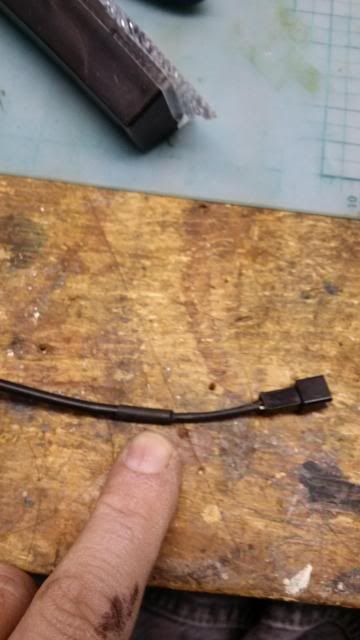 [/IMG]
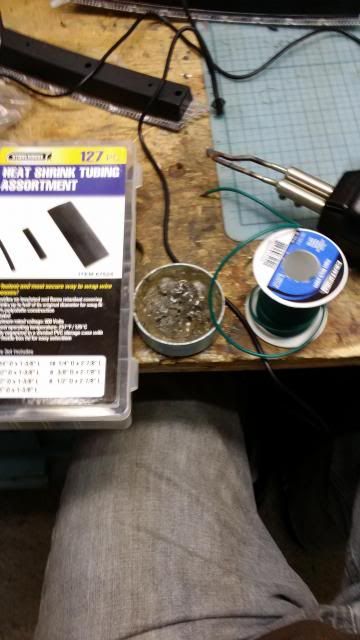 [/IMG]
 [/IMG]
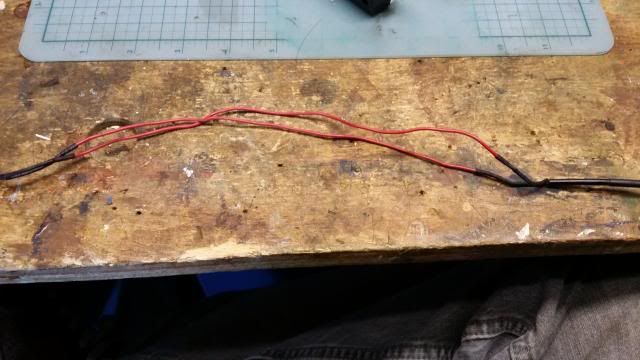 [/IMG]
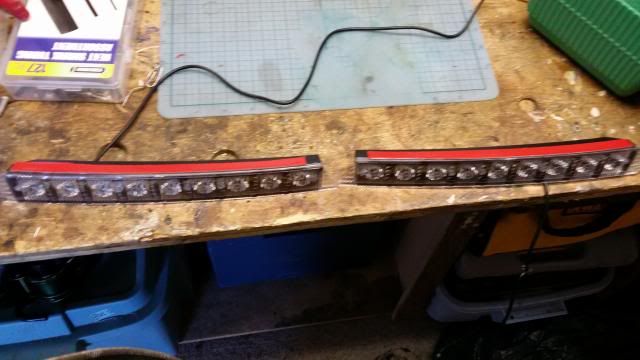 [/IMG]
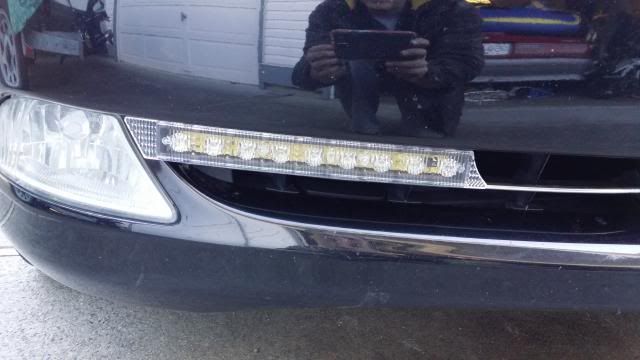 [/IMG]
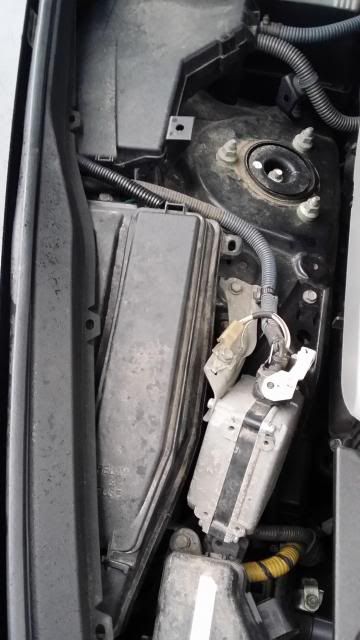 [/IMG]
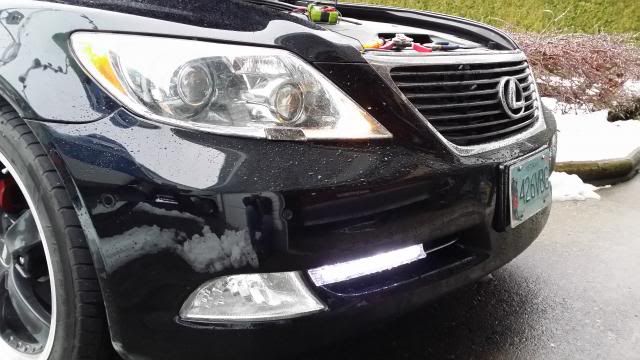 [/IMG]
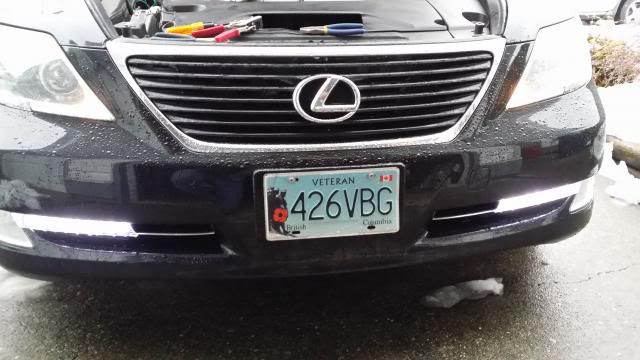 [/IMG]

 [/IMG]
  [/IMG]
 [/IMG]
 [/IMG]
 [/IMG]
 [/IMG]
 [/IMG]
 [/IMG]
 [/IMG]
 [/IMG]
 [/IMG]


 ...
...